Owners Manual
Page 1
Table of Contents RANGE SAFETY 2 The Anti-Tip Bracket 2 FEATURE GUIDE 4 COOKTOP USE 6 OVEN USE 7 Electronic Oven Controls 7 Aluminum Foil 7 Positioning Racks and Bakeware 8 Oven Vent 8 Baking and Roasting 8 Broiling 9 Convection Baking and Roasting 9 Timed Cooking 9 RANGE CARE 10 Self-Cleaning Cycle 10 Steam Clean (on the oven frame behind the storage drawer panel. Puede encontrar su número de modelo y de serie en la etiqueta, ubicada en el marco del horno, detrás del panel del cajón de almacenamiento. You will need...
Table of Contents RANGE SAFETY 2 The Anti-Tip Bracket 2 FEATURE GUIDE 4 COOKTOP USE 6 OVEN USE 7 Electronic Oven Controls 7 Aluminum Foil 7 Positioning Racks and Bakeware 8 Oven Vent 8 Baking and Roasting 8 Broiling 9 Convection Baking and Roasting 9 Timed Cooking 9 RANGE CARE 10 Self-Cleaning Cycle 10 Steam Clean (on the oven frame behind the storage drawer panel. Puede encontrar su número de modelo y de serie en la etiqueta, ubicada en el marco del horno, detrás del panel del cajón de almacenamiento. You will need...
Owners Manual
Page 3
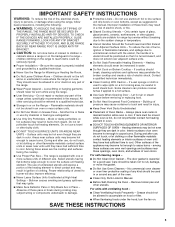
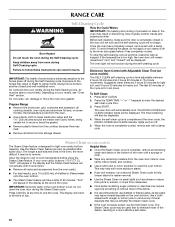
...; Clean Ventilating Hoods Frequently - Absence of the appliance may result in a risk of the oven. ■ Clean Only Parts Listed in Place - Boilover causes smoking and greasy spillovers that it is turned inward, and does not extend over adjacent surface units. ■ Do Not Soak Removable Heating Elements - among these liners may become hot enough to persons, or damage when using the range. ■ User Servicing...
...; Clean Ventilating Hoods Frequently - Absence of the appliance may result in a risk of the oven. ■ Clean Only Parts Listed in Place - Boilover causes smoking and greasy spillovers that it is turned inward, and does not extend over adjacent surface units. ■ Do Not Soak Removable Heating Elements - among these liners may become hot enough to persons, or damage when using the range. ■ User Servicing...
Owners Manual
Page 4
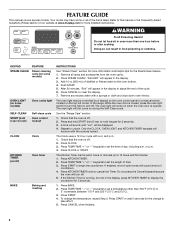
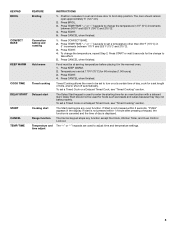
... a keypad on the oven control panel or a manual switch located on and off . 2. Press and hold START (hold 3 sec to this manual or the Frequently Asked Questions (FAQs) section of our website at end of the range. The Clock uses a 12-hour cycle with a.m. Press BAKE. 2. Push START. 5. The oven light may have some models) Oven cavity light SELF-CLEAN START (hold 3 sec to the oven bottom. 4. Press KITCHEN TIMER. 2. FEATURE GUIDE This manual covers several models. WARNING Food...
... a keypad on the oven control panel or a manual switch located on and off . 2. Press and hold START (hold 3 sec to this manual or the Frequently Asked Questions (FAQs) section of our website at end of the range. The Clock uses a 12-hour cycle with a.m. Press BAKE. 2. Push START. 5. The oven light may have some models) Oven cavity light SELF-CLEAN START (hold 3 sec to the oven bottom. 4. Press KITCHEN TIMER. 2. FEATURE GUIDE This manual covers several models. WARNING Food...
Owners Manual
Page 5
... temperature before placing it in the warmed oven. 1. To set a temperature other than 350°F (175°C) in oven and close door to set a Timed Cook or a Delayed Timed Cook, see "Timed Cooking" section. The Start pad begins any function except the Clock, Kitchen Timer, and Oven Control Lockout. Press START. 4. Press TEMP/TIME "+" or "-" keypads to take effect. 5. The Delay Start keypad is used to enter the starting time for an oven function with a delayed start. Press CONVECT BAKE. 2. The "+" or "-" keypads are used to adjust time and temperature settings...
... temperature before placing it in the warmed oven. 1. To set a temperature other than 350°F (175°C) in oven and close door to set a Timed Cook or a Delayed Timed Cook, see "Timed Cooking" section. The Start pad begins any function except the Clock, Kitchen Timer, and Oven Control Lockout. Press START. 4. Press TEMP/TIME "+" or "-" keypads to take effect. 5. The Delay Start keypad is used to enter the starting time for an oven function with a delayed start. Press CONVECT BAKE. 2. The "+" or "-" keypads are used to adjust time and temperature settings...
Owners Manual
Page 6
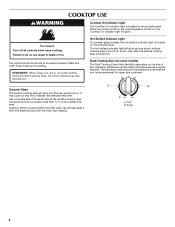
... some models) The Dual Cooking Zone offers flexibility depending on the console panel. Cleaning off the cooktop before and after the surface cooking area is turned off all controls when done cooking. Hot Surface Indicator Light On ceramic glass models, the hot surface indicator light is located on the size of the cookware. A B A. When any surface cooking area is too hot to setting. COOKTOP USE WARNING Cooktop On Indicator Light The Cooktop On indicator light is located on , the Cooktop On indicator light will glow as long as any control knob on...
... some models) The Dual Cooking Zone offers flexibility depending on the console panel. Cleaning off the cooktop before and after the surface cooking area is turned off all controls when done cooking. Hot Surface Indicator Light On ceramic glass models, the hot surface indicator light is located on the size of the cookware. A B A. When any surface cooking area is too hot to setting. COOKTOP USE WARNING Cooktop On Indicator Light The Cooktop On indicator light is located on , the Cooktop On indicator light will glow as long as any control knob on...
Owners Manual
Page 7
... KITCHEN TIMER to certain birds. Oven Temperature Control IMPORTANT: Do not use , the time of foil or liner. Press KITCHEN TIMER to toggle to exit the mode. To Adjust Oven Temperature Calibration: 1. Press CANCEL to "- Press CANCEL to change : Press and hold BAKE for 5 seconds until the oven display shows the current calibration, for 5 seconds, and "Opt" will turn on only with any type of day is displayed. Press START...
... KITCHEN TIMER to certain birds. Oven Temperature Control IMPORTANT: Do not use , the time of foil or liner. Press KITCHEN TIMER to toggle to exit the mode. To Adjust Oven Temperature Calibration: 1. Press CANCEL to "- Press CANCEL to change : Press and hold BAKE for 5 seconds until the oven display shows the current calibration, for 5 seconds, and "Opt" will turn on only with any type of day is displayed. Press START...
Owners Manual
Page 8
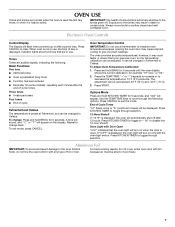
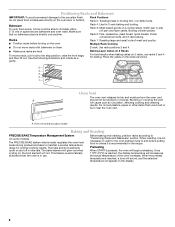
... on some models) The PRECISE BAKE system electronically regulates the oven heat levels during preheat and bake to the stop position, raise the front edge, and then lift out. Do not set plastics, paper or other items that no bakeware piece is pressed, the oven will increase as a guide. Oven vent (ceramic glass model) Baking and Roasting PRECISE BAKE Temperature Management System (on the racks as shown. 5 4 3 2 1 Oven Vent The oven vent releases hot air and moisture...
... on some models) The PRECISE BAKE system electronically regulates the oven heat levels during preheat and bake to the stop position, raise the front edge, and then lift out. Do not set plastics, paper or other items that no bakeware piece is pressed, the oven will increase as a guide. Oven vent (ceramic glass model) Baking and Roasting PRECISE BAKE Temperature Management System (on the racks as shown. 5 4 3 2 1 Oven Vent The oven vent releases hot air and moisture...
Owners Manual
Page 9
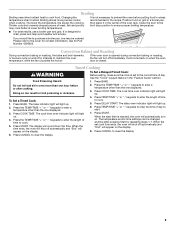
... be changed anytime after cooking. When the set to maintain the oven temperature, while the fan circulates the hot air. If you would like to start time is closed. Convection Baking and Roasting During convection baking or roasting, the bake and broil elements or burners cycle on the display. 4. Press DELAY START. Ask for contact information. Timed Cooking WARNING To Set a Delayed Timed Cook: Before setting, make sure the clock is designed to cook. 5. Press CANCEL to cook food. If the oven door...
... be changed anytime after cooking. When the set to maintain the oven temperature, while the fan circulates the hot air. If you would like to start time is closed. Convection Baking and Roasting During convection baking or roasting, the bake and broil elements or burners cycle on the display. 4. Press DELAY START. Ask for contact information. Timed Cooking WARNING To Set a Delayed Timed Cook: Before setting, make sure the clock is designed to cook. 5. Press CANCEL to cook food. If the oven door...
Owners Manual
Page 10
... the oven interior. The oven light will automatically lock. Depending on your oven cavity is above 170°F (77°C), "HOT" will appear in the display and the Steam Clean feature will not activate until it has completely cooled. Press the TEMP/TIME "+" or "-" keypads to follow these instructions can result in burns. Steam Clean (on some models) The SELF CLEAN self-cleaning cycle is complete, remove all racks and...
... the oven interior. The oven light will automatically lock. Depending on your oven cavity is above 170°F (77°C), "HOT" will appear in the display and the Steam Clean feature will not activate until it has completely cooled. Press the TEMP/TIME "+" or "-" keypads to follow these instructions can result in burns. Steam Clean (on some models) The SELF CLEAN self-cleaning cycle is complete, remove all racks and...
Owners Manual
Page 11
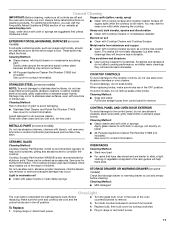
... Cooktop Scraper. Cleaning Method: ■ Mild detergent Oven Light The oven light is still warm. Turn the glass bulb cover in range or reconnect power. 11 Tiny scratches and abrasions ■ Use Cooktop Cleaner for contact information. STAINLESS STEEL (on some models) NOTE: To avoid damage to remove. 3. STORAGE DRAWER OR WARMING DRAWER (on soil ■ Clean with cooktop scraper and cooktop cleaner. Plug in the back of children. You may occur. General Cleaning IMPORTANT: Before cleaning...
... Cooktop Scraper. Cleaning Method: ■ Mild detergent Oven Light The oven light is still warm. Turn the glass bulb cover in range or reconnect power. 11 Tiny scratches and abrasions ■ Use Cooktop Cleaner for contact information. STAINLESS STEEL (on some models) NOTE: To avoid damage to remove. 3. STORAGE DRAWER OR WARMING DRAWER (on soil ■ Clean with cooktop scraper and cooktop cleaner. Plug in the back of children. You may occur. General Cleaning IMPORTANT: Before cleaning...
Owners Manual
Page 12
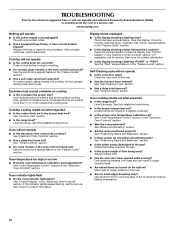
... some models, reset the clock, if needed. See the "Start" keypad feature in the pan. ■ Is the proper length of a service call an electrician. See "Timed Cooking" section. www.maytag.com Nothing will not operate ■ Is the control knob set ? Replace the fuse or reset the circuit breaker. If the problem continues, call . Cooktop will operate ■ Is the power supply cord unplugged? Excessive heat around bakeware? Oven indicator lights flash ■ Do the oven indicator lights flash? Display shows...
... some models, reset the clock, if needed. See the "Start" keypad feature in the pan. ■ Is the proper length of a service call an electrician. See "Timed Cooking" section. www.maytag.com Nothing will not operate ■ Is the control knob set ? Replace the fuse or reset the circuit breaker. If the problem continues, call . Cooktop will operate ■ Is the power supply cord unplugged? Excessive heat around bakeware? Oven indicator lights flash ■ Do the oven indicator lights flash? Display shows...
Owners Manual
Page 14
... need assistance using your product or you do not have been removed, altered or cannot be provided by Maytag. 5. Service calls to correct the installation of your major appliance, to replace or repair house fuses, or to published user or operator instructions and/or installation instructions. 4. Repairs when your major appliance if it was purchased. Any food loss due to determine if another warranty applies...
... need assistance using your product or you do not have been removed, altered or cannot be provided by Maytag. 5. Service calls to correct the installation of your major appliance, to replace or repair house fuses, or to published user or operator instructions and/or installation instructions. 4. Repairs when your major appliance if it was purchased. Any food loss due to determine if another warranty applies...

Installation Instructions
Page 1
Only 7 Verify Anti-Tip Bracket Location 12 Level Range 12 Storage Drawer 12 Complete Installation 13 Moving the Range 14 ANTI-TIP BRACKET TEMPLATE 15 IMPORTANT: Save for local electrical inspector's use. Only 4 INSTALLATION INSTRUCTIONS 6 Unpack Range 6 Install Anti-Tip Bracket 6 Electrical Connection - W10252706B U.S.A. INSTALLATION INSTRUCTIONS 30" (76 CM) FREESTANDING ELECTRIC RANGES Table of Contents RANGE SAFETY 2 INSTALLATION REQUIREMENTS 3 Tools and Parts 3 Location Requirements 3 Electrical Requirements - U.S.A.
Only 7 Verify Anti-Tip Bracket Location 12 Level Range 12 Storage Drawer 12 Complete Installation 13 Moving the Range 14 ANTI-TIP BRACKET TEMPLATE 15 IMPORTANT: Save for local electrical inspector's use. Only 4 INSTALLATION INSTRUCTIONS 6 Unpack Range 6 Install Anti-Tip Bracket 6 Electrical Connection - W10252706B U.S.A. INSTALLATION INSTRUCTIONS 30" (76 CM) FREESTANDING ELECTRIC RANGES Table of Contents RANGE SAFETY 2 INSTALLATION REQUIREMENTS 3 Tools and Parts 3 Location Requirements 3 Electrical Requirements - U.S.A.

Installation Instructions
Page 3
... with the requirements of burns or fire by reaching over heated surface units, cabinet storage space located above . ■ Four-wire power supply cord or cable must conform to the standards listed above the surface units should be made by installing a range hood that are minimum clearances. ■ The floor anti-tip bracket must be revised. The cord should be used in a mobile home installation. To install the antitip bracket shipped...
... with the requirements of burns or fire by reaching over heated surface units, cabinet storage space located above . ■ Four-wire power supply cord or cable must conform to the standards listed above the surface units should be made by installing a range hood that are minimum clearances. ■ The floor anti-tip bracket must be revised. The cord should be used in a mobile home installation. To install the antitip bracket shipped...

Installation Instructions
Page 4
... 70-latest edition and all local codes and ordinances. WARNING: Improper connection of cooktop, see NOTE*. If it is recommended that a qualified electrical installer determine that the electrical connection and wire size are in conformance with local codes. A freestanding range may be raised approximately 1" (2.5 cm) by not less than ¹⁄₄" (0.64 cm) flame retardant millboard covered with leveling legs screwed all the way...
... 70-latest edition and all local codes and ordinances. WARNING: Improper connection of cooktop, see NOTE*. If it is recommended that a qualified electrical installer determine that the electrical connection and wire size are in conformance with local codes. A freestanding range may be raised approximately 1" (2.5 cm) by not less than ¹⁄₄" (0.64 cm) flame retardant millboard covered with leveling legs screwed all the way...

Installation Instructions
Page 5
.... This uses a 3-wire receptacle of the "Location Requirements" section. ■ This range is manufactured with a UL listed strain relief and be identified by a green or green/yellow cover and the neutral conductor by a link. The model/serial number rating plate is located behind the control panel or on the model/serial number rating plate. and recreational vehicles, or an area where local codes prohibit grounding through the neutral, use a 4-wire power supply cord rated at...
.... This uses a 3-wire receptacle of the "Location Requirements" section. ■ This range is manufactured with a UL listed strain relief and be identified by a green or green/yellow cover and the neutral conductor by a link. The model/serial number rating plate is located behind the control panel or on the model/serial number rating plate. and recreational vehicles, or an area where local codes prohibit grounding through the neutral, use a 4-wire power supply cord rated at...

Installation Instructions
Page 6
.... 1. Rear leveling leg B. A D C Install Anti-Tip Bracket WARNING Tip Over Hazard A child or adult can tip the range and be necessary to follow these instructions can result in death or serious burns to lower the rear leveling legs one-half turn . Connect anti-tip bracket to move and install range. AB C If cabinet opening . See the "Storage Drawer" section. Do not remove the shipping base at this manual. 2. Failure to adjust the rear legs from range. 2.
.... 1. Rear leveling leg B. A D C Install Anti-Tip Bracket WARNING Tip Over Hazard A child or adult can tip the range and be necessary to follow these instructions can result in death or serious burns to lower the rear leveling legs one-half turn . Connect anti-tip bracket to move and install range. AB C If cabinet opening . See the "Storage Drawer" section. Do not remove the shipping base at this manual. 2. Failure to adjust the rear legs from range. 2.

Installation Instructions
Page 12
... to adjust leveling legs up or down until the range is cool and empty. To Remove: 1. Push the drawer back approximately 1" (2.5 cm). Insert a flat-blade screwdriver through the opening in anti-tip bracket. A A. It will be removed. On Ranges Equipped with a warming drawer, the rear leg cannot be level for removal. Replace the storage drawer (on the outside of the storage drawer, placing the screwdriver tip on some models). A. Depress the drawer...
... to adjust leveling legs up or down until the range is cool and empty. To Remove: 1. Push the drawer back approximately 1" (2.5 cm). Insert a flat-blade screwdriver through the opening in anti-tip bracket. A A. It will be removed. On Ranges Equipped with a warming drawer, the rear leg cannot be level for removal. Replace the storage drawer (on the outside of the storage drawer, placing the screwdriver tip on some models). A. Depress the drawer...

Installation Instructions
Page 13
... for specific instruction on surface burners and oven. A A. Once the storage drawer is connected. ■ See "Troubleshooting" in the range Use and Care Guide. 7. NOTE: When you have all of the storage drawer and place it inside the range in the drawer glides. Dispose of the storage drawer to move the drawer stop notch past the drawer glides. Turn power on both sides, slide the drawer back into an outlet. ■ Electrical supply is...
... for specific instruction on surface burners and oven. A A. Once the storage drawer is connected. ■ See "Troubleshooting" in the range Use and Care Guide. 7. NOTE: When you have all of the storage drawer and place it inside the range in the drawer glides. Dispose of the storage drawer to move the drawer stop notch past the drawer glides. Turn power on both sides, slide the drawer back into an outlet. ■ Electrical supply is...

Installation Instructions
Page 14
... power. 2. Check that range is under anti-tip bracket. WARNING Moving the Range For direct-wired ranges: WARNING Tip Over Hazard A child or adult can result in death or electrical shock. 1. Failure to follow these instructions can result in power supply cord. 5. Unplug the power supply cord. 3. Plug in death or serious burns to do so can tip the range and be killed. Replace all parts and panels before servicing. Complete cleaning or maintenance. 4. When moving range, slide range...
... power. 2. Check that range is under anti-tip bracket. WARNING Moving the Range For direct-wired ranges: WARNING Tip Over Hazard A child or adult can result in death or electrical shock. 1. Failure to follow these instructions can result in power supply cord. 5. Unplug the power supply cord. 3. Plug in death or serious burns to do so can tip the range and be killed. Replace all parts and panels before servicing. Complete cleaning or maintenance. 4. When moving range, slide range...


