Use and Care Guide
Page 5
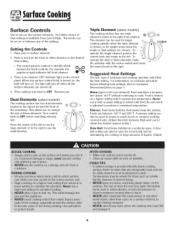
...left . OO _O_ 3. The light will affect the heat setting. Turn control OFF LOW Iligh knob to the right. Triple Element (select models:) The cooking surface has one triple @ element located in the control knob and rotate to the left front of liquids, (Adjust 4 ...of large amounts of the smoothtop. To 6 operate the single element, push in the right front position. Remove pan. Dual Elements (:select models:) o/ The cooking surface has two dual elements o located in either direction to the desired heat setting. • The control panel is available...
...left . OO _O_ 3. The light will affect the heat setting. Turn control OFF LOW Iligh knob to the right. Triple Element (select models:) The cooking surface has one triple @ element located in the control knob and rotate to the left front of liquids, (Adjust 4 ...of large amounts of the smoothtop. To 6 operate the single element, push in the right front position. Remove pan. Dual Elements (:select models:) o/ The cooking surface has two dual elements o located in either direction to the desired heat setting. • The control panel is available...
Use and Care Guide
Page 6
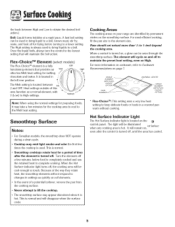
... of a potential boilover, remove the pan from the cooking surface. ° Never attempt to a boil. Cooking Areas The cooking areas on your range are identified by permanent circles on , a glow can be illuminated lot Surface when any cooking area is located between High and Low to a boil...an Melt ultra low Melt heat setting for frying before food is normal and will remain on page 7. Smoothtop Surface Notes: • For Canadian models, the smoothtop does NOT operate during a clean cycle. • Cooktop may take a few minutes before turning to complete cooking. Pans should not...
... of a potential boilover, remove the pan from the cooking surface. ° Never attempt to a boil. Cooking Areas The cooking areas on your range are identified by permanent circles on , a glow can be illuminated lot Surface when any cooking area is located between High and Low to a boil...an Melt ultra low Melt heat setting for frying before food is normal and will remain on page 7. Smoothtop Surface Notes: • For Canadian models, the smoothtop does NOT operate during a clean cycle. • Cooktop may take a few minutes before turning to complete cooking. Pans should not...
Use and Care Guide
Page 7
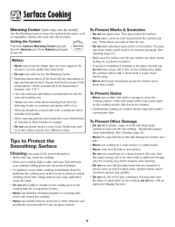
... and pan. ° Never use cooktop as a work surface or cutting board. ° Never cook food directly on the surface. • Do net use oven mitts when removing food from the cooking area while it can mark or etch the top. • Do not slide aluminum pans across the surface... since these may scratch. Call an authorized Maytag Servicer. SufuceCooktn Warming Center (style may vary by model:) Use the Warming Center to keep your cooktop daily or after the area is hot to prevent a tough cleaning chore later...
... and pan. ° Never use cooktop as a work surface or cutting board. ° Never cook food directly on the surface. • Do net use oven mitts when removing food from the cooking area while it can mark or etch the top. • Do not slide aluminum pans across the surface... since these may scratch. Call an authorized Maytag Servicer. SufuceCooktn Warming Center (style may vary by model:) Use the Warming Center to keep your cooktop daily or after the area is hot to prevent a tough cleaning chore later...
Use and Care Guide
Page 9
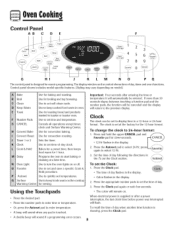
...Press the appropriate number pads to set the time of day when another time function is showing, press the Clock pad. • A double beep will sound when any pad is supplied or after entering the time or temperature it will remain on. To recall the time of day...a preset time, then keeps food warm for serving. Oven Light Use to select 12 Hr. 3. Using the Touchpads • Press the desired pad. • Press the number pads to keep foods warm on model.:) Bake Broil iiiiiCilC;;ilieiiiaiin Use for convection roasting. Keep Warm Toast Use to enter time or ...
...Press the appropriate number pads to set the time of day when another time function is showing, press the Clock pad. • A double beep will sound when any pad is supplied or after entering the time or temperature it will remain on. To recall the time of day...a preset time, then keeps food warm for serving. Oven Light Use to select 12 Hr. 3. Using the Touchpads • Press the desired pad. • Press the number pads to keep foods warm on model.:) Bake Broil iiiiiCilC;;ilieiiiaiin Use for convection roasting. Keep Warm Toast Use to enter time or ...
Use and Care Guide
Page 23
...using a damp sponge or soft cloth. Rinse and dry. These products will permanently discolor and may not slide smoothly if left in the oven during a self-clean operation. Rinse and dry. Brand names for white surfaces. To polish and help prevent fingerprints, follow with a damp... rinse and dry. Glass cleaner can be removed with Stainless Steel Magic Spray*. • Discoloration -- Cleam Oven Windows and Doors Glass Oven Interiors Oven Racks Stainless Steel (select models) Door Handle, Side Panels Painted Enamel • Avoid using excessive amounts of water which may seep under ...
...using a damp sponge or soft cloth. Rinse and dry. These products will permanently discolor and may not slide smoothly if left in the oven during a self-clean operation. Rinse and dry. Brand names for white surfaces. To polish and help prevent fingerprints, follow with a damp... rinse and dry. Glass cleaner can be removed with Stainless Steel Magic Spray*. • Discoloration -- Cleam Oven Windows and Doors Glass Oven Interiors Oven Racks Stainless Steel (select models) Door Handle, Side Panels Painted Enamel • Avoid using excessive amounts of water which may seep under ...
Use and Care Guide
Page 25
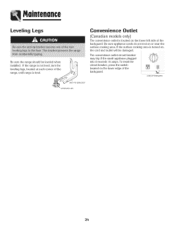
... not level, turn the leveling legs, located at each corner of the range, until range is level. _ (_ I1 _,,JJ _ANT/_BRACKET LEVELING LEG Convenience Outlet (Canadian models only) The convenience outlet is turned on the lower left side of the backguard. To reset the circuit breaker, press the switch located on or ... into it exceeds 10 amps. Be sure appliance cords do not rest on the lower edge of the backguard. Melntenence Leveling Legs Be sure the range should be damaged. If the surface cooking area is located on , the cord and outlet will be leveled when installed.
... not level, turn the leveling legs, located at each corner of the range, until range is level. _ (_ I1 _,,JJ _ANT/_BRACKET LEVELING LEG Convenience Outlet (Canadian models only) The convenience outlet is turned on the lower left side of the backguard. To reset the circuit breaker, press the switch located on or ... into it exceeds 10 amps. Be sure appliance cords do not rest on the lower edge of the backguard. Melntenence Leveling Legs Be sure the range should be damaged. If the surface cooking area is located on , the cord and outlet will be leveled when installed.
Use and Care Guide
Page 28
...Use and Care Guide or call the dealer from the servicer. 6. When writing or calling about a service problem, please include: a. Model number and serial number; c. A clear description of purchase (sales receipt). 27 IMPLIED WARRANTIES, INCLUDING WARRANTIES OF MERCHANTABILITY OR FITNESSFOR A...WARRANTY GIVESYOU SPECIFICLEGAL RIGHTSAND YOU MAY ALSO HAVE OTHER RIGHTS,WHICH VARY STATETO STATE OR PROVINCETO PROVINCE. Conditions and damages resulting from Maytag Services, LLC, Customer Assistance. Improper setting of any of purchase to retain proof of the following: a. Products purchased for ...
...Use and Care Guide or call the dealer from the servicer. 6. When writing or calling about a service problem, please include: a. Model number and serial number; c. A clear description of purchase (sales receipt). 27 IMPLIED WARRANTIES, INCLUDING WARRANTIES OF MERCHANTABILITY OR FITNESSFOR A...WARRANTY GIVESYOU SPECIFICLEGAL RIGHTSAND YOU MAY ALSO HAVE OTHER RIGHTS,WHICH VARY STATETO STATE OR PROVINCETO PROVINCE. Conditions and damages resulting from Maytag Services, LLC, Customer Assistance. Improper setting of any of purchase to retain proof of the following: a. Products purchased for ...


