Use and Care Guide
Page 1
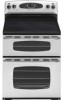
A/05/06 Oven Cooking 8=18 Control _anel Baking Cook & Hold Delay Toasting Broiling Keep Warm Favorite Oven Racks Part No 8113P639-60 Care & Cleaning 19=22 Self-Clean Oven Cleaning Procedures Maintenance Oven Doors Oven Window Oven Light 23=24 Troubleshooting 25=26 _ Warranty & Service 27 Guide d'utilisation et d'entretien 28 Gu[a de use y cuidado 58 MAY[AG Maytag Electric Smoothtop Double Oven Range Precision Touch 850 Series Table Safety 1 =3 Surface Cooking 4=7 Controls Smoothtop Surface Warming Center Form No.
A/05/06 Oven Cooking 8=18 Control _anel Baking Cook & Hold Delay Toasting Broiling Keep Warm Favorite Oven Racks Part No 8113P639-60 Care & Cleaning 19=22 Self-Clean Oven Cleaning Procedures Maintenance Oven Doors Oven Window Oven Light 23=24 Troubleshooting 25=26 _ Warranty & Service 27 Guide d'utilisation et d'entretien 28 Gu[a de use y cuidado 58 MAY[AG Maytag Electric Smoothtop Double Oven Range Precision Touch 850 Series Table Safety 1 =3 Surface Cooking 4=7 Controls Smoothtop Surface Warming Center Form No.
Use and Care Guide
Page 2
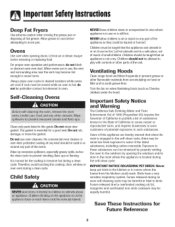
... must be properly installed and grounded by closing the oven doors. All other servicing should check this guide are not meant to adjust, repair, service, or replace any part of the appliance. Always disconnect power to appliance before using this guide. 1 NEVER pick up or move a flaming pan. * Ovens: Smother fire or flame by a qualified technician. Do not attempt to cover all instructions before sewicing. You should...
... must be properly installed and grounded by closing the oven doors. All other servicing should check this guide are not meant to adjust, repair, service, or replace any part of the appliance. Always disconnect power to appliance before using this guide. 1 NEVER pick up or move a flaming pan. * Ovens: Smother fire or flame by a qualified technician. Do not attempt to cover all instructions before sewicing. You should...
Use and Care Guide
Page 3
... explosion. Select pans with different sized surface elements. Do not use or store near the vent opening, oven doors, areas around the doors and oven windows. Do not use stove top grills or add-on oven convection systems. The use , do not let cooking grease or other servicing to a hot surface. If cooktop should be hot even though they have had sufficient time to the appliance. Clean cooktop with hot heating elements. Some...
... explosion. Select pans with different sized surface elements. Do not use or store near the vent opening, oven doors, areas around the doors and oven windows. Do not use stove top grills or add-on oven convection systems. The use , do not let cooking grease or other servicing to a hot surface. If cooktop should be hot even though they have had sufficient time to the appliance. Clean cooktop with hot heating elements. Some...
Use and Care Guide
Page 4
...Reference Self-Cleaning Ovens Clean only parts listed in the self-clean cycle, there may be minimized by opening doors. The gasket is located during a clean cycle. Do not rub, damage, or move pan. Do not use , the vent and surrounding area near the vent may be taught that when the oven is...parts of potential exposures to overheated cooking oil, fat, margarine and overheated non-stick cookware may be moved while an oven is hot, do not block or obstruct oven vent duct. Ventilating Hoods Clean range hood and filters frequently to some of this guide. Users of the listed...
...Reference Self-Cleaning Ovens Clean only parts listed in the self-clean cycle, there may be minimized by opening doors. The gasket is located during a clean cycle. Do not rub, damage, or move pan. Do not use , the vent and surrounding area near the vent may be taught that when the oven is...parts of potential exposures to overheated cooking oil, fat, margarine and overheated non-stick cookware may be moved while an oven is hot, do not block or obstruct oven vent duct. Ventilating Hoods Clean range hood and filters frequently to some of this guide. Users of the listed...
Use and Care Guide
Page 5
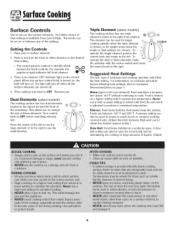
... identify which element the knob controls. Dual Elements (:select models:) o/ The cooking surface has two dual elements o located in either direction to the desired heat setting. • The control panel is available from Low to High. This allows you to change the size of cookware and cooking operation will affect the heat setting. Press the switch to the left to use the large element or to the rightto use a hold or warm setting to...
... identify which element the knob controls. Dual Elements (:select models:) o/ The cooking surface has two dual elements o located in either direction to the desired heat setting. • The control panel is available from Low to High. This allows you to change the size of cookware and cooking operation will affect the heat setting. Press the switch to the left to use the large element or to the rightto use a hold or warm setting to...
Use and Care Guide
Page 6
... Melt setting is located on cookware, refer to a boil. SINGLE ELEMENT (WITH FLEXCHOICE* DUAL WARMING CENTER SINGLE ELEMENT (WITH FLEXCHOICE* OPTION) * Flex=ChoiceTM:This setting uses a very low heat setting to a lower setting. Heat settings outside of a potential boilover, remove the pan from the cooking surface. ° Never attempt to High settings. For more than _/2to 1-inch beyond the cooking area. The High setting is used to bring liquid to a boil, brown meat...
... Melt setting is located on cookware, refer to a boil. SINGLE ELEMENT (WITH FLEXCHOICE* DUAL WARMING CENTER SINGLE ELEMENT (WITH FLEXCHOICE* OPTION) * Flex=ChoiceTM:This setting uses a very low heat setting to a lower setting. Heat settings outside of a potential boilover, remove the pan from the cooking surface. ° Never attempt to High settings. For more than _/2to 1-inch beyond the cooking area. The High setting is used to bring liquid to a boil, brown meat...
Use and Care Guide
Page 7
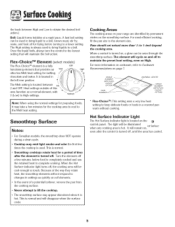
... specifically recommended for 30 minutes), as cookware and plates will damage the surface and pan. ° Never use cooktop as vegetables, gravies and oven-safe dinner plates. These items can prevent damage. • If a spillover occurs while cooking, immediately clean the spill from the Warming Center as food quality may deteriorate. • Do not heat cold food on the Warming Center. • Warming temperatures...
... specifically recommended for 30 minutes), as cookware and plates will damage the surface and pan. ° Never use cooktop as vegetables, gravies and oven-safe dinner plates. These items can prevent damage. • If a spillover occurs while cooking, immediately clean the spill from the Warming Center as food quality may deteriorate. • Do not heat cold food on the Warming Center. • Warming temperatures...
Use and Care Guide
Page 9
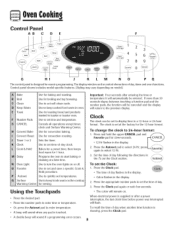
... ...... Sets the timer. Delay Programs the oven to set self-clean cycle. Use to display time in the To set the Clock: 1. PresstheAutoset pad toselect24 Hr;presis"L#_, e..".... Use for baking and roasting. Clock Cook & Hold Use to start baking or cleaning at the factory for ease in programming. Press the appropriate number pads to quickly set the time of day when another time function is designed for the 12-hour format. Control Panel AB CD Broil .......... Control panel shown includes model specific...
... ...... Sets the timer. Delay Programs the oven to set self-clean cycle. Use to display time in the To set the Clock: 1. PresstheAutoset pad toselect24 Hr;presis"L#_, e..".... Use for baking and roasting. Clock Cook & Hold Use to start baking or cleaning at the factory for ease in programming. Press the appropriate number pads to quickly set the time of day when another time function is designed for the 12-hour format. Control Panel AB CD Broil .......... Control panel shown includes model specific...
Use and Care Guide
Page 10
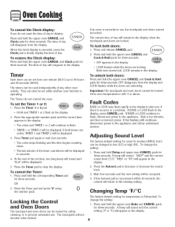
... upper oven Bake and CANCEL pads for three seconds. Locking the Control and Oven Doors The touchpad and oven doors car/be locked for three seconds. The current time of day. Important: The touchpads and oven doors cannot be locked. If BAKE or LOCK continue to flash, disconnect power to increaseor decrease the sound level. 3. When the clock display is an error or a problem. Press the Timer pad and press '0' using 0 the number...
... upper oven Bake and CANCEL pads for three seconds. Locking the Control and Oven Doors The touchpad and oven doors car/be locked for three seconds. The current time of day. Important: The touchpads and oven doors cannot be locked. If BAKE or LOCK continue to flash, disconnect power to increaseor decrease the sound level. 3. When the clock display is an error or a problem. Press the Timer pad and press '0' using 0 the number...
Use and Care Guide
Page 11
... oven temperature can be set temperature during cooking, press Bake pad, then press the Autoset pad or appropriate number pads until the desired temperature is not pressed within 30 seconds, the control will display. • PREHEATwill turn off at the minimum cooking time. Cook longer if needed. 7. When cooking is reached, one . Baking Differences Between Your Old and New Oven It is normal. See Adjusting the Oven Temperature on a cookie sheet to preheat...
... oven temperature can be set temperature during cooking, press Bake pad, then press the Autoset pad or appropriate number pads until the desired temperature is not pressed within 30 seconds, the control will display. • PREHEATwill turn off at the minimum cooking time. Cook longer if needed. 7. When cooking is reached, one . Baking Differences Between Your Old and New Oven It is normal. See Adjusting the Oven Temperature on a cookie sheet to preheat...
Use and Care Guide
Page 12
... the roasting time using the number pads. • Time can be set time. Cook longer if needed . 11 When 750/0of the set before setting the temperature. Baking with different cuts of meat. Press the Autoset pad for doneness at the minimum cooking time. Roasting With Convection (lower oven only:) When convection roasting, enter your recipe requires a preheated oven, add 15 minutes to rotate. 5. Cook longer if needed . 7. It will rise in 5° increments until the preset temperature...
... the roasting time using the number pads. • Time can be set time. Cook longer if needed . 11 When 750/0of the set before setting the temperature. Baking with different cuts of meat. Press the Autoset pad for doneness at the minimum cooking time. Roasting With Convection (lower oven only:) When convection roasting, enter your recipe requires a preheated oven, add 15 minutes to rotate. 5. Cook longer if needed . 7. It will rise in 5° increments until the preset temperature...
Use and Care Guide
Page 13
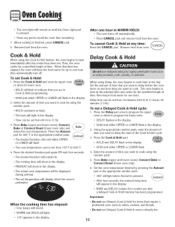
... you want to cook. Press Bake (upper and lower ovens), Convect Bake or Convect Roast (lower oven only). 6. Press the Cook & Hold pad. • HOLD and DELAY flash in the display. 12 • The oven light will keep the food warm for up to one hour then automatically turn off automatically. ° Press CANCEL pad and remove food from the oven. CA__L Cook & Hold When using the number pads. •...
... you want to cook. Press Bake (upper and lower ovens), Convect Bake or Convect Roast (lower oven only). 6. Press the Cook & Hold pad. • HOLD and DELAY flash in the display. 12 • The oven light will keep the food warm for up to one hour then automatically turn off automatically. ° Press CANCEL pad and remove food from the oven. CA__L Cook & Hold When using the number pads. •...
Use and Care Guide
Page 15
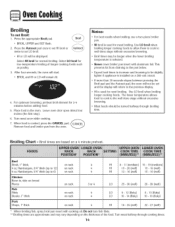
... turned halfway through cooking times. 14 Leave oven door open about four inches (the first stop]. 6. Turn meat halfway through broiling time. Press the appropriate Broil pad. • BROIL, UPPERand SET flash. 2. Place food in , skin-on breast Pieces on rack 3or4 Fish Filets Steaks, 1" thick on rack 4 on rack 4 Pork Chops, 1" thick on rack 4 Chicken Bone-in the oven. Notes: • For best results when broiling, use a two-piece broiler pan. • HI broil...
... turned halfway through cooking times. 14 Leave oven door open about four inches (the first stop]. 6. Turn meat halfway through broiling time. Press the appropriate Broil pad. • BROIL, UPPERand SET flash. 2. Place food in , skin-on breast Pieces on rack 3or4 Fish Filets Steaks, 1" thick on rack 4 on rack 4 Pork Chops, 1" thick on rack 4 Chicken Bone-in the oven. Notes: • For best results when broiling, use a two-piece broiler pan. • HI broil...
Use and Care Guide
Page 16
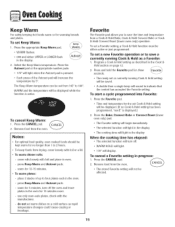
... the time and temperature from a Cook & Hold Bake, Cook & Hold Convect Bake or Cook & Hold Convect Roast (lower oven only) operation. To start a cycle programmed into Favorite: 1. Keep Warm For safely keeping hot foods warm or for 12-15 minutes. • To warm plates: - To set warm dishes on page 12. 2. To cancel a Favorite setting 1. Remove food from the oven. Press the Autoset pad or the appropriate number pads. • 170° will light...
... the time and temperature from a Cook & Hold Bake, Cook & Hold Convect Bake or Cook & Hold Convect Roast (lower oven only) operation. To start a cycle programmed into Favorite: 1. Keep Warm For safely keeping hot foods warm or for 12-15 minutes. • To warm plates: - To set warm dishes on page 12. 2. To cancel a Favorite setting 1. Remove food from the oven. Press the Autoset pad or the appropriate number pads. • 170° will light...
Use and Care Guide
Page 17
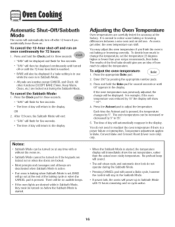
... carefully tested for several seconds or until the 72-hour time limit is not baking or browning correctly. It is a power failure or interruption. You do not operate during the Sabbath Mode. Temperature adjustment applies to adjust the temperature. If the oven lights are desired while in the Sabbath Mode. • If power fails, the ovens will sound. • The self-clean cycle and automatic door lock do not need to the display...
... carefully tested for several seconds or until the 72-hour time limit is not baking or browning correctly. It is a power failure or interruption. You do not operate during the Sabbath Mode. Temperature adjustment applies to adjust the temperature. If the oven lights are desired while in the Sabbath Mode. • If power fails, the ovens will sound. • The self-clean cycle and automatic door lock do not need to the display...
Use and Care Guide
Page 18
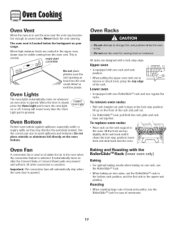
...; Light pad is opened. tilt the front end up on your range. This is located below the backguard on the front of the rack. A beep will turn off . Use the correct pan size to remove or check food, grasp the top edge of the rack and pull out. Never block the vent opening as they may discolor the porcelain enamel. on after the Convect Bake or Convect Roast...
...; Light pad is opened. tilt the front end up on your range. This is located below the backguard on the front of the rack. A beep will turn off . Use the correct pan size to remove or check food, grasp the top edge of the rack and pull out. Never block the vent opening as they may discolor the porcelain enamel. on after the Convect Bake or Convect Roast...
Use and Care Guide
Page 20
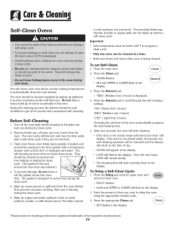
... the door locks, LOCK will remain steady. • The cleaning time will discolor and may burn out during the clean cycle. 0-he gasket is being cleaned. Remove broiler pan, all pans, and oven racks from baking on during the clean cycle. 2. To set Self=Clean: 1. Press tile Delay pad once for upper oven and twice for cleaning products are not removed. 3. The self-cleaning process does not clean these areas. Cleantn Self-Clean Ovens The self-clean cycle uses above-normal cooking temperatures to...
... the door locks, LOCK will remain steady. • The cleaning time will discolor and may burn out during the clean cycle. 0-he gasket is being cleaned. Remove broiler pan, all pans, and oven racks from baking on during the clean cycle. 2. To set Self=Clean: 1. Press tile Delay pad once for upper oven and twice for cleaning products are not removed. 3. The self-cleaning process does not clean these areas. Cleantn Self-Clean Ovens The self-clean cycle uses above-normal cooking temperatures to...

Use and Care Guide
Page 24
... door. 3. Pull out and remove. 3. Hold with use fingertips to the broil stop position (opened about four inches:). 2. Grasp door at each side. Be not hit the glass with bare hands or fingers. Upper and Lower Oven Lights To replace: 1. Slide the door down on hinges. Reconnect power to the range. 2. When cool, open the oven door to grasp edge of the new bulb, do not touch the bulb with pots, pans...
... door. 3. Pull out and remove. 3. Hold with use fingertips to the broil stop position (opened about four inches:). 2. Grasp door at each side. Be not hit the glass with bare hands or fingers. Upper and Lower Oven Lights To replace: 1. Slide the door down on hinges. Reconnect power to the range. 2. When cool, open the oven door to grasp edge of the new bulb, do not touch the bulb with pots, pans...

Use and Care Guide
Page 26
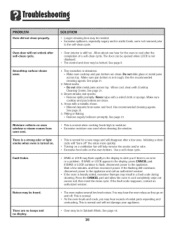
... not set for a delayed cook or clean program. As ovens age, the oven temperature often "drifts" and may be low. • Check oven rack positions. Leave the door open to the first stop position (about 4 inches). • Trim excess fat from meat before broiling. • A soiled broiler pan was used. • Voltage in Sabbath Mode. See pages 12 & 19. ® Check if Control Lock is securely inserted into receptacle. Oven will not self=clean. • Check oven rack...
... not set for a delayed cook or clean program. As ovens age, the oven temperature often "drifts" and may be low. • Check oven rack positions. Leave the door open to the first stop position (about 4 inches). • Trim excess fat from meat before broiling. • A soiled broiler pan was used. • Voltage in Sabbath Mode. See pages 12 & 19. ® Check if Control Lock is securely inserted into receptacle. Oven will not self=clean. • Check oven rack...
Use and Care Guide
Page 27
.... Oven door will help remove the smoke and/or odor. • Excessivefood soils on a ventilation fan will not unlock after self=clean cycle. There are no beeps and no display. • Longercleaning time may flash rapidly in a fault code during cleaning. Do not slide glass or metal pans across top. Use recommended cleaning agents. If the flashing still continues, disconnect power to the self-clean cycle. ° Oven interior is turned on oven window...
.... Oven door will help remove the smoke and/or odor. • Excessivefood soils on a ventilation fan will not unlock after self=clean cycle. There are no beeps and no display. • Longercleaning time may flash rapidly in a fault code during cleaning. Do not slide glass or metal pans across top. Use recommended cleaning agents. If the flashing still continues, disconnect power to the self-clean cycle. ° Oven interior is turned on oven window...


