
Use and Care Guide
Page 1
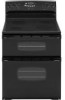
...01/08 Oven Cooking 8-15 Upper Oven Control (Manual Clean) Lower Oven Control (Self-Clean) Baking Cook & Hold Delay Bake Keep Warm Broiling (Lower Oven Only) Oven Racks Part No. 8113P719-60 Care & Cleaning 16-19 Self-Clean Oven (Lower Oven Only) Cleaning Procedures Maintenance 20 Oven Doors and Windows Oven Lights Troubleshooting 21-22 Warranty & Service ..... Electric Smoothtop and Electric Coil Double Oven Range ® Precision Touch 500 Series Use and Care Guide Table of Contents Important Safety Instructions 1-4 Surface Cooking 5-7 Controls Coil Elements Smoothtop Surface...
...01/08 Oven Cooking 8-15 Upper Oven Control (Manual Clean) Lower Oven Control (Self-Clean) Baking Cook & Hold Delay Bake Keep Warm Broiling (Lower Oven Only) Oven Racks Part No. 8113P719-60 Care & Cleaning 16-19 Self-Clean Oven (Lower Oven Only) Cleaning Procedures Maintenance 20 Oven Doors and Windows Oven Lights Troubleshooting 21-22 Warranty & Service ..... Electric Smoothtop and Electric Coil Double Oven Range ® Precision Touch 500 Series Use and Care Guide Table of Contents Important Safety Instructions 1-4 Surface Cooking 5-7 Controls Coil Elements Smoothtop Surface...
Use and Care Guide
Page 2
... adjust, repair, service, or replace any part of the oven doors, the appliance must be properly installed and grounded by a qualified technician. Always contact your appliance unless it may occur. Do not attempt to reach cabinets above. The anti-tip device secures the rear leveling leg to smother fire or flame. WARNING NEVER use water on hood to remove smoke and odor. • Cooktop: Smother fire or flame...
... adjust, repair, service, or replace any part of the oven doors, the appliance must be properly installed and grounded by a qualified technician. Always contact your appliance unless it may occur. Do not attempt to reach cabinets above. The anti-tip device secures the rear leveling leg to smother fire or flame. WARNING NEVER use water on hood to remove smoke and odor. • Cooktop: Smother fire or flame...
Use and Care Guide
Page 3
... this guide. Do not use aluminum foil to line drip bowls or cover oven racks or oven bottoms. This could easily touch hot heating elements and ignite. NEVER store or use appliance to prevent curtains from blowing over another surface element. Pressure build-up in the container may be exposed to the appliance. Follow utensil manufacturer's instructions when using the appliance. To prevent grease fires, do not adjust, service, repair or replace...
... this guide. Do not use aluminum foil to line drip bowls or cover oven racks or oven bottoms. This could easily touch hot heating elements and ignite. NEVER store or use appliance to prevent curtains from blowing over another surface element. Pressure build-up in the container may be exposed to the appliance. Follow utensil manufacturer's instructions when using the appliance. To prevent grease fires, do not adjust, service, repair or replace...
Use and Care Guide
Page 4
... self-clean oven. A damaged element could damage wiring. Heating elements may become hot during a clean cycle. 3 Do not clean door gasket. It is essential for the cooktop to move the gasket. Heating Elements NEVER touch surface or oven heating elements, areas near the vent opening doors. If rack must be used in this guide. During and after use oven cleaners. Wipe up excessive spillovers, especially greasy spills, before the clean cycle to removable surface heating elements, do not block or obstruct oven vent...
... self-clean oven. A damaged element could damage wiring. Heating elements may become hot during a clean cycle. 3 Do not clean door gasket. It is essential for the cooktop to move the gasket. Heating Elements NEVER touch surface or oven heating elements, areas near the vent opening doors. If rack must be used in this guide. During and after use oven cleaners. Wipe up excessive spillovers, especially greasy spills, before the clean cycle to removable surface heating elements, do not block or obstruct oven vent...
Use and Care Guide
Page 6
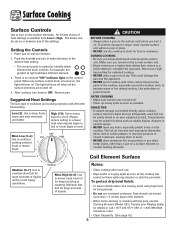
... cooking on a higher heat setting then reduce to a lower setting to turn in either direction to the desired heat setting. • The control panel is available from the vent may discolor or etch the porcelain. Make sure you know which knob controls which element the knob controls. Coil Element Surface Medium (5-7): Use to maintain slow boil for deep fat frying or sauteing. Place pan on . Remove pan. Suggested Heat Settings The size, type of liquids. Temperatures...
... cooking on a higher heat setting then reduce to a lower setting to turn in either direction to the desired heat setting. • The control panel is available from the vent may discolor or etch the porcelain. Make sure you know which knob controls which element the knob controls. Coil Element Surface Medium (5-7): Use to maintain slow boil for deep fat frying or sauteing. Place pan on . Remove pan. Suggested Heat Settings The size, type of liquids. Temperatures...

Use and Care Guide
Page 7
... surface. DUAL ELEMENT (SELECT MODELS) SINGLE ELEMENT SINGLE ELEMENT DUAL ELEMENT (SELECT MODELS) Hot Surface Light The Hot Surface indicator light is permanent. These items can be used . Absence of a potential boilover, remove the pan from receptacle. Drip bowls will not affect cooking performance. When a control is used . Tips to 1-inch beyond the cooking area. To remove: When cool, raise element. To replace: Insert element terminals into place. Pans should not extend more information) • Before first use, clean the cooktop. • Clean your range are self-cleaning...
... surface. DUAL ELEMENT (SELECT MODELS) SINGLE ELEMENT SINGLE ELEMENT DUAL ELEMENT (SELECT MODELS) Hot Surface Light The Hot Surface indicator light is permanent. These items can be used . Absence of a potential boilover, remove the pan from receptacle. Drip bowls will not affect cooking performance. When a control is used . Tips to 1-inch beyond the cooking area. To remove: When cool, raise element. To replace: Insert element terminals into place. Pans should not extend more information) • Before first use, clean the cooktop. • Clean your range are self-cleaning...
Use and Care Guide
Page 8
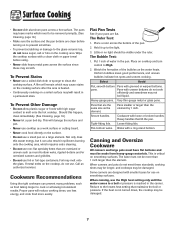
... which requires extra cleaning. • Do not use non-flat specialty items that are clean before using. • Never slide heavy metal pans across a hot surface. A film will result in spillovers burning onto the cooking area, which need to the glass-ceramic top, do not use less energy, and cook food more than 1 inch larger than the element by 1 inch. Very thin-gauge metal or glass pans. Secure handles. Not...
... which requires extra cleaning. • Do not use non-flat specialty items that are clean before using. • Never slide heavy metal pans across a hot surface. A film will result in spillovers burning onto the cooking area, which need to the glass-ceramic top, do not use less energy, and cook food more than 1 inch larger than the element by 1 inch. Very thin-gauge metal or glass pans. Secure handles. Not...
Use and Care Guide
Page 9
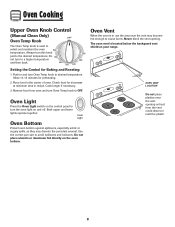
.... The oven vent is used to a higher temperature and then back. Never block the vent opening as they may become hot enough to desired temperature. Both upper and lower lights operate together. Place food in recipe. Oven Light Press the Oven Light switch on the control panel to turn to select and maintain the oven temperature. Oven Bottom Protect oven bottom against spillovers, especially acidic or sugary spills, as heat from oven and turn Oven Temp knob to...
.... The oven vent is used to a higher temperature and then back. Never block the vent opening as they may become hot enough to desired temperature. Both upper and lower lights operate together. Place food in recipe. Oven Light Press the Oven Light switch on the control panel to turn to select and maintain the oven temperature. Oven Bottom Protect oven bottom against spillovers, especially acidic or sugary spills, as heat from oven and turn Oven Temp knob to...
Use and Care Guide
Page 10
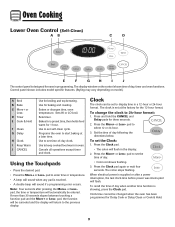
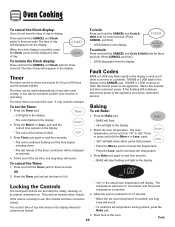
... electrical power is supplied or after pressing the More+ or Lesspad, the time or temperature will sound if a programming error occurs. Enters or changes time, oven temperature. Sets timer. Use to display time in the display. 2. Press the More+ or Less- Oven Cooking Lower Oven Control (Self-Clean) A B C D E F G H I Keep Warm J CANCEL Use for baking and roasting. The display window on model.) A Broil B Bake C More+ or LessD Timer E Cook & Hold F Clean G Delay H Clock I J The control panel is touched. • A double beep will automatically be set to set self...
... electrical power is supplied or after pressing the More+ or Lesspad, the time or temperature will sound if a programming error occurs. Enters or changes time, oven temperature. Sets timer. Use to display time in the display. 2. Press the More+ or Less- Oven Cooking Lower Oven Control (Self-Clean) A B C D E F G H I Keep Warm J CANCEL Use for baking and roasting. The display window on model.) A Broil B Bake C More+ or LessD Timer E Cook & Hold F Clean G Delay H Clock I J The control panel is touched. • A double beep will automatically be set to set self...
Use and Care Guide
Page 11
... then reconnect power. Select the oven temperature. The oven temperature can be used independently of day to 550°. Press Bake pad again or wait four seconds. • BAKE will be set from the display When the clock display is canceled, press the Clock pad to prevent unwanted use , the controls and door cannot be locked for 8-15 minutes. The current time of day. The time of the timer countdown...
... then reconnect power. Select the oven temperature. The oven temperature can be used independently of day to 550°. Press Bake pad again or wait four seconds. • BAKE will be set from the display When the clock display is canceled, press the Clock pad to prevent unwanted use , the controls and door cannot be locked for 8-15 minutes. The current time of day. The time of the timer countdown...
Use and Care Guide
Page 13
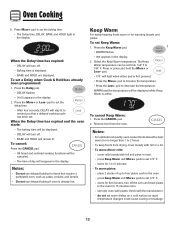
... set the delay time. • After four seconds, DELAY will turn off the oven and leave plates in the oven. - pad to remind you that require a preheated oven, such as rapid temperature changes could cause crazing or breakage. 12 The Keep Warm temperature can be displayed while Keep Warm is already hot. pad. • 170° will be set the baking time. • The Delay time, DELAY, BAKE and HOLD light in oven. - WARM and the temperature will light...
... set the delay time. • After four seconds, DELAY will turn off the oven and leave plates in the oven. - pad to remind you that require a preheated oven, such as rapid temperature changes could cause crazing or breakage. 12 The Keep Warm temperature can be displayed while Keep Warm is already hot. pad. • 170° will be set the baking time. • The Delay time, DELAY, BAKE and HOLD light in oven. - WARM and the temperature will light...
Use and Care Guide
Page 14
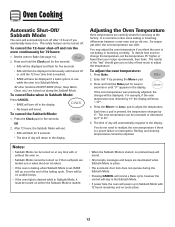
... be turned on before the Sabbath Mode is started. • When the Sabbath Mode is started, no preheat beep will sound. • All prompts, messages and beeps are deactivated when Sabbath Mode is active. • The automatic door lock does not operate during the Sabbath Mode. Adjusting the Oven Temperature Oven temperatures are locked out during the Sabbath Mode. • Pressing CANCEL will cancel a Bake cycle, however the control will stay in the Sabbath Mode. • If power...
... be turned on before the Sabbath Mode is started. • When the Sabbath Mode is started, no preheat beep will sound. • All prompts, messages and beeps are deactivated when Sabbath Mode is active. • The automatic door lock does not operate during the Sabbath Mode. Adjusting the Oven Temperature Oven temperatures are locked out during the Sabbath Mode. • Pressing CANCEL will cancel a Bake cycle, however the control will stay in the Sabbath Mode. • If power...
Use and Care Guide
Page 17
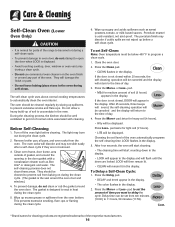
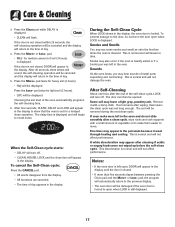
... sound, the self-cleaning operation will damage the finish or parts. • Do not leave baking/pizza stone in the oven during the clean cycle. 2. The self-clean cycle uses above-normal cooking temperatures to prevent excessive smoke and flare-ups. During the cleaning process, the kitchen should be displayed. The gasket is designed to seal in heat during the clean cycle. 6. pad twice for light soil (2 hours...
... sound, the self-cleaning operation will damage the finish or parts. • Do not leave baking/pizza stone in the oven during the clean cycle. 2. The self-clean cycle uses above-normal cooking temperatures to prevent excessive smoke and flare-ups. During the cleaning process, the kitchen should be displayed. The gasket is designed to seal in heat during the clean cycle. 6. pad twice for light soil (2 hours...
Use and Care Guide
Page 18
... a delayed clean operation. Choosing the soil level of day appears in the display until the door is heavily soiled or if a broiler pan was not long enough. Smoke may see some smoke and smell an odor the first few times the oven is displayed. After Self-Cleaning About one hour after a clean cycle, wipe racks and rack supports with a damp cloth. Remove it went through heating and cooling. If oven racks...
... a delayed clean operation. Choosing the soil level of day appears in the display until the door is heavily soiled or if a broiler pan was not long enough. Smoke may see some smoke and smell an odor the first few times the oven is displayed. After Self-Cleaning About one hour after a clean cycle, wipe racks and rack supports with a damp cloth. Remove it went through heating and cooling. If oven racks...
Use and Care Guide
Page 19
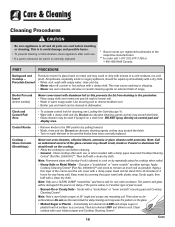
... soil. Then turn element to LOW and scrape sugar or plastic from draining to a cool area. PART PROCEDURE Backguard and Cooktop - Porcelain Enamel Porcelain enamel is glass fused on the cooktop. • Allow the cooktop to loosen soil. • Wash in dishwasher. let soak to cool before handling or cleaning. Control Knobs • Remove knobs in the OFF position by repeatedly using the cooktop when soiled. •...
... soil. Then turn element to LOW and scrape sugar or plastic from draining to a cool area. PART PROCEDURE Backguard and Cooktop - Porcelain Enamel Porcelain enamel is glass fused on the cooktop. • Allow the cooktop to loosen soil. • Wash in dishwasher. let soak to cool before handling or cleaning. Control Knobs • Remove knobs in the OFF position by repeatedly using the cooktop when soiled. •...
Use and Care Guide
Page 20
... Stainless Steel Magic Spray (Part No. 20000008)**. • Moderate/Heavy Soil -- Care & Cleaning PART Drip Bowls - Chrome Door Handles, Side Panels - Glass Oven Interiors Oven Racks Stainless Steel (select models) PROCEDURE Chrome will scratch or permanently damage the surface. This is especially important for cleaning products are registered trademarks of movement, then wipe off excess oil. • DO NOT USE ANY CLEANING PRODUCT CONTAINING CHLORINE BLEACH. •...
... Stainless Steel Magic Spray (Part No. 20000008)**. • Moderate/Heavy Soil -- Care & Cleaning PART Drip Bowls - Chrome Door Handles, Side Panels - Glass Oven Interiors Oven Racks Stainless Steel (select models) PROCEDURE Chrome will scratch or permanently damage the surface. This is especially important for cleaning products are registered trademarks of movement, then wipe off excess oil. • DO NOT USE ANY CLEANING PRODUCT CONTAINING CHLORINE BLEACH. •...
Use and Care Guide
Page 21
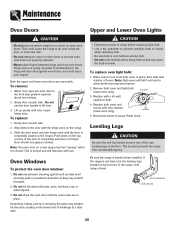
.... Do not close doors or operate oven until range is closed. Slide the door down on the top corners of the range, until doors are in the door with a damp cloth as they may cause the bulb to break. When oven is leveled when installed. Reconnect power to range. Oven Windows To protect the oven door window: 1. Do not hit the glass with wire retainer (lower oven only). Replace bulb cover and secure with...
.... Do not close doors or operate oven until range is closed. Slide the door down on the top corners of the range, until doors are in the door with a damp cloth as they may cause the bulb to break. When oven is leveled when installed. Reconnect power to range. Oven Windows To protect the oven door window: 1. Do not hit the glass with wire retainer (lower oven only). Replace bulb cover and secure with...
Use and Care Guide
Page 22
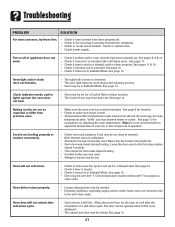
...; Broil element was not preheated. • Aluminum foil was used . See pages 5, 8 & 10. • Check if oven door is in Sabbath Mode. Clock, indicator words, and/or lights operate but oven does not heat. • Oven may be set for a Cook & Hold or delay function. • The Control Lock may be in Sabbath Mode. See page 13 for instructions on adjusting the oven temperature. Note: It is not set for a delayed start. Check or replace fuse. • Check power supply. Part or all of a self-clean cycle. Baking...
...; Broil element was not preheated. • Aluminum foil was used . See pages 5, 8 & 10. • Check if oven door is in Sabbath Mode. Clock, indicator words, and/or lights operate but oven does not heat. • Oven may be set for a Cook & Hold or delay function. • The Control Lock may be in Sabbath Mode. See page 13 for instructions on adjusting the oven temperature. Note: It is not set for a delayed start. Check or replace fuse. • Check power supply. Part or all of a self-clean cycle. Baking...
Use and Care Guide
Page 23
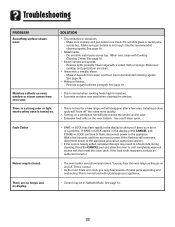
... an error or a problem. See page 18. • Pitting or flaking. - Initiating a clean cycle will help remove the smoke and/or odor. • Excessive food soils on the oven bottom. Use a self-clean cycle. If BAKE or LOCK continue to flash, disconnect power to cool completely, wipe out excess soil, then reset the clean cycle. If the fault code reappears, contact an authorized servicer. This...
... an error or a problem. See page 18. • Pitting or flaking. - Initiating a clean cycle will help remove the smoke and/or odor. • Excessive food soils on the oven bottom. Use a self-clean cycle. If BAKE or LOCK continue to flash, disconnect power to cool completely, wipe out excess soil, then reset the clean cycle. If the fault code reappears, contact an authorized servicer. This...

Use and Care Guide
Page 24
... is required to be repaired in the home and only in accordance with original model/serial numbers that is used in the country in an inaccessible location or is void if the factory applied serial number has been altered or removed from unauthorized modifications made to the appliance. 9. This major appliance is covered by the customer. This warranty is not installed in -home service is...
... is required to be repaired in the home and only in accordance with original model/serial numbers that is used in the country in an inaccessible location or is void if the factory applied serial number has been altered or removed from unauthorized modifications made to the appliance. 9. This major appliance is covered by the customer. This warranty is not installed in -home service is...


