
Use and Care Guide
Page 1
ELECTRIC DRYER USE & CARE GUIDE SÉCHEUSE ÉLECTRIQUE GUIDE D'UTILISATION ET D'ENTRETIEN FOR QUESTIONS ABOUT FEATURES, OPERATION/PERFORMANCE, PARTS, ACCESSORIES OR SERVICE CALL: 1.800.688.9900 IN CANADA, CALL: 1.800.807.6777 VISIT OUR WEBSITE AT WWW.MAYTAG.COM IN CANADA, WWW.MAYTAG.CA W10057351A SI TIENE PREGUNTAS RESPECTO A LAS CARACTERÍSTICAS, FUNCIONAMIENTO, RENDIMIENTO, PARTES..., ACCESORIOS O SERVICIO TÉCNICO, LLAME AL: 1.800.688.9900 EN CANADÁ, LLAME AL: 1.800.807.6777 VISITE NUESTRO SITIO WEB EN WWW.MAYTAG.COM EN CANADÁ, WWW.MAYTAG.CA AU ...
ELECTRIC DRYER USE & CARE GUIDE SÉCHEUSE ÉLECTRIQUE GUIDE D'UTILISATION ET D'ENTRETIEN FOR QUESTIONS ABOUT FEATURES, OPERATION/PERFORMANCE, PARTS, ACCESSORIES OR SERVICE CALL: 1.800.688.9900 IN CANADA, CALL: 1.800.807.6777 VISIT OUR WEBSITE AT WWW.MAYTAG.COM IN CANADA, WWW.MAYTAG.CA W10057351A SI TIENE PREGUNTAS RESPECTO A LAS CARACTERÍSTICAS, FUNCIONAMIENTO, RENDIMIENTO, PARTES..., ACCESORIOS O SERVICIO TÉCNICO, LLAME AL: 1.800.688.9900 EN CANADÁ, LLAME AL: 1.800.807.6777 VISITE NUESTRO SITIO WEB EN WWW.MAYTAG.COM EN CANADÁ, WWW.MAYTAG.CA AU ...

Use and Care Guide
Page 3
... ■ See installation instructions for grounding requirements. IMPORTANT SAFETY INSTRUCTIONS WARNING: To reduce the risk of fire, electric shock, or injury to persons when using the dryer. ■ Do not place items exposed to reduce the chance of injury, and tell you what the potential...with controls. ■ Do not repair or replace any part of the dryer or attempt any servicing unless specifically recommended in the dryer. Close supervision of children is necessary when the dryer is used near children. ■ Before the dryer is removed from the accumulation of lint, dust, and ...
... ■ See installation instructions for grounding requirements. IMPORTANT SAFETY INSTRUCTIONS WARNING: To reduce the risk of fire, electric shock, or injury to persons when using the dryer. ■ Do not place items exposed to reduce the chance of injury, and tell you what the potential...with controls. ■ Do not repair or replace any part of the dryer or attempt any servicing unless specifically recommended in the dryer. Close supervision of children is necessary when the dryer is used near children. ■ Before the dryer is removed from the accumulation of lint, dust, and ...
Use and Care Guide
Page 4
..." (121.9 cm) or 53.5" (135.9 cm), respectively. Ask for Part Number W10200372. You will need to avoid having loose items fall behind the machines during operation. A B A. 10" (25.4 cm) pedestal B. 15.5" (39.4 cm) pedestal The pedestals are installing your PERFORMANCE SERIES washer and dryer and wish to place the 10" (25.4 cm) pedestal...
..." (121.9 cm) or 53.5" (135.9 cm), respectively. Ask for Part Number W10200372. You will need to avoid having loose items fall behind the machines during operation. A B A. 10" (25.4 cm) pedestal B. 15.5" (39.4 cm) pedestal The pedestals are installing your PERFORMANCE SERIES washer and dryer and wish to place the 10" (25.4 cm) pedestal...
Use and Care Guide
Page 5
... water supply from dryer. Dryer only 0" (0 cm) 38" min. (96.52 cm) *Required spacing 1"* (2.5 cm) 27" (68.6 cm) 1"* (2.5 cm) 5 WARNING Location Requirements Dryer Dimensions 51½"...dryer is greater than 1" (2.5 cm), install Extended Dryer Feet Kit, Part Number 279810. The combined weight of a companion appliance should be considered for proper exhaust installation. Contact your dryer...electrical outlet located within 4 ft (1.2 m) of the dryer, and water pressure of 20-100 psi (137.9-689.6 kPa). Place dryer at the end of 0" (0 cm) clearance on all sides of the dryer...
... water supply from dryer. Dryer only 0" (0 cm) 38" min. (96.52 cm) *Required spacing 1"* (2.5 cm) 27" (68.6 cm) 1"* (2.5 cm) 5 WARNING Location Requirements Dryer Dimensions 51½"...dryer is greater than 1" (2.5 cm), install Extended Dryer Feet Kit, Part Number 279810. The combined weight of a companion appliance should be considered for proper exhaust installation. Contact your dryer...electrical outlet located within 4 ft (1.2 m) of the dryer, and water pressure of 20-100 psi (137.9-689.6 kPa). Place dryer at the end of 0" (0 cm) clearance on all sides of the dryer...
Use and Care Guide
Page 7
...cm) 27" (68.6 cm) 1" (2.5 cm) Electrical Requirements - A time-delay fuse or circuit breaker is permanently connected to an individual branch circuit. Electrical Connection To properly install your outlet looks like this: 4-wire receptacle (14-30R) Then choose a 4-wire power supply cord with the National Electrical Code...UL listed strain relief. A copy of electrical connection you will be made in remodeling after 1996, dryer circuits involved in mobile homes to the Manufactured Home Construction and Safety Standard, Title 24 CFR, Part 3280 (formerly the Federal Standard for use...
...cm) 27" (68.6 cm) 1" (2.5 cm) Electrical Requirements - A time-delay fuse or circuit breaker is permanently connected to an individual branch circuit. Electrical Connection To properly install your outlet looks like this: 4-wire receptacle (14-30R) Then choose a 4-wire power supply cord with the National Electrical Code...UL listed strain relief. A copy of electrical connection you will be made in remodeling after 1996, dryer circuits involved in mobile homes to the Manufactured Home Construction and Safety Standard, Title 24 CFR, Part 3280 (formerly the Federal Standard for use...

Use and Care Guide
Page 8
...three 10-gauge copper wires and match a 3-wire receptacle of the equipment- Connect to an individual branch circuit. „ This dryer is within reach of electric shock by direct wire: Power supply cable must match power supply (4-wire or 3-wire) and be: „ Flexible armored cable...the dryer is adequate and in a risk of least resistance for electric current. The plug must be plugged into a grounded 4 prong outlet. SAVE THESE INSTRUCTIONS Electrical Shock Hazard Plug into an appropriate outlet that you are in doubt as to do not use Power Supply Cord Replacement Part ...
...three 10-gauge copper wires and match a 3-wire receptacle of the equipment- Connect to an individual branch circuit. „ This dryer is within reach of electric shock by direct wire: Power supply cable must match power supply (4-wire or 3-wire) and be: „ Flexible armored cable...the dryer is adequate and in a risk of least resistance for electric current. The plug must be plugged into a grounded 4 prong outlet. SAVE THESE INSTRUCTIONS Electrical Shock Hazard Plug into an appropriate outlet that you are in doubt as to do not use Power Supply Cord Replacement Part ...

Use and Care Guide
Page 17
...are available for purchase. Please see the "Assistance or Service" section to order. „ Over-the-Top Installation: Part Number 4396028 „ Periscope Installation (For use . Select the type best for your installation. Over-the-top installation (also available with...specified will: „ Shorten the life of the mobile home structure and must be securely fastened to a noncombustible portion of the dryer. „ Reduce performance, resulting in longer drying times and increased energy usage. A B C A. Special provisions for mobile home installations The exhaust vent must...
...are available for purchase. Please see the "Assistance or Service" section to order. „ Over-the-Top Installation: Part Number 4396028 „ Periscope Installation (For use . Select the type best for your installation. Over-the-top installation (also available with...specified will: „ Shorten the life of the mobile home structure and must be securely fastened to a noncombustible portion of the dryer. „ Reduce performance, resulting in longer drying times and increased energy usage. A B C A. Special provisions for mobile home installations The exhaust vent must...

Use and Care Guide
Page 20
...and/or electrical supply is connected. „ Household fuse is intact and tight, or circuit breaker has not tripped. „ Dryer door is first heated. If you live in a hard water area, use of a water softener is recommended to see which will reduce product performance. This odor...scale buildup may be a problem with a damp cloth to the need for leaks around "Y" connector, faucet and hoses. 6. Check that the dryer is an extra part, go away. 20 Be sure the water faucets are now installed. For direct wire installation, turn on . 5. See "Troubleshooting." See "Troubleshooting...
...and/or electrical supply is connected. „ Household fuse is intact and tight, or circuit breaker has not tripped. „ Dryer door is first heated. If you live in a hard water area, use of a water softener is recommended to see which will reduce product performance. This odor...scale buildup may be a problem with a damp cloth to the need for leaks around "Y" connector, faucet and hoses. 6. Check that the dryer is an extra part, go away. 20 Be sure the water faucets are now installed. For direct wire installation, turn on . 5. See "Troubleshooting." See "Troubleshooting...

Use and Care Guide
Page 24
...glows, the load is finished. See "Damp Dry Signal" in the dryer during the drying cycle of Residential clothes Dryers Heavy Duty Use this cycle to get High heat for drying large items that part of 3 common infectious bacteria. Cool Down The Cool Down light glows...Items Use this time, the Cool Down indicator will aid the drying process. during the WRINKLE PREVENT feature. NSF Protocol P154 Sanitization Performance of a timed cycle. See Sensor Preset or Manual Preset Cycle Settings chart. Wrinkle Prevent Feature The Wrinkle Prevent indicator light blinks...
...glows, the load is finished. See "Damp Dry Signal" in the dryer during the drying cycle of Residential clothes Dryers Heavy Duty Use this cycle to get High heat for drying large items that part of 3 common infectious bacteria. Cool Down The Cool Down light glows...Items Use this time, the Cool Down indicator will aid the drying process. during the WRINKLE PREVENT feature. NSF Protocol P154 Sanitization Performance of a timed cycle. See Sensor Preset or Manual Preset Cycle Settings chart. Wrinkle Prevent Feature The Wrinkle Prevent indicator light blinks...

Use and Care Guide
Page 33
... us to better respond to build every new MAYTAG® appliance. This information will fit right and work right because they are made with any questions or concerns at : Maytag Services, LLC ATTN: CAIR® Center P.O. Factory specified parts will help , follow the instructions below. To... locate the Maytag® appliances designated service company in your area, you can also look in ...
... us to better respond to build every new MAYTAG® appliance. This information will fit right and work right because they are made with any questions or concerns at : Maytag Services, LLC ATTN: CAIR® Center P.O. Factory specified parts will help , follow the instructions below. To... locate the Maytag® appliances designated service company in your area, you can also look in ...

Use and Care Guide
Page 34
This limited warranty does not cover: ITEMS EXCLUDED FROM WARRANTY 1. Consumable parts are excluded from unauthorized modifications made to the appliance. 9. Costs associated with electrical or plumbing codes, or use of consumables or cleaning products not approved by this warranty. 8. The cost of ...your major appliance to correct defects in a manner that have been removed, altered or cannot be provided by an authorized Maytag servicer is contrary to parts or systems resulting from warranty coverage. 3. Repairs when your major appliance if it is used in the country in ...
This limited warranty does not cover: ITEMS EXCLUDED FROM WARRANTY 1. Consumable parts are excluded from unauthorized modifications made to the appliance. 9. Costs associated with electrical or plumbing codes, or use of consumables or cleaning products not approved by this warranty. 8. The cost of ...your major appliance to correct defects in a manner that have been removed, altered or cannot be provided by an authorized Maytag servicer is contrary to parts or systems resulting from warranty coverage. 3. Repairs when your major appliance if it is used in the country in ...

Installation Instructions
Page 1
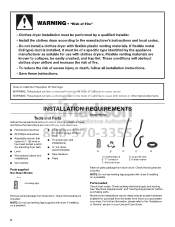
... ONLY Para una versión de estas instrucciones en español, visite www.Whirlpool.com TABLE OF CONTENTS DRYER SAFETY 1 INSTALLATION REQUIREMENTS 2 Tools and Parts 2 Optional Equipment 3 Location Requirements 3 ELECTRIC DRYER POWER HOOKUP 5 Electrical Requirements 5 Electrical Connection 6 VENTING 11 Venting Requirements 11 Plan Vent System 12 Install Vent System 13 INSTALL LEVELING LEGS 13 CONNECT...
... ONLY Para una versión de estas instrucciones en español, visite www.Whirlpool.com TABLE OF CONTENTS DRYER SAFETY 1 INSTALLATION REQUIREMENTS 2 Tools and Parts 2 Optional Equipment 3 Location Requirements 3 ELECTRIC DRYER POWER HOOKUP 5 Electrical Requirements 5 Electrical Connection 6 VENTING 11 Venting Requirements 11 Plan Vent System 12 Install Vent System 13 INSTALL LEVELING LEGS 13 CONNECT...
Installation Instructions
Page 2
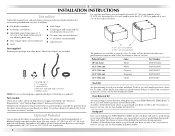
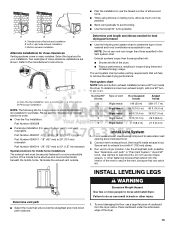
... vent installations) ■ ¼" nut driver (recommended) ■ Tape measure ■ Pliers Parts supplied Non-Steam Models Steam Models A B C D E A. NOTE: Do not use leveling legs supplied with dryer if installing on a pedestal. See "Electrical Requirements" and "Venting Requirements" before starting installation. Parts needed Check local codes. NOTE: Do not use leveling legs supplied with...
... vent installations) ■ ¼" nut driver (recommended) ■ Tape measure ■ Pliers Parts supplied Non-Steam Models Steam Models A B C D E A. NOTE: Do not use leveling legs supplied with dryer if installing on a pedestal. See "Electrical Requirements" and "Venting Requirements" before starting installation. Parts needed Check local codes. NOTE: Do not use leveling legs supplied with...

Installation Instructions
Page 3
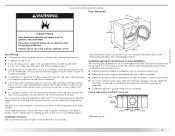
...) D 52 9/16" (1335 mm) Non-Steam (Electric or Gas) 38" (965 mm) 31 1/2" (800 mm) 27" (686 mm) 51 1/2" (1308 mm) NOTE: Most installations require a minimum 5" (127 mm) clearance behind the dryer for your dryer. Venting Dimensions C A* B Back View Steam (Electric or Gas) Non-Steam (Electric or Gas) A* 1" (25 mm) 1" (25 ... the diamond marking on the leveling foot is greater than 1" (25 mm), install Extended Dryer Feet Kit, Part Number 279810. If slope is no longer visible. 3 Do not operate your dryer at least 18" (460 mm) above the floor. This can result in an area where...
...) D 52 9/16" (1335 mm) Non-Steam (Electric or Gas) 38" (965 mm) 31 1/2" (800 mm) 27" (686 mm) 51 1/2" (1308 mm) NOTE: Most installations require a minimum 5" (127 mm) clearance behind the dryer for your dryer. Venting Dimensions C A* B Back View Steam (Electric or Gas) Non-Steam (Electric or Gas) A* 1" (25 mm) 1" (25 ... the diamond marking on the leveling foot is greater than 1" (25 mm), install Extended Dryer Feet Kit, Part Number 279810. If slope is no longer visible. 3 Do not operate your dryer at least 18" (460 mm) above the floor. This can result in an area where...

Installation Instructions
Page 5
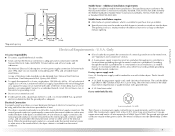
...Part 280) or Standard CAN/CSA-Z240 MH. Recommended installation spacing for recessed or closet installation, with stacked washer and dryer The dimensions shown are for the recommended spacing. 48 in.2 * (310 cm2) 3"* (76 mm) 24 in.2 * (155 cm2) 3"* (76 mm) 1"* (25 mm) A* 1" 27" 1" (25 mm) (686 mm) (25 mm) Steam (Electric...that the electrical connection is adequate and in remodeling after 1996, dryer circuits involved in conformance with a door, minimum ventilation openings in mobile homes to the Manufactured Home Construction and Safety Standard, Title 24 CFR, Part 3280 (...
...Part 280) or Standard CAN/CSA-Z240 MH. Recommended installation spacing for recessed or closet installation, with stacked washer and dryer The dimensions shown are for the recommended spacing. 48 in.2 * (310 cm2) 3"* (76 mm) 24 in.2 * (155 cm2) 3"* (76 mm) 1"* (25 mm) A* 1" 27" 1" (25 mm) (686 mm) (25 mm) Steam (Electric...that the electrical connection is adequate and in remodeling after 1996, dryer circuits involved in conformance with a door, minimum ventilation openings in mobile homes to the Manufactured Home Construction and Safety Standard, Title 24 CFR, Part 3280 (...
Installation Instructions
Page 13
... much room as possible. ■ Bend vent gradually to use the fewest number of close-clearance installations are available for best drying performance ■ Use the following kits for close clearances Venting systems come in many varieties. Terminate the exhaust vent outside. ■ Plan... possible. NOTE: Do not use with dryer vent to wall vent mismatch): Part Number 4396037 - 0" (0 mm) to 18" (457 mm) mismatch Part Number 4396011 - 18" (457 mm) to 29" (737 mm) mismatch Part Number 4396014 - 29" (737 mm) to 50" (1.27 m) mismatch Special provisions for mobile home installations...
... much room as possible. ■ Bend vent gradually to use the fewest number of close-clearance installations are available for best drying performance ■ Use the following kits for close clearances Venting systems come in many varieties. Terminate the exhaust vent outside. ■ Plan... possible. NOTE: Do not use with dryer vent to wall vent mismatch): Part Number 4396037 - 0" (0 mm) to 18" (457 mm) mismatch Part Number 4396011 - 18" (457 mm) to 29" (737 mm) mismatch Part Number 4396014 - 29" (737 mm) to 50" (1.27 m) mismatch Special provisions for mobile home installations...

Installation Instructions
Page 15
...there may be 2 household fuses or circuit breakers for certain part replacement or repair. Replace the fuse or reset the circuit breaker. If the problem continues, call an electrician. Electric dryers require 240-volt power supply. For power supply cord installation,...power failure? If there is closed. Check that both circuit breakers have all parts are on the dryer. 7. Check the dryer's final location. If the dryer will reduce product performance. Wipe the dryer drum interior thoroughly with a qualified electrician. ■ Was a regular fuse...
...there may be 2 household fuses or circuit breakers for certain part replacement or repair. Replace the fuse or reset the circuit breaker. If the problem continues, call an electrician. Electric dryers require 240-volt power supply. For power supply cord installation,...power failure? If there is closed. Check that both circuit breakers have all parts are on the dryer. 7. Check the dryer's final location. If the dryer will reduce product performance. Wipe the dryer drum interior thoroughly with a qualified electrician. ■ Was a regular fuse...


