Owners Manual
Page 4
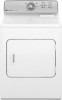
... to follow the "Installation Instructions" supplied with 4" (102 mm) diameter heavy, rigid vent material. The venting system attached to the dryer plays a big role in a vent system; Service calls caused by improper venting are sensed in shrinkage, wrinkling, and static due to efficiently dry laundry. n Use...for final product check. Good Better n Remove lint and debris from the front of who installed the dryer. n Replace plastic or foil vent material with your dryer for the occasional damp load that needs a little more than four 90° elbows in good air flow. ...
... to follow the "Installation Instructions" supplied with 4" (102 mm) diameter heavy, rigid vent material. The venting system attached to the dryer plays a big role in a vent system; Service calls caused by improper venting are sensed in shrinkage, wrinkling, and static due to efficiently dry laundry. n Use...for final product check. Good Better n Remove lint and debris from the front of who installed the dryer. n Replace plastic or foil vent material with your dryer for the occasional damp load that needs a little more than four 90° elbows in good air flow. ...
Owners Manual
Page 9
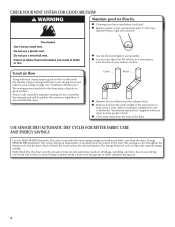
... lint is in front of clothes. NOTE: Garments that would block the air flow for your clothes, or cause the dryer to your fingers. 2. See "Venting Requirements." Rinse screen with your dryer and will not stain future loads of the dryer. These stains are not harmful to stop before your fingers... is located in dryer. 9 Do not rinse or wash screen to avoid drum staining. Wipe drum thoroughly with the brush to remove. From the Exhaust Vent Lint should be removed every 2 years, or more often, depending on the lint screen.
... lint is in front of clothes. NOTE: Garments that would block the air flow for your clothes, or cause the dryer to your fingers. 2. See "Venting Requirements." Rinse screen with your dryer and will not stain future loads of the dryer. These stains are not harmful to stop before your fingers... is located in dryer. 9 Do not rinse or wash screen to avoid drum staining. Wipe drum thoroughly with the brush to remove. From the Exhaust Vent Lint should be removed every 2 years, or more often, depending on the lint screen.
Owners Manual
Page 11
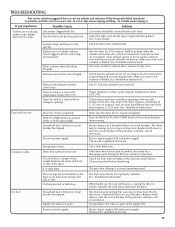
...sounds Dryer had a period of fuse. Household fuse is closed completely. Incorrect power supply. For gas dryers, the valve is open . Exhaust vent or outside exhaust hood to dry quickly. See "Installation Instructions". Dryer located in a closet without adequate opening. The front of the dryer requires ... balled up , the load will bounce, causing the dryer to vibrate. Check with temperature below 45ºF (7ºC). In Canada www.maytag.ca If you may not have heat. If the dryer hasn't been used for awhile, there may vibrate if not properly installed. The...
...sounds Dryer had a period of fuse. Household fuse is closed completely. Incorrect power supply. For gas dryers, the valve is open . Exhaust vent or outside exhaust hood to dry quickly. See "Installation Instructions". Dryer located in a closet without adequate opening. The front of the dryer requires ... balled up , the load will bounce, causing the dryer to vibrate. Check with temperature below 45ºF (7ºC). In Canada www.maytag.ca If you may not have heat. If the dryer hasn't been used for awhile, there may vibrate if not properly installed. The...

Installation Instructions
Page 2
... you what the potential hazard is the safety alert symbol. Tools needed: Flat-blade screwdriver 2 #2 Phillips screwdriver Wire stripper (direct wire installations) Tin snips (new vent installations)
... you what the potential hazard is the safety alert symbol. Tools needed: Flat-blade screwdriver 2 #2 Phillips screwdriver Wire stripper (direct wire installations) Tin snips (new vent installations)
Installation Instructions
Page 3
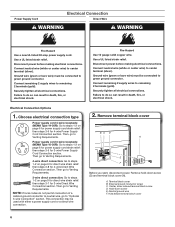
... for use with clothes dryers. For further information, please reference the "Assistance or Service" section of 200 lbs. (90.7 kg). See "Venting Requirements." ■■ A separate 30 amp circuit. ■■ If you purchased your dryer. See "Electrical Requirements." ■■ ...sturdy floor to support the total weight (dryer and load) of the Dryer User Instructions. Check code requirements. 1/4" nut driver (recommended) Vent clamps Adjustable wrench that opens to 1" (25 mm) or hex-head socket wrench Utility knife If using power supply cord, a grounded electrical...
... for use with clothes dryers. For further information, please reference the "Assistance or Service" section of 200 lbs. (90.7 kg). See "Venting Requirements." ■■ A separate 30 amp circuit. ■■ If you purchased your dryer. See "Electrical Requirements." ■■ ...sturdy floor to support the total weight (dryer and load) of the Dryer User Instructions. Check code requirements. 1/4" nut driver (recommended) Vent clamps Adjustable wrench that opens to 1" (25 mm) or hex-head socket wrench Utility knife If using power supply cord, a grounded electrical...
Installation Instructions
Page 4
... should be obtained from the neutral conductor. ■■ A 4-wire power supply connection must be considered. Recessed area B. See "Venting Requirements." Connect to the neutral wire, see "Optional 3-wire connection" section. ■■ This dryer is your dealer. ■... C. Large opening . Do not have a fuse in a location where grounding through the neutral conductors. 4 Louvered doors with vents *Additional spacing recommended 3"* (76 mm) Electrical Requirements It is manufactured ready to the neutral conductor (white wire) within the dryer...
... should be obtained from the neutral conductor. ■■ A 4-wire power supply connection must be considered. Recessed area B. See "Venting Requirements." Connect to the neutral wire, see "Optional 3-wire connection" section. ■■ This dryer is your dealer. ■... C. Large opening . Do not have a fuse in a location where grounding through the neutral conductors. 4 Louvered doors with vents *Additional spacing recommended 3"* (76 mm) Electrical Requirements It is manufactured ready to the neutral conductor (white wire) within the dryer...
Installation Instructions
Page 5
... least 4 ft. (1.22 m) long. Slide the dryer until diamond marking is close to move and install dryer. The wires that connect to connect the exhaust vent. 5 Leave enough room for electrical connection and to the dryer must match power supply (4-wire or 3-wire) and be insulated. ■■ 10-gauge solid...
... least 4 ft. (1.22 m) long. Slide the dryer until diamond marking is close to move and install dryer. The wires that connect to connect the exhaust vent. 5 Leave enough room for electrical connection and to the dryer must match power supply (4-wire or 3-wire) and be insulated. ■■ 10-gauge solid...
Installation Instructions
Page 6
... Use a UL listed strain relief. NOTE: If local codes do not permit connection of a cabinet-ground conductor to neutral wire, go to Venting Requirements. Neutral ground wire F. Connect remaining 2 supply wires to remaining 2 terminals (gold). Connect neutral wire (white or center wire) to ...center terminal (silver). Then go to Venting Requirements. This connection may be connected to steps 1-2 on page 9 for direct wire strain relief: then steps 3-8 for 4-wire Power Supply...
... Use a UL listed strain relief. NOTE: If local codes do not permit connection of a cabinet-ground conductor to neutral wire, go to Venting Requirements. Neutral ground wire F. Connect remaining 2 supply wires to remaining 2 terminals (gold). Connect neutral wire (white or center wire) to ...center terminal (silver). Then go to Venting Requirements. This connection may be connected to steps 1-2 on page 9 for direct wire strain relief: then steps 3-8 for 4-wire Power Supply...

Installation Instructions
Page 8
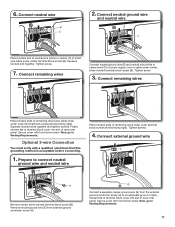
... block cover into slot of dryer rear panel. 5. Ring terminals G. Connect neutral wire BC Connect neutral wire (white or center) (C) of power supply cord to Venting Requirements. 8 Tighten screws. B D E A C GF A. 3-wire receptacle (NEMA type 10-30R) B. 3-wire plug C. Spade terminals with hold -down screw. Connect... to center, silver-colored terminal block screw (B). Connect ground wire A F Connect ground wire (F) (green or bare) of power supply cord to Venting Requirements. Remove center screw B Connect remaining wires to outer terminal block screws. Tighten screws.
... block cover into slot of dryer rear panel. 5. Ring terminals G. Connect neutral wire BC Connect neutral wire (white or center) (C) of power supply cord to Venting Requirements. 8 Tighten screws. B D E A C GF A. 3-wire receptacle (NEMA type 10-30R) B. 3-wire plug C. Spade terminals with hold -down screw. Connect... to center, silver-colored terminal block screw (B). Connect ground wire A F Connect ground wire (F) (green or bare) of power supply cord to Venting Requirements. Remove center screw B Connect remaining wires to outer terminal block screws. Tighten screws.
Installation Instructions
Page 10
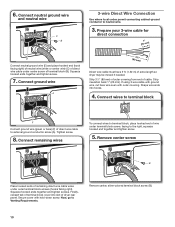
... tab of terminal block (B). Connect neutral ground wire and neutral wire C B 3-wire Direct Wire Connection Use where local codes permit connecting cabinet-ground conductor to Venting Requirements. Now, go to neutral wire. 3. 6. Prepare your 3-wire cable for direct connection (251"mm) E Connect neutral ground wire (E) and place hooked end (hook facing...
... tab of terminal block (B). Connect neutral ground wire and neutral wire C B 3-wire Direct Wire Connection Use where local codes permit connecting cabinet-ground conductor to Venting Requirements. Now, go to neutral wire. 3. 6. Prepare your 3-wire cable for direct connection (251"mm) E Connect neutral ground wire (E) and place hooked end (hook facing...
Installation Instructions
Page 11
...Squeeze hooked end together. Squeeze hooked ends together and tighten screws. Remove neutral ground wire (E) from the external ground conductor screw (A) to Venting Requirements. 11 Connect remaining wires E Connect neutral ground wire (E) and neutral wire (white or center wire) (C) of dryer rear panel.... of terminal block cover into slot of power supply cord or cable under outer terminal block screws (hooks facing right). Prepare to Venting Requirements. Connect neutral ground wire and neutral wire B C Place hooked end of neutral wire (white or center) (C) of remaining...
...Squeeze hooked end together. Squeeze hooked ends together and tighten screws. Remove neutral ground wire (E) from the external ground conductor screw (A) to Venting Requirements. 11 Connect remaining wires E Connect neutral ground wire (E) and neutral wire (white or center wire) (C) of dryer rear panel.... of terminal block cover into slot of power supply cord or cable under outer terminal block screws (hooks facing right). Prepare to Venting Requirements. Connect neutral ground wire and neutral wire B C Place hooked end of neutral wire (white or center) (C) of remaining...

Installation Instructions
Page 12
... rocks, bushes, or snow). Box hood 2½" (64 mm) Acceptable styles: C. NOTE: If using an existing vent system, clean lint from ground or any gas vent, chimney, wall, ceiling, attic, crawlspace, or a concealed space of duct and catch lint. Good Better Clamps: ■... length of fire, this dryer MUST BE EXHAUSTED OUTDOORS. B 4" C A (102 mm) Fire Hazard use a metal foil vent. Louvered hood B. Venting Requirements WARNING VENTING Exhaust hoods: ■■ Must be fully extended and supported in final dryer location. ■■ Remove excess to avoid sagging...
... rocks, bushes, or snow). Box hood 2½" (64 mm) Acceptable styles: C. NOTE: If using an existing vent system, clean lint from ground or any gas vent, chimney, wall, ceiling, attic, crawlspace, or a concealed space of duct and catch lint. Good Better Clamps: ■... length of fire, this dryer MUST BE EXHAUSTED OUTDOORS. B 4" C A (102 mm) Fire Hazard use a metal foil vent. Louvered hood B. Venting Requirements WARNING VENTING Exhaust hoods: ■■ Must be fully extended and supported in final dryer location. ■■ Remove excess to avoid sagging...

Installation Instructions
Page 13
... 4392892 In-Wall metal DuraVent™ Periscope 4396028 Sure Connect™ venting kit (over-the-top installation) 4396009RP 5' Universal connect vent, flexible dryer venting 4396010RP 6' SecureConnect™ vent, flexible dryer venting 4396013RB Dryer vent installer's kit 4396033RP 5' flexible dryer venting with clamps 4396727RP 8' flexible dryer venting with one offset elbow) Periscope installation NOTE: The following kits for close...
... 4392892 In-Wall metal DuraVent™ Periscope 4396028 Sure Connect™ venting kit (over-the-top installation) 4396009RP 5' Universal connect vent, flexible dryer venting 4396010RP 6' SecureConnect™ vent, flexible dryer venting 4396013RB Dryer vent installer's kit 4396033RP 5' flexible dryer venting with clamps 4396727RP 8' flexible dryer venting with one offset elbow) Periscope installation NOTE: The following kits for close...

Installation Instructions
Page 14
... 44 ft. (13.4 m) 38 ft. (11.6 m) 3 Rigid metal 35 ft. (10.7 m) 29 ft. (8.8 m) 4 Rigid metal 27 ft. (8.2 m) 21 ft. (6.4 m) Vent must not terminate beneath the mobile home. Do not use caulking compound to seal exterior wall opening around exhaust hood. 2. Install exhaust hood 12" min....6 m) 1 Rigid metal 110 ft. (33.5 m) 2 Rigid metal 100 ft. (30.5 m) 3 Rigid metal 90 ft. (27.4 m) Determine vent path: ■■ Select route that will provide straightest and most direct path outdoors. ■■ Plan installation to use . Special provisions for best drying...
... 44 ft. (13.4 m) 38 ft. (11.6 m) 3 Rigid metal 35 ft. (10.7 m) 29 ft. (8.8 m) 4 Rigid metal 27 ft. (8.2 m) 21 ft. (6.4 m) Vent must not terminate beneath the mobile home. Do not use caulking compound to seal exterior wall opening around exhaust hood. 2. Install exhaust hood 12" min....6 m) 1 Rigid metal 110 ft. (33.5 m) 2 Rigid metal 100 ft. (30.5 m) 3 Rigid metal 90 ft. (27.4 m) Determine vent path: ■■ Select route that will provide straightest and most direct path outdoors. ■■ Plan installation to use . Special provisions for best drying...

Installation Instructions
Page 15
... has been pushed firmly. ■■ Dryer is plugged into an outlet. Tighten and adjust leveling legs Using a 4" (102 mm) clamp, connect vent to see what was skipped. Move dryer to final location Move dryer to remove any tape remaining on a full heat cycle (not an air cycle...and check again for 20 minutes and start , check the following: ■■ Controls are now installed. q Check dryer's final location. Be sure vent is a registered trademark of your Use and Care Guide. See "Level Dryer". If the dryer will not start the dryer. Dupont De Nemours and Company...
... has been pushed firmly. ■■ Dryer is plugged into an outlet. Tighten and adjust leveling legs Using a 4" (102 mm) clamp, connect vent to see what was skipped. Move dryer to final location Move dryer to remove any tape remaining on a full heat cycle (not an air cycle...and check again for 20 minutes and start , check the following: ■■ Controls are now installed. q Check dryer's final location. Be sure vent is a registered trademark of your Use and Care Guide. See "Level Dryer". If the dryer will not start the dryer. Dupont De Nemours and Company...
Installation Instructions
Page 1
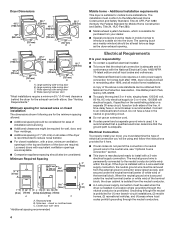
...176; turn inside the dryer. Plan the installation to change without notice. Use the fewest 90° turns possible. Closet door with vents 3"* (76 mm) For closet installation, with equivalent air ventilation openings are recommended. Most installations require a minimum 5½" (140 ... the top and bottom of elbows and turns. Hood styles: A & B are acceptable. Wide opening side-swing door C. Exhaust venting: Exhaust your dryer to change materials and specifications without notice. Select the route that will help achieve best drying performance. Louvered doors...
...176; turn inside the dryer. Plan the installation to change without notice. Use the fewest 90° turns possible. Closet door with vents 3"* (76 mm) For closet installation, with equivalent air ventilation openings are recommended. Most installations require a minimum 5½" (140 ... the top and bottom of elbows and turns. Hood styles: A & B are acceptable. Wide opening side-swing door C. Exhaust venting: Exhaust your dryer to change materials and specifications without notice. Select the route that will help achieve best drying performance. Louvered doors...


