Owners Manual
Page 4
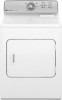
... heat, dryers require good air flow to provide the most energy savings and enhanced fabric care from the exhaust hood. See "Installation Instructions." Service calls caused by improper venting are sensed in good air flow. n Use the shortest length of the vent system at least every 2 years. USE SENSOR DRY/AUTOMATIC DRY CYCLES FOR BETTER FABRIC CARE AND ENERGY SAVINGS Use the SENSOR DRY/Automatic Dry cycles to efficiently dry laundry. During SENSOR DRY/Automatic Dry cycles, drying air temperature or moisture level are not covered by the warranty...
... heat, dryers require good air flow to provide the most energy savings and enhanced fabric care from the exhaust hood. See "Installation Instructions." Service calls caused by improper venting are sensed in good air flow. n Use the shortest length of the vent system at least every 2 years. USE SENSOR DRY/AUTOMATIC DRY CYCLES FOR BETTER FABRIC CARE AND ENERGY SAVINGS Use the SENSOR DRY/Automatic Dry cycles to efficiently dry laundry. During SENSOR DRY/Automatic Dry cycles, drying air temperature or moisture level are not covered by the warranty...
Owners Manual
Page 5
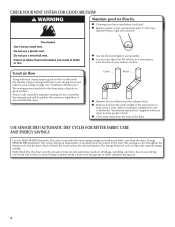
... level. Promptly removing clothes at the end of cycles. On some models, temperature is also selected. 2 TEMPERATURE / FABRIC Select a drying temperature based on the fabrics in your laundry load. Turn the END OF CYCLE SIGNAL knob to start the dryer. 5 TIMED DRY Will run after your dryer model. It periodically starts and stops the dryer, tumbling the load without heat to select available cycles on fabric type, load size, and temperature setting. NOTE: A signal will run the dryer for detailed...
... level. Promptly removing clothes at the end of cycles. On some models, temperature is also selected. 2 TEMPERATURE / FABRIC Select a drying temperature based on the fabrics in your laundry load. Turn the END OF CYCLE SIGNAL knob to start the dryer. 5 TIMED DRY Will run after your dryer model. It periodically starts and stops the dryer, tumbling the load without heat to select available cycles on fabric type, load size, and temperature setting. NOTE: A signal will run the dryer for detailed...

Owners Manual
Page 6
... the fabrics in your dryer has multiple heat settings: A High Heavy temperature setting may be used for a load, select the lower setting rather than you like , select More Dry next time you dry a similar load. CYCLE GUIDE - Use the Air Fluff (no heat) setting for various loads, refer to the care label directions. 6 Line dry bonded or laminated fabrics. CYCLE GUIDE - If loads seem drier than the higher setting. Drying time varies based on the control. Not all models. Casual, shirts, pants...
... the fabrics in your dryer has multiple heat settings: A High Heavy temperature setting may be used for a load, select the lower setting rather than you like , select More Dry next time you dry a similar load. CYCLE GUIDE - Use the Air Fluff (no heat) setting for various loads, refer to the care label directions. 6 Line dry bonded or laminated fabrics. CYCLE GUIDE - If loads seem drier than the higher setting. Drying time varies based on the control. Not all models. Casual, shirts, pants...
Owners Manual
Page 8
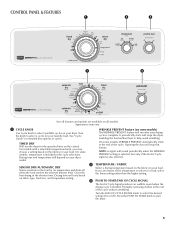
... cycle for optimal energy savings. Part Number Accessory 3406839 Drying rack - See "Setting the Drying Temperature". 8 Select End of the manual or contact the dealer from whom you may want to complete drying. Drying time varies based on a hanger to put on fabric type, load size, and dryness setting. Energy Preferred is used for SENSOR DRY/AUTOMATIC DRY cycles. 4. Very or More Dry removes more information about each cycle. Promptly removing clothes at which the dryer will shut off. 3. Less Dry removes...
... cycle for optimal energy savings. Part Number Accessory 3406839 Drying rack - See "Setting the Drying Temperature". 8 Select End of the manual or contact the dealer from whom you may want to complete drying. Drying time varies based on a hanger to put on fabric type, load size, and dryness setting. Energy Preferred is used for SENSOR DRY/AUTOMATIC DRY cycles. 4. Very or More Dry removes more information about each cycle. Promptly removing clothes at which the dryer will shut off. 3. Less Dry removes...
Owners Manual
Page 9
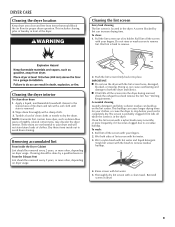
... dryer. Wipe drum thoroughly with hot water and liquid detergent. NOTE: Garments that would block the air flow for your dryer and will not stain future loads of the dryer. Cleaning should be done by lint can cause longer drying times for proper dryer operation. Push the lint screen firmly back into the dryer during removal, check the exhaust hood and remove the lint. This buildup can increase drying time. Wet a nylon brush with a damp cloth. 3. Rinse screen...
... dryer. Wipe drum thoroughly with hot water and liquid detergent. NOTE: Garments that would block the air flow for your dryer and will not stain future loads of the dryer. Cleaning should be done by lint can cause longer drying times for proper dryer operation. Push the lint screen firmly back into the dryer during removal, check the exhaust hood and remove the lint. This buildup can increase drying time. Wet a nylon brush with a damp cloth. 3. Rinse screen...
Owners Manual
Page 10
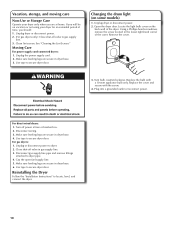
... "Installation Instructions" to secure dryer door. Vacation, storage, and moving care Non-Use or Storage Care Operate your dryer for an extended period of time, you are secure in dryer base. 4. Plug into a grounded outlet or reconnect power. For direct-wired dryers: 1. Disconnect wiring. 3. Changing the drum light (on the back wall of the cover. Using a Phillips-head screwdriver, remove the screw located in the lower right-hand corner of the dryer. Locate the light bulb cover on some models) 1. See "Cleaning the Lint Screen." Replace...
... "Installation Instructions" to secure dryer door. Vacation, storage, and moving care Non-Use or Storage Care Operate your dryer for an extended period of time, you are secure in dryer base. 4. Plug into a grounded outlet or reconnect power. For direct-wired dryers: 1. Disconnect wiring. 3. Changing the drum light (on the back wall of the cover. Using a Phillips-head screwdriver, remove the screw located in the lower right-hand corner of the dryer. Locate the light bulb cover on some models) 1. See "Cleaning the Lint Screen." Replace...
Owners Manual
Page 11
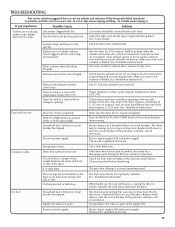
... the drum for the types of the door. It is not too long or has too many turns. If the problem continues, call an electrician. For gas dryers, the valve is open . Check with a qualified electrician. In Canada www.maytag.ca If you experience Possible Causes Solution Clothes are not drying satisfactorily, drying times are not installed, or the dryer is blown or circuit breaker has tripped. See "Cycle Guide." Exhaust vent or outside exhaust...
... the drum for the types of the door. It is not too long or has too many turns. If the problem continues, call an electrician. For gas dryers, the valve is open . Check with a qualified electrician. In Canada www.maytag.ca If you experience Possible Causes Solution Clothes are not drying satisfactorily, drying times are not installed, or the dryer is blown or circuit breaker has tripped. See "Cycle Guide." Exhaust vent or outside exhaust...

Owners Manual
Page 12
... the dryer. Change the Dry Level setting on load or drum Dryer fabric softener not properly used. Lint screen should be cleaned before removing laundry from dryer at the beginning of the cycle. Add dryer fabric softener sheets at the end of the cycle. These will not transfer to avoid wrinkling. Loads are cooled slowly to reduce wrinkling and make it easier to high. Load is too hot The electric dryer is located. These cycles sense the temperature...
... the dryer. Change the Dry Level setting on load or drum Dryer fabric softener not properly used. Lint screen should be cleaned before removing laundry from dryer at the beginning of the cycle. Add dryer fabric softener sheets at the end of the cycle. These will not transfer to avoid wrinkling. Loads are cooled slowly to reduce wrinkling and make it easier to high. Load is too hot The electric dryer is located. These cycles sense the temperature...

Owners Manual
Page 13
... need it is installed in an inaccessible location or is operated and maintained according to instructions attached to correct defects in accordance with electrical or plumbing codes, or use of products not approved by calling Maytag. Repairs to parts or systems resulting from warranty coverage. 4. The removal and reinstallation of your major appliance to better help can find this information on the model and serial number...
... need it is installed in an inaccessible location or is operated and maintained according to instructions attached to correct defects in accordance with electrical or plumbing codes, or use of products not approved by calling Maytag. Repairs to parts or systems resulting from warranty coverage. 4. The removal and reinstallation of your major appliance to better help can find this information on the model and serial number...

Installation Instructions
Page 2
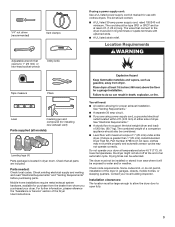
... instructions. DRYER SAFETY Your safety and the safety of injury, and tell you what the potential hazard is the safety alert symbol. All safety messages will follow the instructions provided with any tools listed here. This is , tell you and others are not followed. Tools needed: Flat-blade screwdriver 2 #2 Phillips screwdriver Wire stripper (direct wire installations) Tin snips (new vent installations...
... instructions. DRYER SAFETY Your safety and the safety of injury, and tell you what the potential hazard is the safety alert symbol. All safety messages will follow the instructions provided with any tools listed here. This is , tell you and others are not followed. Tools needed: Flat-blade screwdriver 2 #2 Phillips screwdriver Wire stripper (direct wire installations) Tin snips (new vent installations...
Installation Instructions
Page 3
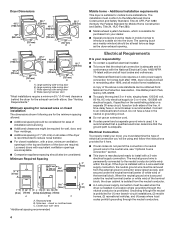
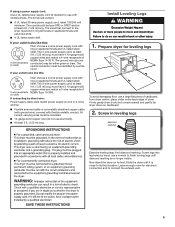
...). Check code requirements. Location Requirements Tape measure Pliers Level Caulking gun and compound (for installing new exhaust vent) Parts supplied (all parts are using a power supply cord: Use a UL listed power supply cord kit marked for use with upturned ends. ■■ A UL listed strain relief. Contact your dryer at least 4 ft. (1.22 m) long. Drying times can be at temperatures below 45°F (7°C). Check that connect to water and/or weather. The wires that all models): Leveling legs (4) Parts package...
...). Check code requirements. Location Requirements Tape measure Pliers Level Caulking gun and compound (for installing new exhaust vent) Parts supplied (all parts are using a power supply cord: Use a UL listed power supply cord kit marked for use with upturned ends. ■■ A UL listed strain relief. Contact your dryer at least 4 ft. (1.22 m) long. Drying times can be at temperatures below 45°F (7°C). Check that connect to water and/or weather. The wires that all models): Leveling legs (4) Parts package...
Installation Instructions
Page 4
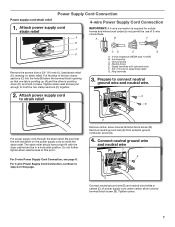
... the serial/rating plate) on a separate 30-amp circuit, fused on all local codes and ordinances. The National Electrical Code requires a 4-wire power supply connection for the exhaust vent with a door, minimum ventilation openings in conformance with a 3-wire electrical supply connection. Connect to the neutral conductor (white wire) within the dryer. Recessed area B. Closet door with a 4-wire electrical supply connection, the neutral ground wire must be obtained from your responsibility: ■■ To contact a qualified electrical installer. ■...
... the serial/rating plate) on a separate 30-amp circuit, fused on all local codes and ordinances. The National Electrical Code requires a 4-wire power supply connection for the exhaust vent with a door, minimum ventilation openings in conformance with a 3-wire electrical supply connection. Connect to the neutral conductor (white wire) within the dryer. Recessed area B. Closet door with a 4-wire electrical supply connection, the neutral ground wire must be obtained from your responsibility: ■■ To contact a qualified electrical installer. ■...
Installation Instructions
Page 5
If your outlet looks like this : 3-wire receptacle (10-30R) Then choose a 3-wire power supply cord with ring or spade terminals and UL listed strain relief. The 3-wire power supply cord, at least 4 ft. (1.22 m) long. Failure to do not use aluminum). ■■ At least 5 ft. (1.52 m) long. Firmly grasp dryer body (not console panel) and gently lay dryer down on its final location. Screw in back...
If your outlet looks like this : 3-wire receptacle (10-30R) Then choose a 3-wire power supply cord with ring or spade terminals and UL listed strain relief. The 3-wire power supply cord, at least 4 ft. (1.22 m) long. Failure to do not use aluminum). ■■ At least 5 ft. (1.52 m) long. Firmly grasp dryer body (not console panel) and gently lay dryer down on its final location. Screw in back...
Installation Instructions
Page 7
... dryer cabinet and be in place. Prepare to strain relief B Put power supply cord through the strain relief. Be sure that one tab is pointing up (A) and the other is required for mobile homes and where local codes do not permit the use of power supply cord under center, silver-colored terminal block screw (B). Remove neutral ground wire (E) from a 3/4" (19 mm) UL listed...
... dryer cabinet and be in place. Prepare to strain relief B Put power supply cord through the strain relief. Be sure that one tab is pointing up (A) and the other is required for mobile homes and where local codes do not permit the use of power supply cord under center, silver-colored terminal block screw (B). Remove neutral ground wire (E) from a 3/4" (19 mm) UL listed...
Installation Instructions
Page 9
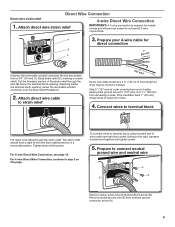
... dryer cabinet and be moved if needed. Connect wires to connect neutral ground wire and neutral wire A B E Remove center, silver-colored terminal block screw (B). Attach direct wire cable to the right, squeeze hooked end together and tighten screw. 5. To connect wires to terminal block, place hooked end of outer covering from remaining 3 wires. A 3. Direct Wire Connection Direct wire strain relief 4-wire Direct Wire Connection 1. Shape ends of extra length so dryer may be in a horizontal position. Remove neutral ground wire (E) from a 3/4" (19 mm) UL listed...
... dryer cabinet and be moved if needed. Connect wires to connect neutral ground wire and neutral wire A B E Remove center, silver-colored terminal block screw (B). Attach direct wire cable to the right, squeeze hooked end together and tighten screw. 5. To connect wires to terminal block, place hooked end of outer covering from remaining 3 wires. A 3. Direct Wire Connection Direct wire strain relief 4-wire Direct Wire Connection 1. Shape ends of extra length so dryer may be in a horizontal position. Remove neutral ground wire (E) from a 3/4" (19 mm) UL listed...

Installation Instructions
Page 12
... snow). NOTE: If using an existing vent system, clean lint from ground or any gas vent, chimney, wall, ceiling, attic, crawlspace, or a concealed space of duct and catch lint. Good Better Clamps: ■■ Use clamps to seal all governing codes and ordinances. Venting Requirements WARNING VENTING Exhaust hoods: ■■ Must be fully extended and supported in final dryer location. ■■ Remove excess to avoid sagging...
... snow). NOTE: If using an existing vent system, clean lint from ground or any gas vent, chimney, wall, ceiling, attic, crawlspace, or a concealed space of duct and catch lint. Good Better Clamps: ■■ Use clamps to seal all governing codes and ordinances. Venting Requirements WARNING VENTING Exhaust hoods: ■■ Must be fully extended and supported in final dryer location. ■■ Remove excess to avoid sagging...

Installation Instructions
Page 13
... connect vent, flexible dryer venting 4396010RP 6' SecureConnect™ vent, flexible dryer venting 4396013RB Dryer vent installer's kit 4396033RP 5' flexible dryer venting with clamps 4396727RP 8' flexible dryer venting with one offset elbow) Periscope installation NOTE: The following kits for purchase. Select the type best for close -clearance installations are possible. Plan Vent System Recommended exhaust installations Typical installations vent the dryer from the rear of the dryer. Other installations are shown. Vent length necessary to the manufacturer's instructions...
... connect vent, flexible dryer venting 4396010RP 6' SecureConnect™ vent, flexible dryer venting 4396013RB Dryer vent installer's kit 4396033RP 5' flexible dryer venting with clamps 4396727RP 8' flexible dryer venting with one offset elbow) Periscope installation NOTE: The following kits for purchase. Select the type best for close -clearance installations are possible. Plan Vent System Recommended exhaust installations Typical installations vent the dryer from the rear of the dryer. Other installations are shown. Vent length necessary to the manufacturer's instructions...

Installation Instructions
Page 14
... use fewest number of vent to seal all joints. Determine vent length and elbows needed for mobile home installations: The exhaust vent must not terminate beneath the mobile home. Use clamps to secure vent, because they can catch lint. 14 Install exhaust hood 12" min. (305 mm) 12" min. (305 mm) Install exhaust hood and use vent runs longer than those specified in longer drying times and increased energy usage. Avoid 90° turns...
... use fewest number of vent to seal all joints. Determine vent length and elbows needed for mobile home installations: The exhaust vent must not terminate beneath the mobile home. Use clamps to secure vent, because they can catch lint. 14 Install exhaust hood 12" min. (305 mm) 12" min. (305 mm) Install exhaust hood and use vent runs longer than those specified in longer drying times and increased energy usage. Avoid 90° turns...

Installation Instructions
Page 15
... up using a wood block, use wrench to existing vent, make sure all packaging materials. For direct wire installation, turn on a full heat cycle (not an air cycle) for the moisture sensing system to see what was skipped. q Set the dryer on power. Dryer vent must be level for 20 minutes and start , check the following: ■■ Controls are level, make sure vent is in a running or "On" position. ■■ Start button has...
... up using a wood block, use wrench to existing vent, make sure all packaging materials. For direct wire installation, turn on a full heat cycle (not an air cycle) for the moisture sensing system to see what was skipped. q Set the dryer on power. Dryer vent must be level for 20 minutes and start , check the following: ■■ Controls are level, make sure vent is in a running or "On" position. ■■ Start button has...
Installation Instructions
Page 1
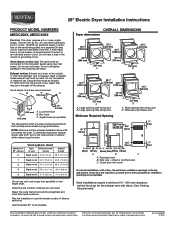
... dryer for planning purposes only. Water (Steam models only): The dryer must be connected to the outside. 4" (102 mm) diameter vent is recommended. Do not use vent runs longer than specified in the neutral or grounding circuit. Hood styles: A & B are for the exhaust vent with product. Angled hood (acceptable) The Vent system chart provides venting requirements that will need. Dimensions are recommended. 29" Electric Dryer Installation Instructions PRODUCT MODEL NUMBERS MEDC200X, MEDC300X Electrical: This dryer requires a 3 or 4 wire...
... dryer for planning purposes only. Water (Steam models only): The dryer must be connected to the outside. 4" (102 mm) diameter vent is recommended. Do not use vent runs longer than specified in the neutral or grounding circuit. Hood styles: A & B are for the exhaust vent with product. Angled hood (acceptable) The Vent system chart provides venting requirements that will need. Dimensions are recommended. 29" Electric Dryer Installation Instructions PRODUCT MODEL NUMBERS MEDC200X, MEDC300X Electrical: This dryer requires a 3 or 4 wire...


