
Use and Care Manual
Page 4
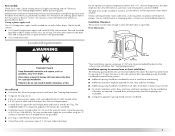
...and adjacent surrounding areas free from dryer drum. Check that all instructions before starting installation. Short inlet hose D. Rubber washer 4 IMPORTANT SAFETY INSTRUCTIONS WARNING: To reduce the risk of fire, electric shock, or injury to persons when using the dryer. ■ Do not place ...items exposed to cooking oils in your dryer. Items contaminated with cooking oils may ...
...and adjacent surrounding areas free from dryer drum. Check that all instructions before starting installation. Short inlet hose D. Rubber washer 4 IMPORTANT SAFETY INSTRUCTIONS WARNING: To reduce the risk of fire, electric shock, or injury to persons when using the dryer. ■ Do not place ...items exposed to cooking oils in your dryer. Items contaminated with cooking oils may ...
Use and Care Manual
Page 5
... not be exposed to open fully. Check code requirements. Contact your dryer. The kit should be large enough to allow the dryer door to water and/or weather. Location Requirements Do not operate your washer using a power supply cord: Use a UL listed power supply cord kit marked for use the...You may also contact the dealer from whom you are using a power supply cord, a grounded electrical outlet located within 4 ft (1.2 m) of the water fill valves, and water pressure of 20-100 psi (138-690 kPa). This dryer has been tested for spacing of 0" (0 mm) clearance on all sides of the...
... not be exposed to open fully. Check code requirements. Contact your dryer. The kit should be large enough to allow the dryer door to water and/or weather. Location Requirements Do not operate your washer using a power supply cord: Use a UL listed power supply cord kit marked for use the...You may also contact the dealer from whom you are using a power supply cord, a grounded electrical outlet located within 4 ft (1.2 m) of the water fill valves, and water pressure of 20-100 psi (138-690 kPa). This dryer has been tested for spacing of 0" (0 mm) clearance on all sides of the...

Use and Care Manual
Page 19
.... 4. Check that there are on connector. Attach angled end of long hose to other end of dryer back panel. Using pliers, tighten the coupling with an additional two-thirds turn . Attach washer cold inlet hose to fill valve at bottom of "Y" connector. Leave enough room to cold water faucet... its final location. Once the exhaust vent connection is seated on connector. 6. Do not use old hoses. 1. Remove old rubber washer from dryer packaging under each of small hose. If "Y" connector cannot be attached directly to exhaust outlet in the flexible gas line. 4. Continue with ...
.... 4. Check that there are on connector. Attach angled end of long hose to other end of dryer back panel. Using pliers, tighten the coupling with an additional two-thirds turn . Attach washer cold inlet hose to fill valve at bottom of "Y" connector. Leave enough room to cold water faucet... its final location. Once the exhaust vent connection is seated on connector. 6. Do not use old hoses. 1. Remove old rubber washer from dryer packaging under each of small hose. If "Y" connector cannot be attached directly to exhaust outlet in the flexible gas line. 4. Continue with ...
Use and Care Manual
Page 23
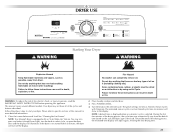
... (in minutes) will show in dryer and shut door. 3. Fire Hazard No washer can result in death, explosion, or fire. WARNING: To reduce the risk of fire, electric shock, or injury to start your dryer. Please refer to select cycle, or open the dryer door and the display will adjust ... Timed or Steam Cycles will turn the knob to specific sections of this appliance. NOTE: A default time is displayed when an automatic cycle is not started within 5 minutes, the dryer will illuminate. Follow these instructions can result in death or fire. NOTE: Your Maytag® dryer is equipped with...
... (in minutes) will show in dryer and shut door. 3. Fire Hazard No washer can result in death, explosion, or fire. WARNING: To reduce the risk of fire, electric shock, or injury to start your dryer. Please refer to select cycle, or open the dryer door and the display will adjust ... Timed or Steam Cycles will turn the knob to specific sections of this appliance. NOTE: A default time is displayed when an automatic cycle is not started within 5 minutes, the dryer will illuminate. Follow these instructions can result in death or fire. NOTE: Your Maytag® dryer is equipped with...


