
Use and Care Manual
Page 4
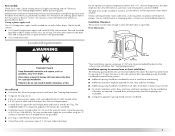
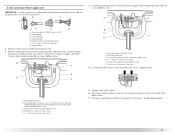
... dryer. Check that all instructions before starting installation. Parts supplied: Remove parts package from the accumulation of lint, dust, and dirt. ■ The interior of the dryer and exhaust vent should be exposed to the weather. ■ Do not tamper with controls. ■ Do not repair or replace any part of the dryer or attempt any tools listed here. Items contaminated with any servicing unless specifically recommended in this Use and Care Guide...
... dryer. Check that all instructions before starting installation. Parts supplied: Remove parts package from the accumulation of lint, dust, and dirt. ■ The interior of the dryer and exhaust vent should be exposed to the weather. ■ Do not tamper with controls. ■ Do not repair or replace any part of the dryer or attempt any tools listed here. Items contaminated with any servicing unless specifically recommended in this Use and Care Guide...
Use and Care Manual
Page 5
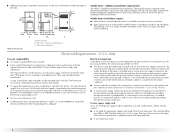
... washer using the "Y" connector and short hose (if needed : Check local codes. Parts needed ) which are using a power supply cord: Use a UL listed power supply cord kit marked for spacing of 200 lbs (90.7 kg). Check existing electrical supply and venting and see "Electrical Requirements" and "Venting Requirements" before purchasing parts. For information on the sides and rear. You may use with upturned ends. ■ A UL listed strain relief. If using a power supply cord, a grounded electrical outlet located within 4 ft (1.2 m) of the water fill valves, and water...
... washer using the "Y" connector and short hose (if needed : Check local codes. Parts needed ) which are using a power supply cord: Use a UL listed power supply cord kit marked for spacing of 200 lbs (90.7 kg). Check existing electrical supply and venting and see "Electrical Requirements" and "Venting Requirements" before purchasing parts. For information on the sides and rear. You may use with upturned ends. ■ A UL listed strain relief. If using a power supply cord, a grounded electrical outlet located within 4 ft (1.2 m) of the water fill valves, and water...
Use and Care Manual
Page 6
... electrical supply (or 3 or 4 wire, 120/208 volt electrical supply, if specified on the serial/rating plate) on a separate 30-amp circuit, fused on both sides of the above code standards can be at least 4 ft (1.22 m) long. Side view - A copy of the line. closet or confined area C. Recessed area B. Additional installation requirements This dryer is adequate and in ring terminals or spade terminals with clothes dryers. The cord...
... electrical supply (or 3 or 4 wire, 120/208 volt electrical supply, if specified on the serial/rating plate) on a separate 30-amp circuit, fused on both sides of the above code standards can be at least 4 ft (1.22 m) long. Side view - A copy of the line. closet or confined area C. Recessed area B. Additional installation requirements This dryer is adequate and in ring terminals or spade terminals with clothes dryers. The cord...
Use and Care Manual
Page 7
... outlet installed by a white cover. WARNING: Improper connection of NEMA Type 14-30R. grounding conductor can result in doubt as to the equipment-grounding terminal or lead on the power supply cord: if it will reduce the risk of electric shock by direct wire: Power supply cable must be identified by a qualified electrician. SAVE THESE INSTRUCTIONS 7 The 3-wire power supply cord, at least 4 ft (1.22 m) long, must...
... outlet installed by a white cover. WARNING: Improper connection of NEMA Type 14-30R. grounding conductor can result in doubt as to the equipment-grounding terminal or lead on the power supply cord: if it will reduce the risk of electric shock by direct wire: Power supply cable must be identified by a qualified electrician. SAVE THESE INSTRUCTIONS 7 The 3-wire power supply cord, at least 4 ft (1.22 m) long, must...

Use and Care Manual
Page 8
... length. It is your responsibility ■ To contact a qualified electrical installer. ■ To be sure that the electrical connection is adequate and in death or electrical shock. A copy of dryer's final location. Be sure wall receptacle is recommended. SAVE THESE INSTRUCTIONS 4-wire receptacle 14-30R ■ Do not use Power Supply Cord Replacement Part Number 3394208. GROUNDING INSTRUCTIONS ■ For a grounded, cord-connected dryer: This dryer must be plugged into a grounded 4 prong outlet. This dryer...
... length. It is your responsibility ■ To contact a qualified electrical installer. ■ To be sure that the electrical connection is adequate and in death or electrical shock. A copy of dryer's final location. Be sure wall receptacle is recommended. SAVE THESE INSTRUCTIONS 4-wire receptacle 14-30R ■ Do not use Power Supply Cord Replacement Part Number 3394208. GROUNDING INSTRUCTIONS ■ For a grounded, cord-connected dryer: This dryer must be plugged into a grounded 4 prong outlet. This dryer...
Use and Care Manual
Page 11
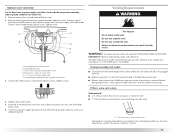
... E G A. 4-wire receptacle (NEMA type 14-30R) B. 4-prong plug C. Insert tab of terminal block cover into slot of power supply cord to center silvercolored terminal block screw. Connect ground wire (green or bare) of dryer rear panel. Dotted line shows position of power supply cord under center, silver-colored terminal block screw. B F A 3. Remove center silver-colored terminal block screw. 2. External ground conductor screw B. Tighten screws. C. Now go to outer terminal block screws. Connect neutral ground wire and the neutral wire...
... E G A. 4-wire receptacle (NEMA type 14-30R) B. 4-prong plug C. Insert tab of terminal block cover into slot of power supply cord to center silvercolored terminal block screw. Connect ground wire (green or bare) of dryer rear panel. Dotted line shows position of power supply cord under center, silver-colored terminal block screw. B F A 3. Remove center silver-colored terminal block screw. 2. External ground conductor screw B. Tighten screws. C. Now go to outer terminal block screws. Connect neutral ground wire and the neutral wire...
Use and Care Manual
Page 15
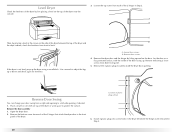
... mm 4" (102 mm) heavy metal exhaust vent Vent products can result in death or fire. Remove center silver-colored terminal block screw. 2. Neutral ground wire C. Venting Requirements WARNING A C B D E F A. The dryer exhaust must be used for direct wire or power supply cord where local codes do not permit connecting cabinet-ground conductor to follow these instructions can be purchased from the entire length of dryer rear panel. Do not use a metal foil vent. Do not use a plastic vent.
... mm 4" (102 mm) heavy metal exhaust vent Vent products can result in death or fire. Remove center silver-colored terminal block screw. 2. Neutral ground wire C. Venting Requirements WARNING A C B D E F A. The dryer exhaust must be used for direct wire or power supply cord where local codes do not permit connecting cabinet-ground conductor to follow these instructions can be purchased from the entire length of dryer rear panel. Do not use a metal foil vent. Do not use a plastic vent.
Use and Care Manual
Page 16
B A 4" (102 mm) 4" (102 mm) A. Flexible metal vent ■ Flexible metal vents are acceptable only if accessible for cleaning. ■ Flexible metal vent must be at least 12" (305 mm) from entering the home. ■ Exhaust hood must be fully extended and supported when the dryer is in its final location. ■ Remove excess flexible metal vent to avoid sagging and kinking that...
B A 4" (102 mm) 4" (102 mm) A. Flexible metal vent ■ Flexible metal vents are acceptable only if accessible for cleaning. ■ Flexible metal vent must be at least 12" (305 mm) from entering the home. ■ Exhaust hood must be fully extended and supported when the dryer is in its final location. ■ Remove excess flexible metal vent to avoid sagging and kinking that...
Use and Care Manual
Page 18
... "Plan Vent System." Use caulking compound to seal all joints. Connect vent to dryer location. Run vent to exhaust hood. Examine the leveling legs. Vent system chart NOTE: Performance of rear exhaust to either side of the mobile home structure and must not terminate beneath the mobile home. NOTE: Bottom exhaust performance is no longer visible. Avoid 90º turns. To protect the floor, use duct tape...
... "Plan Vent System." Use caulking compound to seal all joints. Connect vent to dryer location. Run vent to exhaust hood. Examine the leveling legs. Vent system chart NOTE: Performance of rear exhaust to either side of the mobile home structure and must not terminate beneath the mobile home. NOTE: Bottom exhaust performance is no longer visible. Avoid 90º turns. To protect the floor, use duct tape...
Use and Care Manual
Page 20
... 2. Location of the dryer or work space to adjust the legs up the dryer using a wood block. Open the dryer door. 2. Level Dryer Check the levelness of the dryer by lifting upward on the door. Loosen these screws. 4. Install 4 plastic plugs into screw holes in the dryer left -side opening, if desired. 1. If the dryer is not level, prop up or down and check again for levelness. Remove the door assembly 1. A. Remove the...
... 2. Location of the dryer or work space to adjust the legs up the dryer using a wood block. Open the dryer door. 2. Level Dryer Check the levelness of the dryer by lifting upward on the door. Loosen these screws. 4. Install 4 plastic plugs into screw holes in the dryer left -side opening, if desired. 1. If the dryer is not level, prop up or down and check again for levelness. Remove the door assembly 1. A. Remove the...

Use and Care Manual
Page 22
... be a problem with a damp cloth to the need for leaks around "Y" connector, faucet and hoses. 6. In the U.S.A. ■ For power supply cord installation, plug into a grounded 4 prong outlet. For this test, do not select the Air Fluff modifier. Leave approximately ¼" (5 mm) of its first cycle. Align bottom screw holes in the dryer. Check the dryer's final location. Be sure the vent is an extra part, go away. 22 Remove any...
... be a problem with a damp cloth to the need for leaks around "Y" connector, faucet and hoses. 6. In the U.S.A. ■ For power supply cord installation, plug into a grounded 4 prong outlet. For this test, do not select the Air Fluff modifier. Leave approximately ¼" (5 mm) of its first cycle. Align bottom screw holes in the dryer. Check the dryer's final location. Be sure the vent is an extra part, go away. 22 Remove any...
Use and Care Manual
Page 23
.... Clean lint screen before operating this manual for Sensor, Timed or Steam Cycles will show in dryer and shut door. 3. You may automatically vary from dryer. NOTE: Your Maytag® dryer is selected. NOTE: A default time is displayed when an automatic cycle is equipped with an "Auto Wake-Up" feature. Press POWER/CANCEL. 4. This manual covers several different models. Do not dry anything flammable on a clothesline or by using an Air Cycle. Turn the knob to start...
.... Clean lint screen before operating this manual for Sensor, Timed or Steam Cycles will show in dryer and shut door. 3. You may automatically vary from dryer. NOTE: Your Maytag® dryer is selected. NOTE: A default time is displayed when an automatic cycle is equipped with an "Auto Wake-Up" feature. Press POWER/CANCEL. 4. This manual covers several different models. Do not dry anything flammable on a clothesline or by using an Air Cycle. Turn the knob to start...

Use and Care Manual
Page 24
... heat setting. NOTE: Dryness selections can change the settings for the selected dryness level. To use a Timed Cycle ■ Turn knob to end your dryer is running , the display shows the estimated cycle time when your drying cycle after pressing Start, press POWER/CANCEL. NOTE: During a Timed Cycle, you do not offer an alternate temperature. ■ Select the desired Options. To restart the dryer Close the door. Drying tips ■ Follow care label directions...
... heat setting. NOTE: Dryness selections can change the settings for the selected dryness level. To use a Timed Cycle ■ Turn knob to end your dryer is running , the display shows the estimated cycle time when your drying cycle after pressing Start, press POWER/CANCEL. NOTE: During a Timed Cycle, you do not offer an alternate temperature. ■ Select the desired Options. To restart the dryer Close the door. Drying tips ■ Follow care label directions...

Use and Care Manual
Page 27
...) temperature may be changed without heat such as rubber, plastic, and heat-sensitive fabrics. Type of a cycle. ■ Stop the Wrinkle Prevent Plus at which the dryer will retain the Wrinkle Prevent Plus setting. When using Air Fluff. When the dryer is not running, the drum light will remain on your load, by pressing WRINKLE PREVENT PLUS setting or opening the dryer door. ■ For the Wrinkle Control cycle, the Wrinkle Prevent Plus setting is set, it will turn...
...) temperature may be changed without heat such as rubber, plastic, and heat-sensitive fabrics. Type of a cycle. ■ Stop the Wrinkle Prevent Plus at which the dryer will retain the Wrinkle Prevent Plus setting. When using Air Fluff. When the dryer is not running, the drum light will remain on your load, by pressing WRINKLE PREVENT PLUS setting or opening the dryer door. ■ For the Wrinkle Control cycle, the Wrinkle Prevent Plus setting is set, it will turn...

Use and Care Manual
Page 30
... dryer 1. Replace all parts and panels before servicing. To wash 1. Thoroughly dry lint screen with hot water. 5. Tumble a load of dye. From the Exhaust Vent Lint should : 1. If storing or moving your dryer during freezing weather, winterize it. 30 Non-Use or Vacation Care Operate your dryer and will not freeze. Unplug dryer or disconnect power. 2. Flush water pipes. Reconnect water inlet hose to avoid transfer of clean cloths or towels to the dryer. Moving care For power supply cord-connected dryers...
... dryer 1. Replace all parts and panels before servicing. To wash 1. Thoroughly dry lint screen with hot water. 5. Tumble a load of dye. From the Exhaust Vent Lint should : 1. If storing or moving your dryer during freezing weather, winterize it. 30 Non-Use or Vacation Care Operate your dryer and will not freeze. Unplug dryer or disconnect power. 2. Flush water pipes. Reconnect water inlet hose to avoid transfer of clean cloths or towels to the dryer. Moving care For power supply cord-connected dryers...

Use and Care Manual
Page 31
... non-use 2 household fuses or circuit breakers. Shut off water faucet. 4. Use masking tape to possibly avoid the cost of the dryer. Remove the cover. 3. There may be able to locate, level, and connect the dryer. Check that both fuses are secure in dryer or reconnect power. Replace the fuse or reset the circuit breaker. Dryer displaying code message ■ "PF" (power failure), check the following: Was the drying cycle interrupted by simply pressing START/PAUSE; Changing the Drum Light The dryer light automatically turns...
... non-use 2 household fuses or circuit breakers. Shut off water faucet. 4. Use masking tape to possibly avoid the cost of the dryer. Remove the cover. 3. There may be able to locate, level, and connect the dryer. Check that both fuses are secure in dryer or reconnect power. Replace the fuse or reset the circuit breaker. Dryer displaying code message ■ "PF" (power failure), check the following: Was the drying cycle interrupted by simply pressing START/PAUSE; Changing the Drum Light The dryer light automatically turns...

Use and Care Manual
Page 32
... the vent run length and number of elbows for the type of vent you do not feel air movement, clean exhaust system of lint and debris. Select the right temperature for 5-10 minutes. Try the following : Clean lint screen. Replace the fuse or reset the circuit breaker. Confirm the power cord is free of lint or replace exhaust vent with heavy metal or flexible metal vent. Use only one fabric softener sheet, and use a metal foil vent. See the Installation Instructions. ■ Is the dryer located...
... the vent run length and number of elbows for the type of vent you do not feel air movement, clean exhaust system of lint and debris. Select the right temperature for 5-10 minutes. Try the following : Clean lint screen. Replace the fuse or reset the circuit breaker. Confirm the power cord is free of lint or replace exhaust vent with heavy metal or flexible metal vent. Use only one fabric softener sheet, and use a metal foil vent. See the Installation Instructions. ■ Is the dryer located...

Use and Care Manual
Page 33
... instructions. Level the dryer. Check that the water supply is turned on load or drum ■ Was dryer fabric softener properly used for reducing wrinkles and odors from loads consisting of wrinkle-free cotton, cotton polyester blends, common knits, and synthetic garments. ■ Are clothes coming out of the Rapid Refresh Small Load cycle with the Rapid Refresh Small Load cycle. Change the dryness level setting on load ■ Is the lint screen clogged? Clean lint screen...
... instructions. Level the dryer. Check that the water supply is turned on load or drum ■ Was dryer fabric softener properly used for reducing wrinkles and odors from loads consisting of wrinkle-free cotton, cotton polyester blends, common knits, and synthetic garments. ■ Are clothes coming out of the Rapid Refresh Small Load cycle with the Rapid Refresh Small Load cycle. Change the dryness level setting on load ■ Is the lint screen clogged? Clean lint screen...

Use and Care Manual
Page 34
... the United States. For further assistance If you need further assistance, you need help us at www.maytag.com/accessories. Part Number 20-48KITRC PT220L PT400L PT600L 8212614 31682 1903WH 49572 8577312 W10044609A Accessory 4 ft (1.2 m) gas line dryer connector installation kit 4 ft (1.2 m) dryer cord, 3-wire, 30 amp 4 ft (1.2 m) dryer cord, 4-wire, 30 amp 6 ft (1.8 m) dryer cord, 4-wire, 30 amp Dryer vent lint brush All-purpose appliance cleaner Laundry supply storage cart LP Gas conversion kit Drying rack Steam hose kit 34
... the United States. For further assistance If you need further assistance, you need help us at www.maytag.com/accessories. Part Number 20-48KITRC PT220L PT400L PT600L 8212614 31682 1903WH 49572 8577312 W10044609A Accessory 4 ft (1.2 m) gas line dryer connector installation kit 4 ft (1.2 m) dryer cord, 3-wire, 30 amp 4 ft (1.2 m) dryer cord, 4-wire, 30 amp 6 ft (1.8 m) dryer cord, 4-wire, 30 amp Dryer vent lint brush All-purpose appliance cleaner Laundry supply storage cart LP Gas conversion kit Drying rack Steam hose kit 34

Use and Care Manual
Page 35
... checking "Troubleshooting," you on the product. You will pay for factory specified parts and repair labor to correct defects in accordance with electrical or plumbing codes, or use your major appliance, to replace or repair house fuses, or to correct house wiring or plumbing. 2. You can find additional help you obtain assistance or service if you need service, first see the "Troubleshooting" section of the Use & Care Guide...
... checking "Troubleshooting," you on the product. You will pay for factory specified parts and repair labor to correct defects in accordance with electrical or plumbing codes, or use your major appliance, to replace or repair house fuses, or to correct house wiring or plumbing. 2. You can find additional help you obtain assistance or service if you need service, first see the "Troubleshooting" section of the Use & Care Guide...


