
User Guide
Page 1
....,8 am-8pm EasternTime) Internet: http://www.maytag.com For service information, see page 7. ............ A/O1/O8 Part No. 8111P523-60 http://www.maytag.com _c_2OO6 Maytag Appliances Sales Co. p.g_ IREYOU(::AL.L....... P.g__-_ F,og3o-_4 Serial Number Dateof Purchase & (:LEANI.N...G. ELECTRIC COOKTOPS Installer: Pleaseleavethis manualwith this manualfor future reference.Keep sales receiptand/orcancelledcheckas proofof purchase. Model Number _FETY OOKIH..G..... Page 7 !DEDEL'UTILISATEUfPlage 8 I !ADEULSUAR...
....,8 am-8pm EasternTime) Internet: http://www.maytag.com For service information, see page 7. ............ A/O1/O8 Part No. 8111P523-60 http://www.maytag.com _c_2OO6 Maytag Appliances Sales Co. p.g_ IREYOU(::AL.L....... P.g__-_ F,og3o-_4 Serial Number Dateof Purchase & (:LEANI.N...G. ELECTRIC COOKTOPS Installer: Pleaseleavethis manualwith this manualfor future reference.Keep sales receiptand/orcancelledcheckas proofof purchase. Model Number _FETY OOKIH..G..... Page 7 !DEDEL'UTILISATEUfPlage 8 I !ADEULSUAR...

User Guide
Page 2
... ignite and cause burns if garment comes in the vicinity of this appliance. Alwaysturn off all controlswhencookingis completed. Use baking soda,a dry chemicalor foam-typeextinguisher to element will be highly flammable. This appliance has been tested for its intended purposeas describedin this guide. Donot useor store nearappliance. This appliance is equipped with hot heatingelements. Fitting pan size to smotherfireor flame...
... ignite and cause burns if garment comes in the vicinity of this appliance. Alwaysturn off all controlswhencookingis completed. Use baking soda,a dry chemicalor foam-typeextinguisher to element will be highly flammable. This appliance has been tested for its intended purposeas describedin this guide. Donot useor store nearappliance. This appliance is equipped with hot heatingelements. Fitting pan size to smotherfireor flame...

User Guide
Page 3
... though they are dark in or on a hot cookingarea, be hot. Other potentially hot surfaces include: Cooktopand areas facingthe cooktop. Childrenshouldnot be harmful or fatal to avoidgreasefires. Fumesreleasedduring an oven self-cleaningcycle may penetratethe brokencooktopand createa riskofelectricshock.Contacta qualified technicianimmediately. Clean range hood and filters frequentlyto preventgreaseor otherflammablematerials from the kitchen couldreach.Birdshavea very sensitiverespiratorysystem. Turnthe fanon when flambeingfoods (such as...
... though they are dark in or on a hot cookingarea, be hot. Other potentially hot surfaces include: Cooktopand areas facingthe cooktop. Childrenshouldnot be harmful or fatal to avoidgreasefires. Fumesreleasedduring an oven self-cleaningcycle may penetratethe brokencooktopand createa riskofelectricshock.Contacta qualified technicianimmediately. Clean range hood and filters frequentlyto preventgreaseor otherflammablematerials from the kitchen couldreach.Birdshavea very sensitiverespiratorysystem. Turnthe fanon when flambeingfoods (such as...
User Guide
Page 4
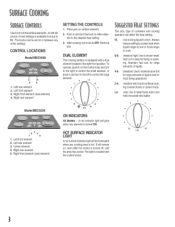
... 3 A red indicatorlight will remain on, even after the control is turnedoff, until the areahascooled.Thelightis locatednear the control knobs. Centerelement 4. Right rear element 5. The size, type of cookware and cooking operationwill affect the heat setting. t 5 1. Lo: (low)Use to control the small element,or pushin and turntothe leftto controlthe large element. Aftercooking,turnknobto OFF.Remove pan. Left front element 3. Hi: Useto bringliquidto a boil. choicoefheast ettingissavailabflreomLoto Hi...
... 3 A red indicatorlight will remain on, even after the control is turnedoff, until the areahascooled.Thelightis locatednear the control knobs. Centerelement 4. Right rear element 5. The size, type of cookware and cooking operationwill affect the heat setting. t 5 1. Lo: (low)Use to control the small element,or pushin and turntothe leftto controlthe large element. Aftercooking,turnknobto OFF.Remove pan. Left front element 3. Hi: Useto bringliquidto a boil. choicoefheast ettingissavailabflreomLoto Hi...
User Guide
Page 5
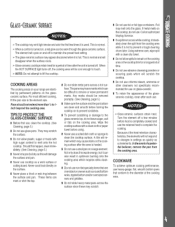
... patterns on the cooking area. Turn the element off to maintainthe presetheat setting. > Theglass-ceramicsurfacemayappeardiscoloredwhenit is hot.This is hotto prevent a toughcleaning chorelater.Usingextremecare,wipespill with high sugar content to removeor leave permanent marks. COOKWARE To achieve optimumcooking performance, use . >Glass-ceramic surfaces retain heat. Pans should be removed promptly.(See Cleaning,page 5.) | Makesurethe surfaceand thepan bottom are oversizedor unevensuchasroundbottom woks,rippledbottomand/oroversizedcannersand griddles. | Do not...
... patterns on the cooking area. Turn the element off to maintainthe presetheat setting. > Theglass-ceramicsurfacemayappeardiscoloredwhenit is hot.This is hotto prevent a toughcleaning chorelater.Usingextremecare,wipespill with high sugar content to removeor leave permanent marks. COOKWARE To achieve optimumcooking performance, use . >Glass-ceramic surfaces retain heat. Pans should be removed promptly.(See Cleaning,page 5.) | Makesurethe surfaceand thepan bottom are oversizedor unevensuchasroundbottom woks,rippledbottomand/oroversizedcannersand griddles. | Do not...
User Guide
Page 6
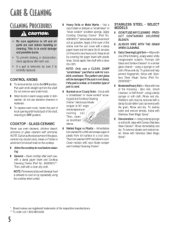
.... Scrubagain,then buffwith a clean dry cloth. NOTE: Only use oven cleaners, chlorine bleach, ammonia or glass cleaners with Stainless Steel Magic Spray*. * Brand namesare registeredtrademarksof the respectivemanufacturers. ** To ordercall 1-800-688-8408. 5 usinga damp sponge or soft cloth. & CONTROL KNOBS | Toremoveknobs,turntothe OFFposition. Topolishand help prevent fingerprints,follow with ammonia. COOKTOP - To restore luster and remove streaks,follow with StainlessSteel...
.... Scrubagain,then buffwith a clean dry cloth. NOTE: Only use oven cleaners, chlorine bleach, ammonia or glass cleaners with Stainless Steel Magic Spray*. * Brand namesare registeredtrademarksof the respectivemanufacturers. ** To ordercall 1-800-688-8408. 5 usinga damp sponge or soft cloth. & CONTROL KNOBS | Toremoveknobs,turntothe OFFposition. Topolishand help prevent fingerprints,follow with ammonia. COOKTOP - To restore luster and remove streaks,follow with StainlessSteel...

User Guide
Page 7
... a blowncircuitfuse or a tripped maincircuit breaker. | Checkifcooktopis properlyconnectedto electriccircuit in house. ELEMENTS EMIT A SLIGHT ODOR AND/OR SMOKE WHEN FIRST TURNEDON. | Thisisnormal. Whencool,cleanwith Cooktop CleaningCreme.Seepg. 5. 3. Brownstreaksand specks. Make sure pan bottomis not rough. II Spillsnot removedpromptly.Wiping with soiledcloth or sponge.Pan bottomnot clean. 4. II Voltageto housemay be fiat or the correct size or shape. II Cookwaremay...
... a blowncircuitfuse or a tripped maincircuit breaker. | Checkifcooktopis properlyconnectedto electriccircuit in house. ELEMENTS EMIT A SLIGHT ODOR AND/OR SMOKE WHEN FIRST TURNEDON. | Thisisnormal. Whencool,cleanwith Cooktop CleaningCreme.Seepg. 5. 3. Brownstreaksand specks. Make sure pan bottomis not rough. II Spillsnot removedpromptly.Wiping with soiledcloth or sponge.Pan bottomnot clean. 4. II Voltageto housemay be fiat or the correct size or shape. II Cookwaremay...
User Guide
Page 8
... Canada, call 1-800-688-9900. Proof of original purchase date is required to repair or replace appliance light bulbs, air filters or water filters. Consumable parts are excluded from your authorized Maytag dealer to published user or operator instructions and/or installation instructions. 4. This major appliance is designed to the appliance. 9. Repairs to parts or systems resulting from unauthorized modifications made to be provided by this warranty...
... Canada, call 1-800-688-9900. Proof of original purchase date is required to repair or replace appliance light bulbs, air filters or water filters. Consumable parts are excluded from your authorized Maytag dealer to published user or operator instructions and/or installation instructions. 4. This major appliance is designed to the appliance. 9. Repairs to parts or systems resulting from unauthorized modifications made to be provided by this warranty...
Installation Instructions
Page 1
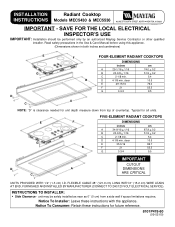
..., FURNISHED AND INSTALLED BY MANUFACTURER (CONNECT TO 240/120 VOLT ELECTRICAL SERVICE). Notice To Installer: Leave these instructions for unit depth measure down from a side wall if space limitations requires. SAVE FOR THE LOCAL ELECTRICAL INSPECTOR'S USE IMPORTANT: Installation should be safely installed as near as 0² (0 cm) from top of countertop. clear 5.4 10.5 E 29-15/16 76.0 F 21 53.3 G 3-3/4 9.5 D A C D NOTE: "D" is clearance needed for future...
..., FURNISHED AND INSTALLED BY MANUFACTURER (CONNECT TO 240/120 VOLT ELECTRICAL SERVICE). Notice To Installer: Leave these instructions for unit depth measure down from a side wall if space limitations requires. SAVE FOR THE LOCAL ELECTRICAL INSPECTOR'S USE IMPORTANT: Installation should be safely installed as near as 0² (0 cm) from top of countertop. clear 5.4 10.5 E 29-15/16 76.0 F 21 53.3 G 3-3/4 9.5 D A C D NOTE: "D" is clearance needed for future...
Installation Instructions
Page 2
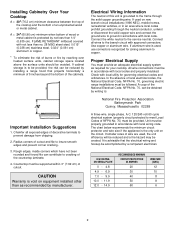
... the cabinets. Countertop must be supported within 3² (7.62 cm) of local electrical codes, the National Electrical Code, NFPA No. 70, governing electric range installations must be followed. All wire connections must be in accordance with local utility for your cooktop. A = 24² (60.96 cm) minimum when bottom of wood or metal cabinet is advisable that projects horizontally a minimum of 5 inches beyond the bottom of wire are used , use...
... the cabinets. Countertop must be supported within 3² (7.62 cm) of local electrical codes, the National Electrical Code, NFPA No. 70, governing electric range installations must be followed. All wire connections must be in accordance with local utility for your cooktop. A = 24² (60.96 cm) minimum when bottom of wood or metal cabinet is advisable that projects horizontally a minimum of 5 inches beyond the bottom of wire are used , use...
Installation Instructions
Page 3
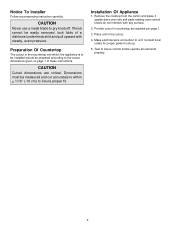
Place unit in countertop as required per page 1. 3. CAUTION Never use a metal blade to insure control knobs operate all elements properly. 3 Consult local codes for proper power hook-up. 5. Provide cutout in the cutout. 4. Test to pry knob off. If knob cannot be easily removed, tuck folds of these instructions. Installation Of Appliance 1. Notice To Installer Follow accompanying instruction carefully. Dimensions must be prepared according to the cutout dimensions given on page...
Place unit in countertop as required per page 1. 3. CAUTION Never use a metal blade to insure control knobs operate all elements properly. 3 Consult local codes for proper power hook-up. 5. Provide cutout in the cutout. 4. Test to pry knob off. If knob cannot be easily removed, tuck folds of these instructions. Installation Of Appliance 1. Notice To Installer Follow accompanying instruction carefully. Dimensions must be prepared according to the cutout dimensions given on page...

Parts List
Page 1
Product Type - Repair Parts List MODEL NUMBER MEC5536BAW COOKTOP When requesting service or ordering parts, always provide the following information: - Model Number - Part Description ©2005 Maytag Services Part Number -
Product Type - Repair Parts List MODEL NUMBER MEC5536BAW COOKTOP When requesting service or ordering parts, always provide the following information: - Model Number - Part Description ©2005 Maytag Services Part Number -
Parts List
Page 2
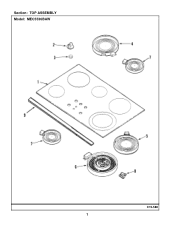
Section: TOP ASSEMBLY Model: MEC5536BAW C15-588 1
Section: TOP ASSEMBLY Model: MEC5536BAW C15-588 1
Parts List
Page 3
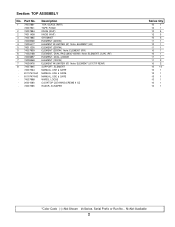
...) ELEMENT (1200W) ELEMENT W/LIMITER (6") Note: ELEMENT (LF/CTR REAR) SUPPORT, ELEMENT - 74007564 MANUAL, USE & CARE - 8111P474-60 MANUAL, USE & CARE - 8111P474-60 MANUAL, USE & CARE - 74007888 WIRES, LOOSE - 20001080 COOKTOP CLEANING CREME 4 OZ - 74007585 RAZOR, SCRAPER Series Qty 10 1 10 1 10 5 12 5 10 5 11 1 10 1 11 1 10 1 10 1 11 1 11 2 10 2 10 10 10 1 12 1 13 1 10 1 10 1 10 1 *Color Code (-)=Not Shown #=Series, Serial Prefix or Run No., N=Not Available 2 Part...
...) ELEMENT (1200W) ELEMENT W/LIMITER (6") Note: ELEMENT (LF/CTR REAR) SUPPORT, ELEMENT - 74007564 MANUAL, USE & CARE - 8111P474-60 MANUAL, USE & CARE - 8111P474-60 MANUAL, USE & CARE - 74007888 WIRES, LOOSE - 20001080 COOKTOP CLEANING CREME 4 OZ - 74007585 RAZOR, SCRAPER Series Qty 10 1 10 1 10 5 12 5 10 5 11 1 10 1 11 1 10 1 10 1 11 1 11 2 10 2 10 10 10 1 12 1 13 1 10 1 10 1 10 1 *Color Code (-)=Not Shown #=Series, Serial Prefix or Run No., N=Not Available 2 Part...
Parts List
Page 4
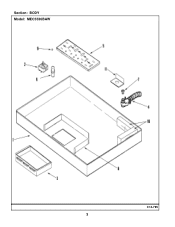
Section: BODY Model: MEC5536BAW C14-795 3
Section: BODY Model: MEC5536BAW C14-795 3
Parts List
Page 5
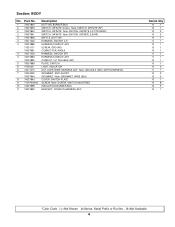
... SCREW, GROUND - 74007891 4 74011003 4 74010994 - 74007892 5 74007889 6 Y706125 CONNECTOR, ANGLE HARNESS, SWITCH (RT) HARNESS/CONDUIT ASY CONDUIT, 1/2" FLEXIBLE (48") PLATE, SWITCH LIGHT, INDICATOR 6 74011015 7 74004222 HOT LIGHT/WIRE HARNESS ASY Note: (INCLDS 2 UND LIGHTS/HARNESS) GROMMET, ANTI-SHORT - 74007844 GROMMET Note: GROMMET, WIRE (BLK) 8 74007843 COVER, SWITCH PLATE 9 7101P309-60 SCREW Note: SCREW, SWITCH MOUNTING 10 74007899 INSULATION, BURNER BOX 11 74007893 BRACKET, CONDUIT/HARNESS ASY.
... SCREW, GROUND - 74007891 4 74011003 4 74010994 - 74007892 5 74007889 6 Y706125 CONNECTOR, ANGLE HARNESS, SWITCH (RT) HARNESS/CONDUIT ASY CONDUIT, 1/2" FLEXIBLE (48") PLATE, SWITCH LIGHT, INDICATOR 6 74011015 7 74004222 HOT LIGHT/WIRE HARNESS ASY Note: (INCLDS 2 UND LIGHTS/HARNESS) GROMMET, ANTI-SHORT - 74007844 GROMMET Note: GROMMET, WIRE (BLK) 8 74007843 COVER, SWITCH PLATE 9 7101P309-60 SCREW Note: SCREW, SWITCH MOUNTING 10 74007899 INSULATION, BURNER BOX 11 74007893 BRACKET, CONDUIT/HARNESS ASY.
Parts List
Page 6
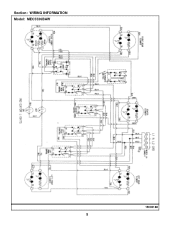
Section: WIRING INFORMATION Model: MEC5536BAW 15003188 5
Section: WIRING INFORMATION Model: MEC5536BAW 15003188 5


