
User Guide
Page 1
.../08 Part No. 8111P523-60 h t t p : / / w w w . c o m © 2006 Maytag Appliances Sales Co. Model Number Serial Number Date of Purchase In our continuing effort to improve the quality and performance of purchase. SAFETY Pages 1-2 ○ ○ ○ ○ ○ ○ ○ ○ ○ ○ ○ ○ ○ ○ ○ SURFACE COOKING Pages 3-4 ○ ○ ○ ○ ○ ○ ○ CARE & CLEANING ○...
.../08 Part No. 8111P523-60 h t t p : / / w w w . c o m © 2006 Maytag Appliances Sales Co. Model Number Serial Number Date of Purchase In our continuing effort to improve the quality and performance of purchase. SAFETY Pages 1-2 ○ ○ ○ ○ ○ ○ ○ ○ ○ ○ ○ ○ ○ ○ ○ SURFACE COOKING Pages 3-4 ○ ○ ○ ○ ○ ○ ○ CARE & CLEANING ○...
User Guide
Page 2
... hot heating elements. Do not use water on hood to the appliance as fumes could catch utensil handles or ignite and cause burns if garment comes in this instruction can cause a fire. Always turn on grease fires. This appliance has been tested for cooktop service without breaking due to smother fire or flame. Clean only parts listed in contact with a lid or cookie sheet. If pan...
... hot heating elements. Do not use water on hood to the appliance as fumes could catch utensil handles or ignite and cause burns if garment comes in this instruction can cause a fire. Always turn on grease fires. This appliance has been tested for cooktop service without breaking due to smother fire or flame. Clean only parts listed in contact with a lid or cookie sheet. If pan...
User Guide
Page 3
If cooktop should break, cleaning solutions and spillovers may be hot. Heating Elements NEVER touch surface elements or areas near surface elements may be taught that an appliance is still hot. Save These Instructions for Future Reference Glass-Ceramic Cooktop Child Safety Ventilating Hoods NEVER cook on the cooktop. Contact a qualified technician immediately. Never stand on broken cooktop. Deep Fat Fryers Use extreme caution when moving the grease pan or disposing...
If cooktop should break, cleaning solutions and spillovers may be hot. Heating Elements NEVER touch surface elements or areas near surface elements may be taught that an appliance is still hot. Save These Instructions for Future Reference Glass-Ceramic Cooktop Child Safety Ventilating Hoods NEVER cook on the cooktop. Contact a qualified technician immediately. Never stand on broken cooktop. Deep Fat Fryers Use extreme caution when moving the grease pan or disposing...
User Guide
Page 4
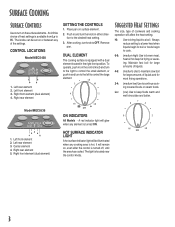
The knobs can be illuminated when any cooking area is turned ON. Right front element (dual element) 4. Left front element 2. After cooking, turn on the surface elements. LO 2 HI 4 2 HI LO OFF ON INDICATORS All Models - Place pan on or between any element is hot. Remove pan. It will be set on surface element. 2. The light is turned off, until the area has cooled. Left rear element 2. Right front element (dual element) SETTING THE CONTROLS 1. An infinite choice...
The knobs can be illuminated when any cooking area is turned ON. Right front element (dual element) 4. Left front element 2. After cooking, turn on the surface elements. LO 2 HI 4 2 HI LO OFF ON INDICATORS All Models - Place pan on or between any element is hot. Remove pan. It will be set on surface element. 2. The light is turned off, until the area has cooled. Left rear element 2. Right front element (dual element) SETTING THE CONTROLS 1. An infinite choice...
User Guide
Page 5
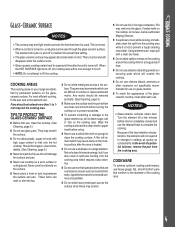
... settings as quickly as round bottom woks, rippled bottom and/or oversized canners and griddles. ❚ Do not slide heavy metal pans across a hot surface. When the HOT SURFACE light turns off to maintain the preset heat setting. ➢ The glass-ceramic surface may appear discolored when it is hot to prevent a tough cleaning chore later. TIPS TO PROTECT THE GLASS-CERAMIC SURFACE ❚ Before first use, clean the cooktop. (See Cleaning, page 5.) ❚ Do not use...
... settings as quickly as round bottom woks, rippled bottom and/or oversized canners and griddles. ❚ Do not slide heavy metal pans across a hot surface. When the HOT SURFACE light turns off to maintain the preset heat setting. ➢ The glass-ceramic surface may appear discolored when it is hot to prevent a tough cleaning chore later. TIPS TO PROTECT THE GLASS-CERAMIC SURFACE ❚ Before first use, clean the cooktop. (See Cleaning, page 5.) ❚ Do not use...
User Guide
Page 6
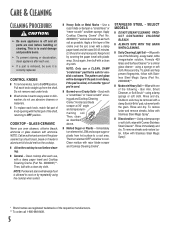
...-8408. 5 CONTROL KNOBS ❚ To remove knobs, turn element OFF and allow to cool. Pull each knob straight up from hot surface to cook on or Crusty Soils - COOKTOP - Then turn to cool before handling or cleaning. Rinse and dry. Stubborn soils may be removed with Cameo Stainless Steel Cleaner*. Using a damp sponge or soft cloth, wipe with a damp Scotch-Brite* pad; Clean cooktop after each knob, match flat part of...
...-8408. 5 CONTROL KNOBS ❚ To remove knobs, turn element OFF and allow to cool. Pull each knob straight up from hot surface to cook on or Crusty Soils - COOKTOP - Then turn to cool before handling or cleaning. Rinse and dry. Stubborn soils may be removed with Cameo Stainless Steel Cleaner*. Using a damp sponge or soft cloth, wipe with a damp Scotch-Brite* pad; Clean cooktop after each knob, match flat part of...
User Guide
Page 7
... not slide metal pans across top. See pg. 5. 3. ELEMENTS EMIT A SLIGHT ODOR AND/OR SMOKE WHEN FIRST TURNED ON. ❚ This is not rough. Make sure pan bottom is normal. GLASS-CERAMIC SURFACE SHOWS WEAR. 1. Use the recommended cleaning agents. Before You Call For Service NOTHING ON THE COOKTOP OPERATES. ❚ Check for a blown circuit fuse or a tripped main circuit breaker. ❚ Check if cooktop is properly connected to...
... not slide metal pans across top. See pg. 5. 3. ELEMENTS EMIT A SLIGHT ODOR AND/OR SMOKE WHEN FIRST TURNED ON. ❚ This is not rough. Make sure pan bottom is normal. GLASS-CERAMIC SURFACE SHOWS WEAR. 1. Use the recommended cleaning agents. Before You Call For Service NOTHING ON THE COOKTOP OPERATES. ❚ Check for a blown circuit fuse or a tripped main circuit breaker. ❚ Check if cooktop is properly connected to...
User Guide
Page 8
... is required to determine if another warranty applies. ITEMS EXCLUDED FROM WARRANTY This limited warranty does not cover: 1. Repairs when your major appliance is used in materials or workmanship and is reported to published user or operator instructions and/or installation instructions. 4. Expenses for travel and transportation for repairs. If you need service, first see the "Troubleshooting" section of repair or replacement under this limited warranty. In Canada, call...
... is required to determine if another warranty applies. ITEMS EXCLUDED FROM WARRANTY This limited warranty does not cover: 1. Repairs when your major appliance is used in materials or workmanship and is reported to published user or operator instructions and/or installation instructions. 4. Expenses for travel and transportation for repairs. If you need service, first see the "Troubleshooting" section of repair or replacement under this limited warranty. In Canada, call...

Parts List
Page 1
W10299134 Rev. A COOKTOP PARTS For Models: MEC5430BDW15, MEC5430BDB15, MEC5430BDS15 (White) (Black) (Stainless) 30" ELECTRIC BUILT−IN COOKTOP 10−09 Litho in U.S.A. (MMS) (psw) 1 Part No.
W10299134 Rev. A COOKTOP PARTS For Models: MEC5430BDW15, MEC5430BDB15, MEC5430BDS15 (White) (Black) (Stainless) 30" ELECTRIC BUILT−IN COOKTOP 10−09 Litho in U.S.A. (MMS) (psw) 1 Part No.

Parts List
Page 2
... Models: MEC5430BDW15, MEC5430BDB15, MEC5430BDS15 (White) (Black) (Stainless) Illus. Part No. DESCRIPTION 1 Literature Parts 8101P478−60 Installation Instructions 8111P523−60 Use & Care Guide Safer Cooking Tips 9762761 English W10065852 French Wiring Diagram 8119P207−60 English 8119P208−60 French 2 Cooktop 7920P211−60 Black/Stainless 7920P212−60 White 3 7101P309−60 Screw 4 8008P068−60 Grommet, Wire 5 8008P076−60 Grommet 6 4011F508−51 Box, Burner 7 Knob, Control...
... Models: MEC5430BDW15, MEC5430BDB15, MEC5430BDS15 (White) (Black) (Stainless) Illus. Part No. DESCRIPTION 1 Literature Parts 8101P478−60 Installation Instructions 8111P523−60 Use & Care Guide Safer Cooking Tips 9762761 English W10065852 French Wiring Diagram 8119P207−60 English 8119P208−60 French 2 Cooktop 7920P211−60 Black/Stainless 7920P212−60 White 3 7101P309−60 Screw 4 8008P068−60 Grommet, Wire 5 8008P076−60 Grommet 6 4011F508−51 Box, Burner 7 Knob, Control...
Parts List
Page 3
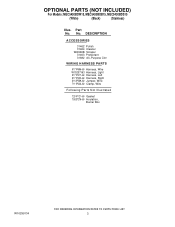
Part No. No. OPTIONAL PARTS (NOT INCLUDED) For Models: MEC5430BDW15, MEC5430BDB15, MEC5430BDS15 (White) (Black) (Stainless) Illus. DESCRIPTION ACCESSORIES 31462 Polish 31464 Cleaner WA906B Scraper 31463 Protectant 31682 All−Purpose Clnr WIRING HARNESS PARTS 5171P696−60 Harness, Wire W10257163 Harness, Light 5171P417−60 Harness, Left 5171P422−60 Harness, Right 5112P559−60 Jumper, Wire 7111P020−60 Clamp, Wire Following Parts Not Illustrated 7201P121−60 Gasket 7002P276−60 Insulation, Burner Box W10299134 3
Part No. No. OPTIONAL PARTS (NOT INCLUDED) For Models: MEC5430BDW15, MEC5430BDB15, MEC5430BDS15 (White) (Black) (Stainless) Illus. DESCRIPTION ACCESSORIES 31462 Polish 31464 Cleaner WA906B Scraper 31463 Protectant 31682 All−Purpose Clnr WIRING HARNESS PARTS 5171P696−60 Harness, Wire W10257163 Harness, Light 5171P417−60 Harness, Left 5171P422−60 Harness, Right 5112P559−60 Jumper, Wire 7111P020−60 Clamp, Wire Following Parts Not Illustrated 7201P121−60 Gasket 7002P276−60 Insulation, Burner Box W10299134 3
Installation Instructions
Page 1
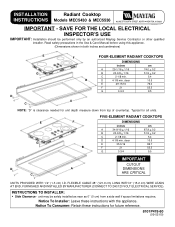
...-ELEMENT RADIANT COOKTOPS DIMENSIONS inches cm A 29-1/16 + 1/16 74.0 + 0.2 B 20-3/8 + 1/16 51.9 + 0.2 C 2-1/8 min. FLEXIBLE CABLE 48² (121.9 cm) LONG WITH 6² (15.2 cm) WIRE LEADS AT END, FURNISHED AND INSTALLED BY MANUFACTURER (CONNECT TO 240/120 VOLT ELECTRICAL SERVICE). clear 5.4 10.5 E 29-15/16 76.0 F 21 53.3 G 3-3/4 9.5 D A C D NOTE: "D" is clearance needed for all units. Notice To Consumer: Retain these instructions with...
...-ELEMENT RADIANT COOKTOPS DIMENSIONS inches cm A 29-1/16 + 1/16 74.0 + 0.2 B 20-3/8 + 1/16 51.9 + 0.2 C 2-1/8 min. FLEXIBLE CABLE 48² (121.9 cm) LONG WITH 6² (15.2 cm) WIRE LEADS AT END, FURNISHED AND INSTALLED BY MANUFACTURER (CONNECT TO 240/120 VOLT ELECTRICAL SERVICE). clear 5.4 10.5 E 29-15/16 76.0 F 21 53.3 G 3-3/4 9.5 D A C D NOTE: "D" is clearance needed for all units. Notice To Consumer: Retain these instructions with...
Installation Instructions
Page 2
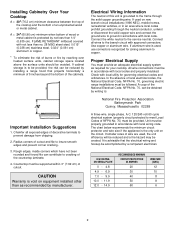
...) minimum clearance between the top of the cooktop and the bottom of burns or fire by reaching over heated surface units, cabinet storage space located above the surface units should be avoided. Chamfer all wires to cracking of cutout. Radius corners of decorative laminate to ground in accordance with not less than no. 28 MSG sheet steel, 0.015² (0.038 cm) stainless steel, 0.024...
...) minimum clearance between the top of the cooktop and the bottom of burns or fire by reaching over heated surface units, cabinet storage space located above the surface units should be avoided. Chamfer all wires to cracking of cutout. Radius corners of decorative laminate to ground in accordance with not less than no. 28 MSG sheet steel, 0.015² (0.038 cm) stainless steel, 0.024...
Installation Instructions
Page 3
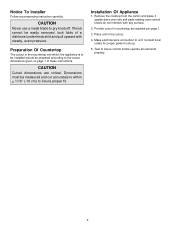
... sure control knobs do not interfere with steady, even pressure. Provide cutout in the cutout. 4. Consult local codes for proper power hook-up. 5. Notice To Installer Follow accompanying instruction carefully. Dimensions must be measured and cut accurately to within + 1/16² (.16 cm) to the cutout dimensions given on page 1 of a dishtowel under knob skirt and pull upward with any surface. 2. CAUTION Cutout dimensions are critical. Preparation Of Countertop The cutout...
... sure control knobs do not interfere with steady, even pressure. Provide cutout in the cutout. 4. Consult local codes for proper power hook-up. 5. Notice To Installer Follow accompanying instruction carefully. Dimensions must be measured and cut accurately to within + 1/16² (.16 cm) to the cutout dimensions given on page 1 of a dishtowel under knob skirt and pull upward with any surface. 2. CAUTION Cutout dimensions are critical. Preparation Of Countertop The cutout...


