
Use and Care Guide
Page 2
... guide are removed from combustible materials. Always disconnect power to cover all packing materials are not meant to appliance before operating it is still hot. Keep area around appliance clear and free from the appliance before servicing. in use water on any part of Fire Use dry chemical or foam-type extinguisher or baking soda to a qualified servicer. NEVER pick up or move a flaming pan...
... guide are removed from combustible materials. Always disconnect power to cover all packing materials are not meant to appliance before operating it is still hot. Keep area around appliance clear and free from the appliance before servicing. in use water on any part of Fire Use dry chemical or foam-type extinguisher or baking soda to a qualified servicer. NEVER pick up or move a flaming pan...

Use and Care Guide
Page 3
.... 2 Do not use , do not adjust, service, repair or replace any devices or accessories that are not specifically recommended in contact with heating elements. Avoid their use of glass, glass/ceramic, ceramic, earthenware, or other flammable materials contact heating elements until they are dark in this guide can trail across hot elements and ignite or get caught on the surface unit. Follow utensil manufacturer's instructions when using conventional cookware. Pressure building up in...
.... 2 Do not use , do not adjust, service, repair or replace any devices or accessories that are not specifically recommended in contact with heating elements. Avoid their use of glass, glass/ceramic, ceramic, earthenware, or other flammable materials contact heating elements until they are dark in this guide can trail across hot elements and ignite or get caught on the surface unit. Follow utensil manufacturer's instructions when using conventional cookware. Pressure building up in...
Use and Care Guide
Page 4
... from the kitchen could reach. Some cleaners can cause a fire. ImportanSt afety Cooktop NEVER leave surface units unattended especially when using high heat. Select pans with caution. Improper installation of the element will improve cooking efficiency. Ventilating Hoods Clean cooktop hood and filters frequently to cover element. Turn off all controls and wait for Future Reference 3 Use care to move pan. Fumes released during cooking could ignite clothing or potholder. Fitting pan size to line surface unit drip...
... from the kitchen could reach. Some cleaners can cause a fire. ImportanSt afety Cooktop NEVER leave surface units unattended especially when using high heat. Select pans with caution. Improper installation of the element will improve cooking efficiency. Ventilating Hoods Clean cooktop hood and filters frequently to cover element. Turn off all controls and wait for Future Reference 3 Use care to move pan. Fumes released during cooking could ignite clothing or potholder. Fitting pan size to line surface unit drip...
Use and Care Guide
Page 5
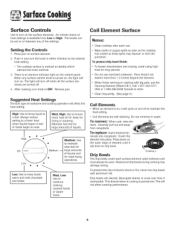
... surface element. 2. Low: Use to continue cooking covered foods or steam foods. Coil Element Surface Notes: ', Clean cooktop after each surface element catch boilovers and must always be set on or between any surface control knob isturned on, the light will affect the heat setting. Push in and turn knob to High. Suggested Heat Settings The size,type of the settings. When home canning or cooking with aluminum foil. Carefully pull out and away _/__ / from Low to OFF. Remove pan...
... surface element. 2. Low: Use to continue cooking covered foods or steam foods. Coil Element Surface Notes: ', Clean cooktop after each surface element catch boilovers and must always be set on or between any surface control knob isturned on, the light will affect the heat setting. Push in and turn knob to High. Suggested Heat Settings The size,type of the settings. When home canning or cooking with aluminum foil. Carefully pull out and away _/__ / from Low to OFF. Remove pan...
Use and Care Guide
Page 6
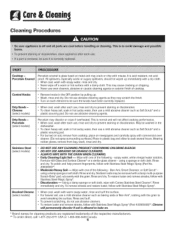
... Stainless Steel Magic Spray (Part No. 20000008)**. , Moderate/Heavy Soil =- Brushed Chrome (select models) _ When cool, wash with commercial oven cleaner. (Do not spray surrounding surfaces.) Place in the dishwasher. To clean heavy soil, soak in the OFF position by pulling up immediatelywith a dry cloth. Do not use abrasive cleaning agents. May be wiped up . Wearing rubber gloves, remove from cooktop...
... Stainless Steel Magic Spray (Part No. 20000008)**. , Moderate/Heavy Soil =- Brushed Chrome (select models) _ When cool, wash with commercial oven cleaner. (Do not spray surrounding surfaces.) Place in the dishwasher. To clean heavy soil, soak in the OFF position by pulling up immediatelywith a dry cloth. Do not use abrasive cleaning agents. May be wiped up . Wearing rubber gloves, remove from cooktop...
Use and Care Guide
Page 7
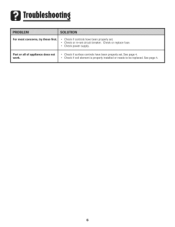
Check if coil element is properly installed or needs to be replaced. Check power supply. See page 4. See page 4. 6 Check if surface controls have been properly set. Check if controls have been properly set circuit breaker. Check or replace fuse. Check or re-set . Part or all of appliance does not work. Troubleshoodn9 For most concerns, try these first.
Check if coil element is properly installed or needs to be replaced. Check power supply. See page 4. See page 4. 6 Check if surface controls have been properly set. Check if controls have been properly set circuit breaker. Check or replace fuse. Check or re-set . Part or all of appliance does not work. Troubleshoodn9 For most concerns, try these first.
Use and Care Guide
Page 8
... original model/serial numbers that is required to instruct you may find additional help by checking the "Assistance or Service" section or by Maytag. 5. This limited warranty is valid only in materials or workmanship. Costs associated with published installation instructions. 11. This warranty is designed to Maytag within 30 days from the date of purchase. 6. If you need service, first see the "Troubleshooting" section of the Use & Care Guide...
... original model/serial numbers that is required to instruct you may find additional help by checking the "Assistance or Service" section or by Maytag. 5. This limited warranty is valid only in materials or workmanship. Costs associated with published installation instructions. 11. This warranty is designed to Maytag within 30 days from the date of purchase. 6. If you need service, first see the "Troubleshooting" section of the Use & Care Guide...

Installation Instructions
Page 1
... regulations and codes require that all wires to the branch circuit with local code. Use copper or aluminum wire. If aluminum wire is not required for joining aluminum to copper. APPRoOxVE _ _ APPROVED INSULATED CONNECTIONS NEUTRAL'-' L2 9219-947 BRANCH CIRCUIT (POWER SUPPLY) RANGE GROUNDED THROUGH NEUTRAL CONDUCTOR UNIT CONNECTIONS This unit is adequate. Connect all electrical wiring be done by your local utility company before examining any of the appliance. THESE ELECTRIC COUNTER MOUNTED SURFACE...
... regulations and codes require that all wires to the branch circuit with local code. Use copper or aluminum wire. If aluminum wire is not required for joining aluminum to copper. APPRoOxVE _ _ APPROVED INSULATED CONNECTIONS NEUTRAL'-' L2 9219-947 BRANCH CIRCUIT (POWER SUPPLY) RANGE GROUNDED THROUGH NEUTRAL CONDUCTOR UNIT CONNECTIONS This unit is adequate. Connect all electrical wiring be done by your local utility company before examining any of the appliance. THESE ELECTRIC COUNTER MOUNTED SURFACE...
Installation Instructions
Page 2
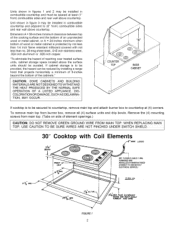
... WIRE USECAUT ONTOBE SURE W RESARE NO NCHED UNDER SWTCH SH ELD MAIN 30" Cooktop with Coil Elements LEADS DEPTH FRONT OI UNIT 3/8" FLEXIBLE CABLE3' MIN. CAUTION: SOMECABINETSAND BUILDING MATERIALSARENOTDESIGNETDOWITHSTAND THE HEATPRODUCEBDY THE NORMALSAFE OPERATIONOF A LISTEDAPPLIANCE,DISCOLORATIONORDAMAGES,UCHASDELAMINATION,MAYOCCUR, COUNTER TOP BASE If cooktop is to be secured to countertop, remove main top and attach burner box to be providedt,hehazardcanbereducedby installinga range...
... WIRE USECAUT ONTOBE SURE W RESARE NO NCHED UNDER SWTCH SH ELD MAIN 30" Cooktop with Coil Elements LEADS DEPTH FRONT OI UNIT 3/8" FLEXIBLE CABLE3' MIN. CAUTION: SOMECABINETSAND BUILDING MATERIALSARENOTDESIGNETDOWITHSTAND THE HEATPRODUCEBDY THE NORMALSAFE OPERATIONOF A LISTEDAPPLIANCE,DISCOLORATIONORDAMAGES,UCHASDELAMINATION,MAYOCCUR, COUNTER TOP BASE If cooktop is to be secured to countertop, remove main top and attach burner box to be providedt,hehazardcanbereducedby installinga range...

Installation Instructions
Page 3
RGURE3 FIGURE2 30" Smoothtop Ceramic Cooktop 2 3/4" DEPTH FRONT// OF UNIT 6" WIRE LEADS 3/8" FLEXIBLE CABLE 48" LONG FURNISHED AND INSTALLED BY MANUFACTURER (CONNECT TO 240/120 VOLT ELECTRICAL SERVICE) 29 7/16" 2 I/8" MIN 20 7/16" 4 I/4" CLEARANCE INSIDE FOR RIGHT ANGLE CONDUIT AND WIRE. MI 6" WIRE LEAE r2" FLEXIBLE CABLE LONG,FURNISHED AND INSTALLED BY MANUFACTURER (CONNECT TO 240/120 VOLTS ELECTRICAL SERVICE.) 34 7/8" M IN. 3 3/8" INSIDE MIN. PLUS CLEARANCE FOR RIGHT ANGLE CONDUIT AND WIRE. 36" Cooktop with Coil Elements FRONT OF UN 19 MIN. _/2 5/8-
RGURE3 FIGURE2 30" Smoothtop Ceramic Cooktop 2 3/4" DEPTH FRONT// OF UNIT 6" WIRE LEADS 3/8" FLEXIBLE CABLE 48" LONG FURNISHED AND INSTALLED BY MANUFACTURER (CONNECT TO 240/120 VOLT ELECTRICAL SERVICE) 29 7/16" 2 I/8" MIN 20 7/16" 4 I/4" CLEARANCE INSIDE FOR RIGHT ANGLE CONDUIT AND WIRE. MI 6" WIRE LEAE r2" FLEXIBLE CABLE LONG,FURNISHED AND INSTALLED BY MANUFACTURER (CONNECT TO 240/120 VOLTS ELECTRICAL SERVICE.) 34 7/8" M IN. 3 3/8" INSIDE MIN. PLUS CLEARANCE FOR RIGHT ANGLE CONDUIT AND WIRE. 36" Cooktop with Coil Elements FRONT OF UN 19 MIN. _/2 5/8-


