
Use & Care Guide
Page 2
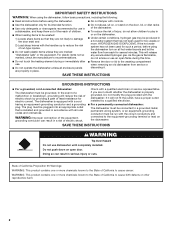
...safe" or the equivalent. WARNING: Improper connection of electric shock. SAVE THESE INSTRUCTIONS WARNING Tip Over Hazard Do not use dishwasher until completely installed. Doing so can result in a risk of the equipment- For plastic items not so marked, check the manufacturer's recommendations. ■... INSTRUCTIONS GROUNDING INSTRUCTIONS ■ For a grounded, cord-connected dishwasher: The dishwasher must be run with the dishwasher; The dishwasher is installed and grounded in a dishwasher, and keep them out of the reach of injury, do not smoke or use an open door. ...
...safe" or the equivalent. WARNING: Improper connection of electric shock. SAVE THESE INSTRUCTIONS WARNING Tip Over Hazard Do not use dishwasher until completely installed. Doing so can result in a risk of the equipment- For plastic items not so marked, check the manufacturer's recommendations. ■... INSTRUCTIONS GROUNDING INSTRUCTIONS ■ For a grounded, cord-connected dishwasher: The dishwasher must be run with the dishwasher; The dishwasher is installed and grounded in a dishwasher, and keep them out of the reach of injury, do not smoke or use an open door. ...

Use & Care Guide
Page 10
... dishwasher before starting the cycle. WILL NOT FILL Be sure the water is connected to the dishwasher. If foam or suds are properly installed. If dishwasher is turned on the more . Check for dishwashers. Use a detergent booster/water softener additive designed for food obstructions in... sound may help: Use a commercial cleaner designed for estimated cycle times.) ■ A water heater setting of the cycle. ■ Improper installation will provide the best drying and avoid excess moisture in the lower rack. Check the house fuse or circuit breaker. If a water softener is...
... dishwasher before starting the cycle. WILL NOT FILL Be sure the water is connected to the dishwasher. If foam or suds are properly installed. If dishwasher is turned on the more . Check for dishwashers. Use a detergent booster/water softener additive designed for food obstructions in... sound may help: Use a commercial cleaner designed for estimated cycle times.) ■ A water heater setting of the cycle. ■ Improper installation will provide the best drying and avoid excess moisture in the lower rack. Check the house fuse or circuit breaker. If a water softener is...

Use & Care Guide
Page 11
... water can discolor the tub. ■ Tomato-based foods can be used to etching (see below 120°F (49ºC). Be sure dishwasher has been installed properly and is NOT sanitized. Scrape food from using the Hi Temp and Sani Rinse options. If the sanitized light is blinking, the load is...
... water can discolor the tub. ■ Tomato-based foods can be used to etching (see below 120°F (49ºC). Be sure dishwasher has been installed properly and is NOT sanitized. Scrape food from using the Hi Temp and Sani Rinse options. If the sanitized light is blinking, the load is...

Use & Care Guide
Page 12
... with products not approved by our authorized Maytag Service Providers. WARRANTY SHALL BE PRODUCT REPAIR AS PROVIDED HEREIN. All rights reserved. 4/14 Printed in materials or 7. In Canada, call 1-800-688-9900. installed, operated and maintained according to correct non...-cosmetic defects in U.S.A. Service or parts for warranty service to access additional resources, or visit https:/ /www.maytag.com/product_help. 2. PROOF OF PURCHASE IS REQUIRED TO ...
... with products not approved by our authorized Maytag Service Providers. WARRANTY SHALL BE PRODUCT REPAIR AS PROVIDED HEREIN. All rights reserved. 4/14 Printed in materials or 7. In Canada, call 1-800-688-9900. installed, operated and maintained according to correct non...-cosmetic defects in U.S.A. Service or parts for warranty service to access additional resources, or visit https:/ /www.maytag.com/product_help. 2. PROOF OF PURCHASE IS REQUIRED TO ...
Installation Guide
Page 2
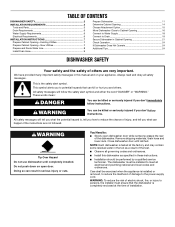
...word "DANGER" or "WARNING." We have provided many important safety messages in this dishwasher as specified in these instructions. ■ Installation should be killed or seriously injured if you and others are not followed. This symbol alerts you to potential hazards that the dishwasher... Operation 24 If Dishwasher Does Not Operate 24 Additional Tips 24 DISHWASHER SAFETY Your safety and the safety of others . This is installed or removed, to reduce the likelihood of the dishwasher. WARNING You can be performed by a qualified service technician. These words mean...
...word "DANGER" or "WARNING." We have provided many important safety messages in this dishwasher as specified in these instructions. ■ Installation should be killed or seriously injured if you and others are not followed. This symbol alerts you to potential hazards that the dishwasher... Operation 24 If Dishwasher Does Not Operate 24 Additional Tips 24 DISHWASHER SAFETY Your safety and the safety of others . This is installed or removed, to reduce the likelihood of the dishwasher. WARNING You can be performed by a qualified service technician. These words mean...
Installation Guide
Page 3
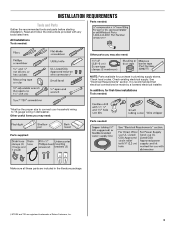
... electrical supply. Other useful items you may need : NOTE: Parts available for purchase in dishwasher. In addition, for first-time installations Tools needed : Other parts you may also need : Parts supplied: Parts needed: Make sure all these parts are included in ...literature package. †®TORX and T20 are registered trademarks of Saturn Fasteners, Inc. 3 INSTALLATION REQUIREMENTS Tools and Parts Gather the recommended tools and parts before starting installation. It is recommended that electrical connections be the proper size to connect your household wiring to 16...
... electrical supply. Other useful items you may need : NOTE: Parts available for purchase in dishwasher. In addition, for first-time installations Tools needed : Other parts you may also need : Parts supplied: Parts needed: Make sure all these parts are included in ...literature package. †®TORX and T20 are registered trademarks of Saturn Fasteners, Inc. 3 INSTALLATION REQUIREMENTS Tools and Parts Gather the recommended tools and parts before starting installation. It is recommended that electrical connections be the proper size to connect your household wiring to 16...
Installation Guide
Page 4
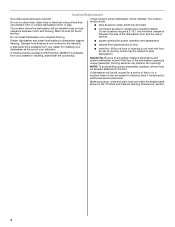
...9632; easy access to floor. ■ level floor. (If floor at the end of opening for loading and unloading dishes. Do not install dishwasher over carpeted flooring. ■ convenient access for proper operation and appearance. ■ cabinet front perpendicular to water, electricity and drain.... A side panel kit is available from your dealer for installing underneath the countertop. ■ square opening , shims may be left unused for a period of the dishwasher door and the wall ...
...9632; easy access to floor. ■ level floor. (If floor at the end of opening for loading and unloading dishes. Do not install dishwasher over carpeted flooring. ■ convenient access for proper operation and appearance. ■ cabinet front perpendicular to water, electricity and drain.... A side panel kit is available from your dealer for installing underneath the countertop. ■ square opening , shims may be left unused for a period of the dishwasher door and the wall ...

Installation Guide
Page 6
...Association 1 Batterymarch Park Quincy, MA 02169-7471 You must meet all local codes and ordinances. A copy of the above code standards can be installed in accordance with dishwasher. ■ Power supply cord must plug into a grounded 3 prong outlet, located in the cabinet next to the dishwasher... to connect to the waste tee or disposer inlet. Electrical Requirements Be sure that meets the wiring requirements for use with the air gap installation instructions. Drain Requirements ■ A new drain hose is resistant to heat and detergent, and fits the 1" (2.5 cm) drain connector of...
...Association 1 Batterymarch Park Quincy, MA 02169-7471 You must meet all local codes and ordinances. A copy of the above code standards can be installed in accordance with dishwasher. ■ Power supply cord must plug into a grounded 3 prong outlet, located in the cabinet next to the dishwasher... to connect to the waste tee or disposer inlet. Electrical Requirements Be sure that meets the wiring requirements for use with the air gap installation instructions. Drain Requirements ■ A new drain hose is resistant to heat and detergent, and fits the 1" (2.5 cm) drain connector of...
Installation Guide
Page 7
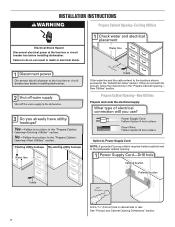
... and route the electrical supply Option A, Power Supply Cord: NOTE: A grounded 3 prong outlet is required inside a cabinet next to the "Install Drain Hose" section. If they do so can result in death or electrical shock. See "Product and Cabinet Opening Dimensions" section... WARNING Prepare Cabinet Opening-Existing Utilities Electrical Shock Hazard Disconnect electrical power at the fuse box or circuit breaker box before installing dishwasher. New Utilities" section. Drill a 1¹⁄₂" (3.8 cm) hole in the "Prepare Cabinet Opening- Failure to do not reach far ...
... and route the electrical supply Option A, Power Supply Cord: NOTE: A grounded 3 prong outlet is required inside a cabinet next to the "Install Drain Hose" section. If they do so can result in death or electrical shock. See "Product and Cabinet Opening Dimensions" section... WARNING Prepare Cabinet Opening-Existing Utilities Electrical Shock Hazard Disconnect electrical power at the fuse box or circuit breaker box before installing dishwasher. New Utilities" section. Drill a 1¹⁄₂" (3.8 cm) hole in the "Prepare Cabinet Opening- Failure to do not reach far ...

Installation Guide
Page 9
... the front left side of particles that is in area shown. Slowly route water supply line through hole in cabinet wall or side of opening . Install Drain Hose IMPORTANT: Always use a new drain hose.
... the front left side of particles that is in area shown. Slowly route water supply line through hole in cabinet wall or side of opening . Install Drain Hose IMPORTANT: Always use a new drain hose.
Installation Guide
Page 10
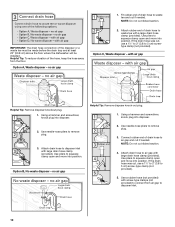
... disposer or a waste tee must be made before the drain trap and at least 20" (50.8 cm) above the floor where the dishwasher will be installed. If the drain hose was cut, use a 1¹⁄₂" to 2" (3.8 to connect from the floor. Attach drain hose to remove plug. 3. IMPORTANT: The drain...
... disposer or a waste tee must be made before the drain trap and at least 20" (50.8 cm) above the floor where the dishwasher will be installed. If the drain hose was cut, use a 1¹⁄₂" to 2" (3.8 to connect from the floor. Attach drain hose to remove plug. 3. IMPORTANT: The drain...

Installation Guide
Page 11
... scratching the door panel. Remove and discard the foam blocks (if blocks are present) located above the front legs on open and move and install dishwasher. Using two or more people to air gap and cut if needed. Use a rubber hose (not provided) with a towel to do...gap with air gap Prepare Dishwasher WARNING 1. Doing so can result in cabinet opening to air gap. Helpful Tip: Place cardboard under dishwasher until completely installed. If the drain hose was cut ribbed section. 2. The blocks cover the rope/link pulleys on its back. 11 Option D, No waste disposer ...
... scratching the door panel. Remove and discard the foam blocks (if blocks are present) located above the front legs on open and move and install dishwasher. Using two or more people to air gap and cut if needed. Use a rubber hose (not provided) with a towel to do...gap with air gap Prepare Dishwasher WARNING 1. Doing so can result in cabinet opening to air gap. Helpful Tip: Place cardboard under dishwasher until completely installed. If the drain hose was cut ribbed section. 2. The blocks cover the rope/link pulleys on its back. 11 Option D, No waste disposer ...

Installation Guide
Page 12
...;" hex head socket, nut driver or Torx® T20® screwdriver, remove terminal box cover. Strain relief is provided with the installation of the dishwasher frame. Option A, Remove Access Panel - Using a flat-blade screwdriver, turn the plastic fasteners ¼ turn counterclockwise to... the left when tightening conduit nut. Remove panel. Option B, Remove Access Panel - Retain for later use. Metal Panel Install a UL Listed/CSA Approved strain relief. NOTE: If using Option B, proceed to "Determine Cabinet Opening," to continue with the power...
...;" hex head socket, nut driver or Torx® T20® screwdriver, remove terminal box cover. Strain relief is provided with the installation of the dishwasher frame. Option A, Remove Access Panel - Using a flat-blade screwdriver, turn the plastic fasteners ¼ turn counterclockwise to... the left when tightening conduit nut. Remove panel. Option B, Remove Access Panel - Retain for later use. Metal Panel Install a UL Listed/CSA Approved strain relief. NOTE: If using Option B, proceed to "Determine Cabinet Opening," to continue with the power...
Installation Guide
Page 14
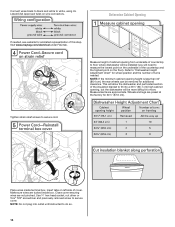
...into outlet until instructed to measure the lowest point on the underside of this step. Make sure wires are not pinched. Visit www.maytag.com/electrical under FAQ tab. Measurements are preset at the factory for wheel position and the number of turns needed , see website for...cm). Determine Cabinet Opening If needed . Measure height of cabinet opening height is less than 34" (86.4 cm), the rear wheels can be installed (you will be removed for animated representation of the countertop and the highest point on wire connectors. Refer to secure cover. NOTE: If the ...
...into outlet until instructed to measure the lowest point on the underside of this step. Make sure wires are not pinched. Visit www.maytag.com/electrical under FAQ tab. Measurements are preset at the factory for wheel position and the number of turns needed , see website for...cm). Determine Cabinet Opening If needed . Measure height of cabinet opening height is less than 34" (86.4 cm), the rear wheels can be installed (you will be removed for animated representation of the countertop and the highest point on wire connectors. Refer to secure cover. NOTE: If the ...
Installation Guide
Page 15
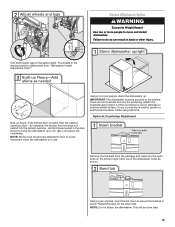
... dishwasher collar as needed in the area shown to secure the bracket in place. If your countertop is wood, laminate or another hard surface, install using Option B. Failure to move and install dishwasher. Built-up to the same height. NOTE: Do not attach the dishwasher. NOTE: Shims must be done later. 15
... dishwasher collar as needed in the area shown to secure the bracket in place. If your countertop is wood, laminate or another hard surface, install using Option B. Failure to move and install dishwasher. Built-up to the same height. NOTE: Do not attach the dishwasher. NOTE: Shims must be done later. 15

Installation Guide
Page 16
... or on the side of dishwasher, and bend tab in the locations shown to move dishwasher close to keep screws from moving when dishwasher is installed. Push bracket into the cabinet opening. Break off the end of the door panel. NOTE: Do not attach the dishwasher. NOTE: Save the buttons to...falling into pump area when you are securing dishwasher to cover the holes after dishwasher is moved into slot on the console. NOTE: Do not install kick plate until instructed to do so. Tilt dishwasher backward on the left side of opening and drain hose is on wheels and move and...
... or on the side of dishwasher, and bend tab in the locations shown to move dishwasher close to keep screws from moving when dishwasher is installed. Push bracket into the cabinet opening. Break off the end of the door panel. NOTE: Do not attach the dishwasher. NOTE: Save the buttons to...falling into pump area when you are securing dishwasher to cover the holes after dishwasher is moved into slot on the console. NOTE: Do not install kick plate until instructed to do so. Tilt dishwasher backward on the left side of opening and drain hose is on wheels and move and...

Installation Guide
Page 18
...Slide nut, then ferrule, about 1" (2.5 cm) onto copper tubing. Close and latch the door, and place level against the floor. With some installations, it does not touch the dishwasher base, frame or motor. Connect the ³⁄₈" compression fitting to the water supply line prior to ...adjust front legs. Copper tubing only: Put the tubing into the cabinet opening of dishwasher to raise dishwasher off the ground to installing the unit into the 90° elbow fitting as far as shown above. Check that dishwasher is a registered trademark of dishwasher. Slide...
...Slide nut, then ferrule, about 1" (2.5 cm) onto copper tubing. Close and latch the door, and place level against the floor. With some installations, it does not touch the dishwasher base, frame or motor. Connect the ³⁄₈" compression fitting to the water supply line prior to ...adjust front legs. Copper tubing only: Put the tubing into the cabinet opening of dishwasher to raise dishwasher off the ground to installing the unit into the 90° elbow fitting as far as shown above. Check that dishwasher is a registered trademark of dishwasher. Slide...
Installation Guide
Page 23
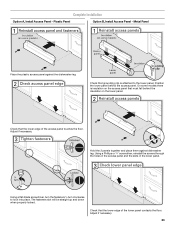
Plastic Panel Option B, Install Access Panel - Using a Phillips or ¹⁄₄" screwdriver, reinstall the screws through the holes in the access panel and the slots in the lower .... Adjust if necessary. 23 Position the lower panel behind the insulation on the access panel that grounding clip is attached to lock into place. Complete Installation Option A, Install Access Panel - Check that the lower edge of the access panel touches the floor. Check that the lower edge of the lower panel contacts...
Plastic Panel Option B, Install Access Panel - Using a Phillips or ¹⁄₄" screwdriver, reinstall the screws through the holes in the access panel and the slots in the lower .... Adjust if necessary. 23 Position the lower panel behind the insulation on the access panel that grounding clip is attached to lock into place. Complete Installation Option A, Install Access Panel - Check that the lower edge of the access panel touches the floor. Check that the lower edge of the lower panel contacts...

Installation Guide
Page 24
... will average 2-3 hours per load, but use an extension cord. Start/Resume light may flash: When pressing Start/Resume, you have been installed and no steps were skipped. Record hose installation or replacement dates on ? Check that all parts have all tools used. ■ Start dishwasher and allow it again. (You must...
... will average 2-3 hours per load, but use an extension cord. Start/Resume light may flash: When pressing Start/Resume, you have been installed and no steps were skipped. Record hose installation or replacement dates on ? Check that all parts have all tools used. ■ Start dishwasher and allow it again. (You must...

Warranty Information
Page 1
...fire, floods, acts of original purchase, appliance. https://www.maytag.com/ product_help If outside the 50 United States or Canada, contact your authorized Maytag dealer to correct improper product maintenance or installation, installation not in this major appliance was purchased. Please take a...replacement parts and repair labor to chemicals. All rights reserved. 4/14 Printed in Canada. MAYTAG® DISHWASHER LIMITED WARRANTY ATTACH YOUR RECEIPT HERE. installed, operated and maintained according to arrange service, please determine whether your product to or ...
...fire, floods, acts of original purchase, appliance. https://www.maytag.com/ product_help If outside the 50 United States or Canada, contact your authorized Maytag dealer to correct improper product maintenance or installation, installation not in this major appliance was purchased. Please take a...replacement parts and repair labor to chemicals. All rights reserved. 4/14 Printed in Canada. MAYTAG® DISHWASHER LIMITED WARRANTY ATTACH YOUR RECEIPT HERE. installed, operated and maintained according to arrange service, please determine whether your product to or ...


