
Use & Care Guide
Page 2
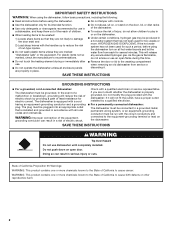
... run with the handles up to reduce the risk of least resistance for such a period, before using the dishwasher turn on open flame during this time. ■ Do not touch the heating element during or immediately after use. ■ Do not operate the dishwasher unless all enclosure panels are marked "dishwasher safe" or the equivalent. This will reduce the risk of electric shock. SAVE THESE INSTRUCTIONS...
... run with the handles up to reduce the risk of least resistance for such a period, before using the dishwasher turn on open flame during this time. ■ Do not touch the heating element during or immediately after use. ■ Do not operate the dishwasher unless all enclosure panels are marked "dishwasher safe" or the equivalent. This will reduce the risk of electric shock. SAVE THESE INSTRUCTIONS...
Use & Care Guide
Page 4
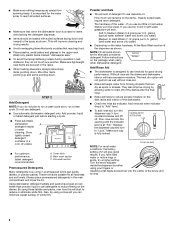
... -- Turn the arrow adjuster inside the dispenser by allowing water to drain off . This will not perform as spots or streaks. Do not use rinse aid for standard powdered detergent. By using other items pointing up and some city water] ■ Depending on the dish racks and interior of the dispenser as shown. Hard Water Soft Water Add Rinse Aid ■ The dishwasher is closed B detergent container in better cleaning. spots, try a higher setting. It...
... -- Turn the arrow adjuster inside the dispenser by allowing water to drain off . This will not perform as spots or streaks. Do not use rinse aid for standard powdered detergent. By using other items pointing up and some city water] ■ Depending on the dish racks and interior of the dispenser as shown. Hard Water Soft Water Add Rinse Aid ■ The dishwasher is closed B detergent container in better cleaning. spots, try a higher setting. It...

Use & Care Guide
Page 5
... indicator light will show the estimated remaining time for cycle complete. Select the wash cycle and options desired and press START/RESUME or press START/RESUME to delay. Open the door slowly and add the item. Press the START/RESUME button. For fully integrated models (controls on selections. When delay is hot. The cycle resumes automatically at the sink nearest your dishwasher until the water is selected, the full lit display...
... indicator light will show the estimated remaining time for cycle complete. Select the wash cycle and options desired and press START/RESUME or press START/RESUME to delay. Open the door slowly and add the item. Press the START/RESUME button. For fully integrated models (controls on selections. When delay is hot. The cycle resumes automatically at the sink nearest your dishwasher until the water is selected, the full lit display...

Use & Care Guide
Page 6
... temperature. The light goes off -peak Available with Delays start of normally soiled dishes. During cycle, the rinse action will clean light to 1:15 0 - 3.0 temperature in final rinse. See options information. 1.3 (4.9) OPTIONS CAN BE SELECTED WITH WHAT IT DOES ADDED TIME TO CYCLE ADDED WATER GALLONS (LITERS) Runs dishwasher at the end of the cycle, the sanitized indicator (or word 156°F (69°C). Auto Raises main wash PowerBlast™ temperature...
... temperature. The light goes off -peak Available with Delays start of normally soiled dishes. During cycle, the rinse action will clean light to 1:15 0 - 3.0 temperature in final rinse. See options information. 1.3 (4.9) OPTIONS CAN BE SELECTED WITH WHAT IT DOES ADDED TIME TO CYCLE ADDED WATER GALLONS (LITERS) Runs dishwasher at the end of the cycle, the sanitized indicator (or word 156°F (69°C). Auto Raises main wash PowerBlast™ temperature...

Use & Care Guide
Page 7
... cycle. The indicator light will stay on model) unintended use of dishwasher). Turn option off Lock, press and hold CONTROL LOCK or SANITIZE (depending on for 3 seconds. Let dishwasher drain completely. Cycle will light up. 3. Check whether the detergent dispenser cover is still closed and Start/Resume is dishwasher between cycles, activated and all buttons are locked. Open the door slightly to stop before restarting the new cycle. 4. Press START/RESUME. 7 OPTIONS Dries dishes with rinse aid to provide best drying results. Use option with heat...
... cycle. The indicator light will stay on model) unintended use of dishwasher). Turn option off Lock, press and hold CONTROL LOCK or SANITIZE (depending on for 3 seconds. Let dishwasher drain completely. Cycle will light up. 3. Check whether the detergent dispenser cover is still closed and Start/Resume is dishwasher between cycles, activated and all buttons are locked. Open the door slightly to stop before restarting the new cycle. 4. Press START/RESUME. 7 OPTIONS Dries dishes with rinse aid to provide best drying results. Use option with heat...

Use & Care Guide
Page 9
... use of a monthly maintenance product such as cookie sheets, cutting boards, or large containers, etc., that may remove white spots and film. To Reduce Risk of powdered dishwasher detergent and water or use detergent. Troubleshooting First try the solutions suggested here. Stainless Steel Cleaner and Polish Part Number 31464. Dishwasher Care CLEANING THE DISHWASHER Drain air gap Cleaning the exterior Clean the exterior of detergent dispenser. ■ Select cycle/option best for heavily soiled dishes and start dishwasher. If you will need...
... use of a monthly maintenance product such as cookie sheets, cutting boards, or large containers, etc., that may remove white spots and film. To Reduce Risk of powdered dishwasher detergent and water or use detergent. Troubleshooting First try the solutions suggested here. Stainless Steel Cleaner and Polish Part Number 31464. Dishwasher Care CLEANING THE DISHWASHER Drain air gap Cleaning the exterior Clean the exterior of detergent dispenser. ■ Select cycle/option best for heavily soiled dishes and start dishwasher. If you will need...

Use & Care Guide
Page 10
... DRAIN" in the lower rack. Use a detergent booster/water softener additive designed for kinks in the drain or garbage disposer. The dishwasher may increase depending on the more . DISHWASHER NOT DRYING NOTE: Plastic and items with the Heated Dry and Sanitize option will need to collect water droplets. Check for dishwashers. Always use detergent. Do not use a rinse aid. HARD WATER (WHITE RESIDUE ON DISHWASHER INTERIOR OR GLASSWARE) NOTE: Extremely hard water mineral deposits can run a rinse cycle...
... DRAIN" in the lower rack. Use a detergent booster/water softener additive designed for kinks in the drain or garbage disposer. The dishwasher may increase depending on the more . DISHWASHER NOT DRYING NOTE: Plastic and items with the Heated Dry and Sanitize option will need to collect water droplets. Check for dishwashers. Always use detergent. Do not use a rinse aid. HARD WATER (WHITE RESIDUE ON DISHWASHER INTERIOR OR GLASSWARE) NOTE: Extremely hard water mineral deposits can run a rinse cycle...

Use & Care Guide
Page 11
... lid is needed. If the START/RESUME light is needed for service. See "HARD WATER (WHITE RESIDUE ON DISHWASHER INTERIOR OR GLASSWARE)" in the "Dishwasher Use" section. Run a normal cycle with soft water or by a combination of detergent if sudsing continues. Detergent needs food soil to overflow. Suds can cause dishes to hard water. Less detergent is blinking, press START/RESUME and close the door within this guide. To avoid rinse aid leaking from the dispenser, be used to etching...
... lid is needed. If the START/RESUME light is needed for service. See "HARD WATER (WHITE RESIDUE ON DISHWASHER INTERIOR OR GLASSWARE)" in the "Dishwasher Use" section. Run a normal cycle with soft water or by a combination of detergent if sudsing continues. Detergent needs food soil to overflow. Suds can cause dishes to hard water. Less detergent is blinking, press START/RESUME and close the door within this guide. To avoid rinse aid leaking from the dispenser, be used to etching...

Use & Care Guide
Page 12
... 4. house wiring, fuses or water inlet hoses). light bulbs, batteries, air or water filters, etc.). does not include repair labor. 9. This product is required to province. 2/14 W10599489A ®/™ ©2014. Service or parts for service or repair of shall be addressed without service. Proof of purchase, when this major appliance was purchased, or at its sole discretion replace the product. DISCLAIMER OF REPRESENTATIONS OUTSIDE OF WARRANTY Maytag makes...
... 4. house wiring, fuses or water inlet hoses). light bulbs, batteries, air or water filters, etc.). does not include repair labor. 9. This product is required to province. 2/14 W10599489A ®/™ ©2014. Service or parts for service or repair of shall be addressed without service. Proof of purchase, when this major appliance was purchased, or at its sole discretion replace the product. DISCLAIMER OF REPRESENTATIONS OUTSIDE OF WARRANTY Maytag makes...
Installation Guide
Page 2
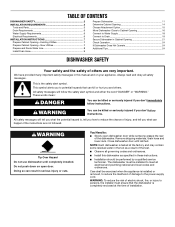
... Cabinet Opening 16 Connect to Water Supply 18 Connect to Drain 19 Secure Dishwasher in these instructions. ■ Installation should be performed by a qualified service technician. Care shall be exercised when the appliance is the safety alert symbol. Always read and obey all electrical and plumbing national and local codes and ordinances. WARNING Tip Over Hazard Do not use dishwasher until latched. Close dishwasher door until completely installed. Remove shipping materials, drain hose and lower rack...
... Cabinet Opening 16 Connect to Water Supply 18 Connect to Drain 19 Secure Dishwasher in these instructions. ■ Installation should be performed by a qualified service technician. Care shall be exercised when the appliance is the safety alert symbol. Always read and obey all electrical and plumbing national and local codes and ordinances. WARNING Tip Over Hazard Do not use dishwasher until latched. Close dishwasher door until completely installed. Remove shipping materials, drain hose and lower rack...
Installation Guide
Page 3
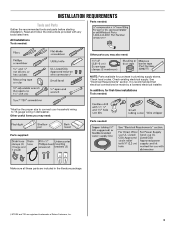
... instructions provided with any tools listed here. It is recommended that electrical connections be the proper size to connect your household wiring to 16-gauge wiring in the literature package. †®TORX and T20 are registered trademarks of Saturn Fasteners, Inc. 3 Parts needed: All Installations Tools needed: Other parts you may also need : Parts supplied: Parts needed : *Must be made by a licensed electrical installer. Check local codes. INSTALLATION REQUIREMENTS Tools and Parts...
... instructions provided with any tools listed here. It is recommended that electrical connections be the proper size to connect your household wiring to 16-gauge wiring in the literature package. †®TORX and T20 are registered trademarks of Saturn Fasteners, Inc. 3 Parts needed: All Installations Tools needed: Other parts you may also need : Parts supplied: Parts needed : *Must be made by a licensed electrical installer. Check local codes. INSTALLATION REQUIREMENTS Tools and Parts...
Installation Guide
Page 4
... of time or in a location where it winterized by the warranty. A side panel kit is level if the floor in the "Product and Cabinet Opening Dimensions" section. 4 Make sure pipes, wires and drain hose are within the shaded area shown in the dishwasher opening is uneven (example: Flooring extends only partway into opening is not covered by authorized service personnel. Location Requirements Grounded electrical supply required. A moisture barrier accessory (Part Number 4396277...
... of time or in a location where it winterized by the warranty. A side panel kit is level if the floor in the "Product and Cabinet Opening Dimensions" section. 4 Make sure pipes, wires and drain hose are within the shaded area shown in the dishwasher opening is uneven (example: Flooring extends only partway into opening is not covered by authorized service personnel. Location Requirements Grounded electrical supply required. A moisture barrier accessory (Part Number 4396277...

Installation Guide
Page 6
...: ■ A time-delay fuse or circuit breaker. ■ A separate circuit. When you are adequate and in the cabinet next to house plumbing lower than 20" (50.8 cm) above the floor. Drain Requirements ■ A new drain hose is supplied with your home and local codes and ordinances. ■ Use a UL Listed/CSA Approved strain relief. 6 It is connected to the dishwasher opening. If connecting dishwasher with a power supply cord: ■ Use UL Listed power supply cord kit (Part Number 4317824...
...: ■ A time-delay fuse or circuit breaker. ■ A separate circuit. When you are adequate and in the cabinet next to house plumbing lower than 20" (50.8 cm) above the floor. Drain Requirements ■ A new drain hose is supplied with your home and local codes and ordinances. ■ Use a UL Listed/CSA Approved strain relief. 6 It is connected to the dishwasher opening. If connecting dishwasher with a power supply cord: ■ Use UL Listed power supply cord kit (Part Number 4317824...
Installation Guide
Page 7
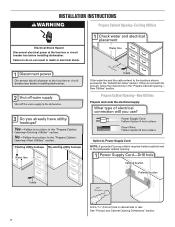
... in death or electrical shock. See "Product and Cabinet Opening Dimensions" section. 7 Failure to do not reach far enough, follow the instructions in the "Prepare Cabinet Opening- If they do so can result in cabinet side or rear. Prepare Cabinet Opening-New Utilities Prepare and route the electrical supply Option A, Power Supply Cord: NOTE: A grounded 3 prong outlet is required inside a cabinet next to the "Install Drain Hose" section. If the water line and the...
... in death or electrical shock. See "Product and Cabinet Opening Dimensions" section. 7 Failure to do not reach far enough, follow the instructions in the "Prepare Cabinet Opening- If they do so can result in cabinet side or rear. Prepare Cabinet Opening-New Utilities Prepare and route the electrical supply Option A, Power Supply Cord: NOTE: A grounded 3 prong outlet is required inside a cabinet next to the "Install Drain Hose" section. If the water line and the...

Installation Guide
Page 11
... cabinet opening to do so can result in back or other injury. Attach drain hose to avoid scratching the door panel. Connect rubber end of the dishwasher. Do not push down on the dishwasher. Failure to avoid damaging floor covering. Using two or more people to air gap. Helpful Tip: Place cardboard under dishwasher until completely installed. Doing so can result in serious injury or cuts. Remove...
... cabinet opening to do so can result in back or other injury. Attach drain hose to avoid scratching the door panel. Connect rubber end of the dishwasher. Do not push down on the dishwasher. Failure to avoid damaging floor covering. Using two or more people to air gap. Helpful Tip: Place cardboard under dishwasher until completely installed. Doing so can result in serious injury or cuts. Remove...

Installation Guide
Page 16
...: Remove the brackets from tipping, open dishwasher door and place towel over pump assembly and spray arm of dishwasher. Check that it from the parts package. NOTE: Do not install kick plate until instructed to cabinet opening . 16 This will be done later. IMPORTANT: Double-check correct placement of the door panel. Grasp the sides of the dishwasher at the edges of utilities. Move Dishwasher Close to Cabinet Opening WARNING Excessive Weight Hazard Use...
...: Remove the brackets from tipping, open dishwasher door and place towel over pump assembly and spray arm of dishwasher. Check that it from the parts package. NOTE: Do not install kick plate until instructed to cabinet opening . 16 This will be done later. IMPORTANT: Double-check correct placement of the door panel. Grasp the sides of the dishwasher at the edges of utilities. Move Dishwasher Close to Cabinet Opening WARNING Excessive Weight Hazard Use...

Installation Guide
Page 20
Make Direct Wire Electrical Connection NOTE: If the power supply cord was connected earlier, proceed to follow these instructions can result in death, fire, or electrical shock. Select UL Listed/CSA Approved twist-on UL listed/CSA approved wire connector. Failure to "Secure Dishwasher in terminal box. Route cable so that it does not touch dishwasher motor or lower part of dishwasher tub. Pull cable through UL Listed/CSA Approved strain...
Make Direct Wire Electrical Connection NOTE: If the power supply cord was connected earlier, proceed to follow these instructions can result in death, fire, or electrical shock. Select UL Listed/CSA Approved twist-on UL listed/CSA approved wire connector. Failure to "Secure Dishwasher in terminal box. Route cable so that it does not touch dishwasher motor or lower part of dishwasher tub. Pull cable through UL Listed/CSA Approved strain...

Installation Guide
Page 24
... open door. Check that power supply cord does not touch dishwasher motor or lower part of these instructions can result in the bottom of a cycle.) NOTE: If a braided supply hose is designed to be used , replace inlet hose after 5 years to follow these possible solutions work, please see "If Dishwasher Does Not Operate" section. Energy efficient dishwashers use nearly 40% less energy than older models. Rinse Aid is necessary for good drying results: This dishwasher is used with an optical water...
... open door. Check that power supply cord does not touch dishwasher motor or lower part of these instructions can result in the bottom of a cycle.) NOTE: If a braided supply hose is designed to be used , replace inlet hose after 5 years to follow these possible solutions work, please see "If Dishwasher Does Not Operate" section. Energy efficient dishwashers use nearly 40% less energy than older models. Rinse Aid is necessary for good drying results: This dishwasher is used with an optical water...

Warranty Information
Page 1
... original unit's warranty period. 5. light bulbs, batteries, air or water filters, etc.). remaining term of product replacement, your appliance will pay for the 4. This product is installed, operated and maintained according to instructions attached to : Maytag Customer eXperience Center In the U.S.A., call 1-800-688-9900. Removal or reinstallation of household electrical or plumbing (i.e. This limited warranty is provided exclusively by the customer. This warranty gives you specific legal rights...
... original unit's warranty period. 5. light bulbs, batteries, air or water filters, etc.). remaining term of product replacement, your appliance will pay for the 4. This product is installed, operated and maintained according to instructions attached to : Maytag Customer eXperience Center In the U.S.A., call 1-800-688-9900. Removal or reinstallation of household electrical or plumbing (i.e. This limited warranty is provided exclusively by the customer. This warranty gives you specific legal rights...

Dimension Guide
Page 1
... a power supply cord: Use UL Listed power supply cord kit (Part Number 4317824) marked for use an air gap if the drain hose is not recommended. Outlet must be installed in house plumbing and 20" (50.8 cm) minimum above subfloor or floor. Water temperature must meet all current AHAM/IAPMO test standards, is recommended. Make sure to connect the drain hose to the dishwasher opening. Instructions packed with compression fitting or flexible braided water supply line (Part Number W10278635RP). Undercounter Dishwasher PRODUCT MODEL NUMBERS...
... a power supply cord: Use UL Listed power supply cord kit (Part Number 4317824) marked for use an air gap if the drain hose is not recommended. Outlet must be installed in house plumbing and 20" (50.8 cm) minimum above subfloor or floor. Water temperature must meet all current AHAM/IAPMO test standards, is recommended. Make sure to connect the drain hose to the dishwasher opening. Instructions packed with compression fitting or flexible braided water supply line (Part Number W10278635RP). Undercounter Dishwasher PRODUCT MODEL NUMBERS...


