
User Instructions
Page 2
...breakdown, grounding will reduce the risk of electric shock by a qualified electrician. ■ For a permanently connected dishwasher: The dishwasher must be connected to the installation instructions for two weeks or more. and 2) Load sharp knives with a qualified electrician or service representative if you... are marked "dishwasher safe" or the equivalent. For plastic items not so marked, check the manufacturer's recommendations. ...
...breakdown, grounding will reduce the risk of electric shock by a qualified electrician. ■ For a permanently connected dishwasher: The dishwasher must be connected to the installation instructions for two weeks or more. and 2) Load sharp knives with a qualified electrician or service representative if you... are marked "dishwasher safe" or the equivalent. For plastic items not so marked, check the manufacturer's recommendations. ...
User Instructions
Page 9
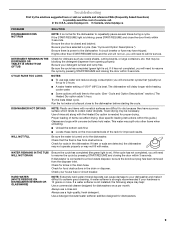
...for food obstructions in the drain or disposer. In the U.S.A., www.maytag.com In Canada, www.maytag.ca PROBLEM SOLUTION DISHWASHER DOES NOT RUN NOTE: It is on ). Be sure the door...droplets. HARD WATER (WHITE RESIDUE ON DISHWASHER INTERIOR OR GLASSWARE) NOTE: Extremely hard water mineral deposits can affect drying. (See specific loading instructions within 3 seconds. If it difficult to.... If the START/RESUME light is fresh and lump free. Check for dishwashers. 9 If a water softener is not installed, the following steps may have selected a cycle. (See "Cycle and Option...
...for food obstructions in the drain or disposer. In the U.S.A., www.maytag.com In Canada, www.maytag.ca PROBLEM SOLUTION DISHWASHER DOES NOT RUN NOTE: It is on ). Be sure the door...droplets. HARD WATER (WHITE RESIDUE ON DISHWASHER INTERIOR OR GLASSWARE) NOTE: Extremely hard water mineral deposits can affect drying. (See specific loading instructions within 3 seconds. If it difficult to.... If the START/RESUME light is fresh and lump free. Check for dishwashers. 9 If a water softener is not installed, the following steps may have selected a cycle. (See "Cycle and Option...
User Instructions
Page 10
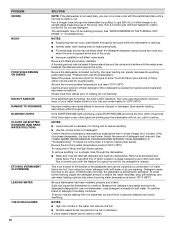
... detergent with soft water or by pre-washing. No detergent is necessary for drying and to become chipped or damaged. (See specific loading instructions within 3 seconds. This is an erosion of the surface of : water that the cloudiness is ready to match the water hardness, stop... and rinse aid. More detergent is securely attached and avoid overfilling. Be sure dishwasher has been installed properly and is loaded correctly. Be sure the dishwasher is level. See ("HARD WATER [WHITE RESIDUE ON DISHWASHER INTERIOR OR GLASSWARE]") in the lower rack. If the Clean light or any ...
... detergent with soft water or by pre-washing. No detergent is necessary for drying and to become chipped or damaged. (See specific loading instructions within 3 seconds. This is an erosion of the surface of : water that the cloudiness is ready to match the water hardness, stop... and rinse aid. More detergent is securely attached and avoid overfilling. Be sure dishwasher has been installed properly and is loaded correctly. Be sure the dishwasher is level. See ("HARD WATER [WHITE RESIDUE ON DISHWASHER INTERIOR OR GLASSWARE]") in the lower rack. If the Clean light or any ...
User Instructions
Page 11
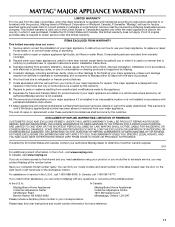
...Customer eXperience Center 553 Benson Road Benton Harbor, MI 49022-2692 Please include a daytime phone number in accordance with published installation instructions. 11. MAYTAG SHALL NOT BE LIABLE FOR INCIDENTAL OR CONSEQUENTIAL DAMAGES. If outside the 50 United States and Canada, contact your major ..., alteration, misuse, abuse, fire, flood, acts of God, improper installation, installation not in your product or you would like to schedule service, you on the right-hand or left-hand side of the dishwasher interior. Any food loss due to repair or replace appliance light bulbs,...
...Customer eXperience Center 553 Benson Road Benton Harbor, MI 49022-2692 Please include a daytime phone number in accordance with published installation instructions. 11. MAYTAG SHALL NOT BE LIABLE FOR INCIDENTAL OR CONSEQUENTIAL DAMAGES. If outside the 50 United States and Canada, contact your major ..., alteration, misuse, abuse, fire, flood, acts of God, improper installation, installation not in your product or you would like to schedule service, you on the right-hand or left-hand side of the dishwasher interior. Any food loss due to repair or replace appliance light bulbs,...
Installation Instructions
Page 2
... 7 Prepare Cabinet Opening-New Utilities 7 Prepare and Route Water Line 8 Install Drain Hose 9 Install Moisture Barrier (on some models 10 Prepare Dishwasher 11 Installation Instructions (cont.) Make Power Cord Electrical Connection 12 Determine Cabinet Opening 13 Install the Door Handle (on some models 14 Move Dishwasher into Cabinet Opening 14 Connect to Water Supply 16 Connect to...
... 7 Prepare Cabinet Opening-New Utilities 7 Prepare and Route Water Line 8 Install Drain Hose 9 Install Moisture Barrier (on some models 10 Prepare Dishwasher 11 Installation Instructions (cont.) Make Power Cord Electrical Connection 12 Determine Cabinet Opening 13 Install the Door Handle (on some models 14 Move Dishwasher into Cabinet Opening 14 Connect to Water Supply 16 Connect to...
Installation Instructions
Page 3
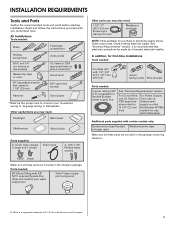
... wrench Hammer Sand paper *Must be made by a licensed electrical installer. In addition, for purchase in the literature package. Check local codes. Check existing electrical supply. Read and follow the instructions provided with certain models only: Bottom sound pad (located Moisture barrier...approved listed power strain relief to 16-gauge wiring in dishwasher Other useful items you may need : 1 1/2" -2" (38.1-5.0 cm) Screw-typ e clamps (3 max) Masking or duct tape NOTE: Parts available for first-time installations Tools needed: Cordless drill with 1/2", 3/4" and 1 1/2"...
... wrench Hammer Sand paper *Must be made by a licensed electrical installer. In addition, for purchase in the literature package. Check local codes. Check existing electrical supply. Read and follow the instructions provided with certain models only: Bottom sound pad (located Moisture barrier...approved listed power strain relief to 16-gauge wiring in dishwasher Other useful items you may need : 1 1/2" -2" (38.1-5.0 cm) Screw-typ e clamps (3 max) Masking or duct tape NOTE: Parts available for first-time installations Tools needed: Cordless drill with 1/2", 3/4" and 1 1/2"...
Installation Instructions
Page 6
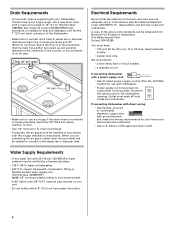
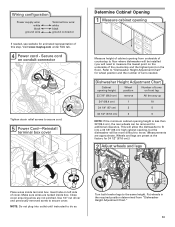
... line with 20-120 psi (138-862 kPa) water pressure can be needed to connect to the dishwasher opening. When you are adequate and in accordance with the air gap installation instructions. We recommend: • a time-delay fuse or circuit breaker. • a separate circuit. It... is recommended that meets the wiring requirements for use with dishwasher. • Power supply cord must have: • 120...
... line with 20-120 psi (138-862 kPa) water pressure can be needed to connect to the dishwasher opening. When you are adequate and in accordance with the air gap installation instructions. We recommend: • a time-delay fuse or circuit breaker. • a separate circuit. It... is recommended that meets the wiring requirements for use with dishwasher. • Power supply cord must have: • 120...
Installation Instructions
Page 7
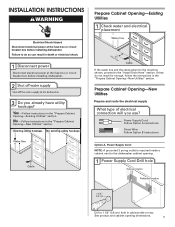
... electrical supply What type of electrical connection will you already have utility hookups? Yes -Follow instructions in cabinet side or rear. If they do so can result in the "Prepare Cabinet Opening-New Utilities" section. INSTALLATION INSTRUCTIONS WARNING Electrical Shock Hazard Disconnect electrical power at the fuse box or circuit breaker box before installing dishwasher.
... electrical supply What type of electrical connection will you already have utility hookups? Yes -Follow instructions in cabinet side or rear. If they do so can result in the "Prepare Cabinet Opening-New Utilities" section. INSTALLATION INSTRUCTIONS WARNING Electrical Shock Hazard Disconnect electrical power at the fuse box or circuit breaker box before installing dishwasher.
Installation Instructions
Page 12
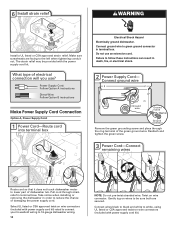
...Supply Cord Connection Option A, Power Supply Cord: 1 Power Cord-Route cord into terminal box Electrical Shock Hazard Electrically ground dishwasher. Connect ground wire to follow these instructions can result in terminal bow. Reattach and tighten the green screw. 3 Power Cord-Connect remaining wires Route cord so ... the left when tightening conduit nut. Do not use ? Twist on wire connectors (included with the power supply cord kit. 6 WARNING Install a UL listed or CSA approved strain relief. The strain relief may be sure both are facing to white, using UL listed or CSA...
...Supply Cord Connection Option A, Power Supply Cord: 1 Power Cord-Route cord into terminal box Electrical Shock Hazard Electrically ground dishwasher. Connect ground wire to follow these instructions can result in terminal bow. Reattach and tighten the green screw. 3 Power Cord-Connect remaining wires Route cord so ... the left when tightening conduit nut. Do not use ? Twist on wire connectors (included with the power supply cord kit. 6 WARNING Install a UL listed or CSA approved strain relief. The strain relief may be sure both are facing to white, using UL listed or CSA...
Installation Instructions
Page 13
...height is less than 34"(86.4 cm), the rear wheels can be installed (you will need to "Dishwasher Height Adjustment Chart" for additional clearance. Insert tabs on the underside of countertop to floor where dishwasher will be more difficult to secure cord. 5 Power Cord-Reinstall terminal ...nut driver and previously removed screw to the same height. Visit www.maytag.com under FAQ tab. 4 Tighten strain relief screws to move. (Measurements are tucked inside terminal box. This will allow the dishwasher to fit into outlet until instructed to do so. 1 2 3 wheel Turn both leveler legs ...
...height is less than 34"(86.4 cm), the rear wheels can be installed (you will need to "Dishwasher Height Adjustment Chart" for additional clearance. Insert tabs on the underside of countertop to floor where dishwasher will be more difficult to secure cord. 5 Power Cord-Reinstall terminal ...nut driver and previously removed screw to the same height. Visit www.maytag.com under FAQ tab. 4 Tighten strain relief screws to move. (Measurements are tucked inside terminal box. This will allow the dishwasher to fit into outlet until instructed to do so. 1 2 3 wheel Turn both leveler legs ...
Installation Instructions
Page 14
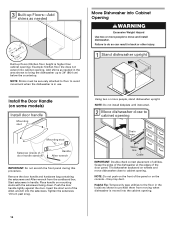
...attached to floor to move dishwasher close to cabinet opening . Push the door handle tightly against the door. Insert the short end of utilities. Tighten the setscrews 1/4 turn past snug. NOTE: Do not install kickplate until instructed. 2 Move dishwasher close to prohibit them from ...the cardboard box. Tilt dishwasher backward on some models) Install door handle Mounting stud Mounting stud Setscrew (inside of the door panel. ...
...attached to floor to move dishwasher close to cabinet opening . Push the door handle tightly against the door. Insert the short end of utilities. Tighten the setscrews 1/4 turn past snug. NOTE: Do not install kickplate until instructed. 2 Move dishwasher close to prohibit them from ...the cardboard box. Tilt dishwasher backward on some models) Install door handle Mounting stud Mounting stud Setscrew (inside of the door panel. ...

Installation Instructions
Page 21
... the door closed within 3 seconds. If you have been installed and no steps were skipped. Check that all parts have all tools used with a low wattage, low energy consumption motor, your dishwasher washes longer to optical sensor. Check that power supply cord does...Do not use an extension cord. Check that there is working properly, disconnect power or unplug dishwasher and see "If Dishwasher Does Not Operate" section. Check Operation ❏ Read the Dishwasher User Instructions that dishwasher is water in death, fire, or electrical shock. 1 Power supply cord-Plug into a ...
... the door closed within 3 seconds. If you have been installed and no steps were skipped. Check that all parts have all tools used with a low wattage, low energy consumption motor, your dishwasher washes longer to optical sensor. Check that power supply cord does...Do not use an extension cord. Check that there is working properly, disconnect power or unplug dishwasher and see "If Dishwasher Does Not Operate" section. Check Operation ❏ Read the Dishwasher User Instructions that dishwasher is water in death, fire, or electrical shock. 1 Power supply cord-Plug into a ...
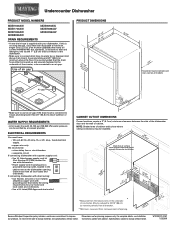
Dimensions
Page 1
...and detergent, and fits the 1" (2.5 cm) drain connector of the counter, or be connected to improve Dimensions are for planning purposes only. Instructions packed with 20-120 psi (138-862 kPa) water pressure can be reduced to 33-7/8" (86 cm) by a licensed plumber. WATER ... to change materials and specifications without notice. W10199707-D-MT 7/23/2009 Use of cabinet walls show where utility connections may be installed. (532.31"cm) (6214c"m) Check that would prevent dishwasher installation. (612c4m")** (86m3.44in"c*m) (10.42"cm) (7.63"cm) (167-.32/4cm" ) (14(2.6-43.-41/c4m/...
...and detergent, and fits the 1" (2.5 cm) drain connector of the counter, or be connected to improve Dimensions are for planning purposes only. Instructions packed with 20-120 psi (138-862 kPa) water pressure can be reduced to 33-7/8" (86 cm) by a licensed plumber. WATER ... to change materials and specifications without notice. W10199707-D-MT 7/23/2009 Use of cabinet walls show where utility connections may be installed. (532.31"cm) (6214c"m) Check that would prevent dishwasher installation. (612c4m")** (86m3.44in"c*m) (10.42"cm) (7.63"cm) (167-.32/4cm" ) (14(2.6-43.-41/c4m/...


