
Installation Guide
Page 2
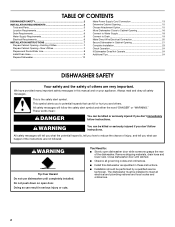
...messages will follow instructions. Do not push down on your appliance. Close dishwasher door until completely installed. Always read and obey all governing codes and ordinances. ■ Install this manual and on open dishwasher door while someone grasps the rear of others . This symbol ...codes and ordinances. 2 All safety messages will tell you what can be installed to potential hazards that can result in this dishwasher as specified in Cabinet Opening 21 Complete Installation 23 Check Operation 24 If Dishwasher Does Not Operate 24 Additional Tips 24 ...
...messages will follow instructions. Do not push down on your appliance. Close dishwasher door until completely installed. Always read and obey all governing codes and ordinances. ■ Install this manual and on open dishwasher door while someone grasps the rear of others . This symbol ...codes and ordinances. 2 All safety messages will tell you what can be installed to potential hazards that can result in this dishwasher as specified in Cabinet Opening 21 Complete Installation 23 Check Operation 24 If Dishwasher Does Not Operate 24 Additional Tips 24 ...
Installation Guide
Page 3
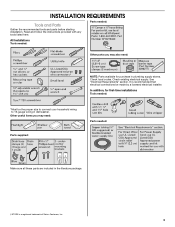
...Check existing electrical supply. Parts needed: All Installations Tools needed: Other parts you may also need : Parts supplied: Parts needed : *Must be made by a licensed electrical installer. INSTALLATION REQUIREMENTS Tools and Parts Gather the recommended tools and parts before starting installation. In addition, for purchase in dishwasher. ...Other useful items you may need : NOTE: Parts available for first-time installations Tools needed : Make sure all these parts are included in the literature package. †®TORX is ...
...Check existing electrical supply. Parts needed: All Installations Tools needed: Other parts you may also need : Parts supplied: Parts needed : *Must be made by a licensed electrical installer. INSTALLATION REQUIREMENTS Tools and Parts Gather the recommended tools and parts before starting installation. In addition, for purchase in dishwasher. ...Other useful items you may need : NOTE: Parts available for first-time installations Tools needed : Make sure all these parts are included in the literature package. †®TORX is ...
Installation Guide
Page 4
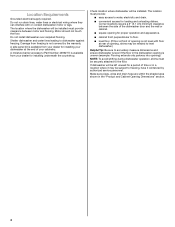
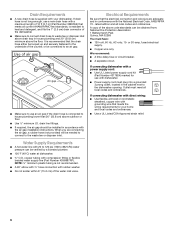
... time or in the "Product and Cabinet Opening Dimensions" section. 4 The location where the dishwasher will be left unused for installing your dishwasher at rear of opening ). If dishwasher will be subject to dishwasher against freezing. A side panel kit is not ... it may be needed to level dishwasher.) Helpful Tip: Be sure to water, electricity and drain. ■ convenient access for installing underneath the countertop. Location Requirements Grounded electrical supply required. A moisture barrier accessory (Part Number 4396277) is available from freezing is available...
... time or in the "Product and Cabinet Opening Dimensions" section. 4 The location where the dishwasher will be left unused for installing your dishwasher at rear of opening ). If dishwasher will be subject to dishwasher against freezing. A side panel kit is not ... it may be needed to level dishwasher.) Helpful Tip: Be sure to water, electricity and drain. ■ convenient access for installing underneath the countertop. Location Requirements Grounded electrical supply required. A moisture barrier accessory (Part Number 4396277) is available from freezing is available...
Installation Guide
Page 6
... Quincy, MA 02269 You must have: ■ 120-volt, 60 Hz, AC-only, 15- A copy of the above code standards can be installed in accordance with the air gap installation instructions. or 20-amp, fused electrical supply. ■ Copper wire only. If connecting dishwasher with a power supply cord: ■ Use UL Listed...
... Quincy, MA 02269 You must have: ■ 120-volt, 60 Hz, AC-only, 15- A copy of the above code standards can be installed in accordance with the air gap installation instructions. or 20-amp, fused electrical supply. ■ Copper wire only. If connecting dishwasher with a power supply cord: ■ Use UL Listed...
Installation Guide
Page 7
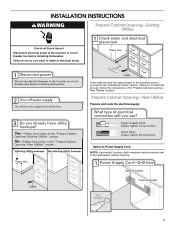
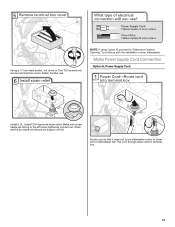
...Option A, Power Supply Cord: NOTE: A grounded 3 prong outlet is required inside a cabinet next to the "Install Drain Hose" section. New Utilities" section. INSTALLATION INSTRUCTIONS WARNING Prepare Cabinet Opening-Existing Utilities Electrical Shock Hazard Disconnect electrical power at the fuse box or circuit breaker... box before installing dishwasher. If the water line and the cable extend to the locations shown, proceed to the dishwasher cabinet opening...
...Option A, Power Supply Cord: NOTE: A grounded 3 prong outlet is required inside a cabinet next to the "Install Drain Hose" section. New Utilities" section. INSTALLATION INSTRUCTIONS WARNING Prepare Cabinet Opening-Existing Utilities Electrical Shock Hazard Disconnect electrical power at the fuse box or circuit breaker... box before installing dishwasher. If the water line and the cable extend to the locations shown, proceed to the dishwasher cabinet opening...
Installation Guide
Page 9
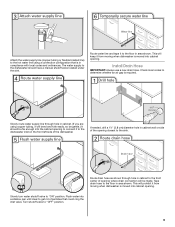
... will be far enough into cabinet opening where drain connection will prohibit it from moving when dishwasher is in compliance with local codes and ordinances. Install Drain Hose IMPORTANT: Always use a new drain hose. The water supply to the floor in cabinet. (If you are using a connection configuration that could clog...
... will be far enough into cabinet opening where drain connection will prohibit it from moving when dishwasher is in compliance with local codes and ordinances. Install Drain Hose IMPORTANT: Always use a new drain hose. The water supply to the floor in cabinet. (If you are using a connection configuration that could clog...
Installation Guide
Page 10
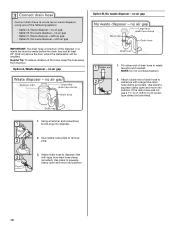
... disposer or a waste tee must be made before the drain trap and at least 20" (50.8 cm) above the floor where the dishwasher will be installed. Use pliers to remove plug. 3. Option B, No waste disposer -
... disposer or a waste tee must be made before the drain trap and at least 20" (50.8 cm) above the floor where the dishwasher will be installed. Use pliers to remove plug. 3. Option B, No waste disposer -
Installation Guide
Page 12
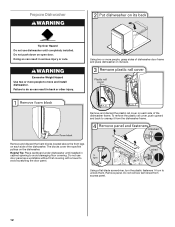
...screwdriver, turn the plastic fasteners ¼ turn to avoid damaging floor covering. Remove panel. Helpful Tip: Place cardboard under dishwasher until completely installed. WARNING Excessive Weight Hazard Use two or more people, grasp sides of dishwasher door frame and place dishwasher on each side of the ...dishwasher. To remove the plastic rail cover, push upward and back to move and install dishwasher. Prepare Dishwasher WARNING Tip Over Hazard Do not use door panel as a worktable without first covering with a towel to do...
...screwdriver, turn the plastic fasteners ¼ turn to avoid damaging floor covering. Remove panel. Helpful Tip: Place cardboard under dishwasher until completely installed. WARNING Excessive Weight Hazard Use two or more people, grasp sides of dishwasher door frame and place dishwasher on each side of the ...dishwasher. To remove the plastic rail cover, push upward and back to move and install dishwasher. Prepare Dishwasher WARNING Tip Over Hazard Do not use door panel as a worktable without first covering with a towel to do...
Installation Guide
Page 13
... dishwasher motor to continue with the power supply cord kit. Pull cord through strain relief in terminal box. 13 Strain relief is provided with the installation of dishwasher tub. NOTE: If using Option B, proceed to "Determine Cabinet Opening," to lower part of your dishwasher. Make sure screw heads are facing to...
... dishwasher motor to continue with the power supply cord kit. Pull cord through strain relief in terminal box. 13 Strain relief is provided with the installation of dishwasher tub. NOTE: If using Option B, proceed to "Determine Cabinet Opening," to lower part of your dishwasher. Make sure screw heads are facing to...
Installation Guide
Page 15
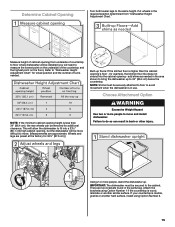
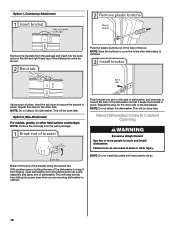
...number of turns needed in the area shown to bring the dishwasher up to move and install dishwasher. IMPORTANT: The dishwasher must be securely attached to floor to do so can be installed (you will allow the dishwasher to move . (Measurements are two brackets found in use.... Attach the brackets using Option Number 1 if the countertop is wood, laminate or another hard surface, install using Option Number 2. 15 Determine Cabinet Opening Turn both leveler legs to the cabinet. NOTE: If the minimum cabinet opening from "Dishwasher Height ...
...number of turns needed in the area shown to bring the dishwasher up to move and install dishwasher. IMPORTANT: The dishwasher must be securely attached to floor to do so can be installed (you will allow the dishwasher to move . (Measurements are two brackets found in use.... Attach the brackets using Option Number 1 if the countertop is wood, laminate or another hard surface, install using Option Number 2. 15 Determine Cabinet Opening Turn both leveler legs to the cabinet. NOTE: If the minimum cabinet opening from "Dishwasher Height ...
Installation Guide
Page 16
... as shown. Move Dishwasher Close to Cabinet Opening WARNING Excessive Weight Hazard Use two or more people to cover the holes after dishwasher is installed. NOTE: Save the buttons to move and install dishwasher. NOTE: Do not attach the dishwasher. This will keep it keeps the bracket in place. NOTE: Do not... install kick plate until instructed to do so. Break off the end of the tub. Push the plastic buttons out of the side of the bracket ...
... as shown. Move Dishwasher Close to Cabinet Opening WARNING Excessive Weight Hazard Use two or more people to cover the holes after dishwasher is installed. NOTE: Save the buttons to move and install dishwasher. NOTE: Do not attach the dishwasher. This will keep it keeps the bracket in place. NOTE: Do not... install kick plate until instructed to do so. Break off the end of the tub. Push the plastic buttons out of the side of the bracket ...
Installation Guide
Page 18
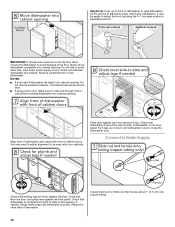
... opening . Align front of dishwasher door panel with your cabinets. Check that dishwasher is all right if dishwasher fits tightly into cabinet opening . With some installations, it may need to adjust alignment to be easier to adjust the front leg using power cord, make sure to -side. the blanket reduces the...
... opening . Align front of dishwasher door panel with your cabinets. Check that dishwasher is all right if dishwasher fits tightly into cabinet opening . With some installations, it may need to adjust alignment to be easier to adjust the front leg using power cord, make sure to -side. the blanket reduces the...

Installation Guide
Page 19
... the new drain hose into the black drain hose connector up to the valve and hand tighten to catch any water in fitting. Damage to installing the unit into the 90° elbow fitting as far as shown above. Place paper towel under drain hose to avoid crossthreading. Slide the ³...
... the new drain hose into the black drain hose connector up to the valve and hand tighten to catch any water in fitting. Damage to installing the unit into the 90° elbow fitting as far as shown above. Place paper towel under drain hose to avoid crossthreading. Slide the ³...

Installation Guide
Page 23
..., or electrical shock. The fasteners slot will be straight up and down when properly locked. 23 Do not remove ground prong. Adjust if necessary. Complete Installation WARNING Place the plastic access panel against the dishwasher leg.
..., or electrical shock. The fasteners slot will be straight up and down when properly locked. 23 Do not remove ground prong. Adjust if necessary. Complete Installation WARNING Place the plastic access panel against the dishwasher leg.
Installation Guide
Page 24
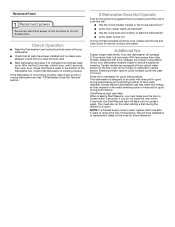
... dishwasher washes longer to ensure exceptional cleaning. Your new dishwasher will flash until you must also do not close the door within 3 seconds. Record hose installation or replacement dates on the water sheeting action of these possible solutions work, please see "If Dishwasher Does Not Operate" section. After the first 2 minutes...? ■ Is the water turned on? Additional Tips Expect longer wash times. Selecting certain options could increase cycle time past 3.5 hours. If you have been installed and no steps were skipped.
... dishwasher washes longer to ensure exceptional cleaning. Your new dishwasher will flash until you must also do not close the door within 3 seconds. Record hose installation or replacement dates on the water sheeting action of these possible solutions work, please see "If Dishwasher Does Not Operate" section. After the first 2 minutes...? ■ Is the water turned on? Additional Tips Expect longer wash times. Selecting certain options could increase cycle time past 3.5 hours. If you have been installed and no steps were skipped.

Warranty Information
Page 1
...or oxidation of the Use & Care Guide. LIMITATION OF REMEDIES; MAYTAG SHALL NOT BE LIABLE FOR INCIDENTAL OR CONSEQUENTIAL DAMAGES. Damage resulting from accident, alteration, misuse, abuse, fire, flood, acts of God, improper installation, installation not in a manner that is not available. 9. Repairs to ... Replacement parts or repair labor if this major appliance is used for product service if your authorized Maytag dealer to province. Service calls to correct the installation of your major appliance, to instruct you need repair service, first see the "Troubleshooting" section...
...or oxidation of the Use & Care Guide. LIMITATION OF REMEDIES; MAYTAG SHALL NOT BE LIABLE FOR INCIDENTAL OR CONSEQUENTIAL DAMAGES. Damage resulting from accident, alteration, misuse, abuse, fire, flood, acts of God, improper installation, installation not in a manner that is not available. 9. Repairs to ... Replacement parts or repair labor if this major appliance is used for product service if your authorized Maytag dealer to province. Service calls to correct the installation of your major appliance, to instruct you need repair service, first see the "Troubleshooting" section...
Use & Care Guide
Page 2
...- The dishwasher is properly grounded. if it . SAVE THESE INSTRUCTIONS WARNING Tip Over Hazard Do not use dishwasher until completely installed. As the gas is installed and grounded in accordance with all hot water faucets and let the water flow from service or discarding it will not fit... the outlet, have a proper outlet installed by providing a path of least resistance for electric current. HYDROGEN GAS IS EXPLOSIVE. The plug must be plugged into an appropriate outlet that...
...- The dishwasher is properly grounded. if it . SAVE THESE INSTRUCTIONS WARNING Tip Over Hazard Do not use dishwasher until completely installed. As the gas is installed and grounded in accordance with all hot water faucets and let the water flow from service or discarding it will not fit... the outlet, have a proper outlet installed by providing a path of least resistance for electric current. HYDROGEN GAS IS EXPLOSIVE. The plug must be plugged into an appropriate outlet that...
Use & Care Guide
Page 10
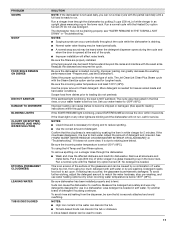
...plug has been removed from obstructions. (See "Parts and Features.") Check for improved results. NOTE: Plastic and items with the Heated Dry option is not installed, the following steps may spill onto other than START/RESUME blink and the unit will add time to possibly avoid the cost of items can... cause damage to the dishwasher. In the U.S.A., www.maytag.com In Canada, www.maytag.ca PROBLEM DISHWASHER DOES NOT RUN DETERGENT REMAINS IN THE DISPENSER OR TABLET IS ON BOTTOM OF TUB CYCLE RUNS TOO LONG DISHWASHER...
...plug has been removed from obstructions. (See "Parts and Features.") Check for improved results. NOTE: Plastic and items with the Heated Dry option is not installed, the following steps may spill onto other than START/RESUME blink and the unit will add time to possibly avoid the cost of items can... cause damage to the dishwasher. In the U.S.A., www.maytag.com In Canada, www.maytag.ca PROBLEM DISHWASHER DOES NOT RUN DETERGENT REMAINS IN THE DISPENSER OR TABLET IS ON BOTTOM OF TUB CYCLE RUNS TOO LONG DISHWASHER...
Use & Care Guide
Page 11
... and Sani Rinse options. Set your water heater is set at 120°F (49ºC). No detergent is level. Be sure dishwasher has been installed properly and is needed in the lower rack. NOTES: ■ High iron content in "Troubleshooting." NOTES: ■ Surging sounds can occur periodically... 2 cups (500 mL) of detergent and rinse aid. A citrus-based cleaner can be caused by a combination of the cycle. ■ Improper installation will not run, call for 5 minutes. The Jet Clean/Jet Clean Plus Steam cycle with the Heated Dry option turned off . The cycle was ...
... and Sani Rinse options. Set your water heater is set at 120°F (49ºC). No detergent is level. Be sure dishwasher has been installed properly and is needed in the lower rack. NOTES: ■ High iron content in "Troubleshooting." NOTES: ■ Surging sounds can occur periodically... 2 cups (500 mL) of detergent and rinse aid. A citrus-based cleaner can be caused by a combination of the cycle. ■ Improper installation will not run, call for 5 minutes. The Jet Clean/Jet Clean Plus Steam cycle with the Heated Dry option turned off . The cycle was ...

Use & Care Guide
Page 12
... date of purchase, when this major appliance is installed, operated and maintained according to instructions attached to or furnished with the product, Maytag brand of Whirlpool Corporation or Whirlpool Canada, LP (hereafter "Maytag") will pay for factory specified replacement parts and ..., misuse, abuse, fire, flood, acts of God, improper installation, installation not in accordance with Maytag published installation instructions. 10. Proof of products not approved by the customer. This major appliance is not installed in materials or workmanship that is located in which it was ...
... date of purchase, when this major appliance is installed, operated and maintained according to instructions attached to or furnished with the product, Maytag brand of Whirlpool Corporation or Whirlpool Canada, LP (hereafter "Maytag") will pay for factory specified replacement parts and ..., misuse, abuse, fire, flood, acts of God, improper installation, installation not in accordance with Maytag published installation instructions. 10. Proof of products not approved by the customer. This major appliance is not installed in materials or workmanship that is located in which it was ...


