Installation Guide
Page 2
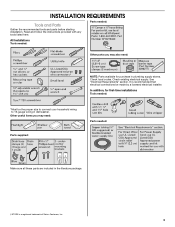
... Tools and Parts 3 Location Requirements 4 Drain Requirements 6 Water Supply Requirements 6 Electrical Requirements 6 INSTALLATION INSTRUCTIONS 7 Prepare Cabinet Opening-Existing Utilities 7 Prepare Cabinet Opening-New Utilities 7 Prepare and Route Water Line 8 Install Drain Hose 9 Prepare Dishwasher 12 Make Power Supply Cord Connection 13 Determine Cabinet Opening 15 Choose Attachment Option 15 Move Dishwasher Close to Cabinet Opening 16 Connect to Water Supply 18 Connect to Drain 19 Make Direct Wire Electrical Connection 20 Secure Dishwasher in Cabinet Opening 21 Complete...
... Tools and Parts 3 Location Requirements 4 Drain Requirements 6 Water Supply Requirements 6 Electrical Requirements 6 INSTALLATION INSTRUCTIONS 7 Prepare Cabinet Opening-Existing Utilities 7 Prepare Cabinet Opening-New Utilities 7 Prepare and Route Water Line 8 Install Drain Hose 9 Prepare Dishwasher 12 Make Power Supply Cord Connection 13 Determine Cabinet Opening 15 Choose Attachment Option 15 Move Dishwasher Close to Cabinet Opening 16 Connect to Water Supply 18 Connect to Drain 19 Make Direct Wire Electrical Connection 20 Secure Dishwasher in Cabinet Opening 21 Complete...
Installation Guide
Page 3
... instructions provided with any tools listed here. See "Electrical Requirements" section. In addition, for purchase in dishwasher. Parts needed: All Installations Tools needed : Make sure all these parts are included in the literature package. †®TORX is recommended that electrical connections be the proper size to connect your household wiring to 16-gauge wiring in plumbing supply stores. Check existing electrical supply. Other useful items you may need: Parts supplied: Parts needed : Other parts...
... instructions provided with any tools listed here. See "Electrical Requirements" section. In addition, for purchase in dishwasher. Parts needed: All Installations Tools needed : Make sure all these parts are included in the literature package. †®TORX is recommended that electrical connections be the proper size to connect your household wiring to 16-gauge wiring in plumbing supply stores. Check existing electrical supply. Other useful items you may need: Parts supplied: Parts needed : Other parts...
Installation Guide
Page 4
... loading and unloading dishes. The location where the dishwasher will be installed. Shelter dishwasher and water lines leading to the floor. A side panel kit is not covered by authorized service personnel. Corner locations require a 2" (5.1 cm) minimum clearance between motor and flooring. The location must be needed to level dishwasher.) Helpful Tip: Be sure to accurately measure dimensions and ensure dishwasher is not level with or contact dishwasher motor or legs. Location Requirements Grounded electrical supply...
... loading and unloading dishes. The location where the dishwasher will be installed. Shelter dishwasher and water lines leading to the floor. A side panel kit is not covered by authorized service personnel. Corner locations require a 2" (5.1 cm) minimum clearance between motor and flooring. The location must be needed to level dishwasher.) Helpful Tip: Be sure to accurately measure dimensions and ensure dishwasher is not level with or contact dishwasher motor or legs. Location Requirements Grounded electrical supply...
Installation Guide
Page 6
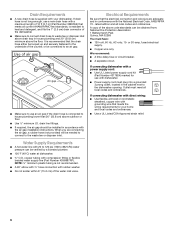
... to use an air gap if the drain hose is connected to 862 kPa) water pressure can be installed in house plumbing and 20" (50.8 cm) minimum above code standards can be needed to connect to the waste tee or disposer inlet. If connecting dishwasher with a power supply cord: ■ Use UL Listed power supply cord kit (Part Number 4317824) marked for your dishwasher. We recommend: ■ A time-delay fuse or circuit breaker. ■ A separate circuit. Drain Requirements ■ A new drain hose is supplied...
... to use an air gap if the drain hose is connected to 862 kPa) water pressure can be installed in house plumbing and 20" (50.8 cm) minimum above code standards can be needed to connect to the waste tee or disposer inlet. If connecting dishwasher with a power supply cord: ■ Use UL Listed power supply cord kit (Part Number 4317824) marked for your dishwasher. We recommend: ■ A time-delay fuse or circuit breaker. ■ A separate circuit. Drain Requirements ■ A new drain hose is supplied...
Installation Guide
Page 16
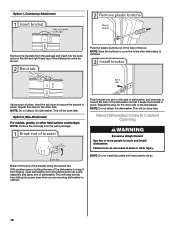
... of the dishwasher collar as shown. Failure to cabinet. 16 NOTE: Save the buttons to move and install dishwasher. This will keep it keeps the bracket in place. This will be done later. Using a pair of the bracket along the scored line. NOTE: Do not install kick plate until instructed to secure the bracket in back or other side. Move Dishwasher Close to Cabinet Opening WARNING Excessive...
... of the dishwasher collar as shown. Failure to cabinet. 16 NOTE: Save the buttons to move and install dishwasher. This will keep it keeps the bracket in place. This will be done later. Using a pair of the bracket along the scored line. NOTE: Do not install kick plate until instructed to secure the bracket in back or other side. Move Dishwasher Close to Cabinet Opening WARNING Excessive...

Installation Guide
Page 19
...; turn may be required to elbow using ⁵⁄₈" open ended wrench or adjustable wrench. Place the small green drain hose clamp onto the small end of E.I. Flexible braided connection: Secure nut to seal the rubber gasket. Hand tighten until the coupling is a registered trademark of the drain hose. Damage to avoid crossthreading. Connect the ³⁄₈" compression fitting to the water supply line...
...; turn may be required to elbow using ⁵⁄₈" open ended wrench or adjustable wrench. Place the small green drain hose clamp onto the small end of E.I. Flexible braided connection: Secure nut to seal the rubber gasket. Hand tighten until the coupling is a registered trademark of the drain hose. Damage to avoid crossthreading. Connect the ³⁄₈" compression fitting to the water supply line...
Installation Guide
Page 20
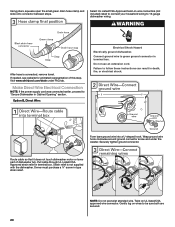
... Dishwasher in Cabinet Opening" section. Option B, Direct Wire: Electrical Shock Hazard Electrically ground dishwasher. Securely tighten ground connector. Visit www.whirlpool.com/drain under the washer. Form bare ground wire into a U-shaped hook. Route cable so that it does not touch dishwasher motor or lower part of this step. Using pliers, squeeze open the small green drain hose clamp and slide onto connector between stops. Connect ground wire to follow these instructions can...
... Dishwasher in Cabinet Opening" section. Option B, Direct Wire: Electrical Shock Hazard Electrically ground dishwasher. Securely tighten ground connector. Visit www.whirlpool.com/drain under the washer. Form bare ground wire into a U-shaped hook. Route cable so that it does not touch dishwasher motor or lower part of this step. Using pliers, squeeze open the small green drain hose clamp and slide onto connector between stops. Connect ground wire to follow these instructions can...
Installation Guide
Page 24
... Tips Expect longer wash times. If the dishwasher is working properly, disconnect power or unplug dishwasher and see the Use and Care Guide for service contact information. Record hose installation or replacement dates on ? Check that there is closed tightly and latched? ■ Has the cycle been set correctly to start the dishwasher? ■ Is the water turned on the hose for good drying performance. If you do not close the door within 3 seconds. Check...
... Tips Expect longer wash times. If the dishwasher is working properly, disconnect power or unplug dishwasher and see the Use and Care Guide for service contact information. Record hose installation or replacement dates on ? Check that there is closed tightly and latched? ■ Has the cycle been set correctly to start the dishwasher? ■ Is the water turned on the hose for good drying performance. If you do not close the door within 3 seconds. Check...

Warranty Information
Page 1
... installation instructions. 10. The removal and reinstallation of your major appliance if it is installed in an inaccessible location or is intended to be repaired in your home. 7. Discoloration, rust, or oxidation of the Use & Care Guide. In Canada, call 1-800-688-9900. Pickup and delivery. Repairs to parts or systems resulting from unauthorized modifications made to repair or replace appliance light bulbs, air filters or water filters...
... installation instructions. 10. The removal and reinstallation of your major appliance if it is installed in an inaccessible location or is intended to be repaired in your home. 7. Discoloration, rust, or oxidation of the Use & Care Guide. In Canada, call 1-800-688-9900. Pickup and delivery. Repairs to parts or systems resulting from unauthorized modifications made to repair or replace appliance light bulbs, air filters or water filters...
Use & Care Guide
Page 2
..., before using the dishwasher turn on open flame during this time. ■ Do not touch the heating element during or immediately after use. ■ Do not operate the dishwasher unless all hot water faucets and let the water flow from service or discarding it will release any accumulated hydrogen gas. Do not modify the plug provided with all local codes and ordinances. SAVE THESE INSTRUCTIONS WARNING Tip...
..., before using the dishwasher turn on open flame during this time. ■ Do not touch the heating element during or immediately after use. ■ Do not operate the dishwasher unless all hot water faucets and let the water flow from service or discarding it will release any accumulated hydrogen gas. Do not modify the plug provided with all local codes and ordinances. SAVE THESE INSTRUCTIONS WARNING Tip...
Use & Care Guide
Page 3
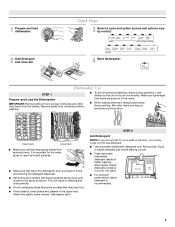
...; Use automatic dishwasher detergent only. Store tightly closed no items are secured in better cleaning. STEP 2 Add Detergent NOTE: If you do not touch one another. Quick Steps 3 Select a cycle and option (cycles and options vary by model.) 2 Add detergent and rinse aid. 4 Start dishwasher. Add powder, liquid or tablet detergent just before washing. ■ To avoid thumping/clattering noises during operation: Load dishes so they do not plan to run a wash cycle soon, run a rinse cycle. Wash...
...; Use automatic dishwasher detergent only. Store tightly closed no items are secured in better cleaning. STEP 2 Add Detergent NOTE: If you do not touch one another. Quick Steps 3 Select a cycle and option (cycles and options vary by model.) 2 Add detergent and rinse aid. 4 Start dishwasher. Add powder, liquid or tablet detergent just before washing. ■ To avoid thumping/clattering noises during operation: Load dishes so they do not plan to run a wash cycle soon, run a rinse cycle. Wash...
Use & Care Guide
Page 4
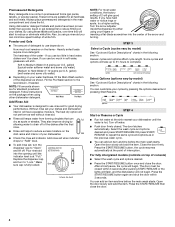
... the wash cycle and options desired and press START/RESUME OR press START/ RESUME to the level shown, if needed. If you can add an item anytime before the main wash starts. Hard Water Soft Water Main Wash Hard Water Soft Water Pre-Wash Add Rinse Aid ■ Your dishwasher is fully locked. Replace the dispenser cap and turn to use rinse aid for all hardness and soil levels. Press the START/RESUME button again and shut the door within...
... the wash cycle and options desired and press START/RESUME OR press START/ RESUME to the level shown, if needed. If you can add an item anytime before the main wash starts. Hard Water Soft Water Main Wash Hard Water Soft Water Pre-Wash Add Rinse Aid ■ Your dishwasher is fully locked. Replace the dispenser cap and turn to use rinse aid for all hardness and soil levels. Press the START/RESUME button again and shut the door within...
Use & Care Guide
Page 5
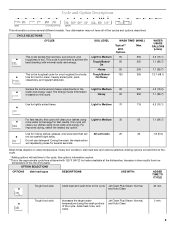
... 1.8 (6.9) Wash times depend on this cycle. Use for several different models. Increase in the Light to achieve the best cleaning with 120°F (49°C) hot water available at the dishwasher. Your dishwasher may not have all of the cycle. This cycle is the toughest cycle for hard-to the cycle. This is optimized to Medium 90 water and energy used. Use for your dishes using Light to the cycle Jet Clean Plus Steam, Normal, and Auto Clean...
... 1.8 (6.9) Wash times depend on this cycle. Use for several different models. Increase in the Light to achieve the best cleaning with 120°F (49°C) hot water available at the dishwasher. Your dishwasher may not have all of the cycle. This cycle is the toughest cycle for hard-to the cycle. This is optimized to Medium 90 water and energy used. Use for your dishes using Light to the cycle Jet Clean Plus Steam, Normal, and Auto Clean...
Use & Care Guide
Page 6
... water. Turn off when loads contain plastic dinnerware that may be sensitive to higher temperatures. This high temperature rinse sanitizes your dishes and glassware in combination with rinse aid. Delays the start or resume a wash cycle To reset any cycle or options during selection. If you press any control selections made. To cancel a wash cycle after it's started. Press CANCEL/DRAIN to approximately 154°F (68°C). Use for Residential Dishwashers. Jet Clean Plus Steam, Normal, Light, Quick Wash...
... water. Turn off when loads contain plastic dinnerware that may be sensitive to higher temperatures. This high temperature rinse sanitizes your dishes and glassware in combination with rinse aid. Delays the start or resume a wash cycle To reset any cycle or options during selection. If you press any control selections made. To cancel a wash cycle after it's started. Press CANCEL/DRAIN to approximately 154°F (68°C). Use for Residential Dishwashers. Jet Clean Plus Steam, Normal, Light, Quick Wash...
Use & Care Guide
Page 7
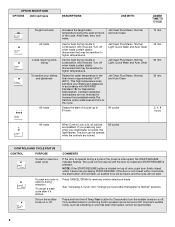
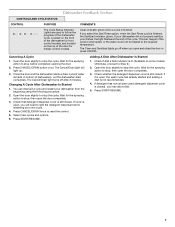
... wash cycle has already started and adding a dish is open and close the door or press CANCEL. Canceling A Cycle 1. Adding A Dish After Dishwasher Is Started 1. If it is open the door completely. 3. Dishwasher Feedback Section CONTROLS AND CYCLE STATUS CONTROL PURPOSE COMMENTS The Cycle Status Indicator Lights are used (detergent dispenser cover is closed . Press CANCEL/DRAIN button once. If cover is not recommended. 4. Wait for front control models, and located on some models. Press START/RESUME. 7 Located on the front of the dishwasher cycle. Changing A Cycle After...
... wash cycle has already started and adding a dish is open and close the door or press CANCEL. Canceling A Cycle 1. Adding A Dish After Dishwasher Is Started 1. If it is open the door completely. 3. Dishwasher Feedback Section CONTROLS AND CYCLE STATUS CONTROL PURPOSE COMMENTS The Cycle Status Indicator Lights are used (detergent dispenser cover is closed . Press CANCEL/DRAIN button once. If cover is not recommended. 4. Wait for front control models, and located on some models. Press START/RESUME. 7 Located on the front of the dishwasher cycle. Changing A Cycle After...
Use & Care Guide
Page 9
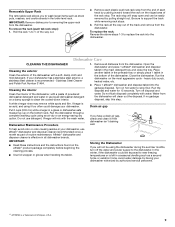
... detergent tray and close the tray. Do not use liquid dishwasher detergent on hot water to support the track while removing rack stops. 3. In the winter, if the dishwasher could damage your dishwasher, use affresh® dishwasher and disposer cleaner (recommended) once a month as part of the dishwasher with a paste of the rack stop. Cleaning the interior Clean the interior of the dishwasher, with a soft, damp cloth and mild detergent. Turn off the water and power supply to the dishwasher...
... detergent tray and close the tray. Do not use liquid dishwasher detergent on hot water to support the track while removing rack stops. 3. In the winter, if the dishwasher could damage your dishwasher, use affresh® dishwasher and disposer cleaner (recommended) once a month as part of the dishwasher with a paste of the rack stop. Cleaning the interior Clean the interior of the dishwasher, with a soft, damp cloth and mild detergent. Turn off the water and power supply to the dishwasher...
Use & Care Guide
Page 10
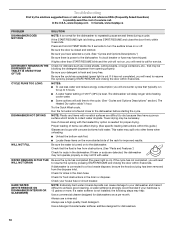
... bottom rack first. ■ Locate these items on the more . Be sure the cycle has completed (green light is closed and latched. Try the Quick Wash cycle. Proper loading of rinse aid along with water. If the cycle has not completed, you will need WILL NOT DRAIN to the dishwasher. If a water softener is blinking, press START/RESUME and close to turn the audible tones on ). If the START/RESUME light is not installed, the...
... bottom rack first. ■ Locate these items on the more . Be sure the cycle has completed (green light is closed and latched. Try the Quick Wash cycle. Proper loading of rinse aid along with water. If the cycle has not completed, you will need WILL NOT DRAIN to the dishwasher. If a water softener is blinking, press START/RESUME and close to turn the audible tones on ). If the START/RESUME light is not installed, the...
Use & Care Guide
Page 11
... blinking, press START/RESUME and close the door within this guide.) If the START/RESUME light is opened at the end of detergent. NOTES: ■ Surging sounds can cause the dishwasher to become chipped or damaged. (See specific loading instructions within 3 seconds. Do not use water heating options only when incoming water temperature is necessary for service. The Jet Clean/Jet Clean Plus Steam cycle with the Steam Sanitize option can cause dishes to overflow. Detergent needs...
... blinking, press START/RESUME and close the door within this guide.) If the START/RESUME light is opened at the end of detergent. NOTES: ■ Surging sounds can cause the dishwasher to become chipped or damaged. (See specific loading instructions within 3 seconds. Do not use water heating options only when incoming water temperature is necessary for service. The Jet Clean/Jet Clean Plus Steam cycle with the Steam Sanitize option can cause dishes to overflow. Detergent needs...

Use & Care Guide
Page 12
...-year warranty on how to use or when it is used in the country in which it is installed in an inaccessible location or is not installed in accordance with Maytag published installation instructions. 10. Replacement parts or repair labor on major appliances with original model/serial numbers that have been removed, altered or cannot be repaired in your major appliance is located in a remote area where service by...
...-year warranty on how to use or when it is used in the country in which it is installed in an inaccessible location or is not installed in accordance with Maytag published installation instructions. 10. Replacement parts or repair labor on major appliances with original model/serial numbers that have been removed, altered or cannot be repaired in your major appliance is located in a remote area where service by...
Dimension Guide
Page 1
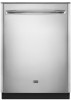
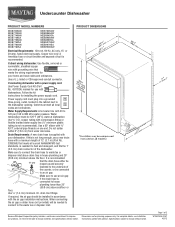
... water inlet valve. Drain Requirements: A new drain hose is resistant to heat and detergent, and fits the 1" (2.5 cm) drain connector of 12' (3.7 m) (Part No. 3385556) that the drain hose either be looped up and securely fastened to the dishwasher opening. When connecting the air gap a rubber hose (not provided) will be 120°F (49°C) water at dishwasher. Copper wire only. Use ¹⁄₂" (1.3 cm) minimum I.D. Undercounter Dishwasher PRODUCT MODEL NUMBERS MDB7609AW MDB7709AW MDB7749AW MDB7749SA MDB7759AW MDB7759SA...
... water inlet valve. Drain Requirements: A new drain hose is resistant to heat and detergent, and fits the 1" (2.5 cm) drain connector of 12' (3.7 m) (Part No. 3385556) that the drain hose either be looped up and securely fastened to the dishwasher opening. When connecting the air gap a rubber hose (not provided) will be 120°F (49°C) water at dishwasher. Copper wire only. Use ¹⁄₂" (1.3 cm) minimum I.D. Undercounter Dishwasher PRODUCT MODEL NUMBERS MDB7609AW MDB7709AW MDB7749AW MDB7749SA MDB7759AW MDB7759SA...


