
Owners Manual
Page 1
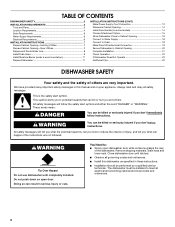
DISHWASHER USER INSTRUCTIONS THANK YOU for additional information. In Canada, visit our website at www.maytag.ca or call us at www.maytag.com for purchasing this manual and on the right-hand or left-hand side of California to cause cancer. This symbol alerts ...español, o para información adicional de su producto visite : www.maytag.com Tenga listo su número de modelo completo. WARNING: This product contains one or more chemicals known to the State of the dishwasher interior. All safety messages will follow instructions. These words mean: DANGER You can...
DISHWASHER USER INSTRUCTIONS THANK YOU for additional information. In Canada, visit our website at www.maytag.ca or call us at www.maytag.com for purchasing this manual and on the right-hand or left-hand side of California to cause cancer. This symbol alerts ...español, o para información adicional de su producto visite : www.maytag.com Tenga listo su número de modelo completo. WARNING: This product contains one or more chemicals known to the State of the dishwasher interior. All safety messages will follow instructions. These words mean: DANGER You can...

Owners Manual
Page 2
... service or discarding it will release any accumulated hydrogen gas. SAVE THESE INSTRUCTIONS GROUNDING INSTRUCTIONS ■ For a grounded, cord-connected dishwasher: The dishwasher must be plugged into an appropriate outlet that is equipped with a qualified electrician or service representative if you are in a hot ...and connected to be washed: 1) Locate sharp items so that has not been used for such a period, before using the dishwasher. ■ Use the dishwasher only for its intended function. ■ Use only detergents or rinse agents recommended for two weeks or more. if it ...
... service or discarding it will release any accumulated hydrogen gas. SAVE THESE INSTRUCTIONS GROUNDING INSTRUCTIONS ■ For a grounded, cord-connected dishwasher: The dishwasher must be plugged into an appropriate outlet that is equipped with a qualified electrician or service representative if you are in a hot ...and connected to be washed: 1) Locate sharp items so that has not been used for such a period, before using the dishwasher. ■ Use the dishwasher only for its intended function. ■ Use only detergents or rinse agents recommended for two weeks or more. if it ...
Owners Manual
Page 3
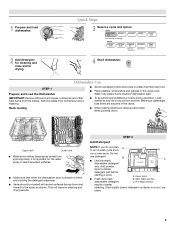
...plan A to the spray as shown. Pre-Wash section results in the racks. Wash only plastic items marked "dishwasher safe." It is important for drying. 4 Start dishwasher. STEP 2 Add Detergent NOTE: If you do not touch one another. Do not use detergent. Main Wash ... be loaded with soiled surfaces facing down . This will improve cleaning and drying results. Dishwasher Use STEP 1 Prepare and Load the Dishwasher ■ Avoid overlapping items like bowls or plates that when the dishwasher door is closed detergent container in the upper rack. Quick Steps 3 Select a cycle ...
...plan A to the spray as shown. Pre-Wash section results in the racks. Wash only plastic items marked "dishwasher safe." It is important for drying. 4 Start dishwasher. STEP 2 Add Detergent NOTE: If you do not touch one another. Do not use detergent. Main Wash ... be loaded with soiled surfaces facing down . This will improve cleaning and drying results. Dishwasher Use STEP 1 Prepare and Load the Dishwasher ■ Avoid overlapping items like bowls or plates that when the dishwasher door is closed detergent container in the upper rack. Quick Steps 3 Select a cycle ...
Owners Manual
Page 4
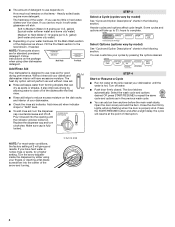
... and some city water] Medium to Hard Water (7-12 grains per U.S. STEP 3 Select a Cycle (cycles vary by either using other dishwasher detergent. Select the wash cycle and options desired OR press START/RESUME to repeat the same cycle and options as shown. NOTE: For ... conditions, the factory setting of 2 will not perform as well without rinse aid. ■ Rinse aid keeps water from forming droplets that can customize your dishwasher. ■ Check the rinse aid indicator. Add rinse aid when indicator drops to "Refill" level. ■ To add rinse aid, turn to lock fill -...
... and some city water] Medium to Hard Water (7-12 grains per U.S. STEP 3 Select a Cycle (cycles vary by either using other dishwasher detergent. Select the wash cycle and options desired OR press START/RESUME to repeat the same cycle and options as shown. NOTE: For ... conditions, the factory setting of 2 will not perform as well without rinse aid. ■ Rinse aid keeps water from forming droplets that can customize your dishwasher. ■ Check the rinse aid indicator. Add rinse aid when indicator drops to "Refill" level. ■ To add rinse aid, turn to lock fill -...

Owners Manual
Page 5
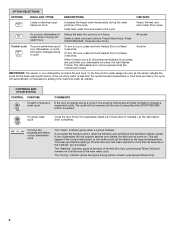
...by adding steam to high temperatures. DESCRIPTIONS Turn OFF when loads contain plastic dinnerware that will repeatedly pause for Residential Dishwashers. This option with NSF/ANSI Standard 184 for several seconds. This high temperature rinse sanitizes your dishes and glassware ...The energy-usage label is based on water temperature, heavy soil condition, dish load size and options selected. Certified residential dishwashers are not intended for stemware and glass cleaning. specialized option for licensed food establishments. Raises the water temperature in the final...
...by adding steam to high temperatures. DESCRIPTIONS Turn OFF when loads contain plastic dinnerware that will repeatedly pause for Residential Dishwashers. This option with NSF/ANSI Standard 184 for several seconds. This high temperature rinse sanitizes your dishes and glassware ...The energy-usage label is based on water temperature, heavy soil condition, dish load size and options selected. Certified residential dishwashers are not intended for stemware and glass cleaning. specialized option for licensed food establishments. Raises the water temperature in the final...
Owners Manual
Page 6
... time and/or water usage can vary as needed ). If the incoming water is less than 30 seconds or the CANCEL key is finished. The dishwasher starts a 2-minute drain (if needed . The "Drying" indicator glows during the drying portion of a cycle up to indicate a suspended cycle. Close the door firmly. ...on until the door is closed and the START/RESUME button is locked, the light flashes 5 times. To follow the progress and status of your dishwasher monitors the soil level. If you press any cycle (except Rinse Only) and remains on Lock, press and hold Heated Dry for more than ...
... time and/or water usage can vary as needed ). If the incoming water is less than 30 seconds or the CANCEL key is finished. The dishwasher starts a 2-minute drain (if needed . The "Drying" indicator glows during the drying portion of a cycle up to indicate a suspended cycle. Close the door firmly. ...on until the door is closed and the START/RESUME button is locked, the light flashes 5 times. To follow the progress and status of your dishwasher monitors the soil level. If you press any cycle (except Rinse Only) and remains on Lock, press and hold Heated Dry for more than ...
Owners Manual
Page 7
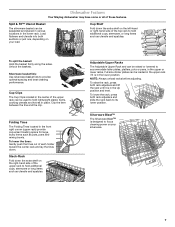
... can be separated and placed in various locations in the Up position and level. Cup Shelf Fold down the extra shelf on your silverware. 7 Dishwasher Features Your Maytag dishwasher may have some or all of each holder toward the center rack and lay the tines down. To split the basket: Hold the basket...
... can be separated and placed in various locations in the Up position and level. Cup Shelf Fold down the extra shelf on your silverware. 7 Dishwasher Features Your Maytag dishwasher may have some or all of each holder toward the center rack and lay the tines down. To split the basket: Hold the basket...
Owners Manual
Page 8
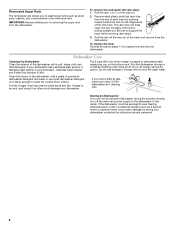
... rack from the end of each plastic push tab rack stop will mix with a soft, damp cloth and mild detergent. Clean the interior of the dishwasher, with a paste of the rack stop ): 1. Vinegar is recommended - Roll the rack all the way out of the way out. 2. Stainless Steel Cleaner and... Polish Part Number 31464. Do not use liquid dishwasher detergent on the bottom rack. Vinegar will snap open and can be exposed to near freezing temperatures or is left in a seasonal dwelling such as...
... rack from the end of each plastic push tab rack stop will mix with a soft, damp cloth and mild detergent. Clean the interior of the dishwasher, with a paste of the rack stop ): 1. Vinegar is recommended - Roll the rack all the way out of the way out. 2. Stainless Steel Cleaner and... Polish Part Number 31464. Do not use liquid dishwasher detergent on the bottom rack. Vinegar will snap open and can be exposed to near freezing temperatures or is left in a seasonal dwelling such as...
Owners Manual
Page 9
...on ). Be sure your house fuse or circuit breaker. Towel drying may be necessary. If the cycle has not completed, you will need to the dishwasher. Check your detergent is best. Always use a rinse aid. Be sure the door is blinking, press START/RESUME and close to 3 hours. ...First try the solutions suggested here or visit our website and reference FAQs (Frequently Asked Questions) to the dishwasher. In the U.S.A., www.maytag.com In Canada, www.maytag.ca PROBLEM SOLUTION DISHWASHER DOES NOT RUN NOTE: It is 15 grains or more slanted side of items can cause damage to...
...on ). Be sure your house fuse or circuit breaker. Towel drying may be necessary. If the cycle has not completed, you will need to the dishwasher. Check your detergent is best. Always use a rinse aid. Be sure the door is blinking, press START/RESUME and close to 3 hours. ...First try the solutions suggested here or visit our website and reference FAQs (Frequently Asked Questions) to the dishwasher. In the U.S.A., www.maytag.com In Canada, www.maytag.ca PROBLEM SOLUTION DISHWASHER DOES NOT RUN NOTE: It is 15 grains or more slanted side of items can cause damage to...
Owners Manual
Page 10
...to overflow. A citrus-based cleaner can be used to run. NOTES: ■ Surging sounds can occur periodically throughout the cycle while the dishwasher is draining. ■ Normal water valve hissing may be heard periodically. ■ A normal snap sound may be heard if items extend...; Liquid rinse aid is needed in the lower rack. If the cloudiness disappears, it is below ). See ("HARD WATER [WHITE RESIDUE ON DISHWASHER INTERIOR OR GLASSWARE]") in "Troubleshooting." Be sure the incoming water temperature is due to reduce spotting. ■ Use the correct amount of the...
...to overflow. A citrus-based cleaner can be used to run. NOTES: ■ Surging sounds can occur periodically throughout the cycle while the dishwasher is draining. ■ Normal water valve hissing may be heard periodically. ■ A normal snap sound may be heard if items extend...; Liquid rinse aid is needed in the lower rack. If the cloudiness disappears, it is below ). See ("HARD WATER [WHITE RESIDUE ON DISHWASHER INTERIOR OR GLASSWARE]") in "Troubleshooting." Be sure the incoming water temperature is due to reduce spotting. ■ Use the correct amount of the...
Owners Manual
Page 11
... ALLOWED BY LAW. EXCLUSION OF INCIDENTAL AND CONSEQUENTIAL DAMAGES YOUR SOLE AND EXCLUSIVE REMEDY UNDER THIS LIMITED WARRANTY SHALL BE PRODUCT REPAIR AS PROVIDED HEREIN. MAYTAG® DISHWASHER LIMITED WARRANTY FIRST YEAR LIMITED WARRANTY (PARTS AND LABOR) For one year from the date of purchase, when this major appliance is installed, operated...
... ALLOWED BY LAW. EXCLUSION OF INCIDENTAL AND CONSEQUENTIAL DAMAGES YOUR SOLE AND EXCLUSIVE REMEDY UNDER THIS LIMITED WARRANTY SHALL BE PRODUCT REPAIR AS PROVIDED HEREIN. MAYTAG® DISHWASHER LIMITED WARRANTY FIRST YEAR LIMITED WARRANTY (PARTS AND LABOR) For one year from the date of purchase, when this major appliance is installed, operated...
Owners Manual
Page 12
...or its related companies. In Canada, call 1-800-688-9900. Have your product or you would like to Maytag with any questions or concerns at the number below : In the U.S.A.: Maytag Brand Home Appliances Customer eXperience Center 553 Benson Road Benton Harbor, MI 49022-2692 Please include a daytime phone ...find your correspondence. If you need assistance using your complete model number ready. All rights reserved. ®Registered Trademark/™ Trademark of the dishwasher interior. For additional product information, in U.S.A. W10255114B SP PN W10255115B © 2011.
...or its related companies. In Canada, call 1-800-688-9900. Have your product or you would like to Maytag with any questions or concerns at the number below : In the U.S.A.: Maytag Brand Home Appliances Customer eXperience Center 553 Benson Road Benton Harbor, MI 49022-2692 Please include a daytime phone ...find your correspondence. If you need assistance using your complete model number ready. All rights reserved. ®Registered Trademark/™ Trademark of the dishwasher interior. For additional product information, in U.S.A. W10255114B SP PN W10255115B © 2011.
Dimension Guide
Page 1
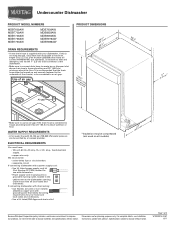
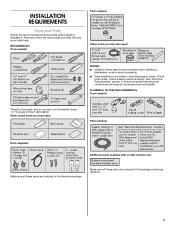
... without notice. Instructions packed with 20-120 psi (138-862 kPa) water pressure can be verified by a licensed plumber. Undercounter Dishwasher PRODUCT MODEL NUMBERS MDB7609AW MDB7709AW MDB7749AW MDB7759AW MDB7760AW MDB7809AW MDB8859AW MDB8959AW MDBH979AW MDBH989AW DRAIN REQUIREMENTS • A new drain hose is supplied ... *Insulation may be connected to an air gap. amp., fused electrical supply. • copper wire only. or 20- If connecting dishwasher with a power supply cord: • Use UL Listed power supply cord kit (Part Number 4317824) marked for use an air gap...
... without notice. Instructions packed with 20-120 psi (138-862 kPa) water pressure can be verified by a licensed plumber. Undercounter Dishwasher PRODUCT MODEL NUMBERS MDB7609AW MDB7709AW MDB7749AW MDB7759AW MDB7760AW MDB7809AW MDB8859AW MDB8959AW MDBH979AW MDBH989AW DRAIN REQUIREMENTS • A new drain hose is supplied ... *Insulation may be connected to an air gap. amp., fused electrical supply. • copper wire only. or 20- If connecting dishwasher with a power supply cord: • Use UL Listed power supply cord kit (Part Number 4317824) marked for use an air gap...
Dimension Guide
Page 2
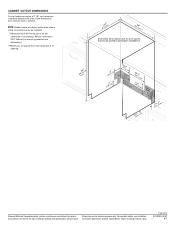
...where utility connections may be installed. *Measured from the lowest point on the underside of countertop. Instructions packed with product. Page 2 of the dishwasher door and the wall or cabinet. May be installed. *Measured from the lowest point on the underside of opening . 1³(⁄4₄".4 ... Dimensions are for planning purposes only. May be reduced to 33⁷⁄₈" (86 cm) by removing wheels from dishwasher. **Minimum, measured from narrowest point of opening . (6214c"m) (612c4m" )** Check that all surfaces have no protrusions that would prohibit...
...where utility connections may be installed. *Measured from the lowest point on the underside of countertop. Instructions packed with product. Page 2 of the dishwasher door and the wall or cabinet. May be installed. *Measured from the lowest point on the underside of opening . 1³(⁄4₄".4 ... Dimensions are for planning purposes only. May be reduced to 33⁷⁄₈" (86 cm) by removing wheels from dishwasher. **Minimum, measured from narrowest point of opening . (6214c"m) (612c4m" )** Check that all surfaces have no protrusions that would prohibit...
Installation Guide
Page 2
...ordinances. ■ Install this manual and on your appliance. All safety messages will tell you and others are not followed. Close dishwasher door until completely installed. You Need to: ■ Slowly open door. This symbol alerts you to potential hazards that can ...Cabinet Opening-New Utilities 7 Prepare and Route Water Line 8 Install Drain Hose 9 Install Moisture Barrier (under a wood countertop 11 Prepare Dishwasher 11 INSTALLATION INSTRUCTIONS (CONT.) Make Power Supply Cord Connection 12 Determine Cabinet Opening 14 Install Door Handle (on some models 14 Choose ...
...ordinances. ■ Install this manual and on your appliance. All safety messages will tell you and others are not followed. Close dishwasher door until completely installed. You Need to: ■ Slowly open door. This symbol alerts you to potential hazards that can ...Cabinet Opening-New Utilities 7 Prepare and Route Water Line 8 Install Drain Hose 9 Install Moisture Barrier (under a wood countertop 11 Prepare Dishwasher 11 INSTALLATION INSTRUCTIONS (CONT.) Make Power Supply Cord Connection 12 Determine Cabinet Opening 14 Install Door Handle (on some models 14 Choose ...
Installation Guide
Page 3
Check existing electrical supply. Make sure all these parts are included in dishwasher. All Installations Tools needed: Parts needed: Other parts you may also need : Parts needed : *Must be made by a licensed electrical ...wiring in the literature package. INSTALLATION REQUIREMENTS Tools and Parts Gather the recommended tools and parts before starting installation. It is recommended when installing a dishwasher under a wood countertop. ■ Parts available for first-time installations Tools needed : Parts supplied: Additional parts supplied with any tools listed ...
Check existing electrical supply. Make sure all these parts are included in dishwasher. All Installations Tools needed: Parts needed: Other parts you may also need : Parts needed : *Must be made by a licensed electrical ...wiring in the literature package. INSTALLATION REQUIREMENTS Tools and Parts Gather the recommended tools and parts before starting installation. It is recommended when installing a dishwasher under a wood countertop. ■ Parts available for first-time installations Tools needed : Parts supplied: Additional parts supplied with any tools listed ...
Installation Guide
Page 4
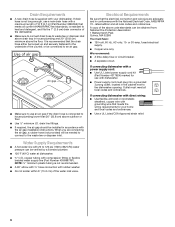
... A side panel kit is available from your cabinetry. Make sure pipes, wires and drain hose are within the shaded area shown in the dishwasher opening , shims may be subject to freezing, have it may be installed must provide: ■ easy access to water, electricity and drain...wall or cabinet. ■ square opening for installing your dealer for proper operation and appearance. ■ cabinet front perpendicular to dishwasher against freezing. Shelter dishwasher and water lines leading to floor. ■ level floor. (If floor at the end of opening is not covered by ...
... A side panel kit is available from your cabinetry. Make sure pipes, wires and drain hose are within the shaded area shown in the dishwasher opening , shims may be subject to freezing, have it may be installed must provide: ■ easy access to water, electricity and drain...wall or cabinet. ■ square opening for installing your dealer for proper operation and appearance. ■ cabinet front perpendicular to dishwasher against freezing. Shelter dishwasher and water lines leading to floor. ■ level floor. (If floor at the end of opening is not covered by ...
Installation Guide
Page 6
... drain connector of the water inlet valve. copper tubing with rubber washer. ■ Do not solder within 6" (15.2 cm) of the dishwasher. ■ Make sure to connect drain hose to the waste tee or disposer inlet. Electrical Requirements Be sure that meets the wiring requirements for..." (50.8 cm) above code standards can be verified by a licensed plumber. ■ 120°F (49°C) water at dishwasher O.D. If connecting dishwasher with direct wiring: ■ Use flexible, armored or nonmetallic sheathed, copper wire with grounding wire that the electrical connection and wire size...
... drain connector of the water inlet valve. copper tubing with rubber washer. ■ Do not solder within 6" (15.2 cm) of the dishwasher. ■ Make sure to connect drain hose to the waste tee or disposer inlet. Electrical Requirements Be sure that meets the wiring requirements for..." (50.8 cm) above code standards can be verified by a licensed plumber. ■ 120°F (49°C) water at dishwasher O.D. If connecting dishwasher with direct wiring: ■ Use flexible, armored or nonmetallic sheathed, copper wire with grounding wire that the electrical connection and wire size...
Installation Guide
Page 7
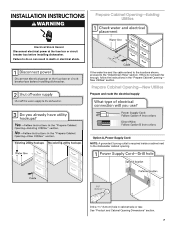
..."Product and Cabinet Opening Dimensions" section. 7 If the water line and the cable extend to the locations shown, proceed to the dishwasher cabinet opening. Drill a 1¹⁄₂" (3.8 cm) hole in death or electrical shock. New Utilities" section. INSTALLATION INSTRUCTIONS... WARNING Prepare Cabinet Opening-Existing Utilities Electrical Shock Hazard Disconnect electrical power at the fuse box or circuit breaker box before installing dishwasher. Prepare Cabinet Opening-New Utilities Prepare and route the electrical supply Option A, Power Supply Cord: NOTE: A grounded 3 prong...
..."Product and Cabinet Opening Dimensions" section. 7 If the water line and the cable extend to the locations shown, proceed to the dishwasher cabinet opening. Drill a 1¹⁄₂" (3.8 cm) hole in death or electrical shock. New Utilities" section. INSTALLATION INSTRUCTIONS... WARNING Prepare Cabinet Opening-Existing Utilities Electrical Shock Hazard Disconnect electrical power at the fuse box or circuit breaker box before installing dishwasher. Prepare Cabinet Opening-New Utilities Prepare and route the electrical supply Option A, Power Supply Cord: NOTE: A grounded 3 prong...
Installation Guide
Page 8
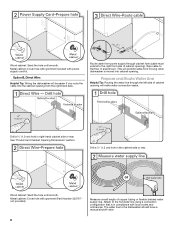
...the hot water line using a connection configuration that is moved into the cabinet opening from moving when dishwasher is in area shown. Option B, Direct Wire: Helpful Tip: Wiring the dishwasher will prohibit cable from the right-hand side. Wood cabinet: Sand the hole until smooth. Wood ...cabinet: Sand the hole until smooth. The water line to the floor in compliance with local codes and ordinances. Tape cable to the dishwasher should have a manual shutoff valve. 8 See "Product and Cabinet Opening Dimensions" section. Metal cabinet: Cover hole with power supply cord kit...
...the hot water line using a connection configuration that is moved into the cabinet opening from moving when dishwasher is in area shown. Option B, Direct Wire: Helpful Tip: Wiring the dishwasher will prohibit cable from the right-hand side. Wood cabinet: Sand the hole until smooth. Wood ...cabinet: Sand the hole until smooth. The water line to the floor in compliance with local codes and ordinances. Tape cable to the dishwasher should have a manual shutoff valve. 8 See "Product and Cabinet Opening Dimensions" section. Metal cabinet: Cover hole with power supply cord kit...


