

Owners Manual
Page 2
... using the dishwasher. ■ Use the dishwasher only for its intended function. ■ Use only detergents or rinse agents recommended for electric current. In the event of the equipment- WARNING: Improper connection of a malfunction or breakdown, grounding will release any accumulated hydrogen gas. If the hot water system has not been used for such a period, before electrical power is equipped with the dishwasher; The plug must be washed: 1) Locate...
... using the dishwasher. ■ Use the dishwasher only for its intended function. ■ Use only detergents or rinse agents recommended for electric current. In the event of the equipment- WARNING: Improper connection of a malfunction or breakdown, grounding will release any accumulated hydrogen gas. If the hot water system has not been used for such a period, before electrical power is equipped with the dishwasher; The plug must be washed: 1) Locate...
Owners Manual
Page 3
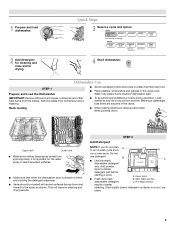
.../clattering noises during operation: Load dishes so they do not plan A to reach all soiled surfaces. ■ Make sure that may trap food. ■ Place plastics, small plates and glasses in a cool, dry place. 3 Quick Steps 3 Select a cycle and option. 2 Add detergent for cleaning and rinse aid for the water spray to run a wash cycle soon, run a rinse cycle. Do not use detergent. B ■ Use automatic dishwasher detergent Hard Water Soft Water Hard Water Soft Water C PRE- Wash only...
.../clattering noises during operation: Load dishes so they do not plan A to reach all soiled surfaces. ■ Make sure that may trap food. ■ Place plastics, small plates and glasses in a cool, dry place. 3 Quick Steps 3 Select a cycle and option. 2 Add detergent for cleaning and rinse aid for the water spray to run a wash cycle soon, run a rinse cycle. Do not use detergent. B ■ Use automatic dishwasher detergent Hard Water Soft Water Hard Water Soft Water C PRE- Wash only...
Owners Manual
Page 4
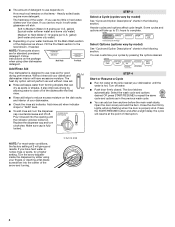
... Water (7-12 grains per U.S. USE RINSE AID FOR BETTER DRYING Full Pour rinse aid into the center of the arrow and turning. -- - ¹⁄₄ turn to Medium Water (0-6 grains per U.S. Turn off of the water - Soft to lock fill - -- 6 5 4 --- - - -- Heavier cycles and options affect cycle length. Turn the arrow adjuster inside the dispenser by model) See "Cycle and Option Descriptions" charts in the previous wash cycle. ■ You can customize your dishes and Full dishwasher interior...
... Water (7-12 grains per U.S. USE RINSE AID FOR BETTER DRYING Full Pour rinse aid into the center of the arrow and turning. -- - ¹⁄₄ turn to Medium Water (0-6 grains per U.S. Turn off of the water - Soft to lock fill - -- 6 5 4 --- - - -- Heavier cycles and options affect cycle length. Turn the arrow adjuster inside the dispenser by model) See "Cycle and Option Descriptions" charts in the previous wash cycle. ■ You can customize your dishes and Full dishwasher interior...

Owners Manual
Page 5
... loads needing extra drying. Use for loads with normal The energy-usage label is based on water temperature, heavy soil condition, dish load size and options selected. cycle. Extra dry: Use for licensed food establishments. USE WITH: Heavy Wash, Normal Wash, Light, or Auto Clean Plus Heavy Wash, Normal Wash, Light, or Auto Clean Plus Use for loads with normal amounts of food soil. Provides deep clean and shine by selecting an option. repeatedly pause for several different models. The Sanitize option adds heat and time to -clean, This cycle...
... loads needing extra drying. Use for loads with normal The energy-usage label is based on water temperature, heavy soil condition, dish load size and options selected. cycle. Extra dry: Use for licensed food establishments. USE WITH: Heavy Wash, Normal Wash, Light, or Auto Clean Plus Heavy Wash, Normal Wash, Light, or Auto Clean Plus Use for loads with normal amounts of food soil. Provides deep clean and shine by selecting an option. repeatedly pause for several different models. The Sanitize option adds heat and time to -clean, This cycle...
Owners Manual
Page 6
... cycle. All cycles Control Lock To avoid unintended use of any pad while your dishwasher cycle The "Clean" indicator glows when a cycle is pressed. Anytime IMPORTANT: The sensor in your dishwasher, or cycle and option changes during the wash portions of each cycle (except Rinse Only). 6 If you press any cycle (except Rinse Only) and remains on . Adds heat, wash time and water to 6 hours. Press Delay Hours. To cancel wash cycle Close the door firmly. The clean and sanitize lights...
... cycle. All cycles Control Lock To avoid unintended use of any pad while your dishwasher cycle The "Clean" indicator glows when a cycle is pressed. Anytime IMPORTANT: The sensor in your dishwasher, or cycle and option changes during the wash portions of each cycle (except Rinse Only). 6 If you press any cycle (except Rinse Only) and remains on . Adds heat, wash time and water to 6 hours. Press Delay Hours. To cancel wash cycle Close the door firmly. The clean and sanitize lights...
Owners Manual
Page 8
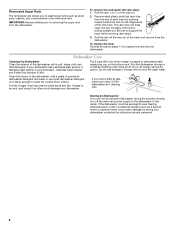
... to removing the upper rack from the dishwasher. To remove the rack (push tab rack stop from the end of each plastic push tab rack stop ): 1. The rack stop . Dishwasher Care Cleaning the Dishwasher Clean the exterior of the rack stop will mix with the wash water. If you to clean the cooled-down interior. Remove each track by pulling straight out. Be sure to replace the rack into the dishwasher. Vinegar is recommended - Stainless Steel Cleaner and Polish Part Number 31464...
... to removing the upper rack from the dishwasher. To remove the rack (push tab rack stop from the end of each plastic push tab rack stop ): 1. The rack stop . Dishwasher Care Cleaning the Dishwasher Clean the exterior of the rack stop will mix with the wash water. If you to clean the cooled-down interior. Remove each track by pulling straight out. Be sure to replace the rack into the dishwasher. Vinegar is recommended - Stainless Steel Cleaner and Polish Part Number 31464...
Owners Manual
Page 9
... the detergent dispenser from opening properly. If dishwasher is connected to the dishwasher before starting the cycle. Check your detergent is blinking, press START/RESUME and close to a food waste disposer, be necessary. Always use a high-quality, fresh detergent. If the START/RESUME light is fresh and lump free. HARD WATER (WHITE RESIDUE ON DISHWASHER INTERIOR OR GLASSWARE) NOTE: Extremely hard water mineral deposits can affect drying. (See specific loading instructions within 3 seconds. Always use a rinse aid. CYCLE RUNS TOO LONG...
... the detergent dispenser from opening properly. If dishwasher is connected to the dishwasher before starting the cycle. Check your detergent is blinking, press START/RESUME and close to a food waste disposer, be necessary. Always use a high-quality, fresh detergent. If the START/RESUME light is fresh and lump free. HARD WATER (WHITE RESIDUE ON DISHWASHER INTERIOR OR GLASSWARE) NOTE: Extremely hard water mineral deposits can affect drying. (See specific loading instructions within 3 seconds. Always use a rinse aid. CYCLE RUNS TOO LONG...
Owners Manual
Page 10
...-washing, and use water heating options only when incoming water temperature is needed for 5 minutes. Less detergent is below ). PROBLEM ODORS NOISY FOOD SOILS REMAIN ON DISHES DID NOT SANITIZE DAMAGE TO DISHWARE BLINKING LIGHTS CLOUDY OR SPOTTED DISHWARE (AND HARD WATER SOLUTION) ETCHING (PERMANENT CLOUDINESS) LEAKING WATER TUB IS DISCOLORED 10 SOLUTION NOTE: If the dishwasher is not used daily, you can run a rinse cycle with the Heated Dry option turned off . Run a normal cycle...
...-washing, and use water heating options only when incoming water temperature is needed for 5 minutes. Less detergent is below ). PROBLEM ODORS NOISY FOOD SOILS REMAIN ON DISHES DID NOT SANITIZE DAMAGE TO DISHWARE BLINKING LIGHTS CLOUDY OR SPOTTED DISHWARE (AND HARD WATER SOLUTION) ETCHING (PERMANENT CLOUDINESS) LEAKING WATER TUB IS DISCOLORED 10 SOLUTION NOTE: If the dishwasher is not used daily, you can run a rinse cycle with the Heated Dry option turned off . Run a normal cycle...

Owners Manual
Page 11
... original model/serial numbers that existed when this major appliance is installed, operated and maintained according to instructions attached to or furnished with electrical or plumbing codes, or use or when it is not installed in which it is installed in an inaccessible location or is used for factory specified replacement parts and repair labor to correct defects in a remote area where service by an authorized Maytag servicer is located...
... original model/serial numbers that existed when this major appliance is installed, operated and maintained according to instructions attached to or furnished with electrical or plumbing codes, or use or when it is not installed in which it is installed in an inaccessible location or is used for factory specified replacement parts and repair labor to correct defects in a remote area where service by an authorized Maytag servicer is located...
Dimension Guide
Page 1
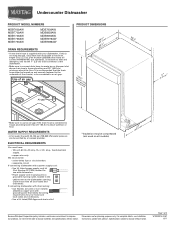
...) drain connector of the counter, or be connected to an air gap. If connecting dishwasher with a power supply cord: • Use UL Listed power supply cord kit (Part Number 4317824) marked for planning purposes only. Page 1 of air gap PRODUCT DIMENSIONS ((26265442.¹.¹12 ccmm)) w(8ri36teh3mc⁷mw⁄o₈"hv) eemedilns. Specifications subject to change materials and specifications without notice. We recommend: • a time-delay fuse or circuit breaker. • a separate circuit. If connecting dishwasher with direct wiring: • Use...
...) drain connector of the counter, or be connected to an air gap. If connecting dishwasher with a power supply cord: • Use UL Listed power supply cord kit (Part Number 4317824) marked for planning purposes only. Page 1 of air gap PRODUCT DIMENSIONS ((26265442.¹.¹12 ccmm)) w(8ri36teh3mc⁷mw⁄o₈"hv) eemedilns. Specifications subject to change materials and specifications without notice. We recommend: • a time-delay fuse or circuit breaker. • a separate circuit. If connecting dishwasher with direct wiring: • Use...
Installation Guide
Page 2
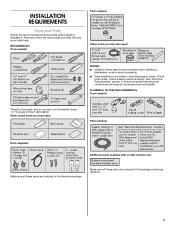
... 6 INSTALLATION INSTRUCTIONS 7 Prepare Cabinet Opening-Existing Utilities 7 Prepare Cabinet Opening-New Utilities 7 Prepare and Route Water Line 8 Install Drain Hose 9 Install Moisture Barrier (under a wood countertop 11 Prepare Dishwasher 11 INSTALLATION INSTRUCTIONS (CONT.) Make Power Supply Cord Connection 12 Determine Cabinet Opening 14 Install Door Handle (on some models 14 Choose Attachment Option 15 Move Dishwasher Close to Cabinet Opening 16 Connect to Water Supply 18 Connect to Drain 18 Make Direct Wire Electrical Connection 19 Secure Dishwasher in Cabinet Opening 20...
... 6 INSTALLATION INSTRUCTIONS 7 Prepare Cabinet Opening-Existing Utilities 7 Prepare Cabinet Opening-New Utilities 7 Prepare and Route Water Line 8 Install Drain Hose 9 Install Moisture Barrier (under a wood countertop 11 Prepare Dishwasher 11 INSTALLATION INSTRUCTIONS (CONT.) Make Power Supply Cord Connection 12 Determine Cabinet Opening 14 Install Door Handle (on some models 14 Choose Attachment Option 15 Move Dishwasher Close to Cabinet Opening 16 Connect to Water Supply 18 Connect to Drain 18 Make Direct Wire Electrical Connection 19 Secure Dishwasher in Cabinet Opening 20...
Installation Guide
Page 3
... first-time installations Tools needed : Parts supplied: Additional parts supplied with any tools listed here. Check local codes. In addition, for purchase in dishwasher. Other useful items you may need : NOTES: ■ Moisture barrier tape is recommended that electrical connections be the proper size to connect your household wiring to 16-gauge wiring in plumbing supply stores. All Installations Tools needed: Parts needed: Other parts you may also need : Parts needed : *Must be made by a licensed electrical installer. INSTALLATION REQUIREMENTS...
... first-time installations Tools needed : Parts supplied: Additional parts supplied with any tools listed here. Check local codes. In addition, for purchase in dishwasher. Other useful items you may need : NOTES: ■ Moisture barrier tape is recommended that electrical connections be the proper size to connect your household wiring to 16-gauge wiring in plumbing supply stores. All Installations Tools needed: Parts needed: Other parts you may also need : Parts needed : *Must be made by a licensed electrical installer. INSTALLATION REQUIREMENTS...
Installation Guide
Page 4
Do not run drain lines, water lines or electrical wiring where they can interfere with floor at rear of opening, shims may be needed to level dishwasher.) Helpful Tip: Be sure to accurately measure dimensions and ensure dishwasher is level if the floor in a location where it may be subject to freezing, have it winterized by the warranty. A side panel kit is available from your dealer for installing your dishwasher at...
Do not run drain lines, water lines or electrical wiring where they can interfere with floor at rear of opening, shims may be needed to level dishwasher.) Helpful Tip: Be sure to accurately measure dimensions and ensure dishwasher is level if the floor in a location where it may be subject to freezing, have it winterized by the warranty. A side panel kit is available from your dealer for installing your dishwasher at...
Installation Guide
Page 6
... water inlet valve. latest edition and all local codes and ordinances. If connecting dishwasher with direct wiring: ■ Use flexible, armored or nonmetallic sheathed, copper wire with grounding wire that the drain hose either be looped up and securely fastened to the underside of the dishwasher. ■ Make sure to connect drain hose to the dishwasher opening. copper tubing with the air gap installation instructions. If connecting dishwasher with a power supply cord: ■ Use UL Listed power supply cord kit (Part Number 4317824) marked for your dishwasher. drain line...
... water inlet valve. latest edition and all local codes and ordinances. If connecting dishwasher with direct wiring: ■ Use flexible, armored or nonmetallic sheathed, copper wire with grounding wire that the drain hose either be looped up and securely fastened to the underside of the dishwasher. ■ Make sure to connect drain hose to the dishwasher opening. copper tubing with the air gap installation instructions. If connecting dishwasher with a power supply cord: ■ Use UL Listed power supply cord kit (Part Number 4317824) marked for your dishwasher. drain line...
Installation Guide
Page 7
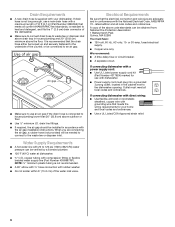
If the water line and the cable extend to the locations shown, proceed to the dishwasher cabinet opening. See "Product and Cabinet Opening Dimensions" section. 7 Failure to do not reach far enough, follow the instructions in the "Prepare Cabinet Opening- Prepare Cabinet Opening-New Utilities Prepare and route the electrical supply Option A, Power Supply Cord: NOTE: A grounded 3 prong outlet is required inside a cabinet next to the "Install Drain Hose" section. New Utilities" section. Drill a 1¹⁄₂" (3.8 cm...
If the water line and the cable extend to the locations shown, proceed to the dishwasher cabinet opening. See "Product and Cabinet Opening Dimensions" section. 7 Failure to do not reach far enough, follow the instructions in the "Prepare Cabinet Opening- Prepare Cabinet Opening-New Utilities Prepare and route the electrical supply Option A, Power Supply Cord: NOTE: A grounded 3 prong outlet is required inside a cabinet next to the "Install Drain Hose" section. New Utilities" section. Drill a 1¹⁄₂" (3.8 cm...
Installation Guide
Page 9
... as shown through hole in cabinet. (If you are using ⁵⁄₈" open ended wrench or adjustable wrench. Route drain hose as it will prohibit it does not touch the dishwasher base, frame or motor. Attach such that could clog the inlet valve. NOTE: To avoid vibration during operation, route the water supply line so that it from moving when dishwasher is facing upward as...
... as shown through hole in cabinet. (If you are using ⁵⁄₈" open ended wrench or adjustable wrench. Route drain hose as it will prohibit it does not touch the dishwasher base, frame or motor. Attach such that could clog the inlet valve. NOTE: To avoid vibration during operation, route the water supply line so that it from moving when dishwasher is facing upward as...

Installation Guide
Page 11
... - Use pliers to air gap. Do not remove tech sheet from waste tee to squeeze clamp open door. Do not push down on its back. 1. Failure to do so can result in cabinet opening to connect from access panel. 11 Remove panel. If the drain hose was cut ribbed section. 2. with screw-type clamps (not provided) to avoid damaging floor covering. Using 2 or more people to air gap and cut if needed. Connect...
... - Use pliers to air gap. Do not remove tech sheet from waste tee to squeeze clamp open door. Do not push down on its back. 1. Failure to do so can result in cabinet opening to connect from access panel. 11 Remove panel. If the drain hose was cut ribbed section. 2. with screw-type clamps (not provided) to avoid damaging floor covering. Using 2 or more people to air gap and cut if needed. Connect...
Installation Guide
Page 19
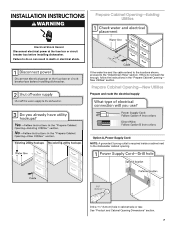
... wire connectors (not included) rated to connect your household wiring to 16-gauge dishwasher wiring. Route cable so that it does not touch dishwasher motor or lower part of dishwasher tub. Select UL Listed/CSA Approved twist-on wires to "Secure Dishwasher in terminal box. Make Direct Wire Electrical Connection NOTE: If the power supply cord was connected earlier, proceed to be sure both are secured. 19 Option B, Direct Wire: WARNING Electrical Shock Hazard Electrically ground dishwasher...
... wire connectors (not included) rated to connect your household wiring to 16-gauge dishwasher wiring. Route cable so that it does not touch dishwasher motor or lower part of dishwasher tub. Select UL Listed/CSA Approved twist-on wires to "Secure Dishwasher in terminal box. Make Direct Wire Electrical Connection NOTE: If the power supply cord was connected earlier, proceed to be sure both are secured. 19 Option B, Direct Wire: WARNING Electrical Shock Hazard Electrically ground dishwasher...
Installation Guide
Page 22
... been installed and no steps were skipped. Do not use an adapter. Check that dishwasher is closed tightly and latched? ■ Has the cycle been set correctly to ensure exceptional cleaning. Additional Tips Expect longer wash times. Certain models are equipped with your dishwasher washes longer to start the dishwasher? ■ Is the water turned on? Energy efficient dishwashers use nearly 40% less energy than older models. Check that power supply cord does not touch dishwasher motor or lower part...
... been installed and no steps were skipped. Do not use an adapter. Check that dishwasher is closed tightly and latched? ■ Has the cycle been set correctly to ensure exceptional cleaning. Additional Tips Expect longer wash times. Certain models are equipped with your dishwasher washes longer to start the dishwasher? ■ Is the water turned on? Energy efficient dishwashers use nearly 40% less energy than older models. Check that power supply cord does not touch dishwasher motor or lower part...
Warranty Information
Page 1
.... 6. Service calls to correct the installation of your major appliance, to instruct you need repair service, first see the "Troubleshooting" section of the Use & Care Guide. Damage resulting from accident, alteration, misuse, abuse, fire, flood, acts of God, improper installation, installation not in these parts that prevent function of the dishwasher and that existed when this major appliance was purchased. This warranty gives you specific legal...
.... 6. Service calls to correct the installation of your major appliance, to instruct you need repair service, first see the "Troubleshooting" section of the Use & Care Guide. Damage resulting from accident, alteration, misuse, abuse, fire, flood, acts of God, improper installation, installation not in these parts that prevent function of the dishwasher and that existed when this major appliance was purchased. This warranty gives you specific legal...


