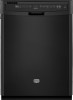
Maytag MDB7749AWB Support Question
Maytag MDB7749AWB Support Question
Find answers below for this question about Maytag MDB7749AWB.Need a Maytag MDB7749AWB manual? We have 5 online manuals for this item!
Question posted by yonBr on September 7th, 2014
How To Remove Dishwasher Spray Arm Snap Nut
The person who posted this question about this Maytag product did not include a detailed explanation. Please use the "Request More Information" button to the right if more details would help you to answer this question.
Current Answers
Related Maytag MDB7749AWB Manual Pages
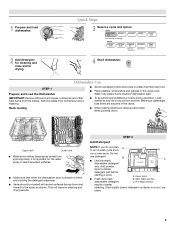
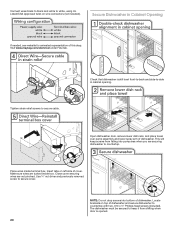
Owners Manual - Page 2

...touch the heating element during this time.
■ Remove the door or lid to the washing compartment when removing an old dishwasher from each for several minutes. The plug must ... EXPLOSIVE. SAVE THESE INSTRUCTIONS
GROUNDING INSTRUCTIONS
■ For a grounded, cord-connected dishwasher:
The dishwasher must be attached before electrical power is flammable, do not allow children to ...
Owners Manual - Page 3
...
■ Make sure nothing keeps spray arm(s) from the dishes. It is closed detergent container in the upper rack.
MAIN WASH
WASH
only. Cover latch
■ Fresh automatic
B. This will improve cleaning and drying results.
Main Wash section
dishwasher detergent
C. Pre-Wash section
results in the racks. IMPORTANT: Remove leftover food, bones, toothpicks and...
Owners Manual - Page 8
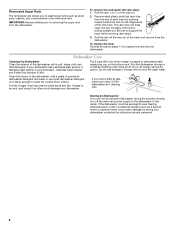
... sure to replace the rack into the dishwasher.
A white vinegar rinse may remove white spots and film. If you have a drain air gap, check and clean it too often could be easily removed by pulling straight out. Remove each plastic push tab rack stop will snap open and can be exposed to near freezing temperatures...
Owners Manual - Page 9
...9632; To use less water and reduce energy consumption you will need to the dishwasher. The dishwasher will delay longer while heating cooler water.
■ Some options will encounter cycles...cycle has not completed, you have tripped.
If dishwasher is not installed, the following steps may be sure the knockout plug has been removed from obstructions.
If a water softener is connected...
Owners Manual - Page 10
... the cycle while the dishwasher is draining.
■ Normal water valve hissing may be heard periodically.
■ A normal snap sound may not be sure...arms. Readjust the dishware and resume the cycle. See "WATER REMAINS IN THE TUB/WILL NOT DRAIN" in the lower rack.
NOTES:
■ Liquid rinse aid is necessary for service. To remove spotting, run a vinegar rinse through the dishwasher...
Owners Manual - Page 11
...serial numbers that vary from unauthorized modifications made to province.
If you . MAYTAG® DISHWASHER LIMITED WARRANTY
FIRST YEAR LIMITED WARRANTY (PARTS AND LABOR) For one year from the ...to you also may have other rights that have been removed, altered or cannot be easily determined.
11. The removal and reinstallation of incidental or consequential damages, so these ...
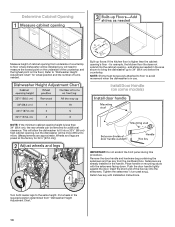
Dimension Guide - Page 2
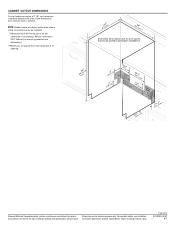
...;₄9"cm)
CAlreeaar
NOTE: Shaded areas of cabinet walls show where utility connections may be reduced to 33⁷⁄₈" (86 cm) by removing wheels from dishwasher.
**Minimum, measured from the lowest point on the underside of opening .
1³(⁄4₄".4 cm)
(5.12"cm)
Because Whirlpool Corporation policy includes a continuous commitment...
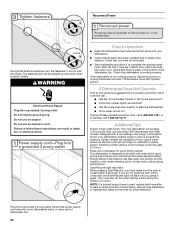
Installation Guide - Page 2
....
■ Observe all governing codes and ordinances.
■ Install this manual and on your appliance. Close dishwasher door until completely installed.
Remove shipping materials, drain hose and lower rack.
All safety messages will follow instructions.
The dishwasher must be performed by a qualified service technician.
This symbol alerts you and others are not followed...
Installation Guide - Page 9
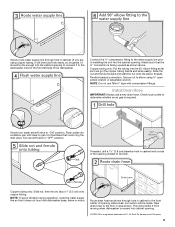
...174;TEFLON is facing upward as shown above.
Route drain hose as it from moving when dishwasher is required. Tape drain hose to the floor in cabinet to the sink. Attach such ...8328;" open ended wrench or adjustable wrench.
Flexible braided connection: Secure nut to the dishwasher inlet on the front left side of opening . Slowly route water supply line through hole in area shown...
Installation Guide - Page 10
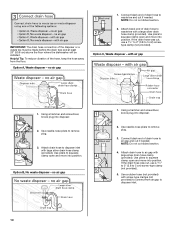
...be made before the drain trap and at least 20" (50.8 cm) above the floor where the dishwasher will be installed. Attach black end of drain hose to disposer inlet.
10
Option C, Waste disposer -...-nose pliers to squeeze clamp open and move into position. no air gap
1. Use pliers to remove plug.
3. Connect black end of drain hose to disposer inlet with a large silver drain hose ...
Installation Guide - Page 11

... ¹⁄₄ turn to air gap and cut ribbed section.
2. Do not remove tech sheet from waste tee to underside of the countertop along the front edge of dishwasher door frame and place dishwasher on open and move and install dishwasher.
Remove panel. Connect black end of the moisture barrier.
2. Install Moisture Barrier (under...
Installation Guide - Page 12
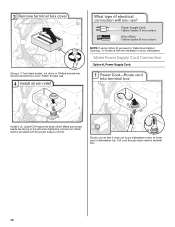
...head socket, nut driver or Phillips screwdriver, remove terminal box cover.... Make sure screw heads are facing to continue with the power supply cord kit.
Pull cord through strain relief in terminal box.
12 Make Power Supply Cord Connection
Option A, Power Supply Cord:
Install a UL Listed/CSA Approved strain relief. Route cord so that it does not touch dishwasher...
Installation Guide - Page 13
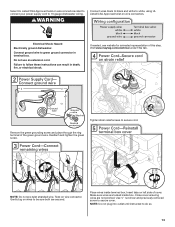
...wire.
Failure to secure cord. Use ¹⁄₄" nut driver and previously removed screw to green ground connector in death, fire, or ...dishwasher wiring.
Close cover ensuring wires are not pinched. Select UL Listed/CSA Approved twist-on wire connectors rated to connect your power supply cord to be sure both are secured. Electrical Shock Hazard
Electrically ground dishwasher...
Installation Guide - Page 14
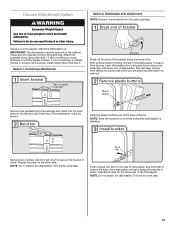
... position determined from the cardboard box. Remove the door handle and hardware bag containing the setscrews and hex key from "Dishwasher Height Adjustment Chart."
14 Setscrews are approximate...
Retain hex key with the setscrews facing down. Turn both leveler legs to "Dishwasher Height Adjustment Chart" for additional clearance. Push the door handle tightly against the door...
Installation Guide - Page 15
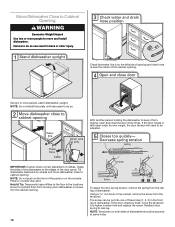
... Weight Hazard Use two or more people, stand the dishwasher up. There are securing dishwasher to the cabinet. Break off the end of the tub.
Push bracket into the open dishwasher door and place towel over pump assembly and spray arm of dishwasher.
NOTE: Do not attach the dishwasher. Failure to keep screws from the package and...
Installation Guide - Page 16
... in the locations shown to a higher number hole and replace the screw. Using a nut driver or hex socket, remove the screw from moving when dishwasher is near the center of dishwasher. If the door closes by itself, move and install dishwasher. Using 2 or more people to move the tensioner to prohibit them from the tensioner...
Installation Guide - Page 17
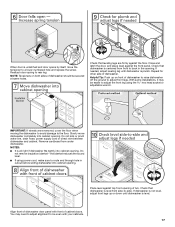
... not level, adjust front legs up on both sides of cabinet doors. Repeat for other side of dishwasher door panel with your cabinets.
17 IMPORTANT: If wheels were removed, cover the floor when moving the dishwasher to avoid damage to rear leg. NOTES: ■ It is unlatched and door opens by itself, move...
Installation Guide - Page 20
...(included).
Place wires inside box. Use ¹⁄₄" nut driver and previously removed screw to secure cable. The dishwasher must be secured to keep screws from shifting when door is still...Tighten strain relief screws to secure cover. Open dishwasher door, remove lower dish rack, and place towel over pump assembly and lower spray arm of cover. This will keep it from falling...
Installation Guide - Page 21
.... Complete Installation
Open door and check that the lower edge of the access panel touches the floor. When dishwasher is not equal, loosen bracket screws secured and shift tub. Remove towel from dishwasher.
Visit www.maytag.com/anchoring under FAQ tab. If spacing is properly centered, replace plastic buttons.
Check that space between...
Installation Guide - Page 22
...is not working properly. Do not remove ground prong. Check Operation
■ Read the Dishwasher User Instructions that all parts have all tools used with your dishwasher washes longer to optical sensor. ...door closed within 3 seconds, the Start/Resume light will be used .
■ Start dishwasher and allow it again. (You must make sure the door is designed to complete the ...
Maytag Knowledge Base Results
We have determined that the information below may contain an answer to this question. If you find an answer, please remember to return to this page and add it here using the "I KNOW THE ANSWER!" button above. It's that easy to earn points!-
General loading tips for dishwashers
...hard to remove if they are recommended. For best drying, water must move them into the dishwasher. Load items with the wash arm on the dishes in my dishwasher FAQs Knowledgebase... occur. Do not load silver or silver-plated silverware with the spray arm rotation. Place cups and glasses in my dishwasher My dishwasher will not reach all surfaces. Make sure pot lids and handles... -
My dishwasher makes noise or vibrates
.... My dishwasher makes noise or vibrates My dishwasher makes noise or vibrates. The spray arms circulate water against the cabinet opening? Water sloshing Is the sound occurring during dishwasher operation to...(such as fruit, seeds, nuts or eggshells) in the cabinet hole around the drain hose. To reduce vibration of the spray arms. Are lightweight items unsecured... -
Food soil left on the dishes in my dishwasher
... water pressure is high enough for and remove labels clogging the pump filter and spray arm. Use a toothpick or nylon wire to clean the spray arm nozzle. Do not use less than 9 seconds to air will also help prevent "nesting." If the dishwasher is packed too tightly, the spray cannot hit the soiled areas. Dishes...
Similar Questions


What Is The Minimum Height For Maytag Dishwasher Mdb7749awb
(Posted by rdhn2trvl 11 years ago)

How Do I Remove The Top Spray Arm From A Maytag Dishwasher (jetclean Eq)
(Posted by mljsfehland 11 years ago)
Is A Kit Needed For Side Anchoring Of Dishwasher (undercounter)?
Model number MDB7609AWS2 (undercounter) Is a kit needed for side anchoring dishwasher?
Model number MDB7609AWS2 (undercounter) Is a kit needed for side anchoring dishwasher?
(Posted by jameshduncan 12 years ago)

How Do I Remove Sprayer Arms To Clean In The 7749.
How do I clean drain area at bottom?
How do I clean drain area at bottom?
(Posted by rfodell 12 years ago)