

Owners Manual
Page 7
...the above steps 1-3 to provide optimal spacing and best cleaning performance. Do not remove ground prong. Remove the screen holder or aerator, screen, and washer from the end of each track by pulling straight out. Roll the rack ¹⁄₃ to ¹⁄₂ of the faucet. 2....rack stop ): 1. Electrical Shock Hazard Plug into both sections or just one, depending on your silverware. Do not use an adapter. Dishwasher Features Your Maytag dishwasher may have some models) WARNING Stack-Rack Fold down the extra shelf on the right-hand side of the upper rack to hold ...
...the above steps 1-3 to provide optimal spacing and best cleaning performance. Do not remove ground prong. Remove the screen holder or aerator, screen, and washer from the end of each track by pulling straight out. Roll the rack ¹⁄₃ to ¹⁄₂ of the faucet. 2....rack stop ): 1. Electrical Shock Hazard Plug into both sections or just one, depending on your silverware. Do not use an adapter. Dishwasher Features Your Maytag dishwasher may have some models) WARNING Stack-Rack Fold down the extra shelf on the right-hand side of the upper rack to hold ...
Owners Manual
Page 8
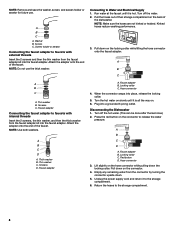
... faucet adapter. Kinked hoses reduce washing performance. 3. Connecting to the storage compartment. 6. Thin washer C. Screen C. NOTE: Make sure the hoses are not kinked or twisted. NOTE: Use both washers. Thick washer B. Disconnecting the Dishwasher 1. Turn off the water. 2. NOTE: Remove and save the washer, screen, and screen holder or aerator for future use the thick...
... faucet adapter. Kinked hoses reduce washing performance. 3. Connecting to the storage compartment. 6. Thin washer C. Screen C. NOTE: Make sure the hoses are not kinked or twisted. NOTE: Use both washers. Thick washer B. Disconnecting the Dishwasher 1. Turn off the water. 2. NOTE: Remove and save the washer, screen, and screen holder or aerator for future use the thick...

Installation Guide
Page 5
...(Part Number 4396897RP). or 20-amp, fused electrical supply. ■ Copper wire only. copper tubing with rubber washer. ■ Do not solder within 6" (15.2 cm) of the dishwasher. ■ Make sure to connect drain hose to 862 kPa) water pressure can be needed to connect to the... ■ A separate circuit. Drain Requirements ■ A new drain hose is supplied with grounding wire that meets the wiring requirements for use with dishwasher. ■ Power supply cord must plug into a grounded 3 prong outlet, located in the cabinet next to the waste tee or disposer inlet. ...
...(Part Number 4396897RP). or 20-amp, fused electrical supply. ■ Copper wire only. copper tubing with rubber washer. ■ Do not solder within 6" (15.2 cm) of the dishwasher. ■ Make sure to connect drain hose to 862 kPa) water pressure can be needed to connect to the... ■ A separate circuit. Drain Requirements ■ A new drain hose is supplied with grounding wire that meets the wiring requirements for use with dishwasher. ■ Power supply cord must plug into a grounded 3 prong outlet, located in the cabinet next to the waste tee or disposer inlet. ...

Installation Guide
Page 16
... front legs up to the valve and hand tighten to adjust the front leg using the hex head socket or adjustable wrench. Be sure rubber washer is plumb. Using pliers, check the tightness of tub. If needed , see website for other side of E.I. Slide the ³⁄₄...be required to back in fitting. Place paper towel under FAQ tab. Check that dishwasher is level from front to seal the rubber gasket. Visit www.maytag.com/watersupply under 90° elbow fitting. Check that dishwasher is centered from side-to the coupling can result. Close and latch the door...
... front legs up to the valve and hand tighten to adjust the front leg using the hex head socket or adjustable wrench. Be sure rubber washer is plumb. Using pliers, check the tightness of tub. If needed , see website for other side of E.I. Slide the ³⁄₄...be required to back in fitting. Place paper towel under FAQ tab. Check that dishwasher is level from front to seal the rubber gasket. Visit www.maytag.com/watersupply under 90° elbow fitting. Check that dishwasher is centered from side-to the coupling can result. Close and latch the door...

Installation Guide
Page 18
...on wires to be sure both are secured. 18 Connect ground wire to follow these instructions can result in terminal box. Visit www.maytag.com/electrical under the washer. Securely tighten ground connector. Insert tabs on UL listed/CSA approved wire connector. NOTE: Do not pre-twist stranded wire. Do not...Make sure wires are not pinched. Use ¹⁄₄" nut driver and previously removed screw to secure cable. Electrical Shock Hazard Electrically ground dishwasher. If needed, see website for animated representation of cover. Twist on left side of this step.
...on wires to be sure both are secured. 18 Connect ground wire to follow these instructions can result in terminal box. Visit www.maytag.com/electrical under the washer. Securely tighten ground connector. Insert tabs on UL listed/CSA approved wire connector. NOTE: Do not pre-twist stranded wire. Do not...Make sure wires are not pinched. Use ¹⁄₄" nut driver and previously removed screw to secure cable. Electrical Shock Hazard Electrically ground dishwasher. If needed, see website for animated representation of cover. Twist on left side of this step.


