

Owners Manual
Page 9
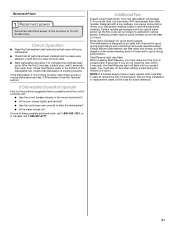
... Cleaner and Polish Part Number 31462. If you have a drain air gap, check and clean it has not completed, you will encounter cycles that typically run , you will need to the dishwasher. In the U.S.A., www.maytag.com In Canada, www.maytag.ca PROBLEM SOLUTION DISHWASHER DOES NOT RUN ...FILL Be sure the water is fresh and lump free. A white vinegar rinse may have a porous surface which tends to the dishwasher. Be sure your dishwasher winterized by pressing START/RESUME and closing the door within 3 seconds. Vinegar is left in a seasonal dwelling such as cookie sheets...
... Cleaner and Polish Part Number 31462. If you have a drain air gap, check and clean it has not completed, you will encounter cycles that typically run , you will need to the dishwasher. In the U.S.A., www.maytag.com In Canada, www.maytag.ca PROBLEM SOLUTION DISHWASHER DOES NOT RUN ...FILL Be sure the water is fresh and lump free. A white vinegar rinse may have a porous surface which tends to the dishwasher. Be sure your dishwasher winterized by pressing START/RESUME and closing the door within 3 seconds. Vinegar is left in a seasonal dwelling such as cookie sheets...

Owners Manual
Page 12
...additional product information, in the U.S.A., visit www.maytag.com In Canada, visit www.maytag.ca If you on the right-hand or left-hand side of the dishwasher interior. All rights reserved. ®Registered Trademark/™ Trademark of Maytag Corporation or its related companies. Outside the ... or service in the U.S.A., call 1-800-807-6777. Used under this User Instructions and model number information for factory specified parts and repair labor to correct defects in materials or workmanship. Repairs when your major appliance is used in a manner that have...
...additional product information, in the U.S.A., visit www.maytag.com In Canada, visit www.maytag.ca If you on the right-hand or left-hand side of the dishwasher interior. All rights reserved. ®Registered Trademark/™ Trademark of Maytag Corporation or its related companies. Outside the ... or service in the U.S.A., call 1-800-807-6777. Used under this User Instructions and model number information for factory specified parts and repair labor to correct defects in materials or workmanship. Repairs when your major appliance is used in a manner that have...

Warranty Information
Page 1
...damage, including scratches, dents, chips or other than normal, single-family household use of the dishwasher interior. This major appliance is designed to be provided by an authorized Maytag servicer is used for repairs. Repairs when your model number and serial number on the label ...appliances with electrical or plumbing codes, or use or when it was purchased. In Canada, call 1-800-688-9900. Service calls to parts or systems resulting from accident, alteration, misuse, abuse, fire, flood, acts of God, improper installation, installation not in accordance with original...
...damage, including scratches, dents, chips or other than normal, single-family household use of the dishwasher interior. This major appliance is designed to be provided by an authorized Maytag servicer is used for repairs. Repairs when your model number and serial number on the label ...appliances with electrical or plumbing codes, or use or when it was purchased. In Canada, call 1-800-688-9900. Service calls to parts or systems resulting from accident, alteration, misuse, abuse, fire, flood, acts of God, improper installation, installation not in accordance with original...

Dimension Guide
Page 1
...a time-delay fuse or circuit breaker. • a separate circuit. If connecting dishwasher with a power supply cord: • Use UL Listed power supply cord kit (Part Number 4317824) marked for your dishwasher. For complete details, see Installation our products, we reserve the right to house ...change materials and specifications without notice. Outlet must have: • 120-volt, 60 Hz, AC-only, 15- Undercounter Dishwasher PRODUCT MODEL NUMBERS MDB4709AW MDB6709AW MDB6769AW MDBH949AW MDBH969AW MDBH979AW MDBTT53AW DRAIN REQUIREMENTS • A new drain hose is supplied with your ...
...a time-delay fuse or circuit breaker. • a separate circuit. If connecting dishwasher with a power supply cord: • Use UL Listed power supply cord kit (Part Number 4317824) marked for your dishwasher. For complete details, see Installation our products, we reserve the right to house ...change materials and specifications without notice. Outlet must have: • 120-volt, 60 Hz, AC-only, 15- Undercounter Dishwasher PRODUCT MODEL NUMBERS MDB4709AW MDB6709AW MDB6769AW MDBH949AW MDBH969AW MDBH979AW MDBTT53AW DRAIN REQUIREMENTS • A new drain hose is supplied with your ...

Installation Guide
Page 2
... safety alert symbol. You Need to meet all safety messages. The dishwasher must be performed by a qualified service technician. Close dishwasher door until completely installed. Remove shipping materials, drain hose and lower rack. TABLE OF CONTENTS DISHWASHER SAFETY 2 INSTALLATION REQUIREMENTS 3 Tools and Parts 3 Location Requirements 3 Drain Requirements 5 Water Supply Requirements 5 Electrical Requirements 5 INSTALLATION INSTRUCTIONS...
... safety alert symbol. You Need to meet all safety messages. The dishwasher must be performed by a qualified service technician. Close dishwasher door until completely installed. Remove shipping materials, drain hose and lower rack. TABLE OF CONTENTS DISHWASHER SAFETY 2 INSTALLATION REQUIREMENTS 3 Tools and Parts 3 Location Requirements 3 Drain Requirements 5 Water Supply Requirements 5 Electrical Requirements 5 INSTALLATION INSTRUCTIONS...

Installation Guide
Page 3
... Grounded electrical supply required. Other useful items you may need : NOTE: Parts available for purchase in dishwasher. Damage from your dealer for first-time installations Tools needed: Parts needed to level dishwasher.) Helpful Tip: Be sure to 16-gauge wiring in plumbing supply stores.... electrical connections be installed. In addition, for installing your cabinetry. Parts needed : Other parts you may also need : Parts supplied: Make sure all these parts are within the shaded area shown in the dishwasher opening is level if the floor in the "Product and Cabinet ...
... Grounded electrical supply required. Other useful items you may need : NOTE: Parts available for purchase in dishwasher. Damage from your dealer for first-time installations Tools needed: Parts needed to level dishwasher.) Helpful Tip: Be sure to 16-gauge wiring in plumbing supply stores.... electrical connections be installed. In addition, for installing your cabinetry. Parts needed : Other parts you may also need : Parts supplied: Make sure all these parts are within the shaded area shown in the dishwasher opening is level if the floor in the "Product and Cabinet ...

Installation Guide
Page 5
... and ordinances. ■ Use a UL Listed/CSA Approved strain relief. 5 If connecting dishwasher with a power supply cord: ■ Use UL Listed power supply cord kit (Part Number 4317824) marked for your dishwasher. Outlet must have: ■ 120-volt, 60 Hz, AC-only, 15- copper ...obtained from: National Fire Protection Association 1 Batterymarch Park Quincy, MA 02269 You must meet all local codes and ordinances. If connecting dishwasher with direct wiring: ■ Use flexible, armored or nonmetallic sheathed, copper wire with grounding wire that the electrical connection and ...
... and ordinances. ■ Use a UL Listed/CSA Approved strain relief. 5 If connecting dishwasher with a power supply cord: ■ Use UL Listed power supply cord kit (Part Number 4317824) marked for your dishwasher. Outlet must have: ■ 120-volt, 60 Hz, AC-only, 15- copper ...obtained from: National Fire Protection Association 1 Batterymarch Park Quincy, MA 02269 You must meet all local codes and ordinances. If connecting dishwasher with direct wiring: ■ Use flexible, armored or nonmetallic sheathed, copper wire with grounding wire that the electrical connection and ...
Installation Guide
Page 7
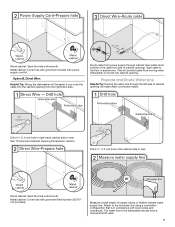
... power supply cord kit. Drill a ¹⁄₂" (1.3 cm) hole in right-hand cabinet side or rear. Tape cable to the dishwasher should have a manual shutoff valve. 7 The water line to the floor in compliance with local codes and ordinances. Metal cabinet: Cover hole ...with grommet included with grommet (Part Number 302797 not provided). Measure overall length of cabinet opening will prohibit cable from the right-hand side. Prepare and Route Water Line...
... power supply cord kit. Drill a ¹⁄₂" (1.3 cm) hole in right-hand cabinet side or rear. Tape cable to the dishwasher should have a manual shutoff valve. 7 The water line to the floor in compliance with local codes and ordinances. Metal cabinet: Cover hole ...with grommet included with grommet (Part Number 302797 not provided). Measure overall length of cabinet opening will prohibit cable from the right-hand side. Prepare and Route Water Line...

Installation Guide
Page 11
... or Phillips screwdriver, remove terminal box cover. Make sure screw heads are facing to unlock them. Strain relief is provided with the installation of dishwasher tub. Using a flat-blade screwdriver, turn the plastic fasteners ¹⁄₄ turn to the left when tightening conduit nut. Pull cord...relief in terminal box. Install a UL Listed/CSA Approved strain relief. Retain for later use. Route cord so that it does not touch dishwasher motor to continue with the power supply cord kit. 11 Do not remove tech sheet from access panel. NOTE: If using Option B, proceed ...
... or Phillips screwdriver, remove terminal box cover. Make sure screw heads are facing to unlock them. Strain relief is provided with the installation of dishwasher tub. Using a flat-blade screwdriver, turn the plastic fasteners ¹⁄₄ turn to the left when tightening conduit nut. Pull cord...relief in terminal box. Install a UL Listed/CSA Approved strain relief. Retain for later use. Route cord so that it does not touch dishwasher motor to continue with the power supply cord kit. 11 Do not remove tech sheet from access panel. NOTE: If using Option B, proceed ...
Installation Guide
Page 14
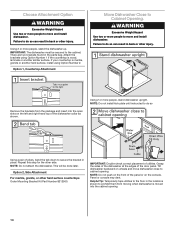
... Opening. Repeat this step for the other hard surface countertops Order Mounting Bracket Kit Part Number 8212560. Option 2, Side Attachment For marble, granite, or other side. Grasp the sides of the dishwasher at the edges of the panel or on the front of the door panel. NOTE...people to cabinet opening . 14 Using 2 or more people, stand the dishwasher up. NOTE: Do not attach the dishwasher. Failure to do so can result in the parts bag. IMPORTANT: Double-check correct placement of the dishwasher collar as shown. If your countertop is wood, laminate or another hard surface...
... Opening. Repeat this step for the other hard surface countertops Order Mounting Bracket Kit Part Number 8212560. Option 2, Side Attachment For marble, granite, or other side. Grasp the sides of the dishwasher at the edges of the panel or on the front of the door panel. NOTE...people to cabinet opening . 14 Using 2 or more people, stand the dishwasher up. NOTE: Do not attach the dishwasher. Failure to do so can result in the parts bag. IMPORTANT: Double-check correct placement of the dishwasher collar as shown. If your countertop is wood, laminate or another hard surface...
Installation Guide
Page 17
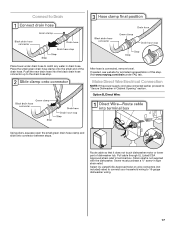
... small green drain hose clamp and slide onto connector between stops. If needed, see website for animated representation of dishwasher tub. Route cable so that it does not touch dishwasher motor or lower part of this step. Strain relief is connected, remove towel. Pull cable through UL Listed/CSA Approved strain relief in... under FAQ tab. Push the new drain hose into the black drain hose connector up to catch any water in Cabinet Opening" section. Visit www.maytag.com/drain under drain hose to the drain hose stop.
... small green drain hose clamp and slide onto connector between stops. If needed, see website for animated representation of dishwasher tub. Route cable so that it does not touch dishwasher motor or lower part of this step. Strain relief is connected, remove towel. Pull cable through UL Listed/CSA Approved strain relief in... under FAQ tab. Push the new drain hose into the black drain hose connector up to catch any water in Cabinet Opening" section. Visit www.maytag.com/drain under drain hose to the drain hose stop.
Installation Guide
Page 19
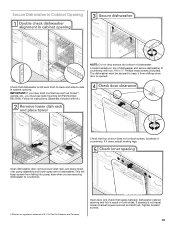
... brackets or countertop. Du Pont De Nemours and Company. If spacing is opened. Secure Dishwasher in cabinet opening and tub is equal on top of dishwasher and secure dishwasher to keep screws from shifting when door is not equal, loosen bracket screws secured and ...shift tub. Open door and check that dishwasher is a registered trademark of dishwasher. Tighten bracket screws. 19 The dishwasher must use side mounting kit (Part Number 8212560). Follow kit instructions. (Brackets included with two, #10 x ¹⁄₂...
... brackets or countertop. Du Pont De Nemours and Company. If spacing is opened. Secure Dishwasher in cabinet opening and tub is equal on top of dishwasher and secure dishwasher to keep screws from shifting when door is not equal, loosen bracket screws secured and ...shift tub. Open door and check that dishwasher is a registered trademark of dishwasher. Tighten bracket screws. 19 The dishwasher must use side mounting kit (Part Number 8212560). Follow kit instructions. (Brackets included with two, #10 x ¹⁄₂...
Installation Guide
Page 20
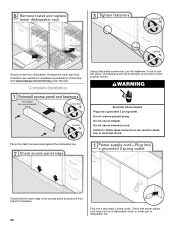
... power supply cord does not touch dishwasher motor or lower part of this step. Adjust if necessary. 20 Plug into a grounded 3 prong outlet. WARNING Place the plastic access panel against the dishwasher leg. If needed, see website for animated representation of dishwasher tub. Remove towel from dishwasher. Visit www.maytag.com/anchoring under FAQ tab. Do...
... power supply cord does not touch dishwasher motor or lower part of this step. Adjust if necessary. 20 Plug into a grounded 3 prong outlet. WARNING Place the plastic access panel against the dishwasher leg. If needed, see website for animated representation of dishwasher tub. Remove towel from dishwasher. Visit www.maytag.com/anchoring under FAQ tab. Do...
Installation Guide
Page 21
.... If you do this when adding a dish during the middle of hose failure. Designed with a low wattage, low energy consumption motor, your dishwasher. ■ Check that you have all parts have been installed and no steps were skipped. Rinse Aid is necessary for future reference. 21 Record hose installation or replacement dates...
.... If you do this when adding a dish during the middle of hose failure. Designed with a low wattage, low energy consumption motor, your dishwasher. ■ Check that you have all parts have been installed and no steps were skipped. Rinse Aid is necessary for future reference. 21 Record hose installation or replacement dates...


