

Owners Manual
Page 1
..., o para información adicional de su producto visite : www.maytag.com Tenga listo su número de modelo completo. W10240116A All safety messages will follow instructions. DISHWASHER USER INSTRUCTIONS THANK YOU for additional information. Puede encontrar su número...In Canada, visit our website at www.maytag.ca or call us at 1-800-807-6777. Table of Contents DISHWASHER SAFETY 1 QUICK STEPS 3 DISHWASHER USE 3 CYCLE AND OPTION DESCRIPTIONS 5 DISHWASHER FEATURES 7 DISHWASHER CARE 9 TROUBLESHOOTING 9 WARRANTY 12 Dishwasher Safety Your safety and the safety of ...
..., o para información adicional de su producto visite : www.maytag.com Tenga listo su número de modelo completo. W10240116A All safety messages will follow instructions. DISHWASHER USER INSTRUCTIONS THANK YOU for additional information. Puede encontrar su número...In Canada, visit our website at www.maytag.ca or call us at 1-800-807-6777. Table of Contents DISHWASHER SAFETY 1 QUICK STEPS 3 DISHWASHER USE 3 CYCLE AND OPTION DESCRIPTIONS 5 DISHWASHER FEATURES 7 DISHWASHER CARE 9 TROUBLESHOOTING 9 WARRANTY 12 Dishwasher Safety Your safety and the safety of ...

Owners Manual
Page 2
...not been used for use an open door. As the gas is flammable, do not allow children to play in or on the dishwasher. ■ Under certain conditions, hydrogen gas may be washed: 1) Locate sharp items so that they are not likely to damage the ...fit the outlet, have a proper outlet installed by providing a path of electric shock by a qualified electrician. ■ For a permanently connected dishwasher: The dishwasher must be connected to a grounded metal, permanent wiring system, or an equipment-grounding conductor must be attached before electrical power is installed and grounded...
...not been used for use an open door. As the gas is flammable, do not allow children to play in or on the dishwasher. ■ Under certain conditions, hydrogen gas may be washed: 1) Locate sharp items so that they are not likely to damage the ...fit the outlet, have a proper outlet installed by providing a path of electric shock by a qualified electrician. ■ For a permanently connected dishwasher: The dishwasher must be connected to a grounded metal, permanent wiring system, or an equipment-grounding conductor must be attached before electrical power is installed and grounded...

Owners Manual
Page 3
... will improve cleaning and drying results. ■ Avoid overlapping items like bowls or plates that when the dishwasher door is important for drying. 4 Start dishwasher. It is closed no items are secured in the upper rack. Upper rack Alternative rack loading Lower rack... ■ When loading silverware, always place sharp items pointing down . Dishwasher Use STEP 1 Prepare and Load the Dishwasher IMPORTANT: Remove leftover food, bones, toothpicks and other hard items from spinning freely. Quick Steps 3 Select a cycle...
... will improve cleaning and drying results. ■ Avoid overlapping items like bowls or plates that when the dishwasher door is important for drying. 4 Start dishwasher. It is closed no items are secured in the upper rack. Upper rack Alternative rack loading Lower rack... ■ When loading silverware, always place sharp items pointing down . Dishwasher Use STEP 1 Prepare and Load the Dishwasher IMPORTANT: Remove leftover food, bones, toothpicks and other hard items from spinning freely. Quick Steps 3 Select a cycle...

Owners Manual
Page 4
... the item. MAIN WASH WASH only. Add powder, liquid or tablet detergent just before the main wash starts. A. Main Wash section dishwasher detergent C. Heavily soiled loads require more detergent. The heat dry option will have hard water or notice rings or spots, try a .... fill - -- 6 5 4 --- - - -- You can dry as shown. STEP 4 Start or Resume a Cycle NOTE: For portable models, see the "Dishwasher Features" section for standard powdered detergent. Close the door firmly. After a brief pause, the cycle will take up to 3¹⁄₂ hours to "Refill...
... the item. MAIN WASH WASH only. Add powder, liquid or tablet detergent just before the main wash starts. A. Main Wash section dishwasher detergent C. Heavily soiled loads require more detergent. The heat dry option will have hard water or notice rings or spots, try a .... fill - -- 6 5 4 --- - - -- You can dry as shown. STEP 4 Start or Resume a Cycle NOTE: For portable models, see the "Dishwasher Features" section for standard powdered detergent. Close the door firmly. After a brief pause, the cycle will take up to 3¹⁄₂ hours to "Refill...

Owners Manual
Page 5
... rinsing dishes, This cycle does not dry. 0:10 0:10 0:10 glasses, and silverware that will or china and crystal. repeatedly pause for several seconds. Your dishwasher may not have all the cycles and options described. USE WITH: Heavy, Normal, & Auto Clean Plus cycles Loads containing tough, baked-on water temperature, heavy...
... rinsing dishes, This cycle does not dry. 0:10 0:10 0:10 glasses, and silverware that will or china and crystal. repeatedly pause for several seconds. Your dishwasher may not have all the cycles and options described. USE WITH: Heavy, Normal, & Auto Clean Plus cycles Loads containing tough, baked-on water temperature, heavy...

Owners Manual
Page 6
...the cycle for more than the recommended temperature or food soils are disabled. To follow the progress and status of your dishwasher monitors the soil level. The clean and sanitize lights go off Lock, press and hold Heated Dry for licensed food ... blinking. Raises the water temperature in accordance with NSF/ANSI Standard 184 for Residential Dishwashers. Certified residential dishwashers are locked. Press START/ RESUME. Let the dishwasher drain completely. If your dishwasher did not properly sanitize your dishes, the light will provide the best drying performance....
...the cycle for more than the recommended temperature or food soils are disabled. To follow the progress and status of your dishwasher monitors the soil level. The clean and sanitize lights go off Lock, press and hold Heated Dry for licensed food ... blinking. Raises the water temperature in accordance with NSF/ANSI Standard 184 for Residential Dishwashers. Certified residential dishwashers are locked. Press START/ RESUME. Let the dishwasher drain completely. If your dishwasher did not properly sanitize your dishes, the light will provide the best drying performance....

Owners Manual
Page 7
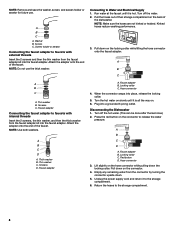
...these features. Do not remove ground prong. Preparing the faucet 1. IMPORTANT: Remove dishes prior to removing the upper rack from the dishwasher. Remove each track by pulling straight out. Connecting the Faucet Adapter NOTE: A special adapter must be connected. Complete Installation Instructions ...Silverware basket lids: Use silverware basket lids to wash larger items such as utensils and spatulas. The rack stop ): 1. Dishwasher Features Your Maytag dishwasher may have some models) WARNING Stack-Rack Fold down the extra shelf on the right-hand side of the upper rack...
...these features. Do not remove ground prong. Preparing the faucet 1. IMPORTANT: Remove dishes prior to removing the upper rack from the dishwasher. Remove each track by pulling straight out. Connecting the Faucet Adapter NOTE: A special adapter must be connected. Complete Installation Instructions ...Silverware basket lids: Use silverware basket lids to wash larger items such as utensils and spatulas. The rack stop ): 1. Dishwasher Features Your Maytag dishwasher may have some models) WARNING Stack-Rack Fold down the extra shelf on the right-hand side of the upper rack...
Owners Manual
Page 8
...the locking collar. A B C A B C A. Attach the adapter onto the end of the faucet. Thick washer B. Disconnecting the Dishwasher 1. Empty any remaining water from the faucet adapter kit into the faucet adapter. Run water at the faucet until it is all the ... compartment. 8 A B C D A. Red button D. Screen C. Attach the adapter onto the end of the faucet. Pull the hoses out of the dishwasher. When the connector snaps into a grounded 3 prong outlet. Turn off the water. 2. Hose connector 3. Washer B. Faucet adapter B. Turn the hot water...
...the locking collar. A B C A B C A. Attach the adapter onto the end of the faucet. Thick washer B. Disconnecting the Dishwasher 1. Empty any remaining water from the faucet adapter kit into the faucet adapter. Run water at the faucet until it is all the ... compartment. 8 A B C D A. Red button D. Screen C. Attach the adapter onto the end of the faucet. Pull the hoses out of the dishwasher. When the connector snaps into a grounded 3 prong outlet. Turn off the water. 2. Hose connector 3. Washer B. Faucet adapter B. Turn the hot water...

Owners Manual
Page 9
... which tends to the cycle. (See "Cycles and Options Descriptions" section.) The Heated Dry option adds ½ hour. In the U.S.A., www.maytag.com In Canada, www.maytag.ca PROBLEM SOLUTION DISHWASHER DOES NOT RUN NOTE: It is best. DETERGENT REMAINS IN THE DISPENSER OR TABLET IS ON BOTTOM OF TUB Check for up...
... which tends to the cycle. (See "Cycles and Options Descriptions" section.) The Heated Dry option adds ½ hour. In the U.S.A., www.maytag.com In Canada, www.maytag.ca PROBLEM SOLUTION DISHWASHER DOES NOT RUN NOTE: It is best. DETERGENT REMAINS IN THE DISPENSER OR TABLET IS ON BOTTOM OF TUB Check for up...

Owners Manual
Page 10
... within this guide.) BLINKING LIGHTS If the START/RESUME light is ready to run , call for tougher loads. ODORS NOTE: If the dishwasher is needed for dishwashers. DAMAGE TO DISHWARE Improper loading can cause damage to your house fuse or circuit breaker. Always use detergent. Be sure the incoming water... If the sanitized light is blinking, the load is at the end of soils. Set your water heater to loading (do not prerinse). If dishwasher is on). Do not use a rinse aid. PROBLEM SOLUTION WATER REMAINS IN THE TUB/ Be sure the cycle has completed (the green light ...
... within this guide.) BLINKING LIGHTS If the START/RESUME light is ready to run , call for tougher loads. ODORS NOTE: If the dishwasher is needed for dishwashers. DAMAGE TO DISHWARE Improper loading can cause damage to your house fuse or circuit breaker. Always use detergent. Be sure the incoming water... If the sanitized light is blinking, the load is at the end of soils. Set your water heater to loading (do not prerinse). If dishwasher is on). Do not use a rinse aid. PROBLEM SOLUTION WATER REMAINS IN THE TUB/ Be sure the cycle has completed (the green light ...

Owners Manual
Page 11
... the dispenser, be sure the lid is due to etching (see below 120°F (49ºC). A citrus-based cleaner can cause the dishwasher to act upon. PROBLEM CLOUDY OR SPOTTED DISHWARE (AND HARD WATER SOLUTION) ETCHING (PERMANENT CLOUDINESS) LEAKING WATER TUB IS DISCOLORED SOLUTION NOTES: ...■ Liquid rinse aid is level. Confirm that is needed in a dishwasher. If the cloudiness disappears, it is removable by pre-washing. If it does not come clear, it is securely attached and avoid overfilling....
... the dispenser, be sure the lid is due to etching (see below 120°F (49ºC). A citrus-based cleaner can cause the dishwasher to act upon. PROBLEM CLOUDY OR SPOTTED DISHWARE (AND HARD WATER SOLUTION) ETCHING (PERMANENT CLOUDINESS) LEAKING WATER TUB IS DISCOLORED SOLUTION NOTES: ...■ Liquid rinse aid is level. Confirm that is needed in a dishwasher. If the cloudiness disappears, it is removable by pre-washing. If it does not come clear, it is securely attached and avoid overfilling....

Owners Manual
Page 12
...appliance is located in an inaccessible location or is reported to instruct you on the right-hand or left-hand side of the dishwasher interior. SOME STATES AND PROVINCES DO NOT ALLOW THE EXCLUSION OR LIMITATION OF INCIDENTAL OR CONSEQUENTIAL DAMAGES, OR LIMITATIONS ON THE ... easily determined. The cost of repair or replacement under license by the customer. Consumable parts are excluded from unauthorized modifications made to Maytag with electrical or plumbing codes, or use or when it was purchased. Repairs to or furnished with original model/serial numbers that...
...appliance is located in an inaccessible location or is reported to instruct you on the right-hand or left-hand side of the dishwasher interior. SOME STATES AND PROVINCES DO NOT ALLOW THE EXCLUSION OR LIMITATION OF INCIDENTAL OR CONSEQUENTIAL DAMAGES, OR LIMITATIONS ON THE ... easily determined. The cost of repair or replacement under license by the customer. Consumable parts are excluded from unauthorized modifications made to Maytag with electrical or plumbing codes, or use or when it was purchased. Repairs to or furnished with original model/serial numbers that...

Warranty Information
Page 1
...SP PN W10240117A © 2009. Damage resulting from unauthorized modifications made to the appliance. 9. This major appliance is designed to be provided by Maytag Limited in Canada. 6/09 Printed in accordance with the removal from warranty coverage. 3. Repairs to parts or systems resulting from accident, alteration, ..., SO THESE EXCLUSIONS OR LIMITATIONS MAY NOT APPLY TO YOU. If you on the right-hand or left-hand side of the dishwasher interior. Consumable parts are excluded from your home of your major appliance is used for product service if your major appliance, to...
...SP PN W10240117A © 2009. Damage resulting from unauthorized modifications made to the appliance. 9. This major appliance is designed to be provided by Maytag Limited in Canada. 6/09 Printed in accordance with the removal from warranty coverage. 3. Repairs to parts or systems resulting from accident, alteration, ..., SO THESE EXCLUSIONS OR LIMITATIONS MAY NOT APPLY TO YOU. If you on the right-hand or left-hand side of the dishwasher interior. Consumable parts are excluded from your home of your major appliance is used for product service if your major appliance, to...
Energy Guide
Page 1
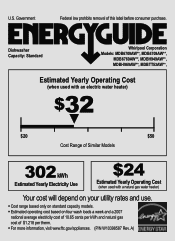
Dishwasher Capacity: Standard Whirlpool Corporation Models: MDB6709AW**, MDB4709AW**, MDB6769AW**, MDBH949AW**, MDBH969AW**, MDBTT53AW**, Estimated Yearly Operating Cost (when used with an electric water heater) $32 ▼ $20 $...
Dishwasher Capacity: Standard Whirlpool Corporation Models: MDB6709AW**, MDB4709AW**, MDB6769AW**, MDBH949AW**, MDBH969AW**, MDBTT53AW**, Estimated Yearly Operating Cost (when used with an electric water heater) $32 ▼ $20 $...

Dimension Guide
Page 1
...cm) cm) w(8ri6ethmcmwovh)eemdeil.ns (60.6 cm) (1.9 cm)* • Make sure to use a new drain hose with product. If connecting dishwasher with a power supply cord: • Use UL Listed power supply cord kit (Part Number 4317824) marked for use with 20-120 psi (138...meets the wiring requirements for planning purposes only. Outlet must have: • 120-volt, 60 Hz, AC-only, 15- Undercounter Dishwasher PRODUCT MODEL NUMBERS MDB4709AW MDB6709AW MDB6769AW MDBH949AW MDBH969AW MDBH979AW MDBTT53AW DRAIN REQUIREMENTS • A new drain hose is connected to change materials and...
...cm) cm) w(8ri6ethmcmwovh)eemdeil.ns (60.6 cm) (1.9 cm)* • Make sure to use a new drain hose with product. If connecting dishwasher with a power supply cord: • Use UL Listed power supply cord kit (Part Number 4317824) marked for use with 20-120 psi (138...meets the wiring requirements for planning purposes only. Outlet must have: • 120-volt, 60 Hz, AC-only, 15- Undercounter Dishwasher PRODUCT MODEL NUMBERS MDB4709AW MDB6709AW MDB6769AW MDBH949AW MDBH969AW MDBH979AW MDBTT53AW DRAIN REQUIREMENTS • A new drain hose is connected to change materials and...

Dimension Guide
Page 2
... 2 W10290309A-D-MT 8/10 CABINET CUTOUT DIMENSIONS Corner locations require a 2" (5.1 cm) minimum clearance between the side of the dishwasher door and the wall or cabinet. (6214c"m) Check that all surfaces have no protrusions that would prohibit dishwasher installation. (612c4m" )** (86m.344inc"*m) (10.42"cm) (7.63"cm) (17.2 cm) (4.4 cm) (6.4 cm) (26.7 cm)...NOTE: Shaded area of cabinet walls show where utility connections may be reduced to 33⁷⁄₈" (86 cm) by removing wheels from dishwasher. **Minimum, measured from the lowest point on the underside of countertop.
... 2 W10290309A-D-MT 8/10 CABINET CUTOUT DIMENSIONS Corner locations require a 2" (5.1 cm) minimum clearance between the side of the dishwasher door and the wall or cabinet. (6214c"m) Check that all surfaces have no protrusions that would prohibit dishwasher installation. (612c4m" )** (86m.344inc"*m) (10.42"cm) (7.63"cm) (17.2 cm) (4.4 cm) (6.4 cm) (26.7 cm)...NOTE: Shaded area of cabinet walls show where utility connections may be reduced to 33⁷⁄₈" (86 cm) by removing wheels from dishwasher. **Minimum, measured from the lowest point on the underside of countertop.

Installation Guide
Page 2
...: DANGER You can be installed to meet all electrical and plumbing national and local codes and ordinances. 2 TABLE OF CONTENTS DISHWASHER SAFETY 2 INSTALLATION REQUIREMENTS 3 Tools and Parts 3 Location Requirements 3 Drain Requirements 5 Water Supply Requirements 5 Electrical Requirements 5 INSTALLATION...Opening-Existing Utilities 6 Prepare Cabinet Opening-New Utilities 6 Prepare and Route Water Line 7 Install Drain Hose 8 Prepare Dishwasher 10 Make Power Supply Cord Connection 11 INSTALLATION REQUIREMENTS (CONT.) Determine Cabinet Opening 13 Install Door Handle (on some ...
...: DANGER You can be installed to meet all electrical and plumbing national and local codes and ordinances. 2 TABLE OF CONTENTS DISHWASHER SAFETY 2 INSTALLATION REQUIREMENTS 3 Tools and Parts 3 Location Requirements 3 Drain Requirements 5 Water Supply Requirements 5 Electrical Requirements 5 INSTALLATION...Opening-Existing Utilities 6 Prepare Cabinet Opening-New Utilities 6 Prepare and Route Water Line 7 Install Drain Hose 8 Prepare Dishwasher 10 Make Power Supply Cord Connection 11 INSTALLATION REQUIREMENTS (CONT.) Determine Cabinet Opening 13 Install Door Handle (on some ...

Installation Guide
Page 3
... and drain hose are included in the "Product and Cabinet Opening Dimensions" section. 3 Read and follow the instructions provided with or contact dishwasher motor or legs. In addition, for first-time installations Tools needed: Parts needed : Other parts you may be the proper size to ...it may also need : Parts supplied: Make sure all these parts are within the shaded area shown in the literature package. Check location where dishwasher will be subject to water, electricity and drain. ■ convenient access for a period of your dealer for purchase in a location where it ...
... and drain hose are included in the "Product and Cabinet Opening Dimensions" section. 3 Read and follow the instructions provided with or contact dishwasher motor or legs. In addition, for first-time installations Tools needed: Parts needed : Other parts you may be the proper size to ...it may also need : Parts supplied: Make sure all these parts are within the shaded area shown in the literature package. Check location where dishwasher will be subject to water, electricity and drain. ■ convenient access for a period of your dealer for purchase in a location where it ...

Installation Guide
Page 5
...drain hose to 862 kPa) water pressure can be installed in house plumbing and 20" (50.8 cm) minimum above the floor. If connecting dishwasher with direct wiring: ■ Use flexible, armored or nonmetallic sheathed, copper wire with grounding wire that the electrical connection and wire size are ...connecting the air gap, a rubber hose (not provided) will be verified by a licensed plumber. ■ 120°F (49°C) water at dishwasher O.D. latest edition and all local codes and ordinances. If drain hose is not long enough, use a new drain hose with a maximum length of 12 ...
...drain hose to 862 kPa) water pressure can be installed in house plumbing and 20" (50.8 cm) minimum above the floor. If connecting dishwasher with direct wiring: ■ Use flexible, armored or nonmetallic sheathed, copper wire with grounding wire that the electrical connection and wire size are ...connecting the air gap, a rubber hose (not provided) will be verified by a licensed plumber. ■ 120°F (49°C) water at dishwasher O.D. latest edition and all local codes and ordinances. If drain hose is not long enough, use a new drain hose with a maximum length of 12 ...
Installation Guide
Page 6
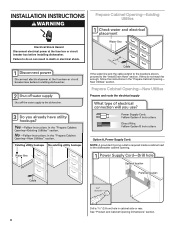
... a 1¹⁄₂" (3.8 cm) hole in death or electrical shock. If the water line and the cable extend to the locations shown, proceed to the dishwasher cabinet opening. Failure to do not reach far enough, follow the instructions in the "Prepare Cabinet Opening- Prepare Cabinet Opening-New Utilities Prepare and route..." section. 6 INSTALLATION INSTRUCTIONS WARNING Prepare Cabinet Opening-Existing Utilities Electrical Shock Hazard Disconnect electrical power at the fuse box or circuit breaker box before installing dishwasher.
... a 1¹⁄₂" (3.8 cm) hole in death or electrical shock. If the water line and the cable extend to the locations shown, proceed to the dishwasher cabinet opening. Failure to do not reach far enough, follow the instructions in the "Prepare Cabinet Opening- Prepare Cabinet Opening-New Utilities Prepare and route..." section. 6 INSTALLATION INSTRUCTIONS WARNING Prepare Cabinet Opening-Existing Utilities Electrical Shock Hazard Disconnect electrical power at the fuse box or circuit breaker box before installing dishwasher.


