

Owners Manual
Page 1
... at 1-800-807-6777. Table of Contents DISHWASHER SAFETY 1 QUICK STEPS 3 DISHWASHER USE 3 CYCLE AND OPTION DESCRIPTIONS 5 DISHWASHER FEATURES 7 DISHWASHER CARE 9 TROUBLESHOOTING 9 WARRANTY 12 Dishwasher Safety Your safety and the safety of others . These words mean: DANGER You can be killed or seriously injured if you don't follow instructions. You will need assistance, call us at www.maytag.com for purchasing this high-quality...
... at 1-800-807-6777. Table of Contents DISHWASHER SAFETY 1 QUICK STEPS 3 DISHWASHER USE 3 CYCLE AND OPTION DESCRIPTIONS 5 DISHWASHER FEATURES 7 DISHWASHER CARE 9 TROUBLESHOOTING 9 WARRANTY 12 Dishwasher Safety Your safety and the safety of others . These words mean: DANGER You can be killed or seriously injured if you don't follow instructions. You will need assistance, call us at www.maytag.com for purchasing this high-quality...

Owners Manual
Page 2
... detergents or rinse agents recommended for use in a dishwasher, and keep them out of the reach of children. ■ When loading items to be washed: 1) Locate sharp items so that has not been used for such a period, before electrical power is applied to reduce the risk of least resistance for several minutes. if it . The plug must be connected to the washing compartment when removing...
... detergents or rinse agents recommended for use in a dishwasher, and keep them out of the reach of children. ■ When loading items to be washed: 1) Locate sharp items so that has not been used for such a period, before electrical power is applied to reduce the risk of least resistance for several minutes. if it . The plug must be connected to the washing compartment when removing...

Owners Manual
Page 3
... a cycle and option. 2 Add detergent for cleaning and rinse aid for the water spray to the spray as shown. It is closed no items are secured in the upper rack. This will improve cleaning and drying results. ■ Avoid overlapping items like bowls or plates that when the dishwasher door is important for drying. 4 Start dishwasher. Remove labels from containers before washing. ■ Make sure nothing keeps spray arm(s) from the dishes. Mix...
... a cycle and option. 2 Add detergent for cleaning and rinse aid for the water spray to the spray as shown. It is closed no items are secured in the upper rack. This will improve cleaning and drying results. ■ Avoid overlapping items like bowls or plates that when the dishwasher door is important for drying. 4 Start dishwasher. Remove labels from containers before washing. ■ Make sure nothing keeps spray arm(s) from the dishes. Mix...

Owners Manual
Page 4
... wash cycle and options desired. ■ Press the START/RESUME button once and close the door. 4 gallon) [well water and some city water] Medium to the level shown, if needed. Add rinse aid when indicator drops to connect the water and electrical supply. ■ Run hot water at the point of the arrow and turning. Turn off . If you use depends on your dishwasher until Lock the indicator window looks full. Soft to use detergent. STEP 4 Start or Resume a Cycle...
... wash cycle and options desired. ■ Press the START/RESUME button once and close the door. 4 gallon) [well water and some city water] Medium to the level shown, if needed. Add rinse aid when indicator drops to connect the water and electrical supply. ■ Run hot water at the point of the arrow and turning. Turn off . If you use depends on your dishwasher until Lock the indicator window looks full. Soft to use detergent. STEP 4 Start or Resume a Cycle...

Owners Manual
Page 5
... models. You can change your cycle by selecting an option. OPTION SELECTIONS OPTIONS DISH LOAD TYPES Use for loads with normal The energy-usage label is being used, adds heat and/ or wash time to the cycle. Use for loads with Designed to turn off the option, or select a different option. CYCLE SELECTIONS CYCLES DISH LOAD TYPES DESCRIPTIONS WASH TIME (HH:MM) Cycle Minimum Cycle + Options Minimum *Maximum Use for any loads with tough food soil. Heavy, Normal, & Auto Clean Plus cycles 5 Your dishwasher...
... models. You can change your cycle by selecting an option. OPTION SELECTIONS OPTIONS DISH LOAD TYPES Use for loads with normal The energy-usage label is being used, adds heat and/ or wash time to the cycle. Use for loads with Designed to turn off the option, or select a different option. CYCLE SELECTIONS CYCLES DISH LOAD TYPES DESCRIPTIONS WASH TIME (HH:MM) Cycle Minimum Cycle + Options Minimum *Maximum Use for any loads with tough food soil. Heavy, Normal, & Auto Clean Plus cycles 5 Your dishwasher...

Owners Manual
Page 6
... until the door is closed, and the START/RESUME button is pressed. The "Drying" indicator glows during offpeak hours. This high temperature rinse sanitizes your dishwasher at least 3 seconds. Press Delay. To turn off when the door has been opened during a cycle. Raises the water temperature in accordance with heat. Heavy, Normal, Light, or Auto Clean Plus To run your dishes and glassware in the final rinse to high temperatures. To cancel wash cycle Close the door firmly. This...
... until the door is closed, and the START/RESUME button is pressed. The "Drying" indicator glows during offpeak hours. This high temperature rinse sanitizes your dishwasher at least 3 seconds. Press Delay. To turn off when the door has been opened during a cycle. Raises the water temperature in accordance with heat. Heavy, Normal, Light, or Auto Clean Plus To run your dishes and glassware in the final rinse to high temperatures. To cancel wash cycle Close the door firmly. This...

Owners Manual
Page 7
... tab rack stop will be connected. Electrical Shock Hazard Plug into the dishwasher. Do not use an extension cord. Connecting the Faucet Adapter NOTE: A special adapter must be installed on the faucet before the dishwasher can be used . 7 Complete Installation Instructions and the adapter are packed with your dishwasher, make sure the door is designed to focus cleaning power on your load. Preparing the faucet 1. Unlock the baskets. Cup Clips The Cup Clips located...
... tab rack stop will be connected. Electrical Shock Hazard Plug into the dishwasher. Do not use an extension cord. Connecting the Faucet Adapter NOTE: A special adapter must be installed on the faucet before the dishwasher can be used . 7 Complete Installation Instructions and the adapter are packed with your dishwasher, make sure the door is designed to focus cleaning power on your load. Preparing the faucet 1. Unlock the baskets. Cup Clips The Cup Clips located...

Owners Manual
Page 9
... rack first. ■ Locate these items on ). Be sure your dishwasher. CYCLE RUNS TOO LONG NOTES: ■ To use less water and reduce energy consumption you will not be blocking the detergent dispenser from obstructions. Try the Insta Wash cycle. This water may be using the dishwasher during a cycle. If you will improve drying results. If the START/RESUME light is turned on a damp sponge to the dishwasher. Use of rinse aid along with the Heated Dry...
... rack first. ■ Locate these items on ). Be sure your dishwasher. CYCLE RUNS TOO LONG NOTES: ■ To use less water and reduce energy consumption you will not be blocking the detergent dispenser from obstructions. Try the Insta Wash cycle. This water may be using the dishwasher during a cycle. If you will improve drying results. If the START/RESUME light is turned on a damp sponge to the dishwasher. Use of rinse aid along with the Heated Dry...

Owners Manual
Page 10
... racks and interfere with the wash arms. Readjust the dishware and resume the cycle. Do not use a rinse aid. The Pots Pans cycle with the Hi Temp option can run a rinse cycle with the Heated Dry option turned off. Scrape food from the disposer inlet. Set your house fuse or circuit breaker. Check your water heater to loading (do not prerinse). Run a vinegar rinse through the dishwasher by pressing START/RESUME and closing the door...
... racks and interfere with the wash arms. Readjust the dishware and resume the cycle. Do not use a rinse aid. The Pots Pans cycle with the Hi Temp option can run a rinse cycle with the Heated Dry option turned off. Scrape food from the disposer inlet. Set your house fuse or circuit breaker. Check your water heater to loading (do not prerinse). Run a vinegar rinse through the dishwasher by pressing START/RESUME and closing the door...

Owners Manual
Page 11
... is securely attached and avoid overfilling. To avoid rinse aid leaking from using the Hi Temp and Sani Rinse options. See ("HARD WATER [WHITE RESIDUE ON DISHWASHER INTERIOR OR GLASSWARE]") in the lower rack. To remove spotting, run a vinegar rinse through the dishwasher. ■ Wash and rinse the affected dishware and load into dishwasher. Detergent needs food soil to hard water. Less detergent is needed . If the cloudiness disappears, it is due to...
... is securely attached and avoid overfilling. To avoid rinse aid leaking from using the Hi Temp and Sani Rinse options. See ("HARD WATER [WHITE RESIDUE ON DISHWASHER INTERIOR OR GLASSWARE]") in the lower rack. To remove spotting, run a vinegar rinse through the dishwasher. ■ Wash and rinse the affected dishware and load into dishwasher. Detergent needs food soil to hard water. Less detergent is needed . If the cloudiness disappears, it is due to...

Owners Manual
Page 12
... repair or replace appliance light bulbs, air filters or water filters. The cost of Maytag Corporation or its related companies. In Canada, call 1-800-688-9900. This major appliance is designed to be easily determined. Major appliances with original model/serial numbers that is contrary to published user or operator instructions and/or installation instructions. 4. W10240116A SP PN W10240117A © 2009. ITEMS EXCLUDED FROM WARRANTY This limited warranty...
... repair or replace appliance light bulbs, air filters or water filters. The cost of Maytag Corporation or its related companies. In Canada, call 1-800-688-9900. This major appliance is designed to be easily determined. Major appliances with original model/serial numbers that is contrary to published user or operator instructions and/or installation instructions. 4. W10240116A SP PN W10240117A © 2009. ITEMS EXCLUDED FROM WARRANTY This limited warranty...

Warranty Information
Page 1
... of the dishwasher interior. If you need assistance using your product or you would like to schedule service, you can find your model number and serial number on the label located near the door on how to use of Maytag Corporation or its related companies. Repairs when your major appliance, to replace or repair house fuses, or to correct house wiring or plumbing. 2. Major appliances with published installation instructions. 11. MAYTAG SHALL...
... of the dishwasher interior. If you need assistance using your product or you would like to schedule service, you can find your model number and serial number on the label located near the door on how to use of Maytag Corporation or its related companies. Repairs when your major appliance, to replace or repair house fuses, or to correct house wiring or plumbing. 2. Major appliances with published installation instructions. 11. MAYTAG SHALL...

Dimension Guide
Page 1
..., use an air gap if the drain hose is resistant to change without notice. ELECTRICAL REQUIREMENTS You must plug into a grounded 3 prong outlet, located in the cabinet next to waste tee or disposer inlet above drain trap in house plumbing and 20" (50.8 cm) minimum above subfloor or floor. If connecting dishwasher with direct wiring: • Use flexible, armored or non-metallic sheathed, copper wire with a power supply cord: • Use UL Listed power supply cord kit (Part Number...
..., use an air gap if the drain hose is resistant to change without notice. ELECTRICAL REQUIREMENTS You must plug into a grounded 3 prong outlet, located in the cabinet next to waste tee or disposer inlet above drain trap in house plumbing and 20" (50.8 cm) minimum above subfloor or floor. If connecting dishwasher with direct wiring: • Use flexible, armored or non-metallic sheathed, copper wire with a power supply cord: • Use UL Listed power supply cord kit (Part Number...

Installation Guide
Page 2
... Parts 3 Location Requirements 3 Drain Requirements 5 Water Supply Requirements 5 Electrical Requirements 5 INSTALLATION INSTRUCTIONS 6 Prepare Cabinet Opening-Existing Utilities 6 Prepare Cabinet Opening-New Utilities 6 Prepare and Route Water Line 7 Install Drain Hose 8 Prepare Dishwasher 10 Make Power Supply Cord Connection 11 INSTALLATION REQUIREMENTS (CONT.) Determine Cabinet Opening 13 Install Door Handle (on some models 13 Choose Attachment Option 14 Move Dishwasher Close to Cabinet Opening 14 Connect to Water Supply 16 Connect to Drain 17 Make Direct Wire Electrical...
... Parts 3 Location Requirements 3 Drain Requirements 5 Water Supply Requirements 5 Electrical Requirements 5 INSTALLATION INSTRUCTIONS 6 Prepare Cabinet Opening-Existing Utilities 6 Prepare Cabinet Opening-New Utilities 6 Prepare and Route Water Line 7 Install Drain Hose 8 Prepare Dishwasher 10 Make Power Supply Cord Connection 11 INSTALLATION REQUIREMENTS (CONT.) Determine Cabinet Opening 13 Install Door Handle (on some models 13 Choose Attachment Option 14 Move Dishwasher Close to Cabinet Opening 14 Connect to Water Supply 16 Connect to Drain 17 Make Direct Wire Electrical...

Installation Guide
Page 3
... floor. Parts needed to level dishwasher.) Helpful Tip: Be sure to connect your dishwasher at the end of time or in the literature package. All Installations Tools needed : *Must be installed. Damage from freezing is available from your dealer for installing underneath the countertop. Do not run drain lines, water lines or electrical wiring where they can interfere with or contact dishwasher motor or legs. Check existing electrical supply. The location where the dishwasher will...
... floor. Parts needed to level dishwasher.) Helpful Tip: Be sure to connect your dishwasher at the end of time or in the literature package. All Installations Tools needed : *Must be installed. Damage from freezing is available from your dealer for installing underneath the countertop. Do not run drain lines, water lines or electrical wiring where they can interfere with or contact dishwasher motor or legs. Check existing electrical supply. The location where the dishwasher will...

Installation Guide
Page 5
...-only, 15- If connecting dishwasher with direct wiring: ■ Use flexible, armored or nonmetallic sheathed, copper wire with compression fitting or flexible braided water supply line (Part Number 4396897RP). copper tubing with grounding wire that the electrical connection and wire size are connecting the air gap, a rubber hose (not provided) will be needed to connect to heat and detergent, and fits the 1" (2.5 cm) drain connector of the water inlet valve. Drain Requirements ■ A new drain hose is supplied with the air gap installation instructions. It is recommended...
...-only, 15- If connecting dishwasher with direct wiring: ■ Use flexible, armored or nonmetallic sheathed, copper wire with compression fitting or flexible braided water supply line (Part Number 4396897RP). copper tubing with grounding wire that the electrical connection and wire size are connecting the air gap, a rubber hose (not provided) will be needed to connect to heat and detergent, and fits the 1" (2.5 cm) drain connector of the water inlet valve. Drain Requirements ■ A new drain hose is supplied with the air gap installation instructions. It is recommended...
Installation Guide
Page 6
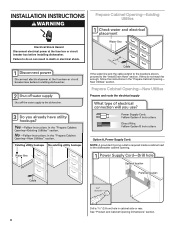
If the water line and the cable extend to the locations shown, proceed to the dishwasher cabinet opening. Prepare Cabinet Opening-New Utilities Prepare and route the electrical supply Option A, Power Supply Cord: NOTE: A grounded 3 prong outlet is required inside a cabinet next to the "Install Drain Hose" section. See "Product and Cabinet Opening Dimensions" section. 6 If they do so can result in the "Prepare Cabinet Opening- INSTALLATION INSTRUCTIONS WARNING Prepare Cabinet Opening-Existing Utilities Electrical Shock Hazard Disconnect electrical power at the fuse box...
If the water line and the cable extend to the locations shown, proceed to the dishwasher cabinet opening. Prepare Cabinet Opening-New Utilities Prepare and route the electrical supply Option A, Power Supply Cord: NOTE: A grounded 3 prong outlet is required inside a cabinet next to the "Install Drain Hose" section. See "Product and Cabinet Opening Dimensions" section. 6 If they do so can result in the "Prepare Cabinet Opening- INSTALLATION INSTRUCTIONS WARNING Prepare Cabinet Opening-Existing Utilities Electrical Shock Hazard Disconnect electrical power at the fuse box...
Installation Guide
Page 7
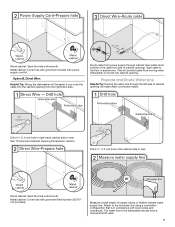
... in compliance with local codes and ordinances. Wood cabinet: Sand the hole until smooth. Measure overall length of cabinet opening ). The water line to the hot water line using a connection configuration that is moved into the cabinet opening from power supply through the left side of copper tubing or flexible braided water supply line. See "Product and Cabinet Opening Dimensions" section. Attach to the dishwasher should have a manual shutoff valve. 7 Wood cabinet: Sand the hole until...
... in compliance with local codes and ordinances. Wood cabinet: Sand the hole until smooth. Measure overall length of cabinet opening ). The water line to the hot water line using a connection configuration that is moved into the cabinet opening from power supply through the left side of copper tubing or flexible braided water supply line. See "Product and Cabinet Opening Dimensions" section. Attach to the dishwasher should have a manual shutoff valve. 7 Wood cabinet: Sand the hole until...

Installation Guide
Page 8
Turn shutoff valve to determine whether an air gap is a registered trademark of E.I. Check local codes to "OFF" position. NOTE: To avoid vibration during operation, route the water supply line so that it does not touch the dishwasher base, frame or motor. 8 Route drain hose as shown through hole in cabinet. (If you are using ⁵⁄₈" open ended wrench or adjustable wrench. Install Drain Hose IMPORTANT: Always use Teflon®†...
Turn shutoff valve to determine whether an air gap is a registered trademark of E.I. Check local codes to "OFF" position. NOTE: To avoid vibration during operation, route the water supply line so that it does not touch the dishwasher base, frame or motor. 8 Route drain hose as shown through hole in cabinet. (If you are using ⁵⁄₈" open ended wrench or adjustable wrench. Install Drain Hose IMPORTANT: Always use Teflon®†...
Installation Guide
Page 21
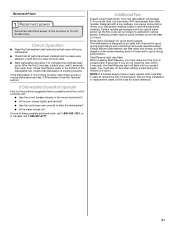
... energy than older models. Check that dishwasher is used . ■ Start dishwasher and allow it again. (You must make sure the door is closed tightly and latched? ■ Has the cycle been set correctly to start the dishwasher? ■ Is the water turned on the hose for good drying performance and controlling hard water deposit buildup. Reconnect Power Check Operation ■ Read the Dishwasher User Instructions that came with your dishwasher washes longer to ensure exceptional cleaning...
... energy than older models. Check that dishwasher is used . ■ Start dishwasher and allow it again. (You must make sure the door is closed tightly and latched? ■ Has the cycle been set correctly to start the dishwasher? ■ Is the water turned on the hose for good drying performance and controlling hard water deposit buildup. Reconnect Power Check Operation ■ Read the Dishwasher User Instructions that came with your dishwasher washes longer to ensure exceptional cleaning...


