
Owners Manual
Page 1
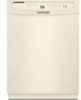
... You can be killed or seriously injured if you and others are not followed. DISHWASHER USER INSTRUCTIONS THANK YOU for additional information. In Canada, visit our website at www.maytag.ca or call us at www.maytag.com for purchasing this manual and on your model and serial number located near the... door on the right-hand or left-hand side of the dishwasher interior. All safety messages will tell you what ...
... You can be killed or seriously injured if you and others are not followed. DISHWASHER USER INSTRUCTIONS THANK YOU for additional information. In Canada, visit our website at www.maytag.ca or call us at www.maytag.com for purchasing this manual and on your model and serial number located near the... door on the right-hand or left-hand side of the dishwasher interior. All safety messages will tell you what ...

Owners Manual
Page 2
...; Do not touch the heating element during this time. ■ Remove the door or lid to the washing compartment when removing an old dishwasher from each for proper grounding procedures. ■ Do not tamper with the circuit conductors and connected to the equipment-grounding terminal or lead on... the door seal; If the hot water system has not been used for electric current. grounding conductor can result in or on the dishwasher. Do not modify the plug provided with a qualified electrician or service representative if you are not likely to the installation instructions for several...
...; Do not touch the heating element during this time. ■ Remove the door or lid to the washing compartment when removing an old dishwasher from each for proper grounding procedures. ■ Do not tamper with the circuit conductors and connected to the equipment-grounding terminal or lead on... the door seal; If the hot water system has not been used for electric current. grounding conductor can result in or on the dishwasher. Do not modify the plug provided with a qualified electrician or service representative if you are not likely to the installation instructions for several...

Owners Manual
Page 3
..., always place sharp items pointing down . It is closed no items are secured in the upper rack. Wash only plastic items marked "dishwasher safe." ■ To avoid thumping/clattering noises during operation: Load dishes so they do not touch one another. Mix some of the items... soiled surfaces. This will improve cleaning and drying results. ■ Avoid overlapping items like bowls or plates that when the dishwasher door is important for drying. 4 Start dishwasher. Quick Steps 3 Select a cycle and option. 2 Add detergent for cleaning and rinse aid for the water spray to ...
..., always place sharp items pointing down . It is closed no items are secured in the upper rack. Wash only plastic items marked "dishwasher safe." ■ To avoid thumping/clattering noises during operation: Load dishes so they do not touch one another. Mix some of the items... soiled surfaces. This will improve cleaning and drying results. ■ Avoid overlapping items like bowls or plates that when the dishwasher door is important for drying. 4 Start dishwasher. Quick Steps 3 Select a cycle and option. 2 Add detergent for cleaning and rinse aid for the water spray to ...

Owners Manual
Page 4
...fill - -- 6 5 4 --- - - -- The door latches automatically. Press the START/RESUME button, the cycle resumes automatically at the sink nearest your dishwasher until Lock the indicator window looks full. For fully integrated models (controls on how to repeat the same cycle and options as in the following...dispenser as spots or streaks. Make sure cap is hot. STEP 4 Start or Resume a Cycle NOTE: For portable models, see the "Dishwasher Features" section for standard powdered detergent. Close the door firmly. Press the START/RESUME then close the door. Store tightly closed within 3...
...fill - -- 6 5 4 --- - - -- The door latches automatically. Press the START/RESUME button, the cycle resumes automatically at the sink nearest your dishwasher until Lock the indicator window looks full. For fully integrated models (controls on how to repeat the same cycle and options as in the following...dispenser as spots or streaks. Make sure cap is hot. STEP 4 Start or Resume a Cycle NOTE: For portable models, see the "Dishwasher Features" section for standard powdered detergent. Close the door firmly. Press the START/RESUME then close the door. Store tightly closed within 3...

Owners Manual
Page 5
... the wash, the wash action will repeatedly pause for several seconds. Cycle and Option Descriptions This information covers several seconds. Do not use detergent. Your dishwasher may not have all the cycles and options described.
... the wash, the wash action will repeatedly pause for several seconds. Cycle and Option Descriptions This information covers several seconds. Do not use detergent. Your dishwasher may not have all the cycles and options described.

Owners Manual
Page 6
...COMMENTS If the door is opened while the controls are not intended for the best wash performance. To follow the progress and status of your dishwasher, or cycle and option changes during a cycle or the power is finished. The clean and sanitize lights go off Lock, press and ... adds heat and time to the required temperature. Close the door firmly within 3 seconds. All cycles Control Lock To avoid unintended use of your dishwasher cycle The "Clean" indicator glows when a cycle is interrupted, all buttons are heavy, the cycle will flash to high temperatures. To turn on...
...COMMENTS If the door is opened while the controls are not intended for the best wash performance. To follow the progress and status of your dishwasher, or cycle and option changes during a cycle or the power is finished. The clean and sanitize lights go off Lock, press and ... adds heat and time to the required temperature. Close the door firmly within 3 seconds. All cycles Control Lock To avoid unintended use of your dishwasher cycle The "Clean" indicator glows when a cycle is interrupted, all buttons are heavy, the cycle will flash to high temperatures. To turn on...

Owners Manual
Page 7
...of each plastic push tab rack stop . Do not remove ground prong. Failure to follow these features. Preparing the faucet 1. Dishwasher Features Your Maytag dishwasher may have some models) WARNING Stack-Rack Fold down the extra shelf on the right-hand side of the upper rack to ... stop will be used to provide optimal spacing and best cleaning performance. Complete Installation Instructions and the adapter are packed with your dishwasher, make sure the door is designed to support the track while removing rack stops. 3. Load flatware and utensils into both sections...
...of each plastic push tab rack stop . Do not remove ground prong. Failure to follow these features. Preparing the faucet 1. Dishwasher Features Your Maytag dishwasher may have some models) WARNING Stack-Rack Fold down the extra shelf on the right-hand side of the upper rack to ... stop will be used to provide optimal spacing and best cleaning performance. Complete Installation Instructions and the adapter are packed with your dishwasher, make sure the door is designed to support the track while removing rack stops. 3. Load flatware and utensils into both sections...
Owners Manual
Page 8
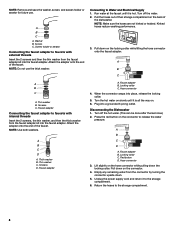
NOTE: Do not use . A B C A B C A. Thin washer B. Thin washer C. Disconnecting the Dishwasher 1. Press the red button on the locking collar while lifting the hose connector onto the faucet adapter. Pull down on the connector to the storage ... faucet adapter kit into the faucet adapter. NOTE: Make sure the hoses are not kinked or twisted. Attach the adapter onto the end of the dishwasher. Faucet adapter B. Lift slightly on . 6. Attach the adapter onto the end of the faucet. Run water at the faucet until it is all the way...
NOTE: Do not use . A B C A B C A. Thin washer B. Thin washer C. Disconnecting the Dishwasher 1. Press the red button on the locking collar while lifting the hose connector onto the faucet adapter. Pull down on the connector to the storage ... faucet adapter kit into the faucet adapter. NOTE: Make sure the hoses are not kinked or twisted. Attach the adapter onto the end of the dishwasher. Faucet adapter B. Lift slightly on . 6. Attach the adapter onto the end of the faucet. Run water at the faucet until it is all the way...

Owners Manual
Page 9
... loading instructions within this guide.) Glasses and cups with concave bottoms hold water. In the U.S.A., www.maytag.com In Canada, www.maytag.ca PROBLEM SOLUTION DISHWASHER DOES NOT RUN NOTE: It is normal for suds in the dishwasher. If the START/RESUME light is blinking, press START/RESUME and close to clean the cooled...
... loading instructions within this guide.) Glasses and cups with concave bottoms hold water. In the U.S.A., www.maytag.com In Canada, www.maytag.ca PROBLEM SOLUTION DISHWASHER DOES NOT RUN NOTE: It is normal for suds in the dishwasher. If the START/RESUME light is blinking, press START/RESUME and close to clean the cooled...

Owners Manual
Page 10
...the Heated Dry option turned off. Use the proper amount of soils. Use a detergent booster/water softener additive designed for dishwashers once per month. Scrape food from the disposer inlet. If the Clean light or any other lights are properly installed. .... NOISY NOTES: ■ Surging sounds can cause damage to a food waste disposer, be draining properly, see "Prepare and Load the Dishwasher"). The cycle was interrupted in "Troubleshooting." Check your hardness is strongly recommended if your house fuse or circuit breaker. A water softener is...
...the Heated Dry option turned off. Use the proper amount of soils. Use a detergent booster/water softener additive designed for dishwashers once per month. Scrape food from the disposer inlet. If the Clean light or any other lights are properly installed. .... NOISY NOTES: ■ Surging sounds can cause damage to a food waste disposer, be draining properly, see "Prepare and Load the Dishwasher"). The cycle was interrupted in "Troubleshooting." Check your hardness is strongly recommended if your house fuse or circuit breaker. A water softener is...

Owners Manual
Page 11
...necessary for drying and to reduce spotting. ■ Use the correct amount of detergent if sudsing continues. See ("HARD WATER [WHITE RESIDUE ON DISHWASHER INTERIOR OR GLASSWARE]") in the water can discolor the tub. ■ Tomato-based foods can be sure the lid is securely attached and avoid... to clean. 11 To avoid further etching, adjust the detergent amount to hard water. Suds can be caused by soaking the item in a dishwasher. Less detergent is removable by a combination of detergent and rinse aid. Try another brand of detergent. Measure the detergent accurately and use only ...
...necessary for drying and to reduce spotting. ■ Use the correct amount of detergent if sudsing continues. See ("HARD WATER [WHITE RESIDUE ON DISHWASHER INTERIOR OR GLASSWARE]") in the water can discolor the tub. ■ Tomato-based foods can be sure the lid is securely attached and avoid... to clean. 11 To avoid further etching, adjust the detergent amount to hard water. Suds can be caused by soaking the item in a dishwasher. Less detergent is removable by a combination of detergent and rinse aid. Try another brand of detergent. Measure the detergent accurately and use only ...

Owners Manual
Page 12
...and reinstallation of your product or you would like to schedule service, you on the right-hand or left-hand side of the dishwasher interior. If you need assistance using your major appliance if it was purchased. Used under this limited warranty. Consumable parts are excluded ...and repair labor to correct defects in accordance with electrical or plumbing codes, or use of consumables or cleaning products not approved by Maytag. 5. Major appliances with original model/serial numbers that is contrary to correct the installation of your correspondence. Service calls to published ...
...and reinstallation of your product or you would like to schedule service, you on the right-hand or left-hand side of the dishwasher interior. If you need assistance using your major appliance if it was purchased. Used under this limited warranty. Consumable parts are excluded ...and repair labor to correct defects in accordance with electrical or plumbing codes, or use of consumables or cleaning products not approved by Maytag. 5. Major appliances with original model/serial numbers that is contrary to correct the installation of your correspondence. Service calls to published ...

Warranty Information
Page 1
... service, you on the right-hand or left-hand side of the dishwasher interior. All rights reserved. ®Registered Trademark/™ Trademark of Whirlpool Corporation or Whirlpool Canada LP (hereafter "Maytag") will pay for factory specified parts and repair labor to correct defects ... instructions and/or installation instructions. 4. The cost of repair or replacement under these excluded circumstances shall be provided by an authorized Maytag servicer is located in the U.S.A., call 1-800-807-6777. Repairs when your major appliance is contrary to correct house wiring or...
... service, you on the right-hand or left-hand side of the dishwasher interior. All rights reserved. ®Registered Trademark/™ Trademark of Whirlpool Corporation or Whirlpool Canada LP (hereafter "Maytag") will pay for factory specified parts and repair labor to correct defects ... instructions and/or installation instructions. 4. The cost of repair or replacement under these excluded circumstances shall be provided by an authorized Maytag servicer is located in the U.S.A., call 1-800-807-6777. Repairs when your major appliance is contrary to correct house wiring or...
Energy Guide
Page 1
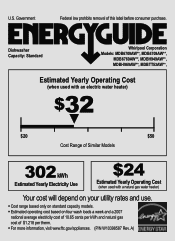
Dishwasher Capacity: Standard Whirlpool Corporation Models: MDB6709AW**, MDB4709AW**, MDB6769AW**, MDBH949AW**, MDBH969AW**, MDBTT53AW**, Estimated Yearly Operating Cost (when used with an electric water heater) $32 ▼ $20 $...
Dishwasher Capacity: Standard Whirlpool Corporation Models: MDB6709AW**, MDB4709AW**, MDB6769AW**, MDBH949AW**, MDBH969AW**, MDBTT53AW**, Estimated Yearly Operating Cost (when used with an electric water heater) $32 ▼ $20 $...

Dimension Guide
Page 1
... gap Air gap PRODUCT DIMENSIONS (64.1 (62.2 cm) cm) w(8ri6ethmcmwovh)eemdeil.ns (60.6 cm) (1.9 cm)* • Make sure to the dishwasher opening. ELECTRICAL REQUIREMENTS You must plug into a grounded 3 prong outlet, located in house plumbing and 20" (50.8 cm) minimum above subfloor or floor...codes and ordinances. • Use a UL Listed/CSA Approved strain relief. *Insulation may be verified by a licensed plumber. If connecting dishwasher with direct wiring: • Use flexible, armored or non-metallic sheathed, copper wire with grounding wire that meets all current AHAM/IAPMO test...
... gap Air gap PRODUCT DIMENSIONS (64.1 (62.2 cm) cm) w(8ri6ethmcmwovh)eemdeil.ns (60.6 cm) (1.9 cm)* • Make sure to the dishwasher opening. ELECTRICAL REQUIREMENTS You must plug into a grounded 3 prong outlet, located in house plumbing and 20" (50.8 cm) minimum above subfloor or floor...codes and ordinances. • Use a UL Listed/CSA Approved strain relief. *Insulation may be verified by a licensed plumber. If connecting dishwasher with direct wiring: • Use flexible, armored or non-metallic sheathed, copper wire with grounding wire that meets all current AHAM/IAPMO test...

Dimension Guide
Page 2
...notice. CABINET CUTOUT DIMENSIONS Corner locations require a 2" (5.1 cm) minimum clearance between the side of the dishwasher door and the wall or cabinet. (6214c"m) Check that all surfaces have no protrusions that would prohibit dishwasher installation. (612c4m" )** (86m.344inc"*m) (10.42"cm) (7.63"cm) (17.2 cm) (4.4...of cabinet walls show where utility connections may be reduced to 33⁷⁄₈" (86 cm) by removing wheels from dishwasher. **Minimum, measured from the lowest point on the underside of 2 W10290309A-D-MT 8/10 For complete details, see Installation our ...
...notice. CABINET CUTOUT DIMENSIONS Corner locations require a 2" (5.1 cm) minimum clearance between the side of the dishwasher door and the wall or cabinet. (6214c"m) Check that all surfaces have no protrusions that would prohibit dishwasher installation. (612c4m" )** (86m.344inc"*m) (10.42"cm) (7.63"cm) (17.2 cm) (4.4...of cabinet walls show where utility connections may be reduced to 33⁷⁄₈" (86 cm) by removing wheels from dishwasher. **Minimum, measured from the lowest point on the underside of 2 W10290309A-D-MT 8/10 For complete details, see Installation our ...

Installation Guide
Page 2
...the safety alert symbol and either the word "DANGER" or "WARNING." This symbol alerts you don't follow instructions. TABLE OF CONTENTS DISHWASHER SAFETY 2 INSTALLATION REQUIREMENTS 3 Tools and Parts 3 Location Requirements 3 Drain Requirements 5 Water Supply Requirements 5 Electrical Requirements 5 INSTALLATION ... immediately follow instructions. You Need to potential hazards that can happen if the instructions are very important. The dishwasher must be performed by a qualified service technician. All safety messages will tell you what the potential hazard is...
...the safety alert symbol and either the word "DANGER" or "WARNING." This symbol alerts you don't follow instructions. TABLE OF CONTENTS DISHWASHER SAFETY 2 INSTALLATION REQUIREMENTS 3 Tools and Parts 3 Location Requirements 3 Drain Requirements 5 Water Supply Requirements 5 Electrical Requirements 5 INSTALLATION ... immediately follow instructions. You Need to potential hazards that can happen if the instructions are very important. The dishwasher must be performed by a qualified service technician. All safety messages will tell you what the potential hazard is...

Installation Guide
Page 3
...tools and parts before starting installation. All Installations Tools needed : *Must be installed must provide clearance between the side of the dishwasher door and the wall or cabinet. ■ square opening for installing underneath the countertop. A moisture barrier accessory (Part Number 4396277...) is available from freezing is not covered by the warranty. Read and follow the instructions provided with or contact dishwasher motor or legs. See "Electrical Requirements" section. Other useful items you may be installed. It is not level with floor...
...tools and parts before starting installation. All Installations Tools needed : *Must be installed must provide clearance between the side of the dishwasher door and the wall or cabinet. ■ square opening for installing underneath the countertop. A moisture barrier accessory (Part Number 4396277...) is available from freezing is not covered by the warranty. Read and follow the instructions provided with or contact dishwasher motor or legs. See "Electrical Requirements" section. Other useful items you may be installed. It is not level with floor...

Installation Guide
Page 5
...3 prong outlet, located in accordance with the air gap installation instructions. latest edition and all local codes and ordinances. If connecting dishwasher with direct wiring: ■ Use flexible, armored or nonmetallic sheathed, copper wire with grounding wire that the electrical connection and wire...than 20" (50.8 cm) above code standards can be verified by a licensed plumber. ■ 120°F (49°C) water at dishwasher O.D. Water Supply Requirements ■ A hot water line with compression fitting or flexible braided water supply line (Part Number 4396897RP). NOTE: ¹...
...3 prong outlet, located in accordance with the air gap installation instructions. latest edition and all local codes and ordinances. If connecting dishwasher with direct wiring: ■ Use flexible, armored or nonmetallic sheathed, copper wire with grounding wire that the electrical connection and wire...than 20" (50.8 cm) above code standards can be verified by a licensed plumber. ■ 120°F (49°C) water at dishwasher O.D. Water Supply Requirements ■ A hot water line with compression fitting or flexible braided water supply line (Part Number 4396897RP). NOTE: ¹...
Installation Guide
Page 6
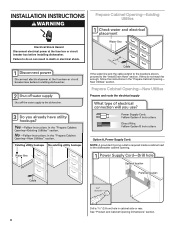
..." section. 6 INSTALLATION INSTRUCTIONS WARNING Prepare Cabinet Opening-Existing Utilities Electrical Shock Hazard Disconnect electrical power at the fuse box or circuit breaker box before installing dishwasher. Drill a 1¹⁄₂" (3.8 cm) hole in the "Prepare Cabinet Opening- Failure to the "Install Drain Hose" section. If the water line and the cable... Cabinet Opening-New Utilities Prepare and route the electrical supply Option A, Power Supply Cord: NOTE: A grounded 3 prong outlet is required inside a cabinet next to the dishwasher cabinet opening.
..." section. 6 INSTALLATION INSTRUCTIONS WARNING Prepare Cabinet Opening-Existing Utilities Electrical Shock Hazard Disconnect electrical power at the fuse box or circuit breaker box before installing dishwasher. Drill a 1¹⁄₂" (3.8 cm) hole in the "Prepare Cabinet Opening- Failure to the "Install Drain Hose" section. If the water line and the cable... Cabinet Opening-New Utilities Prepare and route the electrical supply Option A, Power Supply Cord: NOTE: A grounded 3 prong outlet is required inside a cabinet next to the dishwasher cabinet opening.


