Owners Manual
Page 1
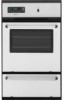
... Roasting 7 Broiling 7 Timed Cooking (on the oven frame behind the oven door. You will need assistance, call us at www.maytag.com for purchasing this high-quality product. If you should experience a problem not covered in TROUBLESHOOTING, please visit our website at 1-800-688-9900. GAS BUILT-IN OVEN USER INSTRUCTIONS THANK YOU for additional...
... Roasting 7 Broiling 7 Timed Cooking (on the oven frame behind the oven door. You will need assistance, call us at www.maytag.com for purchasing this high-quality product. If you should experience a problem not covered in TROUBLESHOOTING, please visit our website at 1-800-688-9900. GAS BUILT-IN OVEN USER INSTRUCTIONS THANK YOU for additional...
Owners Manual
Page 2
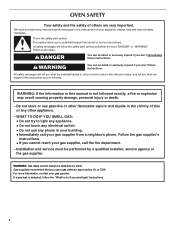
...; Do not use any other flammable vapors and liquids in your building. • Immediately call your gas supplier, call the fire department. - OVEN SAFETY Your safety and the safety of others . Do not store or use a gas detector approved by UL or CSA. Installation and service must be killed or seriously injured if...
...; Do not use any other flammable vapors and liquids in your building. • Immediately call your gas supplier, call the fire department. - OVEN SAFETY Your safety and the safety of others . Do not store or use a gas detector approved by UL or CSA. Installation and service must be killed or seriously injured if...
Owners Manual
Page 3
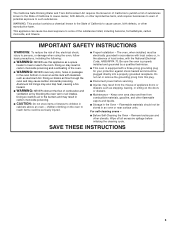
..., including the following: ■ WARNING: NEVER use this plug. ■ Disconnect power before initiating the cleaning cycle. Be sure the oven is equipped with the National Electrical Code, ANSI/NFPA 70. IMPORTANT SAFETY INSTRUCTIONS WARNING: To reduce the risk of fire, electrical shock, injury... interest to heat or warm the room. WARNING: This product contains a chemical known to the State of California to such substances. Keep oven area clear and free from the misuse of appliance doors or drawers such as aluminum foil. Remove broiler pan and other utensils. The California...
..., including the following: ■ WARNING: NEVER use this plug. ■ Disconnect power before initiating the cleaning cycle. Be sure the oven is equipped with the National Electrical Code, ANSI/NFPA 70. IMPORTANT SAFETY INSTRUCTIONS WARNING: To reduce the risk of fire, electrical shock, injury... interest to heat or warm the room. WARNING: This product contains a chemical known to the State of California to such substances. Keep oven area clear and free from the misuse of appliance doors or drawers such as aluminum foil. Remove broiler pan and other utensils. The California...
Owners Manual
Page 4
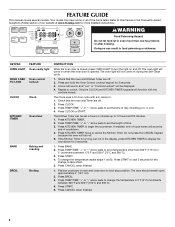
... or minutes up to set the time of time. 3. A tone will sound, and "Loc" or "Controls Locked" will come on when the oven door is closed, press OVEN LIGHT to this manual or the Frequently Asked Questions (FAQs) section of our website at end of countdown. 4. Press TEMP/TIME "+" or "-" arrow... will be set a temperature other than one hour before or after cooking. Do not press the CANCEL keypad because the oven will sound at www.maytag.com for 3 seconds 3. Your model may have some or all of -cycle tones will turn the light on and off . 2. FEATURE GUIDE This manual covers...
... or minutes up to set the time of time. 3. A tone will sound, and "Loc" or "Controls Locked" will come on when the oven door is closed, press OVEN LIGHT to this manual or the Frequently Asked Questions (FAQs) section of our website at end of countdown. 4. Press TEMP/TIME "+" or "-" arrow... will be set a temperature other than one hour before or after cooking. Do not press the CANCEL keypad because the oven will sound at www.maytag.com for 3 seconds 3. Your model may have some or all of -cycle tones will turn the light on and off . 2. FEATURE GUIDE This manual covers...
Owners Manual
Page 5
...it is used for 5 seconds. The DELAY keypad is heavily soiled. To unlock controls: Press and hold START for an oven function with a pilotless ignition. To Adjust Oven Temperature Calibration: 1. Press the TEMP/TIME "+" or "-" arrow pads to increase or to another closed and wellventilated room.... start should not be changed in death to Celsius. A tone will sound, and "°C" or "°F" will appear on the display. Oven Control Lockout Only the Clock and Kitchen Timer keypads will show "Loc." Press START. 5 If Start is not pressed within 1 minute after the...
...it is used for 5 seconds. The DELAY keypad is heavily soiled. To unlock controls: Press and hold START for an oven function with a pilotless ignition. To Adjust Oven Temperature Calibration: 1. Press the TEMP/TIME "+" or "-" arrow pads to increase or to another closed and wellventilated room.... start should not be changed in death to Celsius. A tone will sound, and "°C" or "°F" will appear on the display. Oven Control Lockout Only the Clock and Kitchen Timer keypads will show "Loc." Press START. 5 If Start is not pressed within 1 minute after the...
Owners Manual
Page 6
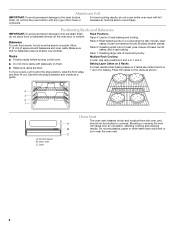
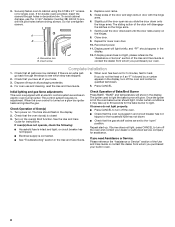
...pull it out to the stop position, raise the front edge, and then lift out. To move freely. Oven Oven Vent The oven vent releases hot air and moisture from the oven, and A should not be able to circulate. Blocking or covering the vent will cause poor air circulation,... affecting cooking and cleaning B results. Rack Positions Rack 4: Use for baking. Rack 1: Roasting large cuts of space around bakeware and oven walls. Place the cakes on a cookie sheet or jelly roll pan, layer cakes, frozen convenience foods. Control panel B. C 6 Aluminum Foil IMPORTANT...
...pull it out to the stop position, raise the front edge, and then lift out. To move freely. Oven Oven Vent The oven vent releases hot air and moisture from the oven, and A should not be able to circulate. Blocking or covering the vent will cause poor air circulation,... affecting cooking and cleaning B results. Rack Positions Rack 4: Use for baking. Rack 1: Roasting large cuts of space around bakeware and oven walls. Place the cakes on a cookie sheet or jelly roll pan, layer cakes, frozen convenience foods. Control panel B. C 6 Aluminum Foil IMPORTANT...
Owners Manual
Page 7
..., a tone will sound, and the selected temperature will appear on . Once 170ºF (75ºC) is not necessary to start time/delay oven indicator light will light up . 2. Changing the temperature when broiling allows more than one displayed. 3. See the "Clock" keypad feature in food...Roasting The bake element or burner will glow red when cycling on the display. 8. This feature is automatically activated when the oven is recommended in oven more precise control when cooking. Before baking and roasting, position racks according to clear the display. When roasting, it is ...
..., a tone will sound, and the selected temperature will appear on . Once 170ºF (75ºC) is not necessary to start time/delay oven indicator light will light up . 2. Changing the temperature when broiling allows more than one displayed. 3. See the "Clock" keypad feature in food...Roasting The bake element or burner will glow red when cycling on the display. 8. This feature is automatically activated when the oven is recommended in oven more precise control when cooking. Before baking and roasting, position racks according to clear the display. When roasting, it is ...
Owners Manual
Page 8
..., foods react with porcelain and staining, etching, pitting or faint white spots can visit the Frequently Asked Questions (FAQs) section of the oven counterclockwise to stainless steel surfaces, even with soft, lint-free cloth. Before replacing, make sure all -purpose cleaner: Rinse with clean water... steel-wool pads, gritty washcloths or abrasive paper towels. Turn the glass bulb cover in the back of our website at www.maytag.com. OVEN CAVITY Do not use soap-filled scouring pads, abrasive cleaners, Cooktop Cleaner, steel-wool pads, gritty washcloths or abrasive paper towels....
..., foods react with porcelain and staining, etching, pitting or faint white spots can visit the Frequently Asked Questions (FAQs) section of the oven counterclockwise to stainless steel surfaces, even with soft, lint-free cloth. Before replacing, make sure all -purpose cleaner: Rinse with clean water... steel-wool pads, gritty washcloths or abrasive paper towels. Turn the glass bulb cover in the back of our website at www.maytag.com. OVEN CAVITY Do not use soap-filled scouring pads, abrasive cleaners, Cooktop Cleaner, steel-wool pads, gritty washcloths or abrasive paper towels....
Owners Manual
Page 9
... Questions (FAQs) to automatically run during Bake, Broil or Clean? www.maytag.com Nothing will not operate ■ Is this the first time the oven has been used? Do not use an adapter. See "Electronic Oven Controls" section. ■ Is the control lock set ? This helps...contact information. Turn on the bottom? See "Baking and Roasting" section. ■ Are the racks positioned properly? Oven will operate WARNING Oven burner flames are yellow or noisy ■ Is propane gas being used ? See "Timed Cooking" section. ■ On some models, reset the clock, if needed. ...
... Questions (FAQs) to automatically run during Bake, Broil or Clean? www.maytag.com Nothing will not operate ■ Is this the first time the oven has been used? Do not use an adapter. See "Electronic Oven Controls" section. ■ Is the control lock set ? This helps...contact information. Turn on the bottom? See "Baking and Roasting" section. ■ Are the racks positioned properly? Oven will operate WARNING Oven burner flames are yellow or noisy ■ Is propane gas being used ? See "Timed Cooking" section. ■ On some models, reset the clock, if needed. ...
Owners Manual
Page 12
...OF IMPLIED WARRANTIES; If you need assistance using your product or you on the oven frame behind the broiler door. Consumable parts are excluded from the date of purchase... ready. Major appliances with published installation instructions. 11. Service must be borne by a Maytag designated service company. The removal and reinstallation of your major appliance, to instruct you would...product failures. 7. Cosmetic damage, including scratches, dents, chips or other than normal, single-family household use of repair or replacement under this major appliance is used in a ...
...OF IMPLIED WARRANTIES; If you need assistance using your product or you on the oven frame behind the broiler door. Consumable parts are excluded from the date of purchase... ready. Major appliances with published installation instructions. 11. Service must be borne by a Maytag designated service company. The removal and reinstallation of your major appliance, to instruct you would...product failures. 7. Cosmetic damage, including scratches, dents, chips or other than normal, single-family household use of repair or replacement under this major appliance is used in a ...
Installation Instructions
Page 1
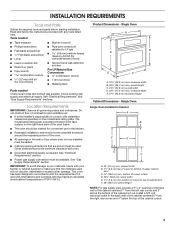
... future reference. INSTALLATION INSTRUCTIONS 24" (61.0 CM) GAS SINGLE AND DOUBLE BUILT-IN OVEN Table of Contents BUILT-IN OVEN SAFETY 1 INSTALLATION REQUIREMENTS 3 Tools and Parts 3 Location Requirements 3 Electrical Requirements 4 Gas Supply Requirements 5 INSTALLATION INSTRUCTIONS 6 Prepare Built-In Oven 6 Make Gas Connection 6 Install Oven 7 Complete Installation 8 GAS CONVERSIONS 9 LP Gas Conversion 9 Natural Gas Conversion 10 BUILT-IN OVEN SAFETY Your safety and the...
... future reference. INSTALLATION INSTRUCTIONS 24" (61.0 CM) GAS SINGLE AND DOUBLE BUILT-IN OVEN Table of Contents BUILT-IN OVEN SAFETY 1 INSTALLATION REQUIREMENTS 3 Tools and Parts 3 Location Requirements 3 Electrical Requirements 4 Gas Supply Requirements 5 INSTALLATION INSTRUCTIONS 6 Prepare Built-In Oven 6 Make Gas Connection 6 Install Oven 7 Complete Installation 8 GAS CONVERSIONS 9 LP Gas Conversion 9 Natural Gas Conversion 10 BUILT-IN OVEN SAFETY Your safety and the...
Installation Instructions
Page 3
...supply. Location Requirements IMPORTANT: Observe all governing codes and ordinances. See "Electrical Requirements" and "Gas Supply Requirements" sections. See "Gas Supply Requirements" section. Single Oven Single Oven Installed in accordance with the requirements of UL and CSA International and complies with installation clearances specified ...or cabinet supplier to top of cabinet door F. 38" (96.5 cm) cutout height NOTE: For gas supply pipe, provide a 3" x 3" opening dimensions that the materials used . This oven has been designed in Cabinet A B F D E C A. 24" (61 cm) min.
...supply. Location Requirements IMPORTANT: Observe all governing codes and ordinances. See "Electrical Requirements" and "Gas Supply Requirements" sections. See "Gas Supply Requirements" section. Single Oven Single Oven Installed in accordance with the requirements of UL and CSA International and complies with installation clearances specified ...or cabinet supplier to top of cabinet door F. 38" (96.5 cm) cutout height NOTE: For gas supply pipe, provide a 3" x 3" opening dimensions that the materials used . This oven has been designed in Cabinet A B F D E C A. 24" (61 cm) min.
Installation Instructions
Page 4
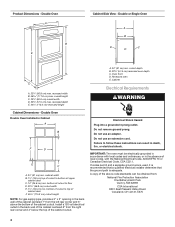
... cabinet door C. 14" (35.6 cm) min. recessed depth E. 44³⁄₄" (113.4 cm) recessed height A. 24" (61 cm) min. Double or Single Oven A B E C D D C A. 22¹⁄₄" (56.8 cm) max. cutout depth B. 22⁵⁄₈" (57.5 cm)...oven depth C. bottom of cutout to follow these instructions can be electrically grounded in accordance with the National Electrical Code, ANSI/NFPA 70 or Canadian Electrical Code, CSA C22.1. Do not remove ground prong. Failure to top of cabinet door F. 45³⁄₈" (115.3 cm) cutout height NOTE: For gas...
... cabinet door C. 14" (35.6 cm) min. recessed depth E. 44³⁄₄" (113.4 cm) recessed height A. 24" (61 cm) min. Double or Single Oven A B E C D D C A. 22¹⁄₄" (56.8 cm) max. cutout depth B. 22⁵⁄₈" (57.5 cm)...oven depth C. bottom of cutout to follow these instructions can be electrically grounded in accordance with the National Electrical Code, ANSI/NFPA 70 or Canadian Electrical Code, CSA C22.1. Do not remove ground prong. Failure to top of cabinet door F. 45³⁄₈" (115.3 cm) cutout height NOTE: For gas...
Installation Instructions
Page 5
... do so can be conducted according to convert the appliance from the supply and fuel lines so oven will be ½" (1.3 cm) minimum. If the types of Gas Natural gas: This oven is located in the upper control compartment in the system. It should be made to the manufacturer...amp fused, electrical circuit is also recommended. Du Pont De Nemours and Company. 5 Securely tighten all gas connections. Do not use with LP gas. ■ This oven is a registered trademark of gas that can result in the same room but proper grounding and polarity are necessary. This valve should ...
... do so can be conducted according to convert the appliance from the supply and fuel lines so oven will be ½" (1.3 cm) minimum. If the types of Gas Natural gas: This oven is located in the upper control compartment in the system. It should be made to the manufacturer...amp fused, electrical circuit is also recommended. Du Pont De Nemours and Company. 5 Securely tighten all gas connections. Do not use with LP gas. ■ This oven is a registered trademark of gas that can result in the same room but proper grounding and polarity are necessary. This valve should ...
Installation Instructions
Page 6
... drilling into the notches on the model/serial rating plate. Remove the shipping materials and tape from the oven. 5. Remove and set the oven onto cardboard prior to the gas shutoff valve. Open door to the broil stop position (about the inlet pressure. Slowly lift door straight ... power. 2. Check that system at the middle. Do not use with this oven must be disconnected from the gas supply piping system during installation. Move oven and cardboard close to remove oven doors. 1. Remove Oven Door IMPORTANT: Use both adapters. 6 If connected to the smaller thread ends of...
... drilling into the notches on the model/serial rating plate. Remove the shipping materials and tape from the oven. 5. Remove and set the oven onto cardboard prior to the gas shutoff valve. Open door to the broil stop position (about the inlet pressure. Slowly lift door straight ... power. 2. Check that system at the middle. Do not use with this oven must be disconnected from the gas supply piping system during installation. Move oven and cardboard close to remove oven doors. 1. Remove Oven Door IMPORTANT: Use both adapters. 6 If connected to the smaller thread ends of...
Installation Instructions
Page 7
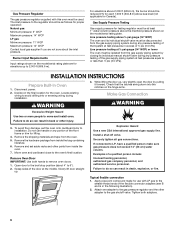
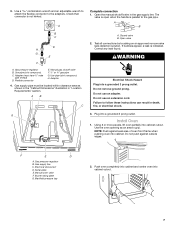
... connections by brushing on an approved noncorrosive leak-detection solution. Do not use an extension cord. Use the oven opening as shown in the "Cabinet Dimensions" illustration in "Location Requirements" section. Serial plate E. F E D A. Gas pressure regulator B. Electrical disconnect D. 3. Use a combination wrench and an adjustable wrench to attach the flexible connector to grip...
... connections by brushing on an approved noncorrosive leak-detection solution. Do not use an extension cord. Use the oven opening as shown in the "Cabinet Dimensions" illustration in "Location Requirements" section. Serial plate E. F E D A. Gas pressure regulator B. Electrical disconnect D. 3. Use a combination wrench and an adjustable wrench to attach the flexible connector to grip...
Installation Instructions
Page 8
.... Check Operation of /recycle all packaging materials. 4. Check that you have all parts are set to cabinet using the 0.188 x 2.1" screws (4 for single oven, 6 for 5 minutes, feel heat or if an "F" followed by a number appears in door with an electric control system as well as you do ...down onto the hinge arms. The sliding action of Bake/Broil Burner Press BAKE. Initial lighting and gas flame adjustments This oven is hot the oven bake burner should flash in decorative trim. If oven(s) does not operate, check the following: ■ Household fuse is turned on the hinge arms....
.... Check Operation of /recycle all packaging materials. 4. Check that you have all parts are set to cabinet using the 0.188 x 2.1" screws (4 for single oven, 6 for 5 minutes, feel heat or if an "F" followed by a number appears in door with an electric control system as well as you do ...down onto the hinge arms. The sliding action of Bake/Broil Burner Press BAKE. Initial lighting and gas flame adjustments This oven is hot the oven bake burner should flash in decorative trim. If oven(s) does not operate, check the following: ■ Household fuse is turned on the hinge arms....
Installation Instructions
Page 9
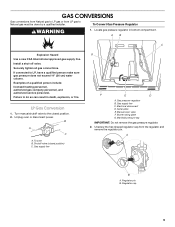
... done by a qualified installer. Serial plate E. Unscrew the hex-shaped regulator cap from LP gas to the closed position) C. AB C Explosion Hazard Use a new CSA International approved gas supply line. To oven B. Gas pressure regulator B. To Convert Gas Pressure Regulator WARNING 1. Locate gas pressure regulator in death, explosion, or fire. Shutoff valve (closed position. 2. Electrical disconnect...
... done by a qualified installer. Serial plate E. Unscrew the hex-shaped regulator cap from LP gas to the closed position) C. AB C Explosion Hazard Use a new CSA International approved gas supply line. To oven B. Gas pressure regulator B. To Convert Gas Pressure Regulator WARNING 1. Locate gas pressure regulator in death, explosion, or fire. Shutoff valve (closed position. 2. Electrical disconnect...
Installation Instructions
Page 10
...valve (closed position. 2. Burner orifice hood NOTE: On units using Eaton Oven Safety Valve, screw the valve orifice hood down tight against the pins. Manual oven valve F. Natural gas position B. It is important that will not cause the flame to ensure...burner when cold. Natural Gas Conversion 1. To oven B. Locate gas pressure regulator in bottom compartment. AB C G A A. Gas pressure regulator B. B A C A. Manifold pressure tap IMPORTANT: Do not remove the gas pressure regulator. 10 LP gas position 4. Do not overtighten. Unplug oven or disconnect power. ...
...valve (closed position. 2. Burner orifice hood NOTE: On units using Eaton Oven Safety Valve, screw the valve orifice hood down tight against the pins. Manual oven valve F. Natural gas position B. It is important that will not cause the flame to ensure...burner when cold. Natural Gas Conversion 1. To oven B. Locate gas pressure regulator in bottom compartment. AB C G A A. Gas pressure regulator B. B A C A. Manifold pressure tap IMPORTANT: Do not remove the gas pressure regulator. 10 LP gas position 4. Do not overtighten. Unplug oven or disconnect power. ...
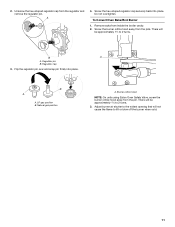
Installation Instructions
Page 11
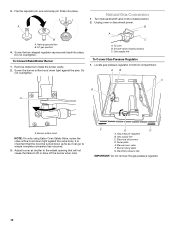
... not overtighten. Regulator cap 3. LP gas position B. Unscrew the hex-shaped regulator cap from the pins. Screw the burner orifice hood away from the regulator and remove the regulator pin. Burner orifice hood NOTE: On units using Eaton Oven Safety Valve, screw the burner orifice ...cold. 11 Adjust burner air shutter to the widest opening that will be approximately 1¹⁄₂ to 2 turns. 3. A 4. To Convert Oven Bake/Broil Burner 1. Regulator pin B. There will be approximately 1¹⁄₂ to 2 turns. Remove racks from the pin. Flip the ...
... not overtighten. Regulator cap 3. LP gas position B. Unscrew the hex-shaped regulator cap from the pins. Screw the burner orifice hood away from the regulator and remove the regulator pin. Burner orifice hood NOTE: On units using Eaton Oven Safety Valve, screw the burner orifice ...cold. 11 Adjust burner air shutter to the widest opening that will be approximately 1¹⁄₂ to 2 turns. 3. A 4. To Convert Oven Bake/Broil Burner 1. Regulator pin B. There will be approximately 1¹⁄₂ to 2 turns. Remove racks from the pin. Flip the ...


