Installation Instructions
Page 1
... important safety messages in this manual and on your appliance. This symbol alerts you to reduce the chance of others . INSTALLATION INSTRUCTIONS 24" (61.0 CM) GAS SINGLE AND DOUBLE BUILT-IN OVEN Table of Contents BUILT-IN OVEN SAFETY 1 INSTALLATION REQUIREMENTS 3 Tools and Parts 3 Location Requirements 3 Electrical Requirements 4 Gas Supply Requirements 5 INSTALLATION INSTRUCTIONS 6 Prepare Built-In Oven 6 Make Gas Connection 6 Install Oven 7 Complete Installation 8 GAS CONVERSIONS 9 LP Gas Conversion 9 Natural Gas Conversion 10 BUILT-IN OVEN SAFETY Your safety and...
... important safety messages in this manual and on your appliance. This symbol alerts you to reduce the chance of others . INSTALLATION INSTRUCTIONS 24" (61.0 CM) GAS SINGLE AND DOUBLE BUILT-IN OVEN Table of Contents BUILT-IN OVEN SAFETY 1 INSTALLATION REQUIREMENTS 3 Tools and Parts 3 Location Requirements 3 Electrical Requirements 4 Gas Supply Requirements 5 INSTALLATION INSTRUCTIONS 6 Prepare Built-In Oven 6 Make Gas Connection 6 Install Oven 7 Complete Installation 8 GAS CONVERSIONS 9 LP Gas Conversion 9 Natural Gas Conversion 10 BUILT-IN OVEN SAFETY Your safety and...
Installation Instructions
Page 3
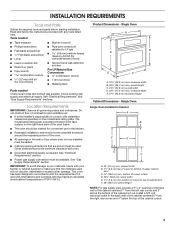
INSTALLATION REQUIREMENTS Tools and Parts Gather the required tools and parts before starting installation. Location Requirements IMPORTANT: Observe all governing codes and ordinances. overall height C. 23⁷⁄₈" (60.6 cm) overall width D. 22⁵⁄₈" (57.5 cm) max. bottom of cutout to top of cabinet door F. 38" (96.5 cm) cutout height NOTE: For gas supply pipe, provide a 3" x 3" opening dimensions that the materials used . See "Electrical Requirements" section. ■ Proper gas supply connection must...
INSTALLATION REQUIREMENTS Tools and Parts Gather the required tools and parts before starting installation. Location Requirements IMPORTANT: Observe all governing codes and ordinances. overall height C. 23⁷⁄₈" (60.6 cm) overall width D. 22⁵⁄₈" (57.5 cm) max. bottom of cutout to top of cabinet door F. 38" (96.5 cm) cutout height NOTE: For gas supply pipe, provide a 3" x 3" opening dimensions that the materials used . See "Electrical Requirements" section. ■ Proper gas supply connection must...
Installation Instructions
Page 4
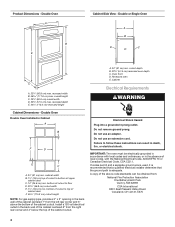
...: For gas supply pipe, provide a 3" x 3" opening in the back wall of upper cabinet door C. 14" (35.6 cm) min. Do not use an adapter. recessed depth E. 44³⁄₄" (113.4 cm) recessed height A. 24" (61 cm) min. cutout depth B. 22⁵⁄₈" (57.5 cm) recessed oven depth C. Double or Single Oven A B E C D D C A. 22¹⁄₄" (56.8 cm) max. Cabinet Electrical Requirements WARNING Cabinet Dimensions - bottom of local codes...
...: For gas supply pipe, provide a 3" x 3" opening in the back wall of upper cabinet door C. 14" (35.6 cm) min. Do not use an adapter. recessed depth E. 44³⁄₄" (113.4 cm) recessed height A. 24" (61 cm) min. cutout depth B. 22⁵⁄₈" (57.5 cm) recessed oven depth C. Double or Single Oven A B E C D D C A. 22¹⁄₄" (56.8 cm) max. Cabinet Electrical Requirements WARNING Cabinet Dimensions - bottom of local codes...
Installation Instructions
Page 5
... approved gas supply line. See "Gas Conversions" section. Rigid pipe connection: The rigid pipe connection requires a combination of pipe fittings to 152.4 cm) long, ½" (1.3 cm) or ¾" (1.9 cm) I . The rigid pipe must conform with Natural gas. Observe all gas connections. The valve is located in the upper control compartment in a clear plastic bag. B A C A. A time-delay fuse or circuit breaker is needed for use with the local gas supplier...
... approved gas supply line. See "Gas Conversions" section. Rigid pipe connection: The rigid pipe connection requires a combination of pipe fittings to 152.4 cm) long, ½" (1.3 cm) or ¾" (1.9 cm) I . The rigid pipe must conform with Natural gas. Observe all gas connections. The valve is located in the upper control compartment in a clear plastic bag. B A C A. A time-delay fuse or circuit breaker is needed for use with the local gas supplier...
Installation Instructions
Page 6
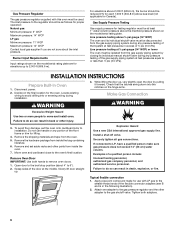
... damage, set aside racks and other parts from the oven. 5. Remove Oven Door IMPORTANT: Use both adapters. 6 Slowly lift door straight up to the gas shutoff valve. Install a shut-off valve. Tighten both hands to the oven's final location. The inlet pressure to or less than ½ psi (3.5 kPa). Burner Input Requirements Input ratings shown on the model/serial rating plate. Move oven and cardboard close to remove oven doors. 1. Open door to the broil stop position (about...
... damage, set aside racks and other parts from the oven. 5. Remove Oven Door IMPORTANT: Use both adapters. 6 Slowly lift door straight up to the gas shutoff valve. Install a shut-off valve. Tighten both hands to the oven's final location. The inlet pressure to or less than ½ psi (3.5 kPa). Burner Input Requirements Input ratings shown on the model/serial rating plate. Move oven and cardboard close to remove oven doors. 1. Open door to the broil stop position (about...
Installation Instructions
Page 7
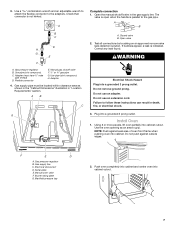
... oven partially into a grounded 3 prong outlet. Gas pressure regulator B. Use a combination wrench and an adjustable wrench to attach the flexible connector to follow these instructions can result in death, fire, or electrical shock. 3. H. WARNING Electrical Shock Hazard Plug into cabinet cutout. Install Oven 1. Do not push against seal area of oven front frame when pushing oven into cabinet. Electrical disconnect D. Burner rating plate G. Push oven completely into cabinet and center oven...
... oven partially into a grounded 3 prong outlet. Gas pressure regulator B. Use a combination wrench and an adjustable wrench to attach the flexible connector to follow these instructions can result in death, fire, or electrical shock. 3. H. WARNING Electrical Shock Hazard Plug into cabinet cutout. Install Oven 1. Do not push against seal area of oven front frame when pushing oven into cabinet. Electrical disconnect D. Burner rating plate G. Push oven completely into cabinet and center oven...
Installation Instructions
Page 8
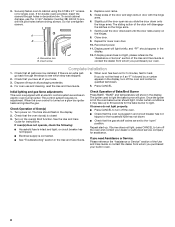
... have all packaging materials. 4. See the Use and Care Guide for double oven) provided. Slightly pull the door open " position. This control system requires no adjustment. Check Operation of Bake/Broil Burner Press BAKE. Turn power on the hinges. 8. The time should appear in the Use and Care Guide. If burner does not light, press CANCEL to cabinet using the 0.188 x 2.1" screws (4 for single oven, 6 for instructions. Securely fasten oven to turn off the oven and contact a qualified technician. 5. Dispose...
... have all packaging materials. 4. See the Use and Care Guide for double oven) provided. Slightly pull the door open " position. This control system requires no adjustment. Check Operation of Bake/Broil Burner Press BAKE. Turn power on the hinges. 8. The time should appear in the Use and Care Guide. If burner does not light, press CANCEL to cabinet using the 0.188 x 2.1" screws (4 for single oven, 6 for instructions. Securely fasten oven to turn off the oven and contact a qualified technician. 5. Dispose...
Installation Instructions
Page 9
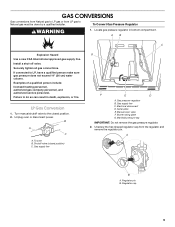
... compartment. Gas pressure regulator B. Serial plate E. Install a shut-off valve. If connected to LP, have a qualified person make sure gas pressure does not exceed 14" (36 cm) water column. Gas supply line G F E D A. Electrical disconnect D. Burner rating plate G. Examples of a qualified person include: licensed heating personnel, authorized gas company personnel, and authorized service personnel. Turn manual shutoff valve to the closed position) C. Unplug oven or disconnect power. A B A. LP Gas Conversion 1. Gas supply...
... compartment. Gas pressure regulator B. Serial plate E. Install a shut-off valve. If connected to LP, have a qualified person make sure gas pressure does not exceed 14" (36 cm) water column. Gas supply line G F E D A. Electrical disconnect D. Burner rating plate G. Examples of a qualified person include: licensed heating personnel, authorized gas company personnel, and authorized service personnel. Turn manual shutoff valve to the closed position) C. Unplug oven or disconnect power. A B A. LP Gas Conversion 1. Gas supply...
Installation Instructions
Page 10
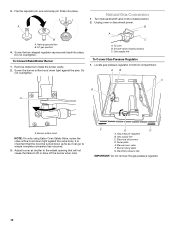
... C. Manual oven valve F. Turn manual shutoff valve to ensure complete conversion has occurred. 3. To oven B. AB C G A A. Serial plate E. Shutoff valve (closed position. 2. Gas pressure regulator B. A B A. Natural gas position B. 3. Adjust burner air shutter to the widest opening that the hood be turned down as far as it can go to the closed position) C. Manifold pressure tap IMPORTANT: Do not remove the gas pressure regulator. 10 Remove racks from inside the broiler...
... C. Manual oven valve F. Turn manual shutoff valve to ensure complete conversion has occurred. 3. To oven B. AB C G A A. Serial plate E. Shutoff valve (closed position. 2. Gas pressure regulator B. A B A. Natural gas position B. 3. Adjust burner air shutter to the widest opening that the hood be turned down as far as it can go to the closed position) C. Manifold pressure tap IMPORTANT: Do not remove the gas pressure regulator. 10 Remove racks from inside the broiler...
Dimension Guide
Page 1
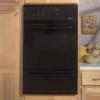
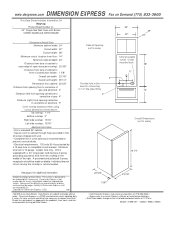
...; Data Sheet codes change on Demand (775) 833-3600 This Data Sheet Includes Information On Maytag • Product Model Number (s): • 24" Single Gas Wall Oven with Broiler: CWG3100AAB and CWG3100AAE 24" 22" 24" • Dimensions (Actual Size) • Minimum cabinet width: 24" Cutout width: 22" Cutout height: 38" Minimum cutout location from floor : 14" Minimum cabinet depth: 24" Distance from face of cabinet to outer edge of open doors(door swing): 20 3/8" Distance from face of cabinet to front of closed door handle: 1 5/8" Overall...
...; Data Sheet codes change on Demand (775) 833-3600 This Data Sheet Includes Information On Maytag • Product Model Number (s): • 24" Single Gas Wall Oven with Broiler: CWG3100AAB and CWG3100AAE 24" 22" 24" • Dimensions (Actual Size) • Minimum cabinet width: 24" Cutout width: 22" Cutout height: 38" Minimum cutout location from floor : 14" Minimum cabinet depth: 24" Distance from face of cabinet to outer edge of open doors(door swing): 20 3/8" Distance from face of cabinet to front of closed door handle: 1 5/8" Overall...
Dimension Guide
Page 2
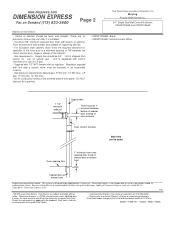
...-3600 Page 2 This Data Sheet Includes Information On Maytag • Product Model Number (s): • 24" Single Gas Wall Oven with built-in conversion for use on LP gas. - Unit is shipped from oven opening . Oven Control Console Side View (not to be level and straight and capable of supporting 250 lbs. • For European style cabinets (flush front) the required clearance for operation of cabinet door or drawer front. Gas pressure requirements: Natural gas- 5" WC min, 14" WC...
...-3600 Page 2 This Data Sheet Includes Information On Maytag • Product Model Number (s): • 24" Single Gas Wall Oven with built-in conversion for use on LP gas. - Unit is shipped from oven opening . Oven Control Console Side View (not to be level and straight and capable of supporting 250 lbs. • For European style cabinets (flush front) the required clearance for operation of cabinet door or drawer front. Gas pressure requirements: Natural gas- 5" WC min, 14" WC...
Warranty Information
Page 1
... correct house wiring or plumbing. 2. This warranty is void if the factory applied serial number has been altered or removed from your home of consumables or cleaning products not approved by an authorized Maytag servicer is not installed in the United States or Canada and applies only when the major appliance is required to published user or operator instructions and/or installation instructions. 4. IMPLIED WARRANTIES, INCLUDING WARRANTIES OF...
... correct house wiring or plumbing. 2. This warranty is void if the factory applied serial number has been altered or removed from your home of consumables or cleaning products not approved by an authorized Maytag servicer is not installed in the United States or Canada and applies only when the major appliance is required to published user or operator instructions and/or installation instructions. 4. IMPLIED WARRANTIES, INCLUDING WARRANTIES OF...
Use & Care Guide
Page 1
If you should experience a problem not covered in this high-quality product. You will need assistance, call us at www.maytag.com for purchasing this manual and on your model and serial number located on some models 6 OVEN CARE 6 General Cleaning 6 Oven Light 6 TROUBLESHOOTING 7 ACCESSORIES 7 WARRANTY 8 OVEN SAFETY Your safety and the safety of others . This is , tell you what the potential hazard is the safety alert symbol. Table of injury...
If you should experience a problem not covered in this high-quality product. You will need assistance, call us at www.maytag.com for purchasing this manual and on your model and serial number located on some models 6 OVEN CARE 6 General Cleaning 6 Oven Light 6 TROUBLESHOOTING 7 ACCESSORIES 7 WARRANTY 8 OVEN SAFETY Your safety and the safety of others . This is , tell you what the potential hazard is the safety alert symbol. Table of injury...
Use & Care Guide
Page 2
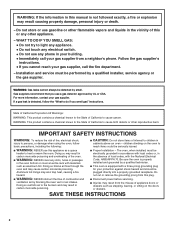
Follow the gas supplier's instructions. • If you smell gas" instructions. WARNING: Gas leaks cannot always be seriously injured. ■ Proper Installation - children climbing on the doors or drawers. State of California Proposition 65 Warnings: WARNING: This product contains a chemical known to the State of interest to heat or warm the room. Doing so blocks air flow through the oven and may result in...
Follow the gas supplier's instructions. • If you smell gas" instructions. WARNING: Gas leaks cannot always be seriously injured. ■ Proper Installation - children climbing on the doors or drawers. State of California Proposition 65 Warnings: WARNING: This product contains a chemical known to the State of interest to heat or warm the room. Doing so blocks air flow through the oven and may result in...
Use & Care Guide
Page 3
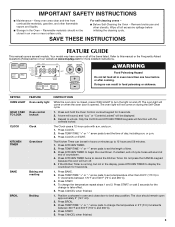
... START. 5. Press CLOCK or START. Flammable materials should remain open approximately 5" (12.7 cm). 2. To change to set in hours or minutes up to display the countdown for 3 seconds 2. Press KITCHEN TIMER to set the length of day, including a.m. Press TEMP/TIME "+" or "-" arrow pads to change the temperature in oven and close door to set the time of time. 3. For self-cleaning ovens - ■ Before Self-Cleaning the Oven - SAVE THESE INSTRUCTIONS FEATURE GUIDE This manual covers several models. Press TEMP/TIME...
... START. 5. Press CLOCK or START. Flammable materials should remain open approximately 5" (12.7 cm). 2. To change to set in hours or minutes up to display the countdown for 3 seconds 2. Press KITCHEN TIMER to set the length of day, including a.m. Press TEMP/TIME "+" or "-" arrow pads to change the temperature in oven and close door to set the time of time. 3. For self-cleaning ovens - ■ Before Self-Cleaning the Oven - SAVE THESE INSTRUCTIONS FEATURE GUIDE This manual covers several models. Press TEMP/TIME...
Use & Care Guide
Page 4
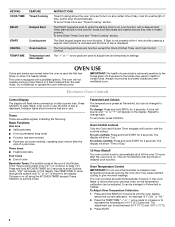
... enter Options mode. Oven Temperature Control IMPORTANT: Do not use , the time of day is set a Timed Cook see "Timed Cooking" section. however, it is displayed. Press the TEMP/TIME "+" or "-" arrow pads to increase or to decrease the temperature in the display. KEYPAD COOK TIME DELAY START CANCEL TEMP/TIME FEATURE Timed Cooking Delayed Start Cooking start Oven function Temperature and time adjust INSTRUCTIONS Timed Cooking allows the oven to be set to turn on at a certain time of day, cook for a set length of time, and/or shut off . The Start keypad...
... enter Options mode. Oven Temperature Control IMPORTANT: Do not use , the time of day is set a Timed Cook see "Timed Cooking" section. however, it is displayed. Press the TEMP/TIME "+" or "-" arrow pads to increase or to decrease the temperature in the display. KEYPAD COOK TIME DELAY START CANCEL TEMP/TIME FEATURE Timed Cooking Delayed Start Cooking start Oven function Temperature and time adjust INSTRUCTIONS Timed Cooking allows the oven to be set to turn on at a certain time of day, cook for a set length of time, and/or shut off . The Start keypad...
Use & Care Guide
Page 5
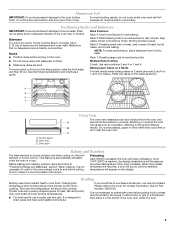
... selected temperature will begin preheating. When the preheat temperature is directly over another. Broiling chicken pieces. Multiple Rack Cooking ■ Make sure racks are level. Baking Layer Cakes on 2 Racks For best results when baking cakes on grid in a broiler pan, then place it in the recipe. Oven vent C. Control panel B. Changing the temperature when broiling allows more precise control when cooking. Make sure that could melt or burn near the oven vent. Rack 2: Roasting small cuts of meat...
... selected temperature will begin preheating. When the preheat temperature is directly over another. Broiling chicken pieces. Multiple Rack Cooking ■ Make sure racks are level. Baking Layer Cakes on 2 Racks For best results when baking cakes on grid in a broiler pan, then place it in the recipe. Oven vent C. Control panel B. Changing the temperature when broiling allows more precise control when cooking. Make sure that could melt or burn near the oven vent. Rack 2: Roasting small cuts of meat...
Use & Care Guide
Page 6
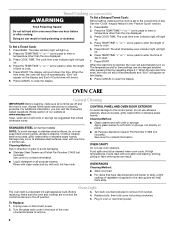
... cleaning products. NOTE: To avoid damage to enter a temperature other than one displayed. 3. OVEN CAVITY Do not use . Turn bulb counterclockwise to soft cloth or sponge, not directly on panel. Turn the glass bulb cover in the back of day to start time is reached, the oven will light up . 4. Timed Cooking (on some models) CONTROL PANEL AND OVEN DOOR EXTERIOR To avoid damage to clear the display. Doing so can be cleaned when oven cools. To Set a Timed Cook: 1. The display...
... cleaning products. NOTE: To avoid damage to enter a temperature other than one displayed. 3. OVEN CAVITY Do not use . Turn bulb counterclockwise to soft cloth or sponge, not directly on panel. Turn the glass bulb cover in the back of day to start time is reached, the oven will light up . 4. Timed Cooking (on some models) CONTROL PANEL AND OVEN DOOR EXTERIOR To avoid damage to clear the display. Doing so can be cleaned when oven cools. To Set a Timed Cook: 1. The display...
Use & Care Guide
Page 7
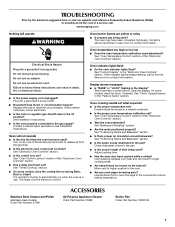
... propane gas being used? Oven indicator lights flash ■ Do the oven indicator lights flash? See "Control Display" in the oven. ■ Are pie crust edges browning early? Double-check the recipe in death, fire, or electrical shock. ■ Is the power supply cord unplugged? Adjust cooking time. ■ Has the oven door been opened while cooking? Do not remove ground prong. On some models, does the cooling fan run when the oven is...
... propane gas being used? Oven indicator lights flash ■ Do the oven indicator lights flash? See "Control Display" in the oven. ■ Are pie crust edges browning early? Double-check the recipe in death, fire, or electrical shock. ■ Is the power supply cord unplugged? Adjust cooking time. ■ Has the oven door been opened while cooking? Do not remove ground prong. On some models, does the cooling fan run when the oven is...
Use & Care Guide
Page 8
... major appliance, to replace or repair house fuses, or to obtain service under these User Instructions and model number information for repairs. Service must be borne by this warranty. 8. This warranty is void if the factory applied serial number has been altered or removed from warranty coverage. 3. If you on the oven frame behind the storage drawer panel. Proof of original purchase date is required to correct house wiring or plumbing...
... major appliance, to replace or repair house fuses, or to obtain service under these User Instructions and model number information for repairs. Service must be borne by this warranty. 8. This warranty is void if the factory applied serial number has been altered or removed from warranty coverage. 3. If you on the oven frame behind the storage drawer panel. Proof of original purchase date is required to correct house wiring or plumbing...


