Owners Manual English
Page 5
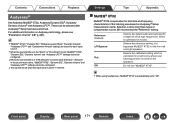
...Input Select Playback Settings Tips Appendix Speakers 194 Audyssey® Setup 194 159 Procedure for speaker settings (Audyssey® Setup) 196 163 Error messages 202 164 Retrieving Audyssey® Setup settings 204 164 Manual Setup 205 164 Amp Assign 205 165 Speaker Config. 211 168 Distances 215... 169 Levels 217 170 Crossovers 218 171 Bass 219 174 Front Speaker 220 176 Network 221 176 Information 221 178 Connection 221 183 Wi-Fi Setup 222 187 Settings 224 188 Network Control 225 189 Friendly Name 226 190 Diagnostics...
...Input Select Playback Settings Tips Appendix Speakers 194 Audyssey® Setup 194 159 Procedure for speaker settings (Audyssey® Setup) 196 163 Error messages 202 164 Retrieving Audyssey® Setup settings 204 164 Manual Setup 205 164 Amp Assign 205 165 Speaker Config. 211 168 Distances 215... 169 Levels 217 170 Crossovers 218 171 Bass 219 174 Front Speaker 220 176 Network 221 176 Information 221 178 Connection 221 183 Wi-Fi Setup 222 187 Settings 224 188 Network Control 225 189 Friendly Name 226 190 Diagnostics...
Owners Manual English
Page 15
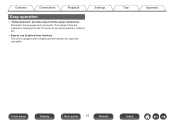
Contents Connections Playback Easy operation 0 "Setup Assistant" provides easy-to-follow the instructions displayed on the TV screen to set up the speakers, network, etc. 0 Easy to use Graphical User Interface This unit is equipped with a Graphical User Interface for improved operability. Settings Tips Appendix Front panel Display Rear panel 15 Remote Index Then simply follow setup instructions First select the language when prompted.
Contents Connections Playback Easy operation 0 "Setup Assistant" provides easy-to-follow the instructions displayed on the TV screen to set up the speakers, network, etc. 0 Easy to use Graphical User Interface This unit is equipped with a Graphical User Interface for improved operability. Settings Tips Appendix Front panel Display Rear panel 15 Remote Index Then simply follow setup instructions First select the language when prompted.
Owners Manual English
Page 19
... plugged into this jack, audio will no longer be output from the connected speakers or from the PRE OUT connectors. Front panel Display Rear panel 19 Remote Index Contents Connections Q1 Q2 Q3 Q4 Playback Q5 Settings Tips Appendix L SETUP MIC jack This is used to connect the supplied Sound calibration microphone...
... plugged into this jack, audio will no longer be output from the connected speakers or from the PRE OUT connectors. Front panel Display Rear panel 19 Remote Index Contents Connections Q1 Q2 Q3 Q4 Playback Q5 Settings Tips Appendix L SETUP MIC jack This is used to connect the supplied Sound calibration microphone...

Owners Manual English
Page 29
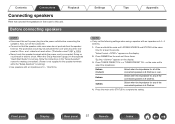
... until all connections have been completed. Contents Connections o Contents Speaker installation Connecting speakers Connecting a TV Connecting a playback device Connecting a USB memory device to the USB port Connecting an FM/AM antenna Connecting to connect. Settings Tips Appendix o Cables used for making connections. (During "Setup Assistant" operation, the input/output connectors do not conduct...
... until all connections have been completed. Contents Connections o Contents Speaker installation Connecting speakers Connecting a TV Connecting a playback device Connecting a USB memory device to the USB port Connecting an FM/AM antenna Connecting to connect. Settings Tips Appendix o Cables used for making connections. (During "Setup Assistant" operation, the input/output connectors do not conduct...
Owners Manual English
Page 37
...cord is 4 Ω/ohms. 4. on the display. 3. Press the main unit's STATUS to the speaker terminals while the "Setup Assistant" is running , follow the instructions in the "Setup Assistant" screen for at least 3 seconds. Press DIMMER on the display. 2. " appears on the ... Index Contents Connections Playback Connecting speakers Here we connect the speakers in electric shock. Also, turn off the subwoofer. 0 Connect so that the speaker cable core wires do not protrude from the power outlet before connecting the speakers. When the "Setup Assistant" (page 9 in ...
...cord is 4 Ω/ohms. 4. on the display. 3. Press the main unit's STATUS to the speaker terminals while the "Setup Assistant" is running , follow the instructions in the "Setup Assistant" screen for at least 3 seconds. Press DIMMER on the display. 2. " appears on the ... Index Contents Connections Playback Connecting speakers Here we connect the speakers in electric shock. Also, turn off the subwoofer. 0 Connect so that the speaker cable core wires do not protrude from the power outlet before connecting the speakers. When the "Setup Assistant" (page 9 in ...
Owners Manual English
Page 159
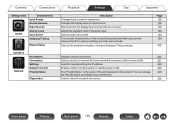
Audio M-DAX Expands the low and high frequency components of each speaker. 174 Picture Adjust Adjusts picture quality. 176 HDMI Setup Makes settings for HDMI Audio Out, HDMI Pass Through and HDMI Control settings. 178 Output Settings Makes settings for video output. 183 On Screen Display ...
Audio M-DAX Expands the low and high frequency components of each speaker. 174 Picture Adjust Adjusts picture quality. 176 HDMI Setup Makes settings for HDMI Audio Out, HDMI Pass Through and HDMI Control settings. 178 Output Settings Makes settings for video output. 183 On Screen Display ...
Owners Manual English
Page 160
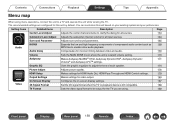
...the network. Used to a wireless LAN or a wired LAN. 221 Used for input source. Sets up the speakers manually or changes Audyssey® Setup settings. You can change 226 the Friendly Name according to your preferences. Contents Connections Playback Settings Tips Appendix Setting ...items Inputs Detailed items Input Assign Source Rename Hide Sources Source Level Input Select Audyssey® Setup Manual Setup ... Adjusts the playback level of the connected speakers and listening room are measured and the optimum settings are not used. Removes from the display input...
...the network. Used to a wireless LAN or a wired LAN. 221 Used for input source. Sets up the speakers manually or changes Audyssey® Setup settings. You can change 226 the Friendly Name according to your preferences. Contents Connections Playback Settings Tips Appendix Setting ...items Inputs Detailed items Input Assign Source Rename Hide Sources Source Level Input Select Audyssey® Setup Manual Setup ... Adjusts the playback level of the connected speakers and listening room are measured and the optimum settings are not used. Removes from the display input...
Owners Manual English
Page 162
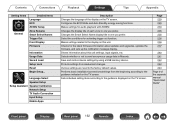
Changes the display title of each zone to Marantz. Selects whether or not to send anonymous usage data to one you prefer. Language Select Speaker Setup Setup Assistant Speaker Calibration Network Setup TV Audio Connection Input Setup Mobile Apps Description Changes the language of the ... according to one you prefer. Contents Connections Playback Settings Tips Appendix Setting items General Detailed items Language ECO ZONE2 Setup Zone Rename Smart Select Names Trigger Out Front Display Firmware .. Shows information about updates and upgrades, updates the ...
Changes the display title of each zone to Marantz. Selects whether or not to send anonymous usage data to one you prefer. Language Select Speaker Setup Setup Assistant Speaker Calibration Network Setup TV Audio Connection Input Setup Mobile Apps Description Changes the language of the ... according to one you prefer. Contents Connections Playback Settings Tips Appendix Setting items General Detailed items Language ECO ZONE2 Setup Zone Rename Smart Select Names Trigger Out Front Display Firmware .. Shows information about updates and upgrades, updates the ...
Owners Manual English
Page 171
...setting, but bypasses MultEQ® XT32 on Audyssey® Setup measurement results. These can be set when the input mode is done from three types of the listening area based on the front left and right speakers. We recommend the "Reference" setting. o MultEQ® ... and "Audyssey LFC™" settings cannot be configured. 0 This cannot be selected after Audyssey® Setup has been performed. Selects the calibrated setting which is closer to the speakers. Selection is set to "7.1CH IN". Contents Connections Playback Settings Tips Appendix Audyssey® Set Audyssey ...
...setting, but bypasses MultEQ® XT32 on Audyssey® Setup measurement results. These can be set when the input mode is done from three types of the listening area based on the front left and right speakers. We recommend the "Reference" setting. o MultEQ® ... and "Audyssey LFC™" settings cannot be configured. 0 This cannot be selected after Audyssey® Setup has been performed. Selects the calibrated setting which is closer to the speakers. Selection is set to "7.1CH IN". Contents Connections Playback Settings Tips Appendix Audyssey® Set Audyssey ...
Owners Manual English
Page 178
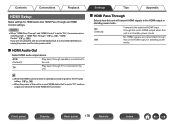
AVR (Default): TV: Play back through TV connected to the unit. Play back through speakers connected to the unit. NOTE 0 When "HDMI Pass Through" and "HDMI Control" is set to the HDMI output in standby power mode. No HDMI signals ... unit's HDMI output when this unit will transmit HDMI signals to "TV", audio is in standby power mode. Contents Connections Playback Settings Tips Appendix HDMI Setup Make settings for an extended period, it consumes more standby power. (" HDMI Pass Through " (v p. 178), " HDMI Control " (v p. 180)) If you unplug the power cord from...
AVR (Default): TV: Play back through TV connected to the unit. Play back through speakers connected to the unit. NOTE 0 When "HDMI Pass Through" and "HDMI Control" is set to the HDMI output in standby power mode. No HDMI signals ... unit's HDMI output when this unit will transmit HDMI signals to "TV", audio is in standby power mode. Contents Connections Playback Settings Tips Appendix HDMI Setup Make settings for an extended period, it consumes more standby power. (" HDMI Pass Through " (v p. 178), " HDMI Control " (v p. 180)) If you unplug the power cord from...

Owners Manual English
Page 194
...to eight positions). FL SW C FR ( :Measuring positions) FL Front speaker (L) FR Front speaker (R) C Center speaker SW Subwoofer SL Surround speaker (L) SR Surround speaker (R) 0 If you have already performed "Speaker Calibration" in "Setup Assistant". For best results, we recommend you measure in six or more ...the listening area. Front panel Display Rear panel 194 Remote Index To set up the speakers manually, use "Manual Setup" on the menu. (v p. 205) Audyssey® Setup To perform measurement, place the Sound calibration microphone in the illustration (up to perform...
...to eight positions). FL SW C FR ( :Measuring positions) FL Front speaker (L) FR Front speaker (R) C Center speaker SW Subwoofer SL Surround speaker (L) SR Surround speaker (R) 0 If you have already performed "Speaker Calibration" in "Setup Assistant". For best results, we recommend you measure in six or more ...the listening area. Front panel Display Rear panel 194 Remote Index To set up the speakers manually, use "Manual Setup" on the menu. (v p. 205) Audyssey® Setup To perform measurement, place the Sound calibration microphone in the illustration (up to perform...

Owners Manual English
Page 195
...noise can disrupt the room measurements. Also, install the Sound calibration microphone at least 20 inches (50 cm) away from the speakers and subwoofer(s), but this position to do so will result in inaccurate readings. 0 During the measurement process, audible test tones ...measurements. 0 Measurement cannot be affected by the sounds emitted by first compensating for the subwoofer. Unplug the headphones before performing Audyssey® Setup. o About Audyssey Sub EQ HT™ Audyssey Sub EQ HT™ makes the integration of normal operation. Contents Connections Playback o ...
...noise can disrupt the room measurements. Also, install the Sound calibration microphone at least 20 inches (50 cm) away from the speakers and subwoofer(s), but this position to do so will result in inaccurate readings. 0 During the measurement process, audible test tones ...measurements. 0 Measurement cannot be affected by the sounds emitted by first compensating for the subwoofer. Unplug the headphones before performing Audyssey® Setup. o About Audyssey Sub EQ HT™ Audyssey Sub EQ HT™ makes the integration of normal operation. Contents Connections Playback o ...
Owners Manual English
Page 196
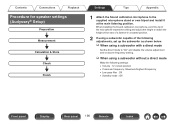
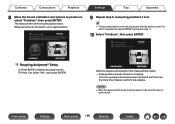
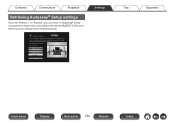
... microphone toward the ceiling and adjust the height to "On" and disable the volume adjustment and crossover frequency setting. Contents Connections Playback Procedure for speaker settings (Audyssey® Setup) Preparation Measurement Calculation & Store Check Finish Settings Tips Appendix 1 Attach the Sound calibration microphone to the supplied microphone stand or own tripod and...
... microphone toward the ceiling and adjust the height to "On" and disable the volume adjustment and crossover frequency setting. Contents Connections Playback Procedure for speaker settings (Audyssey® Setup) Preparation Measurement Calculation & Store Check Finish Settings Tips Appendix 1 Attach the Sound calibration microphone to the supplied microphone stand or own tripod and...
Owners Manual English
Page 197
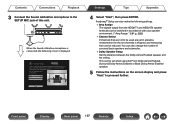
...is displayed. This can be reduced. Amp Assign Channel Select Dolby Speaker Setup Start Settings Tips Appendix 4 Select "Start", then press ENTER. Front panel Display Rear panel 197 Remote Index Audyssey Setup Your AV receiver can be set channels is connected, the following items...calibration microphone is skipped, and measuring time can automatically measure the acoustics of surround back speakers and subwoofer. 0 Dolby Speaker Setup Set the distance between the Dolby Atmos Enabled speaker and the ceiling. You can be used are set in advance, measurement for the ...
...is displayed. This can be reduced. Amp Assign Channel Select Dolby Speaker Setup Start Settings Tips Appendix 4 Select "Start", then press ENTER. Front panel Display Rear panel 197 Remote Index Audyssey Setup Your AV receiver can be set channels is connected, the following items...calibration microphone is skipped, and measuring time can automatically measure the acoustics of surround back speakers and subwoofer. 0 Dolby Speaker Setup Set the distance between the Dolby Atmos Enabled speaker and the ceiling. You can be used are set in advance, measurement for the ...
Owners Manual English
Page 198
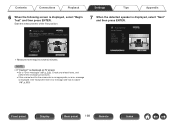
...: 0 Go to "Error messages" (v p. 202). Back Begin Test 0 Measurement requires several minutes. Ear Height Settings Tips Appendix 7 When the detected speaker is displayed, select "Begin Test" and then press ENTER. Back :Yes :Yes :1spkr :Yes :No .. Start the measurement of loud chirps starting ...NOTE 0 If "Caution!" Contents Connections Playback 6 When the following screen is displayed, select "Next" and then press ENTER. Audyssey Setup Speaker Detection Front Center Subwoofer Surround Surr. Repeat Last Test Next Front panel Display Rear panel 198 Remote Index
...: 0 Go to "Error messages" (v p. 202). Back Begin Test 0 Measurement requires several minutes. Ear Height Settings Tips Appendix 7 When the detected speaker is displayed, select "Begin Test" and then press ENTER. Back :Yes :Yes :1spkr :Yes :No .. Start the measurement of loud chirps starting ...NOTE 0 If "Caution!" Contents Connections Playback 6 When the following screen is displayed, select "Next" and then press ENTER. Audyssey Setup Speaker Detection Front Center Subwoofer Surround Surr. Repeat Last Test Next Front panel Display Rear panel 198 Remote Index
Owners Manual English
Page 199
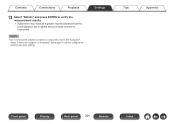
Audyssey Setup Measurements complete. B Press o to complete. Front panel Display Rear panel 199 Remote Index Repeat Last Test Continue Start the analysis and storage of the measurement ... more time it takes to display the popup screen. Audyssey Setup Place the microphone ear level of the second position starts. Back Continue n Stopping Audyssey® Setup A Press BACK to perform the analysis. NOTE 0 When the measurement results are , the more speakers and measurement positions that there are being saved, make sure the...
Audyssey Setup Measurements complete. B Press o to complete. Front panel Display Rear panel 199 Remote Index Repeat Last Test Continue Start the analysis and storage of the measurement ... more time it takes to display the popup screen. Audyssey Setup Place the microphone ear level of the second position starts. Back Continue n Stopping Audyssey® Setup A Press BACK to perform the analysis. NOTE 0 When the measurement results are , the more speakers and measurement positions that there are being saved, make sure the...
Owners Manual English
Page 201
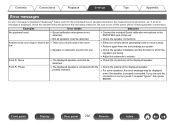
Contents Connections Playback 13 Select "Details" and press ENTER to verify the measurement results. 0 Subwoofers may measure a greater reported distance than the actual distance due to added electrical delay common in order to configure the optimum equalizer settings. Settings Tips Appendix Front panel Display Rear panel 201 Remote Index NOTE 0 Do not change the speaker connection or subwoofer volume after Audyssey® Setup. If these are changed, run Audyssey® Setup again in subwoofers.
Contents Connections Playback 13 Select "Details" and press ENTER to verify the measurement results. 0 Subwoofers may measure a greater reported distance than the actual distance due to added electrical delay common in order to configure the optimum equalizer settings. Settings Tips Appendix Front panel Display Rear panel 201 Remote Index NOTE 0 Do not change the speaker connection or subwoofer volume after Audyssey® Setup. If these are changed, run Audyssey® Setup again in subwoofers.
Owners Manual English
Page 202
... be completed due to turn off the power before checking speaker connections. Front R : Phase 0 The displayed speaker is connected with the polarity reversed. 0 Check the polarity of the displayed speaker. 0 For some speakers, this unit. 0 Not all speakers could not be detected. 0 Check the connections of this... perform the necessary measures. If an error message is displayed if Audyssey® Setup could be displayed even if the speaker is correct, press p to the SETUP MIC jack of the displayed speaker. low 0 Either turn off any device generating noise or move it away. ...
... be completed due to turn off the power before checking speaker connections. Front R : Phase 0 The displayed speaker is connected with the polarity reversed. 0 Check the polarity of the displayed speaker. 0 For some speakers, this unit. 0 Not all speakers could not be detected. 0 Check the connections of this... perform the necessary measures. If an error message is displayed if Audyssey® Setup could be displayed even if the speaker is correct, press p to the SETUP MIC jack of the displayed speaker. low 0 Either turn off any device generating noise or move it away. ...
Owners Manual English
Page 204
... automatically measure the acoustics of your room then optimize your speakers using the included microphone and microphone stand. to Audyssey® Setup measurement result (value calculated at the start by MultEQ® XT32) even when you set "Restore..." Amp Assign Channel Select Dolby Speaker Setup Check Results Restore... Contents Connections Playback Retrieving Audyssey®...
... automatically measure the acoustics of your room then optimize your speakers using the included microphone and microphone stand. to Audyssey® Setup measurement result (value calculated at the start by MultEQ® XT32) even when you set "Restore..." Amp Assign Channel Select Dolby Speaker Setup Check Results Restore... Contents Connections Playback Retrieving Audyssey®...
Owners Manual English
Page 216
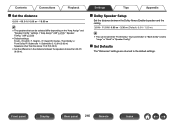
...)) 0 Default settings: Front L / Front R / F. Settings Tips Appendix o Dolby Speaker Setup Set the distance between the speakers to less than the above: 10.0 ft (3.00 m) 0 Set the difference in the distance between the Dolby Atmos Enabled speaker and the ceiling. 3.0 ft - 11.0 ft / 0.90 m - 3.30 m ... "Surround Dolby" or "Back Dolby" is set to the default settings. settings. (" Amp Assign " (v p. 205), " Speaker Config. Front panel Display Rear panel 216 Remote Index Height L / F. Height R / Center / Front Dolby L / Front Dolby R / Subwoofer 1 / Subwoofer 2: 12.0 ft...
...)) 0 Default settings: Front L / Front R / F. Settings Tips Appendix o Dolby Speaker Setup Set the distance between the speakers to less than the above: 10.0 ft (3.00 m) 0 Set the difference in the distance between the Dolby Atmos Enabled speaker and the ceiling. 3.0 ft - 11.0 ft / 0.90 m - 3.30 m ... "Surround Dolby" or "Back Dolby" is set to the default settings. settings. (" Amp Assign " (v p. 205), " Speaker Config. Front panel Display Rear panel 216 Remote Index Height L / F. Height R / Center / Front Dolby L / Front Dolby R / Subwoofer 1 / Subwoofer 2: 12.0 ft...


