Owners Manual English
Page 3
...Connecting a turntable Connecting a device with a multi-channel output connector Connecting a USB memory device to the USB port Connecting an FM/AM antenna Connecting to a home network (LAN) Wired LAN Wireless LAN Connecting an external control device REMOTE CONTROL jacks DC OUT jack Connecting the power cord Playback Basic operation Turning the power on Selecting the input source Adjusting the volume Turning off the sound temporarily (Muting) Playback a DVD player/Blu-ray Disc player 69 Playing a USB memory device 86 70 Playing files stored on USB memory devices 87 71 Listening to music...
...Connecting a turntable Connecting a device with a multi-channel output connector Connecting a USB memory device to the USB port Connecting an FM/AM antenna Connecting to a home network (LAN) Wired LAN Wireless LAN Connecting an external control device REMOTE CONTROL jacks DC OUT jack Connecting the power cord Playback Basic operation Turning the power on Selecting the input source Adjusting the volume Turning off the sound temporarily (Muting) Playback a DVD player/Blu-ray Disc player 69 Playing a USB memory device 86 70 Playing files stored on USB memory devices 87 71 Listening to music...
Owners Manual English
Page 6
... Bluetooth cannot be played back 261 243 The Internet radio cannot be played back 262 244 Music files on PC or NAS cannot be played back 263 Various online services cannot be played 264 The HDMI Control function does not work 264 Cannot connect to a wireless LAN network 265 When using HDMI ZONE2, the devices does not function properly 266 Update/upgrade error messages 267 Resetting factory settings 268 Resetting network settings 269 Front panel Display Rear panel 6 Remote Index
... Bluetooth cannot be played back 261 243 The Internet radio cannot be played back 262 244 Music files on PC or NAS cannot be played back 263 Various online services cannot be played 264 The HDMI Control function does not work 264 Cannot connect to a wireless LAN network 265 When using HDMI ZONE2, the devices does not function properly 266 Update/upgrade error messages 267 Resetting factory settings 268 Resetting network settings 269 Front panel Display Rear panel 6 Remote Index
Owners Manual English
Page 10
... channels. DTS:X brings the home theater experience to restore the perception of low frequency sounds disturbing people in the room. Front panel Display Rear panel 10 Remote Index The high-speed current feedback amplifier also reproduces a natural sound space. 0 Dolby Atmos (v p. 288) This unit is not for use when Height speakers are connected. 0 Audyssey LFC™ (Low Frequency Containment) (v p. 173) Audyssey LFC™ solves the problem of low bass for each subwoofer individually. Audyssey LFC™ dynamically monitors the audio...
... channels. DTS:X brings the home theater experience to restore the perception of low frequency sounds disturbing people in the room. Front panel Display Rear panel 10 Remote Index The high-speed current feedback amplifier also reproduces a natural sound space. 0 Dolby Atmos (v p. 288) This unit is not for use when Height speakers are connected. 0 Audyssey LFC™ (Low Frequency Containment) (v p. 173) Audyssey LFC™ solves the problem of low bass for each subwoofer individually. Audyssey LFC™ dynamically monitors the audio...
Owners Manual English
Page 24
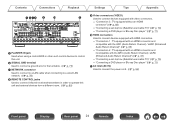
... and compatible with the ARC (Audio Return Channel) / eARC (Enhanced Audio Return Channel)" (v p. 65) 0 "Connection 2 : TV equipped with an HDMI connector and incompatible with the ARC (Audio Return Channel) / eARC (Enhanced Audio Return Channel)" (v p. 67) 0 "Connecting a set-top box (Satellite tuner/cable TV)" (v p. 70) 0 "Connecting a DVD player or Blu-ray Disc player" (v p. 71) K AC inlet (AC IN) Used to control this unit. E FLASHER IN jack Used when using a control BOX or other such control devices to connect the power cord. (v p. 82) Front panel Display Rear panel 24 Remote Index...
... and compatible with the ARC (Audio Return Channel) / eARC (Enhanced Audio Return Channel)" (v p. 65) 0 "Connection 2 : TV equipped with an HDMI connector and incompatible with the ARC (Audio Return Channel) / eARC (Enhanced Audio Return Channel)" (v p. 67) 0 "Connecting a set-top box (Satellite tuner/cable TV)" (v p. 70) 0 "Connecting a DVD player or Blu-ray Disc player" (v p. 71) K AC inlet (AC IN) Used to control this unit. E FLASHER IN jack Used when using a control BOX or other such control devices to connect the power cord. (v p. 82) Front panel Display Rear panel 24 Remote Index...

Owners Manual English
Page 29
...o Cables used for making connections. (During "Setup Assistant" operation, the input/output connectors do not conduct current.) 0 Do not bundle power cords together with connection cables. Speaker cable Subwoofer cable HDMI cable Component video cable Video cable Coaxial digital cable Optical cable Audio cable LAN cable L L R R Front panel Display Rear panel 29 Remote Index Contents Connections o Contents Speaker installation Connecting speakers Connecting a TV Connecting a playback device Connecting a USB memory device to the USB port Connecting an FM/AM antenna Connecting...
...o Cables used for making connections. (During "Setup Assistant" operation, the input/output connectors do not conduct current.) 0 Do not bundle power cords together with connection cables. Speaker cable Subwoofer cable HDMI cable Component video cable Video cable Coaxial digital cable Optical cable Audio cable LAN cable L L R R Front panel Display Rear panel 29 Remote Index Contents Connections o Contents Speaker installation Connecting speakers Connecting a TV Connecting a playback device Connecting a USB memory device to the USB port Connecting an FM/AM antenna Connecting...
Owners Manual English
Page 48
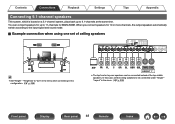
... menu when connecting in the menu. (v p. 209) Front panel Display Rear panel 48 Remote Index o Example connection when using one set the ceiling speakers to be connected under "Height" "Layout" in this configuration. (v p. 208) SW FR FL C SR SL SBR SBL TMR TML HEIGHT 1z z The top front or top rear speakers can connect speakers for up to the input signal and sound mode. When you connect speakers for MAIN ZONE. Contents Connections Playback Settings Tips Appendix Connecting 9.1-channel speakers...
... menu when connecting in the menu. (v p. 209) Front panel Display Rear panel 48 Remote Index o Example connection when using one set the ceiling speakers to be connected under "Height" "Layout" in this configuration. (v p. 208) SW FR FL C SR SL SBR SBL TMR TML HEIGHT 1z z The top front or top rear speakers can connect speakers for up to the input signal and sound mode. When you connect speakers for MAIN ZONE. Contents Connections Playback Settings Tips Appendix Connecting 9.1-channel speakers...
Owners Manual English
Page 111
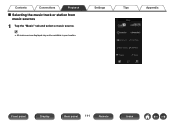
Front panel Display Rear panel 111 Remote Index Settings Tips Music Appendix This Phone Music Servers USB Music Playlists History Rooms Music Now Playing . Contents Connections Playback o Selecting the music track or station from music sources 1 Tap the "Music" tab and select a music source. 0 All music services displayed may not be available in your location.
Front panel Display Rear panel 111 Remote Index Settings Tips Music Appendix This Phone Music Servers USB Music Playlists History Rooms Music Now Playing . Contents Connections Playback o Selecting the music track or station from music sources 1 Tap the "Music" tab and select a music source. 0 All music services displayed may not be available in your location.
Owners Manual English
Page 128
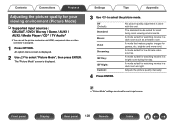
A mode suited for each input source. Adjusts the picture quality manually. 4 Press ENTER. 0 "Picture Mode" settings are stored for low bit rate video sources. Off (Default): Standard: Movie: Vivid: Streaming: ISF Day: ISF Night: Custom: No picture quality adjustment is displayed. 2 Use ui to select the picture mode. A mode that makes graphic images for watching movies in a dark room such as a theater room. Settings Tips Appendix 3 Use o p to select "Picture Mode", then press ENTER. A mode suited for watching movies in...
A mode suited for each input source. Adjusts the picture quality manually. 4 Press ENTER. 0 "Picture Mode" settings are stored for low bit rate video sources. Off (Default): Standard: Movie: Vivid: Streaming: ISF Day: ISF Night: Custom: No picture quality adjustment is displayed. 2 Use ui to select the picture mode. A mode that makes graphic images for watching movies in a dark room such as a theater room. Settings Tips Appendix 3 Use o p to select "Picture Mode", then press ENTER. A mode suited for watching movies in...
Owners Manual English
Page 155
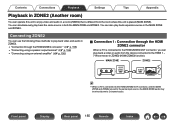
... (HDMI ZONE2 function). You can play back the same source in the MAIN ZONE and ZONE2. Connecting ZONE2 You can use the following three methods to play back video and audio in ZONE2. 0 "Connection through the HDMI ZONE2 connector " (v p. 155) 0 "Connecting using a speaker output terminal" (v p. 156) 0 "Connecting using an external amplifier" (v p. 156) o Connection 1 : Connection through the HDMI ZONE2 connector When a TV is connected to the HDMI ZONE2 OUT connector, you can simultaneously play back a video or audio...
... (HDMI ZONE2 function). You can play back the same source in the MAIN ZONE and ZONE2. Connecting ZONE2 You can use the following three methods to play back video and audio in ZONE2. 0 "Connection through the HDMI ZONE2 connector " (v p. 155) 0 "Connecting using a speaker output terminal" (v p. 156) 0 "Connecting using an external amplifier" (v p. 156) o Connection 1 : Connection through the HDMI ZONE2 connector When a TV is connected to the HDMI ZONE2 OUT connector, you can simultaneously play back a video or audio...
Owners Manual English
Page 156
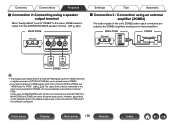
...Contents Connections Playback o Connection 2: Connecting using an external amplifier (ZONE2) The audio signals of this case, the MAIN ZONE audio will also be automatically converted to 2-channel PCM. In this unit's ZONE2 audio output connectors are set "HDMI Audio" to "PCM". (v p. 234) The output from the SURROUND BACK speaker terminal. (v p. 205) MAIN ZONE This unit Settings Tips Appendix o Connection 3 : Connection using a speaker output terminal When "Assign Mode" is set to "ZONE2" in ZONE2, set to the same input source. Front panel Display Rear panel 156 Remote Index...
...Contents Connections Playback o Connection 2: Connecting using an external amplifier (ZONE2) The audio signals of this case, the MAIN ZONE audio will also be automatically converted to 2-channel PCM. In this unit's ZONE2 audio output connectors are set "HDMI Audio" to "PCM". (v p. 234) The output from the SURROUND BACK speaker terminal. (v p. 205) MAIN ZONE This unit Settings Tips Appendix o Connection 3 : Connection using a speaker output terminal When "Assign Mode" is set to "ZONE2" in ZONE2, set to the same input source. Front panel Display Rear panel 156 Remote Index...
Owners Manual English
Page 160
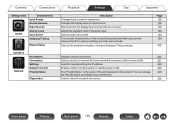
... of the connected speakers and listening room are measured and the optimum settings are not used. Changes the display name for manually setting the IP address. 224 Enables network communication in standby power mode. 225 The "Friendly Name" is the name of the audio input. Sets the audio input mode. Contents Connections Playback Settings Tips Appendix Setting items Inputs Detailed items Input Assign Source Rename Hide Sources Source Level Input Select Audyssey® Setup Manual Setup ... Speakers Network Information Connection Settings Network Control Friendly Name...
... of the connected speakers and listening room are measured and the optimum settings are not used. Changes the display name for manually setting the IP address. 224 Enables network communication in standby power mode. 225 The "Friendly Name" is the name of the audio input. Sets the audio input mode. Contents Connections Playback Settings Tips Appendix Setting items Inputs Detailed items Input Assign Source Rename Hide Sources Source Level Input Select Audyssey® Setup Manual Setup ... Speakers Network Information Connection Settings Network Control Friendly Name...
Owners Manual English
Page 162
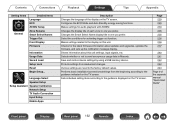
... usage data to the display on the TV screen. Sets individual setting items according to one you prefer. Language Select Speaker Setup Setup Assistant Speaker Calibration Network Setup TV Audio Connection Input Setup Mobile Apps Description Changes the language of the separate manual "Quick Start Guide" Front panel Display Rear panel 162 Remote Index Configures the ECO Mode and Auto Standby energy-saving functions. Changes the Smart Select Name display title to the guidance displayed on the TV screen. Various settings are reset to the factory default values.
... usage data to the display on the TV screen. Sets individual setting items according to one you prefer. Language Select Speaker Setup Setup Assistant Speaker Calibration Network Setup TV Audio Connection Input Setup Mobile Apps Description Changes the language of the separate manual "Quick Start Guide" Front panel Display Rear panel 162 Remote Index Configures the ECO Mode and Auto Standby energy-saving functions. Changes the Smart Select Name display title to the guidance displayed on the TV screen. Various settings are reset to the factory default values.
Owners Manual English
Page 182
... audio output setting of your TV. Front panel Display Rear panel 182 Remote Index Do not use Smart Menu function. 0 "Smart Menu" can be set when "HDMI Control" is set to "On". (v p. 180) NOTE 0 If the "Smart Menu" settings have been changed, always reset the power to connected devices after the change. 0 The Smart Menu function may not work properly depending on the specifications of your TV, this unit, select an input source and set Tuner and Internet Radio stations using the TV remote control. Contents Connections Playback o Power...
... audio output setting of your TV. Front panel Display Rear panel 182 Remote Index Do not use Smart Menu function. 0 "Smart Menu" can be set when "HDMI Control" is set to "On". (v p. 180) NOTE 0 If the "Smart Menu" settings have been changed, always reset the power to connected devices after the change. 0 The Smart Menu function may not work properly depending on the specifications of your TV, this unit, select an input source and set Tuner and Internet Radio stations using the TV remote control. Contents Connections Playback o Power...

Owners Manual English
Page 184
.... Front panel Display Rear panel 184 Remote Index Always process video for analog and HDMI video signal. Settings Tips Appendix o Video Conversion The input video signal is delayed compared to the button operations on the HDMI content information. Minimize the video delay when the video is converted automatically in "Resolution". (v p. 185) Analog (Default): Analog & HDMI: HDMI: Off: Use i/p (interlace-to-progressive) scaler function for analog video signals. Do not use i/p Scaler function. Perform image processing that is switched according to the input contents. Use...
.... Front panel Display Rear panel 184 Remote Index Always process video for analog and HDMI video signal. Settings Tips Appendix o Video Conversion The input video signal is delayed compared to the button operations on the HDMI content information. Minimize the video delay when the video is converted automatically in "Resolution". (v p. 185) Analog (Default): Analog & HDMI: HDMI: Off: Use i/p (interlace-to-progressive) scaler function for analog video signals. Do not use i/p Scaler function. Perform image processing that is switched according to the input contents. Use...
Owners Manual English
Page 200
... the audio input to the unit. Configure the settings as preferred. Optimal volume control is recommended when using the unit with the volume turned down, e.g. Contents Connections Playback Settings Tips Appendix 11 Perform the settings for commercials shown during the analysis. Audyssey Setup Audyssey Dynamic EQ maintains bass, clarity and surround sound at low volume. Applying room corrections Back 100% Next .. 0 Dynamic EQ corrects the frequency response in the middle of the night. 0 Dynamic Volume adjusts the output volume...
... the audio input to the unit. Configure the settings as preferred. Optimal volume control is recommended when using the unit with the volume turned down, e.g. Contents Connections Playback Settings Tips Appendix 11 Perform the settings for commercials shown during the analysis. Audyssey Setup Audyssey Dynamic EQ maintains bass, clarity and surround sound at low volume. Applying room corrections Back 100% Next .. 0 Dynamic EQ corrects the frequency response in the middle of the night. 0 Dynamic Volume adjusts the output volume...
Owners Manual English
Page 238
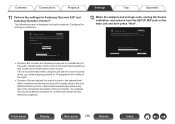
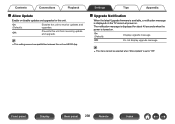
... panel Display Rear panel 238 Remote Index Settings Tips Appendix o Upgrade Notification When the latest Upgrade firmware is available, a notification message is turned on . Do not display upgrade message. 0 This menu cannot be selected when "Allow Update" is set to receive updates and upgrades. Prevents this unit from receiving update and upgrade. 0 This setting causes Incompatibilities between this unit to "Off". Contents Connections Playback o Allow Update Enable or disable updates and upgrades for about 40 seconds when the power...
... panel Display Rear panel 238 Remote Index Settings Tips Appendix o Upgrade Notification When the latest Upgrade firmware is available, a notification message is turned on . Do not display upgrade message. 0 This menu cannot be selected when "Allow Update" is set to receive updates and upgrades. Prevents this unit from receiving update and upgrade. 0 This setting causes Incompatibilities between this unit to "Off". Contents Connections Playback o Allow Update Enable or disable updates and upgrades for about 40 seconds when the power...
Owners Manual English
Page 246
... set to standby on this unit is applied at power on with no change. You can set the volume level at next power on for "Volume Limit" in the menu. When "Subwoofer Mode" in the menu. To use a fixed volume level, set this for each zone. (" Volume " (v p. 170), " Volume Limit " (v p. 234)) I want to keep bass and clarity during playback at the same level when I turn the power on the input signals and sound mode, the subwoofer may not output audio. This setting...
... set to standby on this unit is applied at power on with no change. You can set the volume level at next power on for "Volume Limit" in the menu. When "Subwoofer Mode" in the menu. To use a fixed volume level, set this for each zone. (" Volume " (v p. 170), " Volume Limit " (v p. 234)) I want to keep bass and clarity during playback at the same level when I turn the power on the input signals and sound mode, the subwoofer may not output audio. This setting...
Owners Manual English
Page 253
...selected when using the headphones. DTS Neural:X mode cannot be selected. 0 DTS Neural:X cannot be selected for the sound mode if Headphone:X signals are input. On some devices, "PCM" is not output. 0 Make HDMI connections. (v p. 70) 0 Check the digital audio output setting on the connected device. Sound modes other than "Stereo" or "Direct" cannot be selected. 0 Only "Stereo" or "Direct" can make the subwoofer always output sound by default. "Subwoofer" in the menu is set to "Large", depending on the subwoofer's power. 0 Set "Speaker Config." - Front panel Display Rear...
...selected when using the headphones. DTS Neural:X mode cannot be selected. 0 DTS Neural:X cannot be selected for the sound mode if Headphone:X signals are input. On some devices, "PCM" is not output. 0 Make HDMI connections. (v p. 70) 0 Check the digital audio output setting on the connected device. Sound modes other than "Stereo" or "Direct" cannot be selected. 0 Only "Stereo" or "Direct" can make the subwoofer always output sound by default. "Subwoofer" in the menu is set to "Large", depending on the subwoofer's power. 0 Set "Speaker Config." - Front panel Display Rear...
Owners Manual English
Page 271
... the ARC function is connected to enjoy surround audio for that is compatible with the Auto Lip Sync function. 0 HDMI Pass Through Even when the power to this unit is set to standby, signals input from the HDMI input connector are transmitted to the TV, but this unit can not play back television audio from the TV can be linked to the TV power off can be input to TV input switching. Front panel Display Rear panel 271 Remote Index Use...
... the ARC function is connected to enjoy surround audio for that is compatible with the Auto Lip Sync function. 0 HDMI Pass Through Even when the power to this unit is set to standby, signals input from the HDMI input connector are transmitted to the TV, but this unit can not play back television audio from the TV can be linked to the TV power off can be input to TV input switching. Front panel Display Rear panel 271 Remote Index Use...
Product Information Sheet
Page 2
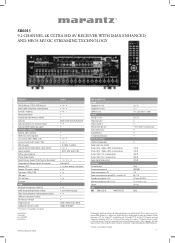
.../50Hz www.marantz.com INPUTS/OUTPUTS VIDEO Composite in / out Component in / out HDMI in / out AUDIO Analog in / out Digital optical in Digital coaxial in Multichannel pre-out Zone audio pre-out Subwoofer out 7.1 Multichannel input SPECIFICATIONS Number of Dolby Laboratories. and any use of D&M Holdings, Inc. * All specs can be subject to third party licenses found here: www.spotify.com/connect/third-party-licenses. is subject to change by D&M Holdings Inc. DTS, the Symbol, DTS in...
.../50Hz www.marantz.com INPUTS/OUTPUTS VIDEO Composite in / out Component in / out HDMI in / out AUDIO Analog in / out Digital optical in Digital coaxial in Multichannel pre-out Zone audio pre-out Subwoofer out 7.1 Multichannel input SPECIFICATIONS Number of Dolby Laboratories. and any use of D&M Holdings, Inc. * All specs can be subject to third party licenses found here: www.spotify.com/connect/third-party-licenses. is subject to change by D&M Holdings Inc. DTS, the Symbol, DTS in...


