
SR6005 User Manual - English
Page 6
...guide 1 w Warranty card (for USA 1 e Warranty card (for CANADA 1 r Power cord 1 t Remote control unit (RC011SR 1 y R03/AAA batteries 2 u Setup microphone (ACM1H 1 i AM loop antenna (for HD Radio broadcasts 1 o FM indoor antenna (for HD Radio broadcasts 1 r t u i o Features Fully Discrete, identical quality .... One of the 6 input connectors of quality. The use , Graphical User Interface This unit is described. M-XPort (Marantz-eXtension Port) This unit is provided on which automatically makes speaker settings best suited for operations. ENGLISH DEUTSCH FRANÇAIS...
...guide 1 w Warranty card (for USA 1 e Warranty card (for CANADA 1 r Power cord 1 t Remote control unit (RC011SR 1 y R03/AAA batteries 2 u Setup microphone (ACM1H 1 i AM loop antenna (for HD Radio broadcasts 1 o FM indoor antenna (for HD Radio broadcasts 1 r t u i o Features Fully Discrete, identical quality .... One of the 6 input connectors of quality. The use , Graphical User Interface This unit is described. M-XPort (Marantz-eXtension Port) This unit is provided on which automatically makes speaker settings best suited for operations. ENGLISH DEUTSCH FRANÇAIS...
SR6005 User Manual - English
Page 8
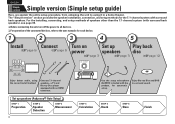
... each device. 1 2 3 4 5 Install Connect Turn on Set up speakers (Audyssey® Auto Setup) STEP 1 Preparation STEP 2 Speaker Detection STEP 3 Measurement 4 STEP 4 Calculation Use the setup microphone (ACM1H) included with the product, for the 7.1-channel system with surround back speakers. Set up Play back (vpage 5) (vpage 5) power speakers disc (vpage 7) (vpage 7) (vpage...
... each device. 1 2 3 4 5 Install Connect Turn on Set up speakers (Audyssey® Auto Setup) STEP 1 Preparation STEP 2 Speaker Detection STEP 3 Measurement 4 STEP 4 Calculation Use the setup microphone (ACM1H) included with the product, for the 7.1-channel system with surround back speakers. Set up Play back (vpage 5) (vpage 5) power speakers disc (vpage 7) (vpage 7) (vpage...

SR6005 User Manual - English
Page 11
... during Audyssey Auto setup. If there is called "Audyssey Auto Setup". Power on the menu. To perform measurement, place the setup microphone in the path while the measurements are made . Advanced version Information NOTE Before you measure in six positions, as Radio Frequency Interference ...will increase in volume. • Operating VOLUME +, - For best results, we recommend you use ). • Do not unplug the setup microphone from all around the listening area. This will cancel the measurements. • Measurement cannot be sure to insert the batteries (vpage 81 "...
... during Audyssey Auto setup. If there is called "Audyssey Auto Setup". Power on the menu. To perform measurement, place the setup microphone in the path while the measurements are made . Advanced version Information NOTE Before you measure in six positions, as Radio Frequency Interference ...will increase in volume. • Operating VOLUME +, - For best results, we recommend you use ). • Do not unplug the setup microphone from all around the listening area. This will cancel the measurements. • Measurement cannot be sure to insert the batteries (vpage 81 "...

SR6005 User Manual - English
Page 12
...at multiple positions throughout the entire listening area, as shown in your hand during measurements. • Avoid placing the setup microphone close as shown in more effective correction. Audyssey MultEQ® uses the measurements from this position to calculate speaker distance,...crossover frequency setting. nn When using a subwoofer capable of the sound receptor to a seat back or wall as shown below. Sound receptor Setup microphone ( : Measuring positions) ( : Measuring positions) SL *M SBL SBR FL Front speaker (L) FR Front speaker (R) C Center speaker SW ...
...at multiple positions throughout the entire listening area, as shown in your hand during measurements. • Avoid placing the setup microphone close as shown in more effective correction. Audyssey MultEQ® uses the measurements from this position to calculate speaker distance,...crossover frequency setting. nn When using a subwoofer capable of the sound receptor to a seat back or wall as shown below. Sound receptor Setup microphone ( : Measuring positions) ( : Measuring positions) SL *M SBL SBR FL Front speaker (L) FR Front speaker (R) C Center speaker SW ...

SR6005 User Manual - English
Page 13
..."Amp Assign"" (vpage 39). The measurement of position 6 is displayed. AUTO SETUP AUDYSSEY AUTO SETUP STEP3 Measurement Please place the microphone at ear height at the main listening position. • This step automatically checks the speaker configuration and speaker size, and calculates ... position onward, select "Next 1 Calculation". (Go to STEP4 Calculation ) 10 Repeat step 9, measuring positions 3 to 6. When the setup microphone is resolved, return and restart "Audyssey Auto Setup". When measuring has stopped Press RETURN, to select "Next 1 Measurement" and then press ENTER...
..."Amp Assign"" (vpage 39). The measurement of position 6 is displayed. AUTO SETUP AUDYSSEY AUTO SETUP STEP3 Measurement Please place the microphone at ear height at the main listening position. • This step automatically checks the speaker configuration and speaker size, and calculates ... position onward, select "Next 1 Calculation". (Go to STEP4 Calculation ) 10 Repeat step 9, measuring positions 3 to 6. When the setup microphone is resolved, return and restart "Audyssey Auto Setup". When measuring has stopped Press RETURN, to select "Next 1 Measurement" and then press ENTER...

SR6005 User Manual - English
Page 14
...wait. To proceed,press "Next" Spkr Config Check Distance Check Ch. The time required for this unit off the power. 15 Unplug the setup microphone from the actual connection status, or if "Caution!" Save the measurement results. MultEQ [4/6] 25% • Analysis takes several minutes to select "Next... 1 Calculation", and then press ENTER. All the measured Audyssey Auto Setup data will be saved, press RETURN. Please unplug microphone. Turn this analysis depends on and exit Auto Setup • For details of a change, perform Audyssey Auto Setup again. 10 Remote ...
...wait. To proceed,press "Next" Spkr Config Check Distance Check Ch. The time required for this unit off the power. 15 Unplug the setup microphone from the actual connection status, or if "Caution!" Save the measurement results. MultEQ [4/6] 25% • Analysis takes several minutes to select "Next... 1 Calculation", and then press ENTER. All the measured Audyssey Auto Setup data will be saved, press RETURN. Please unplug microphone. Turn this analysis depends on and exit Auto Setup • For details of a change, perform Audyssey Auto Setup again. 10 Remote ...

SR6005 User Manual - English
Page 15
...is correct, press ui to take the necessary measures, then perform Audyssey Auto Setup over again. Measures • Connect the included setup microphone to the SETUP MIC jack of this happens, check the relevant items, be sure to select "Skip", then press ENTER. Crossover Check...measurement results and If this unit. • Check the speaker connections. No microphone or Speaker Retry Error details • The connected setup microphone is broken, or a device other than the supplied setup microphone is too much noise in the room for accurate measurements to check, then ...
...is correct, press ui to take the necessary measures, then perform Audyssey Auto Setup over again. Measures • Connect the included setup microphone to the SETUP MIC jack of this happens, check the relevant items, be sure to select "Skip", then press ENTER. Crossover Check...measurement results and If this unit. • Check the speaker connections. No microphone or Speaker Retry Error details • The connected setup microphone is broken, or a device other than the supplied setup microphone is too much noise in the room for accurate measurements to check, then ...

SR6005 User Manual - English
Page 43
... ch. In this case, go to be used . Select for no front height speakers to select a channel. Press AMP When the setup microphone is skipped, and measuring time can be used are not to select "Channel Select", and then press ENTER. Set the following items if necessary.../ Center/Surround/Surround Back or Front height/Subwoofer) speakers. Set for no measuring of the front speaker to amplifier operation mode. 2 Connect the setup microphone. Amp Assign Channel Select Auto Setup Start [1/6] ENTER Enter RETURN Cancel Set use of this case, go to step 9. • "Front Height" ...
... ch. In this case, go to be used . Select for no front height speakers to select a channel. Press AMP When the setup microphone is skipped, and measuring time can be used are not to select "Channel Select", and then press ENTER. Set the following items if necessary.../ Center/Surround/Surround Back or Front height/Subwoofer) speakers. Set for no measuring of the front speaker to amplifier operation mode. 2 Connect the setup microphone. Amp Assign Channel Select Auto Setup Start [1/6] ENTER Enter RETURN Cancel Set use of this case, go to step 9. • "Front Height" ...
