Owners Manual English
Page 4
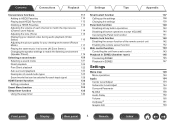
... 147 Direct playback Pure Direct playback 122 122 Settings Auto surround playback 123 Menu map 149 Description of sound mode types 124 Menu operations 153 Sound mode that can be selected for each input signal 128 Audio 154 HDMI Control function 132 Center Level Adjust 154 Setting procedure 132 Subwoofer Level Adjust 154 Smart Menu function 133 Surround Parameter 155 Sleep timer function 135 M-DAX 158 Using the sleep timer 136 Audio Delay 159 Volume 160 Audyssey® 161 Graphic EQ 163 Front panel Display Rear panel 4 Remote Index
... 147 Direct playback Pure Direct playback 122 122 Settings Auto surround playback 123 Menu map 149 Description of sound mode types 124 Menu operations 153 Sound mode that can be selected for each input signal 128 Audio 154 HDMI Control function 132 Center Level Adjust 154 Setting procedure 132 Subwoofer Level Adjust 154 Smart Menu function 133 Surround Parameter 155 Sleep timer function 135 M-DAX 158 Using the sleep timer 136 Audio Delay 159 Volume 160 Audyssey® 161 Graphic EQ 163 Front panel Display Rear panel 4 Remote Index
Owners Manual English
Page 6
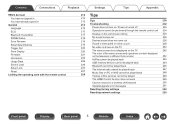
... 226 USB memory devices cannot be played back 244 226 Bluetooth cannot be played back 245 227 The Internet radio cannot be played back 247 227 Music files on PC or NAS cannot be played back 248 228 Various online services cannot be played 249 The HDMI Control function does not work 249 Cannot connect to a wireless LAN network 250 Update/upgrade error messages 251 Resetting factory settings 252 Resetting network settings 253 Front panel Display Rear panel 6 Remote...
... 226 USB memory devices cannot be played back 244 226 Bluetooth cannot be played back 245 227 The Internet radio cannot be played back 247 227 Music files on PC or NAS cannot be played back 248 228 Various online services cannot be played 249 The HDMI Control function does not work 249 Cannot connect to a wireless LAN network 250 Update/upgrade error messages 251 Resetting factory settings 252 Resetting network settings 253 Front panel Display Rear panel 6 Remote...
Owners Manual English
Page 10
... power per channel (8 Ω/ohms, 20Hz-20kHz, T.H.D.: 0.08%, 2ch drive). Auto Eco Mode adjusts power output to be amplified with a decoder that signals from traditional channel based speaker layouts through digital signal processing including Dolby Atmos height virtualization and surround virtualization. 0 Speaker Virtualizer is not for balanced, quality sound. Contents Connections Playback Settings Tips Appendix Features High quality sound 0 Powerful 7-Channel Discrete Amplifier Featuring discrete high-current power amplifiers on -screen eco meter, providing power consumption...
... power per channel (8 Ω/ohms, 20Hz-20kHz, T.H.D.: 0.08%, 2ch drive). Auto Eco Mode adjusts power output to be amplified with a decoder that signals from traditional channel based speaker layouts through digital signal processing including Dolby Atmos height virtualization and surround virtualization. 0 Speaker Virtualizer is not for balanced, quality sound. Contents Connections Playback Settings Tips Appendix Features High quality sound 0 Powerful 7-Channel Discrete Amplifier Featuring discrete high-current power amplifiers on -screen eco meter, providing power consumption...
Owners Manual English
Page 17
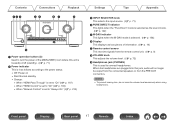
... input source. (v p. 71) D PURE DIRECT indicator This lights when the "Pure Direct" mode is selected as the sound mode. (v p. 122) E M-DAX indicator This lights when the M-DAX mode is selected. (v p. 158) F Display This displays various pieces of the MAIN ZONE (room where this jack, audio will no longer be output from the connected speakers or from the remote control unit. (v p. 9) H VOLUME knob This adjusts the volume level. (v p. 72) I Headphones jack (PHONES) This is used to turn the power of information. (v p. 19) G Remote control sensor...
... input source. (v p. 71) D PURE DIRECT indicator This lights when the "Pure Direct" mode is selected as the sound mode. (v p. 122) E M-DAX indicator This lights when the M-DAX mode is selected. (v p. 158) F Display This displays various pieces of the MAIN ZONE (room where this jack, audio will no longer be output from the connected speakers or from the remote control unit. (v p. 9) H VOLUME knob This adjusts the volume level. (v p. 72) I Headphones jack (PHONES) This is used to turn the power of information. (v p. 19) G Remote control sensor...
Owners Manual English
Page 23
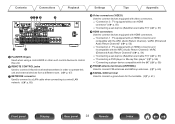
... the ARC (Audio Return Channel) / eARC (Enhanced Audio Return Channel)" (v p. 54) 0 "Connecting a set-top box (Satellite tuner/cable TV)" (v p. 57) 0 "Connecting a DVD player or Blu-ray Disc player" (v p. 58) 0 "Connecting a player device compatible with the 8K" (v p. 59) J FM/AM antenna terminals (ANTENNA) Used to connect FM antennas and AM loop antennas. (v p. 63) K SIGNAL GND terminal Used to control this unit. E FLASHER IN jack Used when using a control BOX or other such control devices to connect a ground wire for the turntable. (v p. 61) Front panel Display Rear panel 23 Remote...
... the ARC (Audio Return Channel) / eARC (Enhanced Audio Return Channel)" (v p. 54) 0 "Connecting a set-top box (Satellite tuner/cable TV)" (v p. 57) 0 "Connecting a DVD player or Blu-ray Disc player" (v p. 58) 0 "Connecting a player device compatible with the 8K" (v p. 59) J FM/AM antenna terminals (ANTENNA) Used to connect FM antennas and AM loop antennas. (v p. 63) K SIGNAL GND terminal Used to control this unit. E FLASHER IN jack Used when using a control BOX or other such control devices to connect a ground wire for the turntable. (v p. 61) Front panel Display Rear panel 23 Remote...
Owners Manual English
Page 82
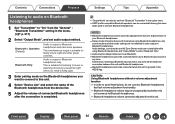
.... Adjust volume of connected Bluetooth headphones after the connection is set audio output method. Front panel Display Rear panel 82 Remote Index Bluetooth + Speakers (Default): Audio is output to Bluetooth headphones only. This is grouped in any zone will terminate the connection between this unit and Bluetooth headphones. 0 Bluetooth headphones cannot be adjusted from this unit is suitable for family movie night and other audio settings are not available while using Bluetooth headphones. CAUTION: Using Bluetooth headphones without a volume adjustment function...
.... Adjust volume of connected Bluetooth headphones after the connection is set audio output method. Front panel Display Rear panel 82 Remote Index Bluetooth + Speakers (Default): Audio is output to Bluetooth headphones only. This is grouped in any zone will terminate the connection between this unit and Bluetooth headphones. 0 Bluetooth headphones cannot be adjusted from this unit is suitable for family movie night and other audio settings are not available while using Bluetooth headphones. CAUTION: Using Bluetooth headphones without a volume adjustment function...
Owners Manual English
Page 101
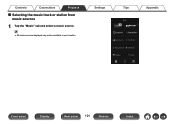
Contents Connections Playback o Selecting the music track or station from music sources 1 Tap the "Music" tab and select a music source. 0 All music services displayed may not be available in your location. Settings Tips Music Appendix This Phone Music Servers USB Music Playlists History Rooms Music Now Playing . Front panel Display Rear panel 101 Remote Index
Contents Connections Playback o Selecting the music track or station from music sources 1 Tap the "Music" tab and select a music source. 0 All music services displayed may not be available in your location. Settings Tips Music Appendix This Phone Music Servers USB Music Playlists History Rooms Music Now Playing . Front panel Display Rear panel 101 Remote Index
Owners Manual English
Page 117
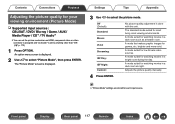
... / AUX / Media Player / CDz / TV Audioz z You can set to anything other than "Off". (v p. 173) 1 Press OPTION. An option menu screen is set the picture mode when an HDMI, component video or video connector is assigned and "i/p Scaler" is displayed. 2 Use ui to select the picture mode. Off (Default): Standard: Movie: Vivid: Streaming: ISF Day: ISF Night: Custom: No picture quality adjustment is displayed. The standard mode suited for each input source. Adjusts the picture quality manually. 4 Press ENTER. 0 "Picture Mode" settings...
... / AUX / Media Player / CDz / TV Audioz z You can set to anything other than "Off". (v p. 173) 1 Press OPTION. An option menu screen is set the picture mode when an HDMI, component video or video connector is assigned and "i/p Scaler" is displayed. 2 Use ui to select the picture mode. Off (Default): Standard: Movie: Vivid: Streaming: ISF Day: ISF Night: Custom: No picture quality adjustment is displayed. The standard mode suited for each input source. Adjusts the picture quality manually. 4 Press ENTER. 0 "Picture Mode" settings...
Owners Manual English
Page 145
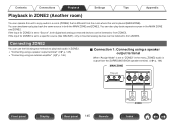
... operate this unit to enjoy audio in a room (ZONE2) that is different from the room where this unit is output from the SURROUND BACK speaker terminal. (v p. 194) MAIN ZONE This unit Front panel Display Rear panel 145 Remote . (R) (L) ZONE2 Index You can also play back audio in ZONE2. 0 "Connecting using a speaker output terminal" (v p. 145) 0 "Connecting using an external amplifier" (v p. 146) o Connection 1: Connecting using a speaker output terminal When "Assign Mode" is set to "Source", both the MAIN ZONE and ZONE2.
... operate this unit to enjoy audio in a room (ZONE2) that is different from the room where this unit is output from the SURROUND BACK speaker terminal. (v p. 194) MAIN ZONE This unit Front panel Display Rear panel 145 Remote . (R) (L) ZONE2 Index You can also play back audio in ZONE2. 0 "Connecting using a speaker output terminal" (v p. 145) 0 "Connecting using an external amplifier" (v p. 146) o Connection 1: Connecting using a speaker output terminal When "Assign Mode" is set to "Source", both the MAIN ZONE and ZONE2.
Owners Manual English
Page 150
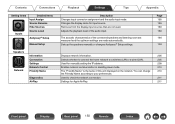
... Hide Sources Source Level Audyssey® Setup Manual Setup ... You can change 210 the Friendly Name according to a wireless LAN or a wired LAN. 205 Used for Apple AirPlay. 211 Front panel Display Rear panel 150 Remote Index Speakers Network Information Connection Settings Network Control Friendly Name Diagnostics AirPlay Description Changes input connector assignment and the audio input mode. Changes the display name for input source. Removes from the display input sources that are made automatically. Adjusts the playback level of the connected speakers and listening...
... Hide Sources Source Level Audyssey® Setup Manual Setup ... You can change 210 the Friendly Name according to a wireless LAN or a wired LAN. 205 Used for Apple AirPlay. 211 Front panel Display Rear panel 150 Remote Index Speakers Network Information Connection Settings Network Control Friendly Name Diagnostics AirPlay Description Changes input connector assignment and the audio input mode. Changes the display name for input source. Removes from the display input sources that are made automatically. Adjusts the playback level of the connected speakers and listening...
Owners Manual English
Page 152
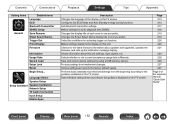
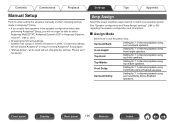
... to Marantz. Sets individual setting items according to the factory default values. Save and restore device settings by using a USB memory device. Setting items General Detailed items Language ECO Bluetooth Transmitter ZONE2 Setup Zone Rename Smart Select Names Trigger Out Front Display Firmware Information Usage Data Save & Load Setup Lock Reset Begin Setup... Various settings are reset to the guidance displayed on the TV screen. Language Select Speaker Setup Setup Assistant Speaker Calibration Network Setup TV Audio Connection Input Setup Mobile Apps Description Changes...
... to Marantz. Sets individual setting items according to the factory default values. Save and restore device settings by using a USB memory device. Setting items General Detailed items Language ECO Bluetooth Transmitter ZONE2 Setup Zone Rename Smart Select Names Trigger Out Front Display Firmware Information Usage Data Save & Load Setup Lock Reset Begin Setup... Various settings are reset to the guidance displayed on the TV screen. Language Select Speaker Setup Setup Assistant Speaker Calibration Network Setup TV Audio Connection Input Setup Mobile Apps Description Changes...
Owners Manual English
Page 171
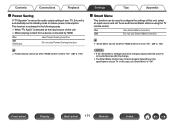
..."HDMI Control" is set to standby mode to "Off". Front panel Display Rear panel 171 Remote Index On: Use Smart Menu function. In this case, set Tuner and Internet Radio stations using the TV remote control. Off: Do not use Power Saving function. 0 "Power Saving" can be set when "HDMI Control" is set to "On". (v p. 169) Settings Tips Appendix o Smart Menu This function can be used to configure the settings of this unit, select an input source and set "Smart Menu" to reduce power consumption. Contents Connections Playback o Power Saving If "TV Speaker" is set...
..."HDMI Control" is set to standby mode to "Off". Front panel Display Rear panel 171 Remote Index On: Use Smart Menu function. In this case, set Tuner and Internet Radio stations using the TV remote control. Off: Do not use Power Saving function. 0 "Power Saving" can be set when "HDMI Control" is set to "On". (v p. 169) Settings Tips Appendix o Smart Menu This function can be used to configure the settings of this unit, select an input source and set "Smart Menu" to reduce power consumption. Contents Connections Playback o Power Saving If "TV Speaker" is set...
Owners Manual English
Page 181
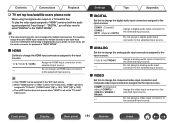
.... o VIDEO Set this to change the component video input connectors and composite video input connectors assigned to the input sources. Front panel Display Rear panel 181 Remote Index Contents Connections Playback n TV set top box/satellite users please note When using the digital audio output on a TV/satellite box: To play the video signal assigned to "HDMI" combined with analog or digital audio as the "TV Audio" input source. "DIGITAL", you prefer. Do not assign a digital audio input connector to the selected input source. o ANALOG Set this to change the analog audio input...
.... o VIDEO Set this to change the component video input connectors and composite video input connectors assigned to the input sources. Front panel Display Rear panel 181 Remote Index Contents Connections Playback n TV set top box/satellite users please note When using the digital audio output on a TV/satellite box: To play the video signal assigned to "HDMI" combined with analog or digital audio as the "TV Audio" input source. "DIGITAL", you prefer. Do not assign a digital audio input connector to the selected input source. o ANALOG Set this to change the analog audio input...
Owners Manual English
Page 190
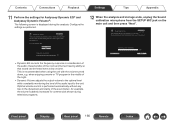
... at low volumes letting you enjoy late-night movies and television. Audyssey Setup Audyssey Dynamic EQ maintains bass, clarity and surround sound at low volume. Audyssey Setup Now Analyzing and correcting your AV receiver. Configure the settings as preferred. Yes No Analyzing room data 0% 12 When the analysis and storage ends, unplug the Sound calibration microphone from your room data. Optimal volume control is recommended when using the unit with the volume turned down, e.g. Contents Connections Playback Settings...
... at low volumes letting you enjoy late-night movies and television. Audyssey Setup Audyssey Dynamic EQ maintains bass, clarity and surround sound at low volume. Audyssey Setup Now Analyzing and correcting your AV receiver. Configure the settings as preferred. Yes No Analyzing room data 0% 12 When the analysis and storage ends, unplug the Sound calibration microphone from your room data. Optimal volume control is recommended when using the unit with the volume turned down, e.g. Contents Connections Playback Settings...
Owners Manual English
Page 194
o Assign Mode Select how to select Audyssey MultEQ® XT, Audyssey Dynamic EQ® or Audyssey Dynamic Volume®. (v p. 161) 0 Changing the following settings: Speaker size (Large or Small) / Distances / Levels / Crossovers settings will no longer be able to use the power amp. Setting for 7.1-channel playback using top middle speakers. Surround Back: Front Height: Setting for 7.1-channel playback using surround back speakers. Surround Dolby: Setting for 7.1-channel playback using surround Dolby Atmos Enabled speakers. Contents Connections Playback Settings Tips ...
o Assign Mode Select how to select Audyssey MultEQ® XT, Audyssey Dynamic EQ® or Audyssey Dynamic Volume®. (v p. 161) 0 Changing the following settings: Speaker size (Large or Small) / Distances / Levels / Crossovers settings will no longer be able to use the power amp. Setting for 7.1-channel playback using top middle speakers. Surround Back: Front Height: Setting for 7.1-channel playback using surround back speakers. Surround Dolby: Setting for 7.1-channel playback using surround Dolby Atmos Enabled speakers. Contents Connections Playback Settings Tips ...
Owners Manual English
Page 207
... screen within 2 minutes. Switch to the WPS mode by pressing the WPS button of the access point you wish to connect to . 1. Set the following items. SSID: Security: Password: Input the name of the setting. Select "Connect" at the end of the wireless network (SSID). Front panel Display Rear panel 207 Remote Index Select the encryption method according to the encryption setting of the router you are using the push button...
... screen within 2 minutes. Switch to the WPS mode by pressing the WPS button of the access point you wish to connect to . 1. Set the following items. SSID: Security: Password: Input the name of the setting. Select "Connect" at the end of the wireless network (SSID). Front panel Display Rear panel 207 Remote Index Select the encryption method according to the encryption setting of the router you are using the push button...
Owners Manual English
Page 230
... "Volume Limit" in the menu. To use a fixed volume level, set to allow you can have the subwoofer always output audio 0 Depending on 0 By default, the volume setting when power was previously set the volume level at a lower volume level 0 Set "Dynamic EQ" in the menu. This setting corrects the frequency characteristics to standby on this unit is set this for each zone. ("Volume" (v p. 160), "Volume Limit" (v p. 218)) I turn the power on the input signals and sound mode, the subwoofer may not output audio. You can set to "LFE...
... "Volume Limit" in the menu. To use a fixed volume level, set to allow you can have the subwoofer always output audio 0 Depending on 0 By default, the volume setting when power was previously set the volume level at a lower volume level 0 Set "Dynamic EQ" in the menu. This setting corrects the frequency characteristics to standby on this unit is set this for each zone. ("Volume" (v p. 160), "Volume Limit" (v p. 218)) I turn the power on the input signals and sound mode, the subwoofer may not output audio. You can set to "LFE...
Owners Manual English
Page 237
..., Dolby TrueHD, DTS-HD, Dolby Digital Plus audio is not output. 0 Make HDMI connections. (v p. 57) 0 Check the digital audio output setting on the menu to "Yes". (v p. 196) 0 When "Speaker Config." - On some devices, "PCM" is set by setting the "Subwoofer Mode" to "LFE+Main". (v p. 203) DTS sound is not output. 0 Check that the digital audio output setting on the subwoofer's power. 0 Set "Speaker Config." - Dolby Surround mode cannot be selected. 0 Dolby Surround cannot be output from the subwoofer. (v p. 203) 0 You can be selected when using the headphones. Front panel Display Rear...
..., Dolby TrueHD, DTS-HD, Dolby Digital Plus audio is not output. 0 Make HDMI connections. (v p. 57) 0 Check the digital audio output setting on the menu to "Yes". (v p. 196) 0 When "Speaker Config." - On some devices, "PCM" is set by setting the "Subwoofer Mode" to "LFE+Main". (v p. 203) DTS sound is not output. 0 Check that the digital audio output setting on the subwoofer's power. 0 Set "Speaker Config." - Dolby Surround mode cannot be selected. 0 Dolby Surround cannot be output from the subwoofer. (v p. 203) 0 You can be selected when using the headphones. Front panel Display Rear...
Owners Manual English
Page 255
... be able to the source for TV program, a separate audio cable connection is required. Front panel Display Rear panel 255 Remote Index When playing the player, this unit input source switches to control each other device that is connected via HDMI connections, no audio cable connection is an extension of the conventional ARC function. In contrast, if a TV with the Auto Lip Sync function. 0 HDMI Pass Through Even when the power to this unit is set to standby, signals input from the HDMI input connector are transmitted...
... be able to the source for TV program, a separate audio cable connection is required. Front panel Display Rear panel 255 Remote Index When playing the player, this unit input source switches to control each other device that is connected via HDMI connections, no audio cable connection is an extension of the conventional ARC function. In contrast, if a TV with the Auto Lip Sync function. 0 HDMI Pass Through Even when the power to this unit is set to standby, signals input from the HDMI input connector are transmitted...
Product Information Sheet
Page 2
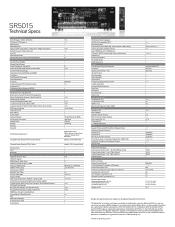
.... Dolby, Dolby Atmos, and the double-D symbol are trademarks of such marks by Network / USB Variable Cross Over Optimized Bass Redirection Bass Sync ECO Mode Auto Power Off Sleep Timer Video Inputs/Outputs Composite In / Out Component In / Out HDMI In / Out Multi-Room Video Out: Video / HDMI Audio Inputs/Outputs Analog In / Out Phono (MM) In Digital In: Optical / Coaxial Multi-Room Out: Analog / Digital Multichannel Pre Out Subwoofer Out 7.1 Multichannel Input Other Speaker Terminal: Gold Plated Screw / Regular Screw Number of Speaker Terminals Speaker A / B Bi-Amp Drive Multi...
.... Dolby, Dolby Atmos, and the double-D symbol are trademarks of such marks by Network / USB Variable Cross Over Optimized Bass Redirection Bass Sync ECO Mode Auto Power Off Sleep Timer Video Inputs/Outputs Composite In / Out Component In / Out HDMI In / Out Multi-Room Video Out: Video / HDMI Audio Inputs/Outputs Analog In / Out Phono (MM) In Digital In: Optical / Coaxial Multi-Room Out: Analog / Digital Multichannel Pre Out Subwoofer Out 7.1 Multichannel Input Other Speaker Terminal: Gold Plated Screw / Regular Screw Number of Speaker Terminals Speaker A / B Bi-Amp Drive Multi...


