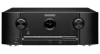
SR5007 Spec Sheet
Page 1
...IP/232C) n Assignable DC trigger (+12V, 150mA x 1) n Less depth for iPod, iPhone and USB drives n 6 (front:1) /1 HDMI In/Out -CEC (Control) -ARC (Audio Return Channel) -Standby source setting via RX101 make the SR5007 a powerful and versatile solution for Zone2 n 2/1 Component In/Out n 3 (front:1) /1 Composite In/Out n 2/2 Optical/Coaxial Digital In n Headphone output n FM Tuner n 56 Tuner Presets n 5 Audio inputs (incl. Two audio zones and additional support for Bluetooth devices via HDMI control -Auto Lip Sync. -Deep Color, "x.v.Color" -Pass through in standby mode n Audyssey MultEQ XT...
...IP/232C) n Assignable DC trigger (+12V, 150mA x 1) n Less depth for iPod, iPhone and USB drives n 6 (front:1) /1 HDMI In/Out -CEC (Control) -ARC (Audio Return Channel) -Standby source setting via RX101 make the SR5007 a powerful and versatile solution for Zone2 n 2/1 Component In/Out n 3 (front:1) /1 Composite In/Out n 2/2 Optical/Coaxial Digital In n Headphone output n FM Tuner n 56 Tuner Presets n 5 Audio inputs (incl. Two audio zones and additional support for Bluetooth devices via HDMI control -Auto Lip Sync. -Deep Color, "x.v.Color" -Pass through in standby mode n Audyssey MultEQ XT...

SR5007 Spec Sheet
Page 2
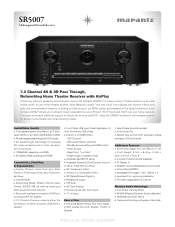
...-A weighted, DIRECT mode) STEREO 67 dB (IHF-A weighted, DIRECT mode) Total harmonic Distortion (at 1 kHz): MONO 0.7 % STEREO 1.0 % Technology General Power supply: AC 120 V, 60 Hz Power consumption: 650 W 0.2 W (Standby mode) 0.5 W (CEC standby mode) 2.7 W (network standby mode) Dimensions (W x H x D): 17 21/64" x 6 11/32" x 13 13/64" 440 x 161 x 335.2 mm Weight: 22 lbs 4 oz, 10.1 kg Front Panel USB Input Front Panel HDMI Input Stream music from your iPad®, iPhone® or iPod Touch...
...-A weighted, DIRECT mode) STEREO 67 dB (IHF-A weighted, DIRECT mode) Total harmonic Distortion (at 1 kHz): MONO 0.7 % STEREO 1.0 % Technology General Power supply: AC 120 V, 60 Hz Power consumption: 650 W 0.2 W (Standby mode) 0.5 W (CEC standby mode) 2.7 W (network standby mode) Dimensions (W x H x D): 17 21/64" x 6 11/32" x 13 13/64" 440 x 161 x 335.2 mm Weight: 22 lbs 4 oz, 10.1 kg Front Panel USB Input Front Panel HDMI Input Stream music from your iPad®, iPhone® or iPod Touch...

Getting Started Guide
Page 2
For frequency asked questions please visit http://marantz.custhelp.com/app/answers/list For US and Canada only 1 This guide provides step-by-step instructions for choosing a marantz receiver. If you have setup problems: If you for setting up your area. ENGLISH DEUTSCH Welcome FRANÇAIS ITALIANO ESPAÑOL NEDERLANDS SVENSKA Thank you need additional help in solving problems, contact marantz customer service in the box. 1-855-ONE-MARANTZ 1-855-663-6272 Call for Assistance: 9:00AM to 8:00PM M-F E.S.T. See the address sheet included in your receiver.
For frequency asked questions please visit http://marantz.custhelp.com/app/answers/list For US and Canada only 1 This guide provides step-by-step instructions for choosing a marantz receiver. If you have setup problems: If you for setting up your area. ENGLISH DEUTSCH Welcome FRANÇAIS ITALIANO ESPAÑOL NEDERLANDS SVENSKA Thank you need additional help in solving problems, contact marantz customer service in the box. 1-855-ONE-MARANTZ 1-855-663-6272 Call for Assistance: 9:00AM to 8:00PM M-F E.S.T. See the address sheet included in your receiver.

Getting Started Guide
Page 3
SVENSKA Before You Begin NEDERLANDS ESPAÑOL ITALIANO FRANÇAIS DEUTSCH ENGLISH What's In the Box Required for setup Setup microphone Remote control unit R03/AAA batteries TV HDMI cable Receiver Power cord Speaker systems Note that the illustrations in this manual is for explanation purposes and may differ from the actual unit. Safety Instructions Getting Started Owner's Manual 2
SVENSKA Before You Begin NEDERLANDS ESPAÑOL ITALIANO FRANÇAIS DEUTSCH ENGLISH What's In the Box Required for setup Setup microphone Remote control unit R03/AAA batteries TV HDMI cable Receiver Power cord Speaker systems Note that the illustrations in this manual is for explanation purposes and may differ from the actual unit. Safety Instructions Getting Started Owner's Manual 2

Getting Started Guide
Page 4
NEDERLANDS SVENSKA 1 Installing batteries in the remote control unit 1 Install batteries in the remote control unit 2 Connect the receiver to the setup process. ENGLISH DEUTSCH FRANÇAIS Setup Steps ITALIANO ESPAÑOL There are three steps to your TV 3 Follow the On-Screen Setup Assistant R03/AAA batteries 3
NEDERLANDS SVENSKA 1 Installing batteries in the remote control unit 1 Install batteries in the remote control unit 2 Connect the receiver to the setup process. ENGLISH DEUTSCH FRANÇAIS Setup Steps ITALIANO ESPAÑOL There are three steps to your TV 3 Follow the On-Screen Setup Assistant R03/AAA batteries 3

Getting Started Guide
Page 5
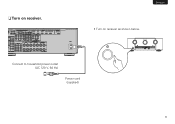
nnConnect the receiver to your TV nnPlace the receiver near your TV with an HDMI cable. HDMI IN (ARC) TV HDMI cable HDMI OUT MONITOR (ARC) Receiver Receiver (Rear panel) 4 SVENSKA NEDERLANDS ESPAÑOL ITALIANO FRANÇAIS DEUTSCH ENGLISH 2 Connecting the receiver to your TV.
nnConnect the receiver to your TV nnPlace the receiver near your TV with an HDMI cable. HDMI IN (ARC) TV HDMI cable HDMI OUT MONITOR (ARC) Receiver Receiver (Rear panel) 4 SVENSKA NEDERLANDS ESPAÑOL ITALIANO FRANÇAIS DEUTSCH ENGLISH 2 Connecting the receiver to your TV.

Getting Started Guide
Page 6
HDMI TV remote control unit 5 INPUT TV remote control unit nnSelect the appropriate HDMI input on the TV. ENGLISH DEUTSCH FRANÇAIS ITALIANO ESPAÑOL NEDERLANDS SVENSKA nnTurn on your TV.
HDMI TV remote control unit 5 INPUT TV remote control unit nnSelect the appropriate HDMI input on the TV. ENGLISH DEUTSCH FRANÇAIS ITALIANO ESPAÑOL NEDERLANDS SVENSKA nnTurn on your TV.
Getting Started Guide
Page 7
SVENSKA NEDERLANDS ESPAÑOL ITALIANO FRANÇAIS DEUTSCH ENGLISH • Turn on receiver. Connect to household power outlet (AC 120 V, 60 Hz) Power cord (supplied) 6 nnTurn on receiver as shown below.
SVENSKA NEDERLANDS ESPAÑOL ITALIANO FRANÇAIS DEUTSCH ENGLISH • Turn on receiver. Connect to household power outlet (AC 120 V, 60 Hz) Power cord (supplied) 6 nnTurn on receiver as shown below.
Getting Started Guide
Page 8
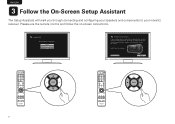
... through connecting and configuring your speakers and components to your AV receiver. Language Select Please select a language... Cancel Next 7 ENGLISH DEUTSCH FRANÇAIS ITALIANO ESPAÑOL NEDERLANDS SVENSKA 3 Follow the On-Screen Setup Assistant The Setup Assistant will walk you through connecting your speakers and components to your marantz receiver. Select "Next" to providing the best possible sound and video experience. Please use the remote control and follow the on-screen instructions...
... through connecting and configuring your speakers and components to your AV receiver. Language Select Please select a language... Cancel Next 7 ENGLISH DEUTSCH FRANÇAIS ITALIANO ESPAÑOL NEDERLANDS SVENSKA 3 Follow the On-Screen Setup Assistant The Setup Assistant will walk you through connecting your speakers and components to your marantz receiver. Select "Next" to providing the best possible sound and video experience. Please use the remote control and follow the on-screen instructions...

Getting Started Guide
Page 9
ENGLISH 1 Insert the disc into your PC. 2 Follow the screen or double click on the PDF file. Please reference this manual for the AV receiver. Product Name: AV Surround Receiver Model Number: SR5007 8 SVENSKA Owner's Manual NEDERLANDS ESPAÑOL ITALIANO FRANÇAIS DEUTSCH The included CD-ROM contains an Adobe PDF version of the full owner's manual for more details about the setup and operation of the receiver and it's features.
ENGLISH 1 Insert the disc into your PC. 2 Follow the screen or double click on the PDF file. Please reference this manual for the AV receiver. Product Name: AV Surround Receiver Model Number: SR5007 8 SVENSKA Owner's Manual NEDERLANDS ESPAÑOL ITALIANO FRANÇAIS DEUTSCH The included CD-ROM contains an Adobe PDF version of the full owner's manual for more details about the setup and operation of the receiver and it's features.


