Owner s Manual In English
Page 5
...Inputs Input Assign Source Rename Hide Sources Source Level Input Select Speakers Audyssey® Setup Procedure for speaker settings (Audyssey® Setup) Error messages Retrieving Audyssey® Setup settings 155 Manual Setup 155 Amp Assign 157 Speaker Config. 162 Distances 165 Levels 166 Crossovers 167 ...Bass 168 Front Speaker 168 Network 170 Information 171 Connection 171 Wi-Fi Setup 171 Settings 172 Network Control 172 Friendly Name 174 Diagnostics 180 181 Tips Appendix 182 182 183 188 189 190 191...
...Inputs Input Assign Source Rename Hide Sources Source Level Input Select Speakers Audyssey® Setup Procedure for speaker settings (Audyssey® Setup) Error messages Retrieving Audyssey® Setup settings 155 Manual Setup 155 Amp Assign 157 Speaker Config. 162 Distances 165 Levels 166 Crossovers 167 ...Bass 168 Front Speaker 168 Network 170 Information 171 Connection 171 Wi-Fi Setup 171 Settings 172 Network Control 172 Friendly Name 174 Diagnostics 180 181 Tips Appendix 182 182 183 188 189 190 191...
Owner s Manual In English
Page 6
... Tips Appendix HEOS Account You have not signed in You have already signed in General Language ECO ZONE2 Setup Zone Rename Smart Select Names Trigger Out Front Display Firmware Information Usage Data Save & Load Setup Lock Limiting the operating zone with the remote control 200 Tips 200 200 Tips 215 201 Troubleshooting...
... Tips Appendix HEOS Account You have not signed in You have already signed in General Language ECO ZONE2 Setup Zone Rename Smart Select Names Trigger Out Front Display Firmware Information Usage Data Save & Load Setup Lock Limiting the operating zone with the remote control 200 Tips 200 200 Tips 215 201 Troubleshooting...
Owner s Manual In English
Page 13
... function that allows you to be enjoyed in use. "Marantz 2016 AVR Remote" App also gives you full control of the unit with the "Marantz 2016 AVR Remote" Appz for your phones or tablets. z Download the appropriate "Marantz 2016 AVR Remote" App for performing basic operations of the...as access to the receiver's status display, option menus, Marantz Blu-ray Disc player control, and online owner's manual for detailed adjustments from your iOS or Android devices. The new app gives you quick access to its setup menu for your convenience. Front panel Display Rear panel 13...
... function that allows you to be enjoyed in use. "Marantz 2016 AVR Remote" App also gives you full control of the unit with the "Marantz 2016 AVR Remote" Appz for your phones or tablets. z Download the appropriate "Marantz 2016 AVR Remote" App for performing basic operations of the...as access to the receiver's status display, option menus, Marantz Blu-ray Disc player control, and online owner's manual for detailed adjustments from your iOS or Android devices. The new app gives you quick access to its setup menu for your convenience. Front panel Display Rear panel 13...
Owner s Manual In English
Page 14
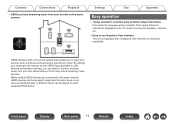
... iOS, Android and Amazon devices), you to enjoy your favorite music anywhere and everywhere around your favorite online music sources Settings Tips Appendix Easy operation 0 "Setup Assistant" provides easy-to-follow the instructions displayed on each separate HEOS device. HEOS wireless multi-room sound system that enables you can explore, browse...
... iOS, Android and Amazon devices), you to enjoy your favorite music anywhere and everywhere around your favorite online music sources Settings Tips Appendix Easy operation 0 "Setup Assistant" provides easy-to-follow the instructions displayed on each separate HEOS device. HEOS wireless multi-room sound system that enables you can explore, browse...
Owner s Manual In English
Page 17
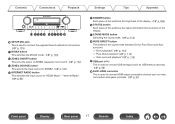
... used to connect USB storages (such as USB memory devices). (v p. 58) T AUX1-HDMI connector This is used to "HEOS Music" - Q0 Q1Q2Q3Q4 Q5QQ6 7Q8Q9 W0 J SETUP MIC jack This is used to connect the supplied Sound calibration microphone. (v p. 175) K M-DAX button This switches the M-DAX mode. (v p. 148) L ZONE2 ON/OFF button...
... used to connect USB storages (such as USB memory devices). (v p. 58) T AUX1-HDMI connector This is used to "HEOS Music" - Q0 Q1Q2Q3Q4 Q5QQ6 7Q8Q9 W0 J SETUP MIC jack This is used to connect the supplied Sound calibration microphone. (v p. 175) K M-DAX button This switches the M-DAX mode. (v p. 148) L ZONE2 ON/OFF button...

Owner s Manual In English
Page 26
Q ENTER button This determines the selection. R SETUP button This displays the menu on the TV screen. Contents Connections Playback Q3 Q4 Q5 Q6 Q7 Q8 Settings Tips Appendix M POWER button (X) This turns ...
Q ENTER button This determines the selection. R SETUP button This displays the menu on the TV screen. Contents Connections Playback Q3 Q4 Q5 Q6 Q7 Q8 Settings Tips Appendix M POWER button (X) This turns ...

Owner s Manual In English
Page 27
......... Settings Tips Appendix o Cables used for making connections. (During "Setup Assistant" operation, the input/output connectors do not conduct current.) 0 Do not bundle power cords together with connection cables. ...digital cable Optical cable Audio cable LAN cable L L R R Front panel Display Rear panel 27 Remote Index However, when the "Setup Assistant" is running, follow the instructions in the "Setup Assistant" (page 8 in noise. Contents Connections o Contents Speaker installation Connecting speakers Connecting a TV Connecting a playback device Connecting a USB...
......... Settings Tips Appendix o Cables used for making connections. (During "Setup Assistant" operation, the input/output connectors do not conduct current.) 0 Do not bundle power cords together with connection cables. ...digital cable Optical cable Audio cable LAN cable L L R R Front panel Display Rear panel 27 Remote Index However, when the "Setup Assistant" is running, follow the instructions in the "Setup Assistant" (page 8 in noise. Contents Connections o Contents Speaker installation Connecting speakers Connecting a TV Connecting a playback device Connecting a USB...

Owner s Manual In English
Page 35
... touch the speaker terminals while the power cord is running , follow the instructions in the "Setup Assistant" screen for making connections. (Power is not supplied to the speaker terminals while the "Setup Assistant" is connected. When the "Setup Assistant" (page 8 in the separate "Quick Start Guide") is running .) 0 Use speakers with an impedance...
... touch the speaker terminals while the power cord is running , follow the instructions in the "Setup Assistant" screen for making connections. (Power is not supplied to the speaker terminals while the "Setup Assistant" is connected. When the "Setup Assistant" (page 8 in the separate "Quick Start Guide") is running .) 0 Use speakers with an impedance...

Owner s Manual In English
Page 62
See "Wi-Fi Setup" on how to connect to a wireless LAN router. (v p. 194) Internet Modem To WAN side Router with PPPoE. If a flat-type cable or unshielded-type cable ...
See "Wi-Fi Setup" on how to connect to a wireless LAN router. (v p. 194) Internet Modem To WAN side Router with PPPoE. If a flat-type cable or unshielded-type cable ...

Owner s Manual In English
Page 126
In this case, set "Smart Menu" to this unit. NOTE 0 If the "HDMI Control" or "Smart Menu" settings have been changed, always reset the power to connected devices after the change. 0 The Smart Menu function may not work properly depending on the specifications of this unit. Contents Connections Playback o Setup Menu Displays a setup menu for configuring the settings of your TV. o Smart Select Calls up the SMART SELECT items registered to "Off". (v p. 161) Settings Tips Appendix Front panel Display Rear panel 126 Remote Index
In this case, set "Smart Menu" to this unit. NOTE 0 If the "HDMI Control" or "Smart Menu" settings have been changed, always reset the power to connected devices after the change. 0 The Smart Menu function may not work properly depending on the specifications of this unit. Contents Connections Playback o Setup Menu Displays a setup menu for configuring the settings of your TV. o Smart Select Calls up the SMART SELECT items registered to "Off". (v p. 161) Settings Tips Appendix Front panel Display Rear panel 126 Remote Index

Owner s Manual In English
Page 139
... customize this unit by default. Audio M-DAX Expands the low and high frequency components of each speaker. 153 Picture Adjust Adjusts picture quality. 155 HDMI Setup Makes settings for HDMI Audio Out, HDMI Pass Through and HDMI Control settings. 157 Output Settings Makes settings for video output. 162 .
... customize this unit by default. Audio M-DAX Expands the low and high frequency components of each speaker. 153 Picture Adjust Adjusts picture quality. 155 HDMI Setup Makes settings for HDMI Audio Out, HDMI Pass Through and HDMI Control settings. 157 Output Settings Makes settings for video output. 162 .

Owner s Manual In English
Page 140
.... Setting items Inputs Detailed items Input Assign Source Rename Hide Sources Source Level Input Select Audyssey® Setup . Removes from the display input sources that are made automatically. Network Manual Setup Information Connection Settings Network Control Friendly Name Diagnostics Description Changes input connector assignment. The acoustic characteristics of the connected speakers and...
.... Setting items Inputs Detailed items Input Assign Source Rename Hide Sources Source Level Input Select Audyssey® Setup . Removes from the display input sources that are made automatically. Network Manual Setup Information Connection Settings Network Control Friendly Name Diagnostics Description Changes input connector assignment. The acoustic characteristics of the connected speakers and...

Owner s Manual In English
Page 142
... display on the TV screen. Checks for the latest firmware information about this unit. Speaker Setup Setup Assistant Speaker Calibration Network Setup TV Audio Connection Input Setup Mobile Apps Description Changes the language of the separate manual "Quick Start Guide" Front panel ...Data Save & Load Setup Lock Begin Setup... Shows information about updates and upgrades, updates the firmware, and sets up the notification message display. Select the conditions for audio playback with ZONE2. Protects settings from the beginning according to Marantz. Changes the display ...
... display on the TV screen. Checks for the latest firmware information about this unit. Speaker Setup Setup Assistant Speaker Calibration Network Setup TV Audio Connection Input Setup Mobile Apps Description Changes the language of the separate manual "Quick Start Guide" Front panel ...Data Save & Load Setup Lock Begin Setup... Shows information about updates and upgrades, updates the firmware, and sets up the notification message display. Select the conditions for audio playback with ZONE2. Protects settings from the beginning according to Marantz. Changes the display ...

Owner s Manual In English
Page 143
... Appendix Menu operations 1 Press MAIN on the remote control unit to set the operating zone to the previous item, press BACK. 0 Exiting the menu, press SETUP while the menu is displayed on the TV screen. 3 Use ui p to select the menu to be set or operated, then press ENTER. 4 Use o p to... to the MAIN ZONE. The menu display disappears. . Front panel Display Rear panel 143 Remote Index The menu is displayed. The MAIN button lights. 2 Press SETUP.
... Appendix Menu operations 1 Press MAIN on the remote control unit to set the operating zone to the previous item, press BACK. 0 Exiting the menu, press SETUP while the menu is displayed on the TV screen. 3 Use ui p to select the menu to be set or operated, then press ENTER. 4 Use o p to... to the MAIN ZONE. The menu display disappears. . Front panel Display Rear panel 143 Remote Index The menu is displayed. The MAIN button lights. 2 Press SETUP.

Owner s Manual In English
Page 151
..., which is optimized for movies. These can be configured. Selection is closer to "Off". Selects the reference setting, but bypasses MultEQ® on "Audyssey® Setup" measurement results. Selects the calibrated setting which is optimized for small rooms where your listening position is done from three types of the listening area... headphones, "MultEQ®" is in the "Direct" or "Pure Direct" mode, "MultEQ®", "Dynamic EQ" and "Dynamic Volume" settings cannot be selected after Audyssey® Setup has been performed.
..., which is optimized for movies. These can be configured. Selection is closer to "Off". Selects the reference setting, but bypasses MultEQ® on "Audyssey® Setup" measurement results. Selects the calibrated setting which is optimized for small rooms where your listening position is done from three types of the listening area... headphones, "MultEQ®" is in the "Direct" or "Pure Direct" mode, "MultEQ®", "Dynamic EQ" and "Dynamic Volume" settings cannot be selected after Audyssey® Setup has been performed.

Owner s Manual In English
Page 153
... be set when the "MultEQ®" setting is "Off". (v p. 151) 0 This cannot be set when the sound mode is set to "Yes" in "Audyssey® Setup", the setting is automatically changed to "Medium". (v p. 172) Settings Tips Appendix Graphic EQ Uses the graphic equalizer to adjust the tone of large variations in...
... be set when the "MultEQ®" setting is "Off". (v p. 151) 0 This cannot be set when the sound mode is set to "Yes" in "Audyssey® Setup", the setting is automatically changed to "Medium". (v p. 172) Settings Tips Appendix Graphic EQ Uses the graphic equalizer to adjust the tone of large variations in...

Owner s Manual In English
Page 154
... level. -20.0 dB - +6.0 dB (Default: 0.0 dB) Settings Tips Appendix o Curve Copy Copy the Flat correction curve created in the Audyssey® Setup. 0 "Curve Copy" is displayed after Audyssey® Setup has been performed. 0 "Curve Copy" cannot be set when 63 Hz/125 Hz/250 Hz/500 Hz/1 kHz. Front panel Display Rear...
... level. -20.0 dB - +6.0 dB (Default: 0.0 dB) Settings Tips Appendix o Curve Copy Copy the Flat correction curve created in the Audyssey® Setup. 0 "Curve Copy" is displayed after Audyssey® Setup has been performed. 0 "Curve Copy" cannot be set when 63 Hz/125 Hz/250 Hz/500 Hz/1 kHz. Front panel Display Rear...

Owner s Manual In English
Page 157
... Pass Through Selects how this unit will transmit HDMI signals to the HDMI output in standby power mode. Contents Connections Playback Settings Tips Appendix HDMI Setup Make settings for an extended period, it consumes more standby power. ("HDMI Pass Through" (v p. 157), "HDMI Control" (v p. 159)) If you unplug the power cord from...
... Pass Through Selects how this unit will transmit HDMI signals to the HDMI output in standby power mode. Contents Connections Playback Settings Tips Appendix HDMI Setup Make settings for an extended period, it consumes more standby power. ("HDMI Pass Through" (v p. 157), "HDMI Control" (v p. 159)) If you unplug the power cord from...

Owner s Manual In English
Page 172
... speaker (L) FR Front speaker (R) C Center speaker SW Subwoofer SL Surround speaker (L) SR Surround speaker (R) 0 If you perform the Audyssey® Setup, the Audyssey MultEQ®, Audyssey Dynamic EQ® and Audyssey Dynamic Volume® functions are made automatically. To set up the speakers manually, use... 151) SL Listening position SR . Front panel Display Rear panel 172 Remote Index You do not have to perform Audyssey® Setup when you measure in six positions, as shown in the illustration. For best results, we recommend you have already performed "Speaker Calibration...
... speaker (L) FR Front speaker (R) C Center speaker SW Subwoofer SL Surround speaker (L) SR Surround speaker (R) 0 If you perform the Audyssey® Setup, the Audyssey MultEQ®, Audyssey Dynamic EQ® and Audyssey Dynamic Volume® functions are made automatically. To set up the speakers manually, use... 151) SL Listening position SR . Front panel Display Rear panel 172 Remote Index You do not have to perform Audyssey® Setup when you measure in six positions, as shown in the illustration. For best results, we recommend you have already performed "Speaker Calibration...

Owner s Manual In English
Page 173
... one would normally sit alone within the listening environment. Background noise can disrupt the room measurements. Before starting Audyssey® Setup, place the Sound calibration microphone in the path while the measurements are connected. Unplug the headphones before performing Audyssey®...; Setup. Cell phone signals could be performed when headphones are being made. Contents Connections Playback o About the main listening position The ...
... one would normally sit alone within the listening environment. Background noise can disrupt the room measurements. Before starting Audyssey® Setup, place the Sound calibration microphone in the path while the measurements are connected. Unplug the headphones before performing Audyssey®...; Setup. Cell phone signals could be performed when headphones are being made. Contents Connections Playback o About the main listening position The ...


