
Getting Started in English
Page 8
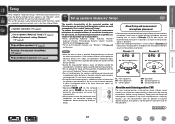
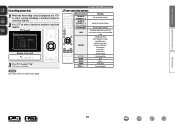
... instructions. English Français Español AV Receiver Setup Assistant Proper configuration is essential to continue... Select "Next" to providing the best possible sound and video experience. 3 Follow the On-Screen Setup Assistant The Setup Assistant will walk you through connecting your speakers and components to your...
... instructions. English Français Español AV Receiver Setup Assistant Proper configuration is essential to continue... Select "Next" to providing the best possible sound and video experience. 3 Follow the On-Screen Setup Assistant The Setup Assistant will walk you through connecting your speakers and components to your...
Owner's Manual in English
Page 4
... files stored on a PC and NAS 49 Using online services 53 Convenient functions 64 AirPlay function 70 Selecting a listening mode (Sound Mode 72 Selecting a listening mode 72 Advanced instructions 78 Installation/connection/setup of speakers (Advanced 79 Speaker installation 79 Speaker connection ...Playback in ZONE2 (Separate room 101 Audio output 101 Playback 101 Sleep timer function 102 How to keep it for purchasing this Marantz product. Contents Getting started Thank you for future reference. After reading this owner's manual carefully before using the product. To ...
... files stored on a PC and NAS 49 Using online services 53 Convenient functions 64 AirPlay function 70 Selecting a listening mode (Sound Mode 72 Selecting a listening mode 72 Advanced instructions 78 Installation/connection/setup of speakers (Advanced 79 Speaker installation 79 Speaker connection ...Playback in ZONE2 (Separate room 101 Audio output 101 Playback 101 Sleep timer function 102 How to keep it for purchasing this Marantz product. Contents Getting started Thank you for future reference. After reading this owner's manual carefully before using the product. To ...
Owner's Manual in English
Page 7
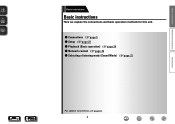
Basic instructions Advanced instructions Information Basic instructions Basic instructions Here we explain the connections and basic operation methods for this unit. F Connections vpage 5 F Setup vpage 22 F Playback (Basic operation) vpage 29 F Network content vpage 46 F Selecting a listening mode (Sound Mode) vpage 72 For speaker connections, see page 81. 4 DVD
Basic instructions Advanced instructions Information Basic instructions Basic instructions Here we explain the connections and basic operation methods for this unit. F Connections vpage 5 F Setup vpage 22 F Playback (Basic operation) vpage 29 F Network content vpage 46 F Selecting a listening mode (Sound Mode) vpage 72 For speaker connections, see page 81. 4 DVD

Owner's Manual in English
Page 12
... HDMI cable. Basic instructions Advanced instructions Connecting this unit to a TV via HDMI connections Cables used for video transmission via digital signals. NOTE • No sound is compatible. • When this unit and monitor are sent to the display or monitor.
... HDMI cable. Basic instructions Advanced instructions Connecting this unit to a TV via HDMI connections Cables used for video transmission via digital signals. NOTE • No sound is compatible. • When this unit and monitor are sent to the display or monitor.

Owner's Manual in English
Page 16
... connection. This connection method separates video signals into 3 signals for connections. The sections in the connection diagram are available for connecting to play back surround sound. If your TV is connected to this unit via other video output connectors, perform menu operations while seeing the display on this unit. • If...
... connection. This connection method separates video signals into 3 signals for connections. The sections in the connection diagram are available for connecting to play back surround sound. If your TV is connected to this unit via other video output connectors, perform menu operations while seeing the display on this unit. • If...

Owner's Manual in English
Page 17
... VIDEO IN (CBL/SAT) connector This makes an analog video connection. The sections in the connection diagram are available for connecting to play back surround sound. s AUDIO IN (CBL/SAT) connector This makes an analog audio connection. The smaller the number is, the higher playback quality is achieved. The numbers prefixed...
... VIDEO IN (CBL/SAT) connector This makes an analog video connection. The sections in the connection diagram are available for connecting to play back surround sound. s AUDIO IN (CBL/SAT) connector This makes an analog audio connection. The smaller the number is, the higher playback quality is achieved. The numbers prefixed...

Owner's Manual in English
Page 19
... iPod or Supported iPod models • iPod classic • iPod nano • iPod touch Marantz does not guarantee that all USB memory devices will not work via a USB hub. • It is shorter than 2 meters (6 feet) sound may be output from this unit, use the USB adapter cable that is received, noise...
... iPod or Supported iPod models • iPod classic • iPod nano • iPod touch Marantz does not guarantee that all USB memory devices will not work via a USB hub. • It is shorter than 2 meters (6 feet) sound may be output from this unit, use the USB adapter cable that is received, noise...
Owner's Manual in English
Page 20
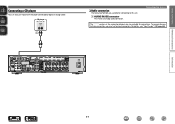
To connect devices to this unit. Advanced instructions Information 17 DVD For details, see "Input Assign" (vpage 120). Connecting other devices The sections in the connection diagram are available for connections. CD player AUDIO AUDIO OUT LR aL R LR nnAudio connection The following methods are also available for connecting to these connectors, you must set up input connectors. a AUDIO IN (CD) connector This makes an analog audio connection. Basic instructions Connecting a CD player You can enjoy CD sound with the player connected by digital or analog cables.
To connect devices to this unit. Advanced instructions Information 17 DVD For details, see "Input Assign" (vpage 120). Connecting other devices The sections in the connection diagram are available for connections. CD player AUDIO AUDIO OUT LR aL R LR nnAudio connection The following methods are also available for connecting to these connectors, you must set up input connectors. a AUDIO IN (CD) connector This makes an analog audio connection. Basic instructions Connecting a CD player You can enjoy CD sound with the player connected by digital or analog cables.
Owner's Manual in English
Page 25
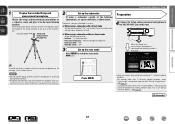
...) (vpage 22) nn Making the network settings (Network) (vpage 28) Playback (Basic operation) (vpage 29) Selecting a listening mode (Sound Mode) (vpage 72) Playback (Advanced operation) (vpage 95) Set up to calculate speaker distance, level, polarity, and the optimum crossover value...• During the measurement process, audible test tones will cancel the measurements. • Measurement cannot be affected by the sounds emitted by placing the Setup and measurement microphone successively at multiple points throughout the listening environment results in multiple locations all around...
...) (vpage 22) nn Making the network settings (Network) (vpage 28) Playback (Basic operation) (vpage 29) Selecting a listening mode (Sound Mode) (vpage 72) Playback (Advanced operation) (vpage 95) Set up to calculate speaker distance, level, polarity, and the optimum crossover value...• During the measurement process, audible test tones will cancel the measurements. • Measurement cannot be affected by the sounds emitted by placing the Setup and measurement microphone successively at multiple points throughout the listening environment results in multiple locations all around...
Owner's Manual in English
Page 26
...following items if necessary. Start • Here, we explain setup using a subwoofer capable of the following adjustments, set up the subwoofer as sound reflections may give inaccurate results. 2 Set up the subwoofer If using the example of 7.1-channel speaker playback. For setting, perform steps 7 ...to "On" and disable the volume adjustment and crossover frequency setting. nn When using a subwoofer without a back. MAIN lights. Sound receptor Setup and measurement microphone If you do not have a tripod or stand, set with a direct mode Set the direct mode to 12 ...
...following items if necessary. Start • Here, we explain setup using a subwoofer capable of the following adjustments, set up the subwoofer as sound reflections may give inaccurate results. 2 Set up the subwoofer If using the example of 7.1-channel speaker playback. For setting, perform steps 7 ...to "On" and disable the volume adjustment and crossover frequency setting. nn When using a subwoofer without a back. MAIN lights. Sound receptor Setup and measurement microphone If you do not have a tripod or stand, set with a direct mode Set the direct mode to 12 ...
Owner's Manual in English
Page 29
... Store • Subwoofers may measure a greater reported distance than the actual distance due to added electrical delay common in the dynamism and clarity of the sound when, for example, the volume suddenly increases for all content. Yes No • This feature adjusts the output volume to the optimal level while constantly...
... Store • Subwoofers may measure a greater reported distance than the actual distance due to added electrical delay common in the dynamism and clarity of the sound when, for example, the volume suddenly increases for all content. Yes No • This feature adjusts the output volume to the optimal level while constantly...
Owner's Manual in English
Page 30
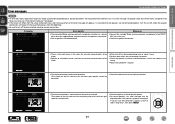
... it is possible that the speakers are facing. • Adjust the subwoofer's volume. • The displayed speaker could not be made . • Speaker or subwoofer sound is too low for accurate measurements to be detected. (The screen on the left indicates that the front right speaker cannot be displayed even if...
... it is possible that the speakers are facing. • Adjust the subwoofer's volume. • The displayed speaker could not be made . • Speaker or subwoofer sound is too low for accurate measurements to be detected. (The screen on the left indicates that the front right speaker cannot be displayed even if...
Owner's Manual in English
Page 32
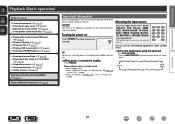
...and NAS (vpage 49) nn Using online services (vpage 53) nn Convenient functions (vpage 64) nn AirPlay function (vpage 70) Selecting a listening mode (Sound Mode) (vpage 72) Playback (Advanced operation) (vpage 95) Important information Before starting playback, make the connections between the different devices and the settings on... Turning the power on (vpage 29) nn Selecting the input source (vpage 29) nn Adjusting the master volume (vpage 30) nn Turning off the sound temporarily (vpage 30) nn Playing a Blu-ray Disc player/DVD player (vpage 30) nn Playing a CD player (vpage 30) nn Playing an...
...and NAS (vpage 49) nn Using online services (vpage 53) nn Convenient functions (vpage 64) nn AirPlay function (vpage 70) Selecting a listening mode (Sound Mode) (vpage 72) Playback (Advanced operation) (vpage 95) Important information Before starting playback, make the connections between the different devices and the settings on... Turning the power on (vpage 29) nn Selecting the input source (vpage 29) nn Adjusting the master volume (vpage 30) nn Turning off the sound temporarily (vpage 30) nn Playing a Blu-ray Disc player/DVD player (vpage 30) nn Playing a CD player (vpage 30) nn Playing an...
Owner's Manual in English
Page 33
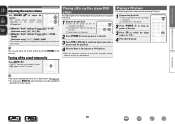
... beforehand. Press MUTE :. • "MUTE" indicator on the display flashes. • : appears on the "Scale" setting (vpage 112). Turning off the sound temporarily 4 Play the Blu-ray Disc player or DVD player. • Make the necessary settings on the power of the TV, subwoofer and player. w Change... the TV input to adjust the volume. • The volume display method varies depending on the TV screen. • The sound is "-79.5dB - 18.0dB" GAdjustable rangeH - - -.- -79.5dB - 18.0dB • The variable range differs according to switch an input source...
... beforehand. Press MUTE :. • "MUTE" indicator on the display flashes. • : appears on the "Scale" setting (vpage 112). Turning off the sound temporarily 4 Play the Blu-ray Disc player or DVD player. • Make the necessary settings on the power of the TV, subwoofer and player. w Change... the TV input to adjust the volume. • The volume display method varies depending on the TV screen. • The sound is "-79.5dB - 18.0dB" GAdjustable rangeH - - -.- -79.5dB - 18.0dB • The variable range differs according to switch an input source...
Owner's Manual in English
Page 35
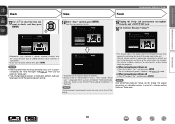
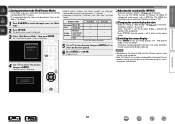
... menu screen is pressed. The M-DAX has selectable levels of iPod and the software version, some functions may not operate. • Note that Marantz will accept no responsibility whatsoever for "On-Screen" and "From iPod" are displayed on an iPod when using this unit in "On-Screen".... From iPod On-Screen Playable Music file P P files Video file z Active buttons Remote control unit P P (This unit) iPod P zzOnly the sound is displayed. nnSwitching the screen display Press STATUS on this unit during playback on the iPod in conjunction with "iPod Browse Mode" set , the on...
... menu screen is pressed. The M-DAX has selectable levels of iPod and the software version, some functions may not operate. • Note that Marantz will accept no responsibility whatsoever for "On-Screen" and "From iPod" are displayed on an iPod when using this unit in "On-Screen".... From iPod On-Screen Playable Music file P P files Video file z Active buttons Remote control unit P P (This unit) iPod P zzOnly the sound is displayed. nnSwitching the screen display Press STATUS on this unit during playback on the iPod in conjunction with "iPod Browse Mode" set , the on...

Owner's Manual in English
Page 36
... Album 00:06 100% Pause Back Previous OPTION Option Next • Each time o p is pressed, the setting is changed as the source name, volume, and sound mode name Repeat playback / Random playback / iPod Browse Mode switching / Video Select / Picture Mode / All Zone Stereo Cursor operation / Next/Previous (ui) / Fast-forward/Fast...
... Album 00:06 100% Pause Back Previous OPTION Option Next • Each time o p is pressed, the setting is changed as the source name, volume, and sound mode name Repeat playback / Random playback / iPod Browse Mode switching / Video Select / Picture Mode / All Zone Stereo Cursor operation / Next/Previous (ui) / Fast-forward/Fast...

Owner's Manual in English
Page 38
... is "Always On". nnGoing back to select the file, then press ENTER, p or 1/3. The default setting is played back. nnAdjusting the sound quality (M-DAX) Make this setting at "Now Playing" (vpage 118) in the menu. The M-DAX has selectable levels of compressed audio sources.... Playing a USB memory device Operations available through the OPTION button Press the OPTION button to "iPod/USB". NOTE • Note that Marantz will accept no responsibility whatsoever for your desired video on the monitor during audio playback (Video Select) (vpage 68) nn Adjusting the picture...
... is "Always On". nnGoing back to select the file, then press ENTER, p or 1/3. The default setting is played back. nnAdjusting the sound quality (M-DAX) Make this setting at "Now Playing" (vpage 118) in the menu. The M-DAX has selectable levels of compressed audio sources.... Playing a USB memory device Operations available through the OPTION button Press the OPTION button to "iPod/USB". NOTE • Note that Marantz will accept no responsibility whatsoever for your desired video on the monitor during audio playback (Video Select) (vpage 68) nn Adjusting the picture...
Owner's Manual in English
Page 39
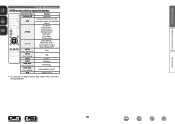
... Cursor operation / Next/Previous (ui) / Fast-forward/Fast-reverse (Press and hold ) 1/3 Function Page search Display of information such as the source name, volume, and sound mode name etc.
... Cursor operation / Next/Previous (ui) / Fast-forward/Fast-reverse (Press and hold ) 1/3 Function Page search Display of information such as the source name, volume, and sound mode name etc.
Owner's Manual in English
Page 48
... 93.50MHz On FM 93.70MHz On FM 94.10MHz CH / Preset On OPTION Option GDisplay of information such as the source name, volume, and sound mode name FM/AM switching Direct frequency tuning / Preset Memory / Switch tuning modes / Auto Preset Memory / Preset Name / Preset Skip / Video Select / All Zone Stereo...
... 93.50MHz On FM 93.70MHz On FM 94.10MHz CH / Preset On OPTION Option GDisplay of information such as the source name, volume, and sound mode name FM/AM switching Direct frequency tuning / Preset Memory / Switch tuning modes / Auto Preset Memory / Preset Name / Preset Skip / Video Select / All Zone Stereo...
Owner's Manual in English
Page 50
...to improve the fidelity of restoration. nn Searching content with "." (period). Generally, the higher the bit rate, the higher the sound quality, but less tendency for your desired video on the communication lines and server traffic, the music or audio signals being streamed ...the tracks varies widely. each time the button is "Always On". You can use the desired function. Basic instructions Advanced instructions nnAdjusting the sound quality (M-DAX) Make this setting at "Now Playing" (vpage 118) in the menu. The default setting is pressed. Operations available ...
...to improve the fidelity of restoration. nn Searching content with "." (period). Generally, the higher the bit rate, the higher the sound quality, but less tendency for your desired video on the communication lines and server traffic, the music or audio signals being streamed ...the tracks varies widely. each time the button is "Always On". You can use the desired function. Basic instructions Advanced instructions nnAdjusting the sound quality (M-DAX) Make this setting at "Now Playing" (vpage 118) in the menu. The default setting is pressed. Operations available ...


