User Guide
Page 2
... experienced radio/TV technician for purchasing the Marantz D-VHS video cassette recorder. DISH NetworkTM is connected. CAUTION: This video cassette recorder should be determined by turning the equipment off and on, the user is no guarantee that it is possible to record and play back with the limits for a Class B digital device, pursuant to Part 15 of your new VCR. To prevent electric shocks and fire...
... experienced radio/TV technician for purchasing the Marantz D-VHS video cassette recorder. DISH NetworkTM is connected. CAUTION: This video cassette recorder should be determined by turning the equipment off and on, the user is no guarantee that it is possible to record and play back with the limits for a Class B digital device, pursuant to Part 15 of your new VCR. To prevent electric shocks and fire...
User Guide
Page 3
... plug. Grounding or Polarization (A) Your product may be walked on your product dealer or local power company. Power Sources Operate your personal safety. But improper use and servicing. 5. EN 3 IMPORTANT PRODUCT SAFETY INSTRUCTIONS Electrical energy can fall into a grounding-type power outlet. ANTENNA INSTALLATION INSTRUCTIONS 1. Power Lines An outside antenna or cable system is connected to the product, be taken to lightning and...
... plug. Grounding or Polarization (A) Your product may be walked on your product dealer or local power company. Power Sources Operate your personal safety. But improper use and servicing. 5. EN 3 IMPORTANT PRODUCT SAFETY INSTRUCTIONS Electrical energy can fall into a grounding-type power outlet. ANTENNA INSTALLATION INSTRUCTIONS 1. Power Lines An outside antenna or cable system is connected to the product, be taken to lightning and...
User Guide
Page 5
... video tapes ● continuous usage for D-VHS video heads (JVC D-VHS video head cleaner DFC-2) to clean the video heads. ● In order to avoid misoperation, set "NAVIGATION" to enter this unit. 7. DO NOT block the VCR's ventilation openings or holes. (If the ventilation openings or holes are provided with the cleaning tape. DO NOT place heavy objects on the apparatus. 8. The heads get a clear picture after using the optional cleaning tapes. Adjust the tracking manually...
... video tapes ● continuous usage for D-VHS video heads (JVC D-VHS video head cleaner DFC-2) to clean the video heads. ● In order to avoid misoperation, set "NAVIGATION" to enter this unit. 7. DO NOT block the VCR's ventilation openings or holes. (If the ventilation openings or holes are provided with the cleaning tape. DO NOT place heavy objects on the apparatus. 8. The heads get a clear picture after using the optional cleaning tapes. Adjust the tracking manually...
User Guide
Page 6
... Timer Recording (ITR) ...28 Watching one program while recording another ...29 Showing on-screen display ...29 OTHER USEFUL FUNCTIONS 53 Useful Function Settings ...53 i.LINK Set Up ...60 Satellite Auto Recording ...62 JLIP ID Number Setting ...63 EDITING 64 i.LINK/DV Connections ...64 S-VIDEO/VIDEO Connections ...66 MULTI-BRAND REMOTE CONTROL 68 TV Brand Setting ...68 Cable Box Brand Setting ...69 DBS Receiver Brand Setting ...70 Changing Remote Control Code ...71 TROUBLESHOOTING 72 Error Codes and Messages ...78 Questions and answers ...79 INDEX 80 SPECIAL EFFECT PLAYBACK...
... Timer Recording (ITR) ...28 Watching one program while recording another ...29 Showing on-screen display ...29 OTHER USEFUL FUNCTIONS 53 Useful Function Settings ...53 i.LINK Set Up ...60 Satellite Auto Recording ...62 JLIP ID Number Setting ...63 EDITING 64 i.LINK/DV Connections ...64 S-VIDEO/VIDEO Connections ...66 MULTI-BRAND REMOTE CONTROL 68 TV Brand Setting ...68 Cable Box Brand Setting ...69 DBS Receiver Brand Setting ...70 Changing Remote Control Code ...71 TROUBLESHOOTING 72 Error Codes and Messages ...78 Questions and answers ...79 INDEX 80 SPECIAL EFFECT PLAYBACK...
User Guide
Page 7
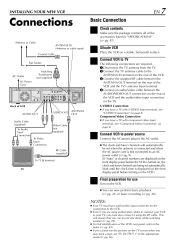
... accessories listed in "SPECIFICATIONS" (੬ pg. 87). 2 Situate VCR 3 Connect VCR to the appropriate mode (੬ pg. 56). AC Outlet AC Power Cord COMPONENT VIDEO OUT Y PB/CB PR/CR VHF/UHF ANTENNA IN OUT S VIDEO IN IN(L-1) S VIDEO i.LINK IN/OUT DV IN S400 ANTENNA CABLE BOX REMOTE PAUSE/ AV COMPULINK R AUDIO L VIDEO R AUDIO L OUT VIDEO DIGITAL OUT OPTICAL PCM/DOLBY DIGITAL IN(L-2) D THEATER REGION 1 The following connections are being set "TV OUTPUT...
... accessories listed in "SPECIFICATIONS" (੬ pg. 87). 2 Situate VCR 3 Connect VCR to the appropriate mode (੬ pg. 56). AC Outlet AC Power Cord COMPONENT VIDEO OUT Y PB/CB PR/CR VHF/UHF ANTENNA IN OUT S VIDEO IN IN(L-1) S VIDEO i.LINK IN/OUT DV IN S400 ANTENNA CABLE BOX REMOTE PAUSE/ AV COMPULINK R AUDIO L VIDEO R AUDIO L OUT VIDEO DIGITAL OUT OPTICAL PCM/DOLBY DIGITAL IN(L-2) D THEATER REGION 1 The following connections are being set "TV OUTPUT...
User Guide
Page 8
... set "TV OUTPUT 1" to the TV as explained in step 3 of the Super VHS picture performance we recommend that you play back a tape, set the timer program on the TV. Connect both the RF cable and the AV cables to the TV as explained in step 3 of the VCR and the S-VIDEO input connector on the menu screen, switch the TV's input mode for the connection with your TV using the TV's Remote...
... set "TV OUTPUT 1" to the TV as explained in step 3 of the Super VHS picture performance we recommend that you play back a tape, set the timer program on the TV. Connect both the RF cable and the AV cables to the TV as explained in step 3 of the VCR and the S-VIDEO input connector on the menu screen, switch the TV's input mode for the connection with your TV using the TV's Remote...

User Guide
Page 10
... GUIDE CHANNEL AUTO CLOCK SET MANUAL CLOCK SET AUTO CLOCK OFF OK SELECT EXIT SELECT WITH ARROW KEYS THEN PRESS [OK] ● If "CABLE BOX USERS SET CLOCK MANUALLY" appears on the Remote to perform the Semiauto or Manual Clock Set. VCR CABLE TV /DBS 2 Access Clock Set screen 1 Press @ # to move the arrow to "INITIAL SET UP", then press fi or OK. 2 Press @ # to move the arrow to access the Clock Set screen. (Even if you use a cable box, set correctly by the Plug & Play setting...
... GUIDE CHANNEL AUTO CLOCK SET MANUAL CLOCK SET AUTO CLOCK OFF OK SELECT EXIT SELECT WITH ARROW KEYS THEN PRESS [OK] ● If "CABLE BOX USERS SET CLOCK MANUALLY" appears on the Remote to perform the Semiauto or Manual Clock Set. VCR CABLE TV /DBS 2 Access Clock Set screen 1 Press @ # to move the arrow to "INITIAL SET UP", then press fi or OK. 2 Press @ # to move the arrow to access the Clock Set screen. (Even if you use a cable box, set correctly by the Plug & Play setting...
User Guide
Page 15
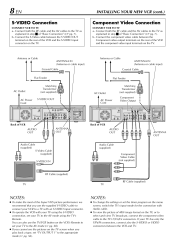
... channels through a cable box (descrambler). To set up the VCR's Remote, refer to automatically switch the cable box channel during timer recording. The Controller allows the VCR to page 69. Installing Controller 1 Situate Controller 2 Attach Controller Place the Controller so that have been programed using the adhesive strip attached on the back of the Controller. 3 Connect cable box to VCR Your VCR Controller (suggested locations) Cable box ● If your cable box does not have audio/video output connectors Connect the RF output terminal on the cable box...
... channels through a cable box (descrambler). To set up the VCR's Remote, refer to automatically switch the cable box channel during timer recording. The Controller allows the VCR to page 69. Installing Controller 1 Situate Controller 2 Attach Controller Place the Controller so that have been programed using the adhesive strip attached on the back of the Controller. 3 Connect cable box to VCR Your VCR Controller (suggested locations) Cable box ● If your cable box does not have audio/video output connectors Connect the RF output terminal on the cable box...
User Guide
Page 17
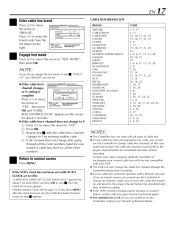
... AUTO CLOCK set to ON) "CABLE BOX USERS SET CLOCK MANUALLY" appears for about the possibility of a power failure, set the cable box input channel and brand again. ● For customers in U.S.A.: If you press MENU after going through the Controller during timer recording. ● If your cable company about 5 seconds when you cannot use the Controller to change after the clock has been set . ● If the cable box's channel changes INPUT CH OFF to "TEST MODE", then press OK. FUNCTION SET UP TUNER SET...
... AUTO CLOCK set to ON) "CABLE BOX USERS SET CLOCK MANUALLY" appears for about the possibility of a power failure, set the cable box input channel and brand again. ● For customers in U.S.A.: If you press MENU after going through the Controller during timer recording. ● If your cable company about 5 seconds when you cannot use the Controller to change after the clock has been set . ● If the cable box's channel changes INPUT CH OFF to "TEST MODE", then press OK. FUNCTION SET UP TUNER SET...
User Guide
Page 18
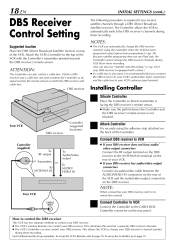
... audio/video output connectors Connect an audio/video cable between the Controller and the DBS receiver's remote sensor is not blocked. The Controller allows the VCR to page 70. DBS Receiver Control Setting Suggested location Place the DBS (Direct Broadcast Satellite) receiver on the back of the VCR. Your VCR 2 Attach Controller Fix securely using Express timer programing (੬ pg. 38). NOTE: Your VCR CABLE BOX When connecting your DBS receiver, refer to its instruction manual. 4 Connect Controller to VCR Connect...
... audio/video output connectors Connect an audio/video cable between the Controller and the DBS receiver's remote sensor is not blocked. The Controller allows the VCR to page 70. DBS Receiver Control Setting Suggested location Place the DBS (Direct Broadcast Satellite) receiver on the back of the VCR. Your VCR 2 Attach Controller Fix securely using Express timer programing (੬ pg. 38). NOTE: Your VCR CABLE BOX When connecting your DBS receiver, refer to its instruction manual. 4 Connect Controller to VCR Connect...

User Guide
Page 20
... arrow to change satellite channels. FUNCTION SET UP DBS SET UP TUNER SET UP INITIAL SET UP YES NO MENU 7 Return to enter the brand code from the following list. If you are not set the Controller, contact your DBS receiver cannot be operated with all types of timer recording. ● For customers in U.S.A.: If you do not engage the test mode in step 6, "INPUT CH" and "BRAND" are unable...
... arrow to change satellite channels. FUNCTION SET UP DBS SET UP TUNER SET UP INITIAL SET UP YES NO MENU 7 Return to enter the brand code from the following list. If you are not set the Controller, contact your DBS receiver cannot be operated with all types of timer recording. ● For customers in U.S.A.: If you do not engage the test mode in step 6, "INPUT CH" and "BRAND" are unable...

User Guide
Page 26
...; ). POWER 1 2 IN F-1 + D-VHS Recording 4 STOP/EJECT (7/0) 1 Load a D-VHS cassette Make sure the record safety tab is important. To memorize the recording date and start time, channel number, and recording speed are important. Press the Number keys. 2 -b REW (1) 3 FF ( 1 ) 3 Set recording speed Press REC SPEED to "VCR". or b- HS: When picture quality and sound quality is equal to or better than in STD mode, with picture quality that every tape recorded on the Remote to set correctly. Basic Recording ● Turn on the VCR...
...; ). POWER 1 2 IN F-1 + D-VHS Recording 4 STOP/EJECT (7/0) 1 Load a D-VHS cassette Make sure the record safety tab is important. To memorize the recording date and start time, channel number, and recording speed are important. Press the Number keys. 2 -b REW (1) 3 FF ( 1 ) 3 Set recording speed Press REC SPEED to "VCR". or b- HS: When picture quality and sound quality is equal to or better than in STD mode, with picture quality that every tape recorded on the Remote to set correctly. Basic Recording ● Turn on the VCR...

User Guide
Page 42
... AV mode on the TV. ● Set the VCR/TV/CABLE/DBS selector on the Remote to "VCR". 1 Load a cassette Insert a tape recorded on this , the higher tape number will be shown on a tape. NAVI 0107 ALL SPORTS TAPE 1. Playback starts automatically after the selected program is deactivated, the Navigation Set Up screen appears. After this VCR. ● The VCR turns on automatically. ● The tape will be assigned just one tape number (the...
... AV mode on the TV. ● Set the VCR/TV/CABLE/DBS selector on the Remote to "VCR". 1 Load a cassette Insert a tape recorded on this , the higher tape number will be shown on a tape. NAVI 0107 ALL SPORTS TAPE 1. Playback starts automatically after the selected program is deactivated, the Navigation Set Up screen appears. After this VCR. ● The VCR turns on automatically. ● The tape will be assigned just one tape number (the...

User Guide
Page 62
... front display panel (Satellite Auto Recording standby mode). When it has a timer. * To use this function. • You can also connect the cable box if it is turned on. otherwise, the VCR will not start recording when the DBS receiver is off . When the DBS receiver outputs a signal, the VCR starts recording and the "L-1" blinks and the record ( ) indicator lights. IMPORTANT: Be sure not to timer-record a satellite program. (Some...
... front display panel (Satellite Auto Recording standby mode). When it has a timer. * To use this function. • You can also connect the cable box if it is turned on. otherwise, the VCR will not start recording when the DBS receiver is off . When the DBS receiver outputs a signal, the VCR starts recording and the "L-1" blinks and the record ( ) indicator lights. IMPORTANT: Be sure not to timer-record a satellite program. (Some...
User Guide
Page 69
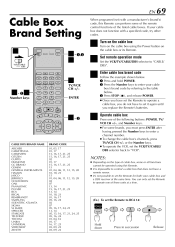
... have a remote sensor. ● It's not possible to set the Remote for both your cable box and a DBS receiver at a time. (Ex.) To set the Remote to operate one of the following buttons: POWER, TV/ VCR CH +/-, and Number keys. ● For some brands, you replace the Remote's batteries. 3-3 4 Operate cable box Press one of the listed cable boxes. ENTER Turn on the cable box or its Remote. 2 Set remote operation mode 3 Enter cable box brand code Set the VCR/TV/CABLE/DBS selector to "CABLE/ DBS". If your cable box's brand code by...
... have a remote sensor. ● It's not possible to set the Remote for both your cable box and a DBS receiver at a time. (Ex.) To set the Remote to operate one of the following buttons: POWER, TV/ VCR CH +/-, and Number keys. ● For some brands, you replace the Remote's batteries. 3-3 4 Operate cable box Press one of the listed cable boxes. ENTER Turn on the cable box or its Remote. 2 Set remote operation mode 3 Enter cable box brand code Set the VCR/TV/CABLE/DBS selector to "CABLE/ DBS". If your cable box's brand code by...

User Guide
Page 72
... timer recording standby mode with fast action or switching the display. TAPE TRANSPORT SYMPTOM 1. The cassette gets stuck partway during loading, and is pointing towards the VCR. The tape is engaged. ● The video heads may be cleaned. The heads must be dirty. ● The digital program is not recorded in Hi-Fi sound track. 3. To record the program in D-VHS mode. The Remote will not appear. 2. POSSIBLE CAUSE ● The TV receiver is set...
... timer recording standby mode with fast action or switching the display. TAPE TRANSPORT SYMPTOM 1. The cassette gets stuck partway during loading, and is pointing towards the VCR. The tape is engaged. ● The video heads may be cleaned. The heads must be dirty. ● The digital program is not recorded in Hi-Fi sound track. 3. To record the program in D-VHS mode. The Remote will not appear. 2. POSSIBLE CAUSE ● The TV receiver is set...

User Guide
Page 73
... tape reaches its record safety tab removed. Cable channels are not automatically switched during timer recording. 5. ‰ blinks for 10 seconds and the timer mode is no cassette loaded. ● The loaded cassette has had its end during timer recording. POSSIBLE CAUSE ● The clock and/or the timer have enough time on the front display panel will not work . ● The VCR has been set up procedures. Select the appropriate channel on . Connect...
... tape reaches its record safety tab removed. Cable channels are not automatically switched during timer recording. 5. ‰ blinks for 10 seconds and the timer mode is no cassette loaded. ● The loaded cassette has had its end during timer recording. POSSIBLE CAUSE ● The clock and/or the timer have enough time on the front display panel will not work . ● The VCR has been set up procedures. Select the appropriate channel on . Connect...

User Guide
Page 76
.... ● Recording is in progress. Reset the correct brand codes (੬ pg. 68 - 70 ). Select a different host channel during Semiauto Clock Set (੬ pg. 11), or perform Manual Clock Set (੬ pg. 12). Even though Auto or Semiauto Clock Set has been performed, the clock is set to on the video heads may occur, keep the VCR turned on the front display panel. 6. In conditions where condensation may cause the playback picture to...
.... ● Recording is in progress. Reset the correct brand codes (੬ pg. 68 - 70 ). Select a different host channel during Semiauto Clock Set (੬ pg. 11), or perform Manual Clock Set (੬ pg. 12). Even though Auto or Semiauto Clock Set has been performed, the clock is set to on the video heads may occur, keep the VCR turned on the front display panel. 6. In conditions where condensation may cause the playback picture to...
User Guide
Page 81
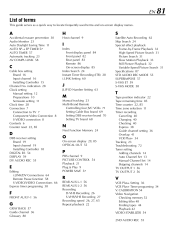
...D DBS receiver setting Brand 19 Input channel 19 Installing Controller 18 DIGITAL R3 54 DISPLAY 59 DV AUDIO REC 55 O On-screen display 29, 85 OPTICAL OUT 55 P PBS channel 9 PICTURE CONTROL 54 Playback 21 Plug & Play 9 POWER SAVE 57 E Editing i.LINK/DV Connections 64 Remote Pause function 58 S-VIDEO/VIDEO Connections 66 Express timer programing 38 R REAR AUX L-1 56 REAR AUX L-2 56 Recording D-VHS Recording 26 S-VHS/VHS Recording 27 Recording speed 26, 27, 65 Repeat playback 22 V VCR Plus+ Setting 36 VCR Plus+ Timer programing 34 V. indication 28 Clock setting Manual setting 12 Preparations...
...D DBS receiver setting Brand 19 Input channel 19 Installing Controller 18 DIGITAL R3 54 DISPLAY 59 DV AUDIO REC 55 O On-screen display 29, 85 OPTICAL OUT 55 P PBS channel 9 PICTURE CONTROL 54 Playback 21 Plug & Play 9 POWER SAVE 57 E Editing i.LINK/DV Connections 64 Remote Pause function 58 S-VIDEO/VIDEO Connections 66 Express timer programing 38 R REAR AUX L-1 56 REAR AUX L-2 56 Recording D-VHS Recording 26 S-VHS/VHS Recording 27 Recording speed 26, 27, 65 Repeat playback 22 V VCR Plus+ Setting 36 VCR Plus+ Timer programing 34 V. indication 28 Clock setting Manual setting 12 Preparations...
User Guide
Page 87
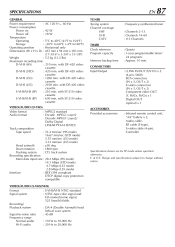
... UHF CATV TIMER Clock reference Program capacity Memory backup time CONNECTORS Input/Output EN 87 : Frequency-synthesized tuner : Channels 2-13 : Channels 14-69 : 113 Channels : Quartz : 1-year programmable timer/ 24 programs : Approx. 10 min. : i.LINK IN/OUT (DV IN) x 2 (4-pin, S400) RCA connectors (IN x 3, OUT x 2) S-video connectors (IN x 3, OUT x 2) Component video OUT (Y, PB/CB, PR/CR) x 1 Digital OUT (optical) x 1 : Infrared remote control unit, "AA" battery x 2, Audio cable, RF cable (F-type), S-video cable (4-pin), Controller Weight Maximum recording time D-VHS (HS...
... UHF CATV TIMER Clock reference Program capacity Memory backup time CONNECTORS Input/Output EN 87 : Frequency-synthesized tuner : Channels 2-13 : Channels 14-69 : 113 Channels : Quartz : 1-year programmable timer/ 24 programs : Approx. 10 min. : i.LINK IN/OUT (DV IN) x 2 (4-pin, S400) RCA connectors (IN x 3, OUT x 2) S-video connectors (IN x 3, OUT x 2) Component video OUT (Y, PB/CB, PR/CR) x 1 Digital OUT (optical) x 1 : Infrared remote control unit, "AA" battery x 2, Audio cable, RF cable (F-type), S-video cable (4-pin), Controller Weight Maximum recording time D-VHS (HS...
