
CD5001 .pcf File
Page 1
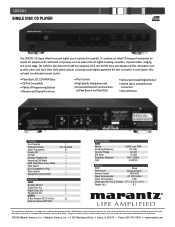
.... • 1100 Maplewood Drive • Itasca, IL 60143 • Phone 630-741-0300 • www.marantz.com The CD5001 also features the ability to -analog converters, improved detail, imaging and sound stage. Also included is a dedicated remote control. • Plays Back; SPECIFICATIONS AUDIO Format Sampling Frequency Dynamic Range S/N Ratio Frequency Response THD 16-Bit...
.... • 1100 Maplewood Drive • Itasca, IL 60143 • Phone 630-741-0300 • www.marantz.com The CD5001 also features the ability to -analog converters, improved detail, imaging and sound stage. Also included is a dedicated remote control. • Plays Back; SPECIFICATIONS AUDIO Format Sampling Frequency Dynamic Range S/N Ratio Frequency Response THD 16-Bit...
CD5001 User Manual
Page 6
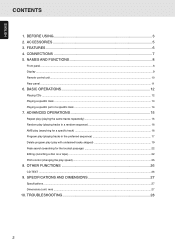
...9. BASIC OPERATIONS 12 Playing CDs ...12 Playing a specific track ...13 Playing a specific part of a specific track ...14 7. NAMES AND FUNCTIONS 8 Front panel ...8 Display ...9 Remote control unit ...10 Rear panel ...11 6. TROUBLESHOOTING 28 2 FEATURES ...6 4. SPECIFICATIONS AND DIMENSIONS 27 Specifications ...27 Dimensions (unit: mm) ...27 10. BEFORE USING ...3 2. ADVANCED ... with undesired tracks skipped 19 Peak search (searching for the loudest passage 22 Editing (recording a disc on a tape) ...22 Pitch control (changing the play speed) ...25 8. CONNECTIONS ...7 5.
...9. BASIC OPERATIONS 12 Playing CDs ...12 Playing a specific track ...13 Playing a specific part of a specific track ...14 7. NAMES AND FUNCTIONS 8 Front panel ...8 Display ...9 Remote control unit ...10 Rear panel ...11 6. TROUBLESHOOTING 28 2 FEATURES ...6 4. SPECIFICATIONS AND DIMENSIONS 27 Specifications ...27 Dimensions (unit: mm) ...27 10. BEFORE USING ...3 2. ADVANCED ... with undesired tracks skipped 19 Peak search (searching for the loudest passage 22 Editing (recording a disc on a tape) ...22 Pitch control (changing the play speed) ...25 8. CONNECTIONS ...7 5.
CD5001 User Manual
Page 8
... with a new one. • Insert the batteries while ensuring that their ª and · poles are authorized to play music CDs only. Cautions on the remote control unit. • Batteries with wet hands. • When disconnecting the mains cord, always make sure that if the volume... into a warm room Since, in cases like this is called condensation. Bear in the following points when using batteries. • Remove the batteries from the remote control unit if the unit is not going to be read and the player is prevented from operating properly, wait about 30 minutes, and then operate...
... with a new one. • Insert the batteries while ensuring that their ª and · poles are authorized to play music CDs only. Cautions on the remote control unit. • Batteries with wet hands. • When disconnecting the mains cord, always make sure that if the volume... into a warm room Since, in cases like this is called condensation. Bear in the following points when using batteries. • Remove the batteries from the remote control unit if the unit is not going to be read and the player is prevented from operating properly, wait about 30 minutes, and then operate...
CD5001 User Manual
Page 9
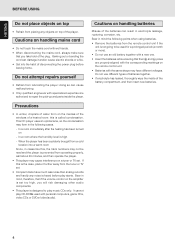
...to align their polarities correctly with the polarity markings (ª with ª and · with ·). Doing so may cause other strong source of the remote control unit may be held down which will cause the batteries to be disabled. - Size "AAA" (SUM-4) batteries x 2 3 Push the battery cover down... for the first time, load the batteries in the direction of the arrow to verify the operations of the remote control unit only. 1 Take hold of the tab on top of REMOTE CONTROL UNIT • Precautions - Bear in mind that the following accessories are used to close it. 5 ENGLISH...
...to align their polarities correctly with the polarity markings (ª with ª and · with ·). Doing so may cause other strong source of the remote control unit may be held down which will cause the batteries to be disabled. - Size "AAA" (SUM-4) batteries x 2 3 Push the battery cover down... for the first time, load the batteries in the direction of the arrow to verify the operations of the remote control unit only. 1 Take hold of the tab on top of REMOTE CONTROL UNIT • Precautions - Bear in mind that the following accessories are used to close it. 5 ENGLISH...
CD5001 User Manual
Page 11
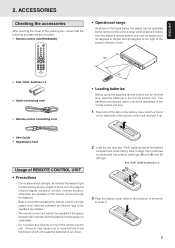
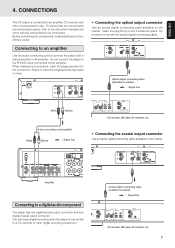
... (Red) (White) Audio connecting cord (supplied) (Red) (White) : Signal flow DIGITAL IN/OUT COAXIAL OPTICAL INPUT OUTPUT INPUT OUTPUT REMOTE CONTROL IN OUT EXTERNAL INTERNAL CD recorder, MD deck, AV amplifier, etc. • Connecting the coaxial output connector Use a coaxial digital connecting ...cable available on market) : Signal flow ALOG IN/OUT L R OUTPUT DIGITAL IN/OUT COAXIAL OPTICAL INPUT OUTPUT INPUT OUTPUT REMOTE CONTROL IN OUT EXTERNAL INTERNAL CD recorder, MD deck, AV amplifier, etc. 7 Coaxial digital connecting cable (available on the market. Do...
... (Red) (White) Audio connecting cord (supplied) (Red) (White) : Signal flow DIGITAL IN/OUT COAXIAL OPTICAL INPUT OUTPUT INPUT OUTPUT REMOTE CONTROL IN OUT EXTERNAL INTERNAL CD recorder, MD deck, AV amplifier, etc. • Connecting the coaxial output connector Use a coaxial digital connecting ...cable available on market) : Signal flow ALOG IN/OUT L R OUTPUT DIGITAL IN/OUT COAXIAL OPTICAL INPUT OUTPUT INPUT OUTPUT REMOTE CONTROL IN OUT EXTERNAL INTERNAL CD recorder, MD deck, AV amplifier, etc. 7 Coaxial digital connecting cable (available on the market. Do...
CD5001 User Manual
Page 12
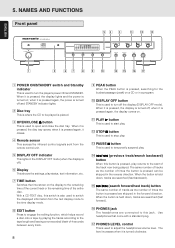
...and Standby indicator This is also used to turn off ; With a CD-TEXT disc, this switch is used to switch the displayed information from the remote control unit. when it is pressed, the disc tray opens; m TIME button Switches the time shown on a CD or in the DISPLAY OFF mode (when...are skipped in the reverse direction. x Disc tray This is where the CD to turn the player's power ON and STANDBY. v Remote sensor This senses the infrared control signals sent from the text display mode to the time display mode. , EDIT button Press to engage the editing function, which helps ...
...and Standby indicator This is also used to turn off ; With a CD-TEXT disc, this switch is used to switch the displayed information from the remote control unit. when it is pressed, the disc tray opens; m TIME button Switches the time shown on a CD or in the DISPLAY OFF mode (when...are skipped in the reverse direction. x Disc tray This is where the CD to turn the player's power ON and STANDBY. v Remote sensor This senses the infrared control signals sent from the text display mode to the time display mode. , EDIT button Press to engage the editing function, which helps ...
CD5001 User Manual
Page 14
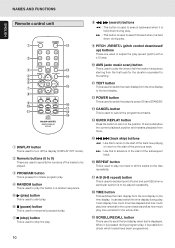
...(A-B repeat) button This is displayed. NAMES AND FUNCTIONS ENGLISH Remote control unit DISPLAY q POWER !2 1 2 3 w 4 5 6 7 8 9 PROGRAM CANCEL e 0 !3 RANDOM r t y u QUICK REPLAY !4 !5 i PITCH RESET o !0 AMS A-B REPEAT TEXT SCROLL/ RECALL TIME !6 !7 !1 !8 !9 REMOTE CONTROLLER RC5400CD q DISPLAY button This is used to temporarily suspend play...scroll the text display when text is used to check which tracks have been programmed. o PITCH -/RESET/+ (pitch control down during play. ¡ : This button is used to set start play . y 8 (pause) button This...
...(A-B repeat) button This is displayed. NAMES AND FUNCTIONS ENGLISH Remote control unit DISPLAY q POWER !2 1 2 3 w 4 5 6 7 8 9 PROGRAM CANCEL e 0 !3 RANDOM r t y u QUICK REPLAY !4 !5 i PITCH RESET o !0 AMS A-B REPEAT TEXT SCROLL/ RECALL TIME !6 !7 !1 !8 !9 REMOTE CONTROLLER RC5400CD q DISPLAY button This is used to temporarily suspend play...scroll the text display when text is used to check which tracks have been programmed. o PITCH -/RESET/+ (pitch control down during play. ¡ : This button is used to set start play . y 8 (pause) button This...
CD5001 User Manual
Page 15
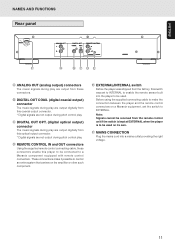
... player was set the switch to a Marantz component equipped with remote control connectors. F MAINS CONNECTION Plug the mains cord into the player to be connected to EXTERNAL. Note: Signals cannot be received from the factory, this player to enable the remote sensor built into a mains outlet providing...are output from these connectors enable this switch was shipped from the remote control unit if the switch is kept at EXTERNAL when the player is to make it possible to control an entire system that centers on a Marantz equipment, set to INTERNAL to be used on its own. C ...
... player was set the switch to a Marantz component equipped with remote control connectors. F MAINS CONNECTION Plug the mains cord into the player to be connected to EXTERNAL. Note: Signals cannot be received from the factory, this player to enable the remote sensor built into a mains outlet providing...are output from these connectors enable this switch was shipped from the remote control unit if the switch is kept at EXTERNAL when the player is to make it possible to control an entire system that centers on a Marantz equipment, set to INTERNAL to be used on its own. C ...
CD5001 User Manual
Page 16
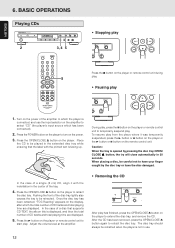
... 1. Adjust the volume level at the amplifier. • Removing the CD After play has finished, press the OPEN/CLOSE 0 button on the player or remote control unit to extend the disc tray, and remove the CD. The disc tray should always be careful not to turn on the display, after which ...the total number of CD tracks and total playing time are displayed. 5. Press the OPEN/CLOSE 0 button on the remote control unit. To resume play . In the case of CD tracks and total playing time are displayed. Press the POWER button on the player to have...
... 1. Adjust the volume level at the amplifier. • Removing the CD After play has finished, press the OPEN/CLOSE 0 button on the player or remote control unit to extend the disc tray, and remove the CD. The disc tray should always be careful not to turn on the display, after which ...the total number of CD tracks and total playing time are displayed. 5. Press the OPEN/CLOSE 0 button on the remote control unit. To resume play . In the case of CD tracks and total playing time are displayed. Press the POWER button on the player to have...

CD5001 User Manual
Page 17
...2 3 Within 1.5 second, press the "2" numeric button. Example: To play track 3 Press the "3" numeric button. DISPLAY POWER Returning to 9) on the remote control unit. To select track number 10 or above, use the numeric buttons to the number of the track now playing. DISPLAY POWER 1 2 3 When the ... subsequent track (track skip) Advancing to a subsequent track Press the ¡/¢ button on the player or ¢ button on the remote control unit is pressed, play returns to the start of tracks through which is selected, play is to be played directly by pressing the numeric ...
...2 3 Within 1.5 second, press the "2" numeric button. Example: To play track 3 Press the "3" numeric button. DISPLAY POWER Returning to 9) on the remote control unit. To select track number 10 or above, use the numeric buttons to the number of the track now playing. DISPLAY POWER 1 2 3 When the ... subsequent track (track skip) Advancing to a subsequent track Press the ¡/¢ button on the player or ¢ button on the remote control unit is pressed, play returns to the start of tracks through which is selected, play is to be played directly by pressing the numeric ...
CD5001 User Manual
Page 18
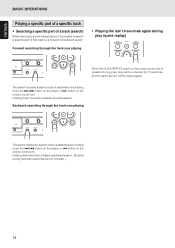
... Playing the last 10 seconds again during play (quick replay) PROGRAM 0 CANCEL RANDOM QUICK REPLAY When the QUICK REPLAY button on the remote control unit. Holding down the button initiates a forward search. Forward searching through the track now playing The search (backward search) mode is established... by holding down the ¡/¢ button on the player or ¡ button on the remote control unit is possible to search a specific part of a track (search) While listening to a track being played, it is pressed during backward...
... Playing the last 10 seconds again during play (quick replay) PROGRAM 0 CANCEL RANDOM QUICK REPLAY When the QUICK REPLAY button on the remote control unit. Holding down the button initiates a forward search. Forward searching through the track now playing The search (backward search) mode is established... by holding down the ¡/¢ button on the player or ¡ button on the remote control unit is possible to search a specific part of a track (search) While listening to a track being played, it is pressed during backward...
CD5001 User Manual
Page 19
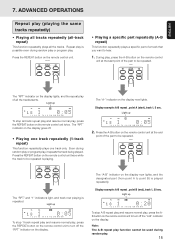
... 7 8 9 10 11 12 13 14 15 16 17 18 To stop all the tracks. PITCH RESET AMS A-B REPEAT The "A-B" indicator on the remote control unit to be repeated is possible even during random play , it repeats the track being played. Repeat play is playing. Display example: A-B repeat , ...to turn off . • Playing one track repeatedly (1-track repeat) This function repeatedly plays one track only. The "A-" indicator on the remote control unit. Press the REPEAT button on the display. Display example: A-B repeat , point B (end), track 1, 20 sec. ADVANCED OPERATIONS Repeat...
... 7 8 9 10 11 12 13 14 15 16 17 18 To stop all the tracks. PITCH RESET AMS A-B REPEAT The "A-B" indicator on the remote control unit to be repeated is possible even during random play , it repeats the track being played. Repeat play is playing. Display example: A-B repeat , ...to turn off . • Playing one track repeatedly (1-track repeat) This function repeatedly plays one track only. The "A-" indicator on the remote control unit. Press the REPEAT button on the display. Display example: A-B repeat , point B (end), track 1, 20 sec. ADVANCED OPERATIONS Repeat...
CD5001 User Manual
Page 20
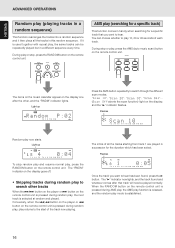
... up RNDM 7 8 9 10 11 12 13 14 Press the AMS button repeatedly to play , press the AMS (auto music scan) button on the remote control unit. You can be played normally. PROGRAM 0 CANCEL RANDOM QUICK REPLAY AMS play (searching for the duration which has been select. The "RNDM" indicator ... next track is established. 16 The "3" indicator now lights, and the track found , press the 3 button. When the RANDOM button on the remote control unit is pressed during AMS play, the AMS play function is released, and the random play mode is selected at random and played. ENGLISH ADVANCED...
... up RNDM 7 8 9 10 11 12 13 14 Press the AMS button repeatedly to play , press the AMS (auto music scan) button on the remote control unit. You can be played normally. PROGRAM 0 CANCEL RANDOM QUICK REPLAY AMS play (searching for the duration which has been select. The "RNDM" indicator ... next track is established. 16 The "3" indicator now lights, and the track found , press the 3 button. When the RANDOM button on the remote control unit is pressed during AMS play, the AMS play function is released, and the random play mode is selected at random and played. ENGLISH ADVANCED...
CD5001 User Manual
Page 21
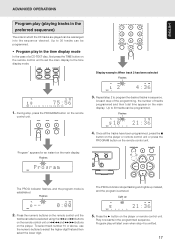
...TEXT disc, first press the TIME button on the main display. Once all the tracks have been programmed, press the 7 button on the player or remote control unit or press the PROGRAM button on the main display. Light up instead, and the program is entered. AMS A-B REPEAT TEXT SCROLL/ RECALL TIME ...PROG 5 TTL TIME TEXT 2. Play now starts in the time display mode In the case of tracks programmed and their total time appear on the remote control unit to set the main display to 30 tracks can be programmed. Repeat step 2 to select the higher digit first and then select the lower...
...TEXT disc, first press the TIME button on the main display. Once all the tracks have been programmed, press the 7 button on the player or remote control unit or press the PROGRAM button on the main display. Light up instead, and the program is entered. AMS A-B REPEAT TEXT SCROLL/ RECALL TIME ...PROG 5 TTL TIME TEXT 2. Play now starts in the time display mode In the case of tracks programmed and their total time appear on the remote control unit to set the main display to 30 tracks can be programmed. Repeat step 2 to select the higher digit first and then select the lower...
CD5001 User Manual
Page 22
...text display mode cannot be programmed. 4. TEXT 2 3 4 5 6 7 8 9 10 11 12 13 14 15 16 17 18 19 3. Press the 4 and ¢ buttons on the remote control unit or 4/1 and ¡/¢ buttons on the player to establish the text display mode. Flashes 555 PROG TEXT 2. The title of each selected track... • Program play in the text display mode In the case of a CD-TEXT disc, tracks can be selected using the numeric buttons on the remote control unit but in this case the title is completed. AMS A-B REPEAT TEXT SCROLL/ RECALL TIME TEXT 1 2 3 4 5 6 7 8 9 10 11 12 13 14 15 16...
...text display mode cannot be programmed. 4. TEXT 2 3 4 5 6 7 8 9 10 11 12 13 14 15 16 17 18 19 3. Press the 4 and ¢ buttons on the remote control unit or 4/1 and ¡/¢ buttons on the player to establish the text display mode. Flashes 555 PROG TEXT 2. The title of each selected track... • Program play in the text display mode In the case of a CD-TEXT disc, tracks can be selected using the numeric buttons on the remote control unit but in this case the title is completed. AMS A-B REPEAT TEXT SCROLL/ RECALL TIME TEXT 1 2 3 4 5 6 7 8 9 10 11 12 13 14 15 16...
CD5001 User Manual
Page 23
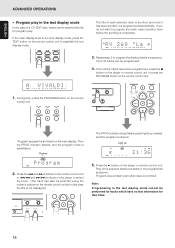
... PROG TEXT 1 2 3 4 5 6 7 8 9 10 11 12 13 14 15 16 17 18 19 5 5 The total number of the programming, press the 7 button on the player or remote control unit or press the PROGRAM button on the player). 1 2 3 4 5 6 7 8 PROGRAM 0 9 CANCEL TTL TTL TIME TEXT 1 2 3 4 5 6 7 8 9 10 11 12 13 14 15 ...16 17 18 1. Press the 3 button on the remote control unit to set the main display to hear during CD play. Up to 30 tracks can be selected using the 4 and ¢ buttons on the...
... PROG TEXT 1 2 3 4 5 6 7 8 9 10 11 12 13 14 15 16 17 18 19 5 5 The total number of the programming, press the 7 button on the player or remote control unit or press the PROGRAM button on the player). 1 2 3 4 5 6 7 8 PROGRAM 0 9 CANCEL TTL TTL TIME TEXT 1 2 3 4 5 6 7 8 9 10 11 12 13 14 15 ...16 17 18 1. Press the 3 button on the remote control unit to set the main display to hear during CD play. Up to 30 tracks can be selected using the 4 and ¢ buttons on the...
CD5001 User Manual
Page 24
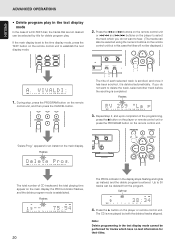
...the text display mode In the case of the programming, press the 7 button on the player or remote control unit or press the PROGRAM button on the remote control unit. Press the 4 and ¢ buttons on the remote control unit or 4/1 and ¡/¢ buttons on the player to hear. (The tracks can also... display mode cannot be deleted from the program. If the main display is set to the time display mode, press the TEXT button on the remote control unit to delete the track, select another track before the scrolling is established. Flashes 555 PROG 5 5 TEXT 2 3 4 5 6 7 8 9 10 11 12 13 14...
...the text display mode In the case of the programming, press the 7 button on the player or remote control unit or press the PROGRAM button on the remote control unit. Press the 4 and ¢ buttons on the remote control unit or 4/1 and ¡/¢ buttons on the player to hear. (The tracks can also... display mode cannot be deleted from the program. If the main display is set to the time display mode, press the TEXT button on the remote control unit to delete the track, select another track before the scrolling is established. Flashes 555 PROG 5 5 TEXT 2 3 4 5 6 7 8 9 10 11 12 13 14...
CD5001 User Manual
Page 25
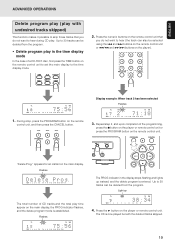
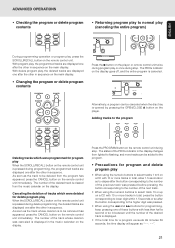
... one after the other in the music calendar on the display. 7 8 PROGRAM 0 9 CANCEL Press the PROGRAM button on the remote control unit during stop . Canceling the deletion of tracks which were programmed for programming, keep pressing one after the button corresponding to the number...on the main display. • Changing the program or delete program contents PROGRAM 0 CANCEL RANDOM QUICK REPLAY Press the 7 button on the remote control unit. Alternatively, a program can be added to the program. • Precautions for a program exceeds 99 minutes 59 seconds, the time...
... one after the other in the music calendar on the display. 7 8 PROGRAM 0 9 CANCEL Press the PROGRAM button on the remote control unit during stop . Canceling the deletion of tracks which were programmed for programming, keep pressing one after the button corresponding to the number...on the main display. • Changing the program or delete program contents PROGRAM 0 CANCEL RANDOM QUICK REPLAY Press the 7 button on the remote control unit. Alternatively, a program can be added to the program. • Precautions for a program exceeds 99 minutes 59 seconds, the time...
CD5001 User Manual
Page 26
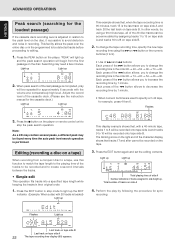
... is adjusted in relation to the peak level on side A 4. Editing (recording a disc on a tape) When recording from the first passage on the player or remote control unit to stop mode to light up the EDIT indicator. (Example: When a disc with 28 tracks is loaded) Light up EDIT TEXT 1 2 3 4 5 6 7 8 9 10 11 12...
... is adjusted in relation to the peak level on side A 4. Editing (recording a disc on a tape) When recording from the first passage on the player or remote control unit to stop mode to light up the EDIT indicator. (Example: When a disc with 28 tracks is loaded) Light up EDIT TEXT 1 2 3 4 5 6 7 8 9 10 11 12...
CD5001 User Manual
Page 27
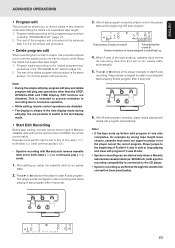
This is intended to prevent mistakes in recording due to erroneous operation. • While editing, remote control operations are disabled. Reverse mode switch may be started only when a Marantz autoreverse cassette deck (ex. After setting up . 4. The player sends out signal to start B side recording... TRK A - The rest of program. Press 3 or 8 buttons of the player to start editing, connect remote control input of Marantz cassette deck with remote control output of CD5001 by wrong tape length have chosen, cassette deck send out signal to player to let the player cancel the rest...
This is intended to prevent mistakes in recording due to erroneous operation. • While editing, remote control operations are disabled. Reverse mode switch may be started only when a Marantz autoreverse cassette deck (ex. After setting up . 4. The player sends out signal to start B side recording... TRK A - The rest of program. Press 3 or 8 buttons of the player to start editing, connect remote control input of Marantz cassette deck with remote control output of CD5001 by wrong tape length have chosen, cassette deck send out signal to player to let the player cancel the rest...

