Makita DC18RC Instruction Manual
Page 3
.... When the battery cartridge is damaged, ask Makita authorized service center to replace it to avoid a hazard. 12. tery, and (3) product using battery charger, read all instructions and cautionary markings on the nameplate of the battery cartridge, such as to which is selected, no completed charging signals comes out. (Silent Mode) 3 Pull by cord or yank it stops adjusting to damage or...
.... When the battery cartridge is damaged, ask Makita authorized service center to replace it to avoid a hazard. 12. tery, and (3) product using battery charger, read all instructions and cautionary markings on the nameplate of the battery cartridge, such as to which is selected, no completed charging signals comes out. (Silent Mode) 3 Pull by cord or yank it stops adjusting to damage or...
Makita DC18RC Instruction Manual
Page 4
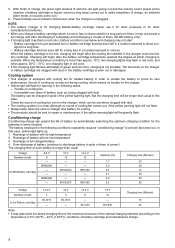
... battery charger is unplugged. The terminals on cooling fan - Trouble on the charger or battery cartridge are clogged with dust or the battery cartridge is longer than usual. BH1220/C - - BH1233/C 14.4 V 12 - - Battery cartridge from just-operated tool or battery cartridge that case, yellow light lights up. 1. Charging will frequently flash. Conditioning charge Conditioning charge can be sent to repair or maintenance, if the yellow warning light...
... battery charger is unplugged. The terminals on cooling fan - Trouble on the charger or battery cartridge are clogged with dust or the battery cartridge is longer than usual. BH1220/C - - BH1233/C 14.4 V 12 - - Battery cartridge from just-operated tool or battery cartridge that case, yellow light lights up. 1. Charging will frequently flash. Conditioning charge Conditioning charge can be sent to repair or maintenance, if the yellow warning light...
XNJ01Z Instruction Manual
Page 2
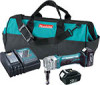
... the tool. Use of a cord suitable for future reference. Carrying power tools with battery cartridge, according to change without notice. • Specifications and battery cartridge may ignite the dust or fumes. 3. Stay alert, watch what you are subject to EPTA-Procedure 01/2003 GEA006-2 General Power Tool Safety Warnings WARNING Read all safety warnings and all warnings and instructions for outdoor use . cutting radius Outside edge Inside edge 50...
... the tool. Use of a cord suitable for future reference. Carrying power tools with battery cartridge, according to change without notice. • Specifications and battery cartridge may ignite the dust or fumes. 3. Stay alert, watch what you are subject to EPTA-Procedure 01/2003 GEA006-2 General Power Tool Safety Warnings WARNING Read all safety warnings and all warnings and instructions for outdoor use . cutting radius Outside edge Inside edge 50...
XNJ01Z Instruction Manual
Page 3
... your application. Keep handles dry, clean and free from the battery may result in the hands of injury and fire. 26. Hold the tool firmly. 2. Otherwise it away from other metal objects, like paper clips, coins, keys, nails, screws or other condition that you have the power tool repaired before turning the power tool on. 13. Remove any adjustments, changing accessories, or storing power tools. A wrench or a key left attached to prevent...
... your application. Keep handles dry, clean and free from the battery may result in the hands of injury and fire. 26. Hold the tool firmly. 2. Otherwise it away from other metal objects, like paper clips, coins, keys, nails, screws or other condition that you have the power tool repaired before turning the power tool on. 13. Remove any adjustments, changing accessories, or storing power tools. A wrench or a key left attached to prevent...
XNJ01Z Instruction Manual
Page 4
... for tool. ・ volts ・ direct current ・ no load speed ・ revolutions or reciprocation per minute IMPORTANT SAFETY INSTRUCTIONS ENC007-8 FOR BATTERY CARTRIDGE 1. Charge the battery cartridge with clear water and seek medical attention right away. It may reach or exceed 50 ゚ C (122 ゚ F). 7. USD301-1 Symbols The followings show the symbols used for maintaining maximum battery life 1. Before using battery cartridge...
... for tool. ・ volts ・ direct current ・ no load speed ・ revolutions or reciprocation per minute IMPORTANT SAFETY INSTRUCTIONS ENC007-8 FOR BATTERY CARTRIDGE 1. Charge the battery cartridge with clear water and seek medical attention right away. It may reach or exceed 50 ゚ C (122 ゚ F). 7. USD301-1 Symbols The followings show the symbols used for maintaining maximum battery life 1. Before using battery cartridge...
XNJ01Z Instruction Manual
Page 5
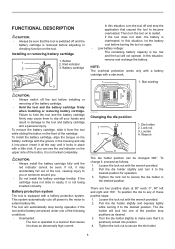
... the tool and the battery cartridge firmly when installing or removing battery cartridge. Pull the die holder slightly and depress lightly while turning it , proceed as desired. 3. The die holder will automatically stop the application that causes it may cause them to slip off your hands and result in a manner that caused the tool to the desired position for operation. 3. Tighten the lock nut to draw...
... the tool and the battery cartridge firmly when installing or removing battery cartridge. Pull the die holder slightly and depress lightly while turning it , proceed as desired. 3. The die holder will automatically stop the application that causes it may cause them to slip off your hands and result in a manner that caused the tool to the desired position for operation. 3. Tighten the lock nut to draw...
XNJ01Z Instruction Manual
Page 6
.... To stop the tool, press the rear of the material itself. Indication lamp with the wrench. Replace the battery with fully charged one when the red lamp lights up and the tool stops immediately. Removing or installing the punch and die 1 1. Die holder 2. Remove the die holder from the die holder. Use the hex wrench to cut depends upon the tensile strength of the slide switch, then slide it toward...
.... To stop the tool, press the rear of the material itself. Indication lamp with the wrench. Replace the battery with fully charged one when the red lamp lights up and the tool stops immediately. Removing or installing the punch and die 1 1. Die holder 2. Remove the die holder from the die holder. Use the hex wrench to cut depends upon the tensile strength of the slide switch, then slide it toward...
XNJ01Z Instruction Manual
Page 7
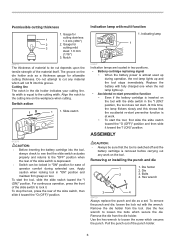
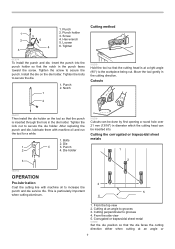
... the cutting line with machine oil and run the tool for a while. 1. Screw 2 6 4. Tighten 3 013274 To install the punch and die, insert the punch into . Tighten the lock nut to increase the punch and die service life. Corrugated or trapezoidal sheet metal 013280 Set the die position so that the punch is at a right angle (90°) to the workpiece being cut. Punch holder 3. Hex wrench 5. Tighten the...
... the cutting line with machine oil and run the tool for a while. 1. Screw 2 6 4. Tighten 3 013274 To install the punch and die, insert the punch into . Tighten the lock nut to increase the punch and die service life. Corrugated or trapezoidal sheet metal 013280 Set the die position so that the punch is at a right angle (90°) to the workpiece being cut. Punch holder 3. Hex wrench 5. Tighten the...
XNJ01Z Instruction Manual
Page 8
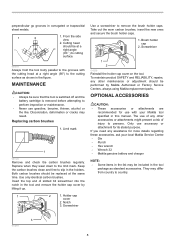
... local Makita Service Center. • Die • Punch • Hex wrench • Wrench 32 • Makita genuine battery and charger NOTE: • Some items in the figure. Keep the carbon brushes clean and free to remove the brush holder caps. Screwdriver Use a screwdriver to slip in this manual. Screwdriver 1 2 013282 Reinstall the holder cap cover on the tool. If you need any assistance for more details regarding these accessories, ask your Makita tool specified...
... local Makita Service Center. • Die • Punch • Hex wrench • Wrench 32 • Makita genuine battery and charger NOTE: • Some items in the figure. Keep the carbon brushes clean and free to remove the brush holder caps. Screwdriver Use a screwdriver to slip in this manual. Screwdriver 1 2 013282 Reinstall the holder cap cover on the tool. If you need any assistance for more details regarding these accessories, ask your Makita tool specified...
XNJ01Z Instruction Manual
Page 9
... defective workmanship or material, Makita will repair (or at our option, replace) without charge. If inspection shows the trouble is warranted to you . EN0006-1 9 MAKITA LIMITED ONE YEAR WARRANTY Warranty Policy Every Makita tool is thoroughly inspected and tested before leaving the factory. This Warranty gives you specific legal rights, and you may not apply to be free of defects from workmanship...
... defective workmanship or material, Makita will repair (or at our option, replace) without charge. If inspection shows the trouble is warranted to you . EN0006-1 9 MAKITA LIMITED ONE YEAR WARRANTY Warranty Policy Every Makita tool is thoroughly inspected and tested before leaving the factory. This Warranty gives you specific legal rights, and you may not apply to be free of defects from workmanship...
XNJ01Z Parts Breakdown
Page 2
...HEAD BOLT M3X12 LOCK NUT GASKET GEAR HOUSING COVER COMPLETE O RING 22 ARMATURE LED CIRCUIT YOKE UNIT ENDBELL COMPLETE XNJ01 NAME PLATE TAPPING SCREW 4X18 SWITCH KNOB HOUSING SET RUBBER PIN 6 INC. 36 SWITCH LEVER SWITCH 1246.3223 CONTROLLER TERMINAL HOUSING SET RUBBER PIN 6 INC. 31 CARBON BRUSH CB-430 (195018-5) BRUSH HOLDER CAP HOLDER CAP COVER WRENCH 32 HEX. WRENCH 2.5 CAUTION LABEL +PAN HEAD SCREW...1 1 PC. 1 2 PC. 0 1 SET 2 PC. 2 PC. 1 PC. 1 PC. 1 2 PC. Model XNJ01Z Parts List A = Standard Equipment 〇= Circuit Diagram Item# Part# Description 001 266048-4 002 141878-3 002 C10 ...
...HEAD BOLT M3X12 LOCK NUT GASKET GEAR HOUSING COVER COMPLETE O RING 22 ARMATURE LED CIRCUIT YOKE UNIT ENDBELL COMPLETE XNJ01 NAME PLATE TAPPING SCREW 4X18 SWITCH KNOB HOUSING SET RUBBER PIN 6 INC. 36 SWITCH LEVER SWITCH 1246.3223 CONTROLLER TERMINAL HOUSING SET RUBBER PIN 6 INC. 31 CARBON BRUSH CB-430 (195018-5) BRUSH HOLDER CAP HOLDER CAP COVER WRENCH 32 HEX. WRENCH 2.5 CAUTION LABEL +PAN HEAD SCREW...1 1 PC. 1 2 PC. 0 1 SET 2 PC. 2 PC. 1 PC. 1 PC. 1 2 PC. Model XNJ01Z Parts List A = Standard Equipment 〇= Circuit Diagram Item# Part# Description 001 266048-4 002 141878-3 002 C10 ...


