
VC4710 Instruction Manual
Page 3
...Electrical connection 13 3.2 Switching on the vacuum cleaner 13 3.2.1 Switch "auto-0-I 13 3.2.2 Suction power control 13 3.2.3 Auto-On/Off-Operation - Contents Makita VC4710 1 Safety instructions 2 Before starting the cleaner 3 Control /Operation 4 Applications and techniques 5 After finishing work 6 Maintenance 7 Troubleshooting 8 Technical data ... the tank 18 6.2.2 Wet suction 19 6.2.3 Emptying the tank 19 6.2.4 Replacing the filter bag 20 6.2.5 Replacing the disposal bag 21 6.2.6 Replacing filter element (Auto Filter Cleaning System)......22 23 24 Original Instruction 3
...Electrical connection 13 3.2 Switching on the vacuum cleaner 13 3.2.1 Switch "auto-0-I 13 3.2.2 Suction power control 13 3.2.3 Auto-On/Off-Operation - Contents Makita VC4710 1 Safety instructions 2 Before starting the cleaner 3 Control /Operation 4 Applications and techniques 5 After finishing work 6 Maintenance 7 Troubleshooting 8 Technical data ... the tank 18 6.2.2 Wet suction 19 6.2.3 Emptying the tank 19 6.2.4 Replacing the filter bag 20 6.2.5 Replacing the disposal bag 21 6.2.6 Replacing filter element (Auto Filter Cleaning System)......22 23 24 Original Instruction 3

VC4710 Instruction Manual
Page 11
tion firmly on to the inlet fitting. 5. Original Instruction 11 2.2 Preparing for dust pick-up: Inserting the filter bag A Makita VC4710 1. Close the retaining clamps (A ). ing clamps fit properly. Be sure that the retain- Open the retaining clamps A (A) and remove the upper sec-tion of the vacuum. Attach the upper section of the vacuum cleaner. 3. Press the filter bag connec- Ensure that the vacuum is switched off and unplugged. 2. Insert the filter bag into the tank. 1. 2. 3. 4. A A 6.
tion firmly on to the inlet fitting. 5. Original Instruction 11 2.2 Preparing for dust pick-up: Inserting the filter bag A Makita VC4710 1. Close the retaining clamps (A ). ing clamps fit properly. Be sure that the retain- Open the retaining clamps A (A) and remove the upper sec-tion of the vacuum. Attach the upper section of the vacuum cleaner. 3. Press the filter bag connec- Ensure that the vacuum is switched off and unplugged. 2. Insert the filter bag into the tank. 1. 2. 3. 4. A A 6.

VC4710 Instruction Manual
Page 12
Makita VC4710 2.3 Preparation for wet pick-up , always remove the filter bag/ disposal bag. 4. Before liquids are picked up : Empty container A 1. Open the retaining clamps A (A) and remove the upper section of the vacuum cleaner. 5. Close the retaining clamps A A (A). er. 3. Ensure that the vacuum is switched off and unplugged. 2. Attach the upper section of the vacuum clean- Be sure that the retaining clamps fit properly. 12 Original Instruction
Makita VC4710 2.3 Preparation for wet pick-up , always remove the filter bag/ disposal bag. 4. Before liquids are picked up : Empty container A 1. Open the retaining clamps A (A) and remove the upper section of the vacuum cleaner. 5. Close the retaining clamps A A (A). er. 3. Ensure that the vacuum is switched off and unplugged. 2. Attach the upper section of the vacuum clean- Be sure that the retaining clamps fit properly. 12 Original Instruction
VC4710 Instruction Manual
Page 14
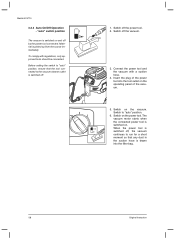
... on and off the vacuum. 3. Switch off by the power tool connected. Switch on the operating panel of the power tool into the filter bag. 14 Original Instruction Makita VC4710 3.2.3 Auto-On/Off-Operation - "auto" switch position The vacuum is drawn into the tool outlet on the vacuum. Insert the plug of the...
... on and off the vacuum. 3. Switch off by the power tool connected. Switch on the operating panel of the power tool into the filter bag. 14 Original Instruction Makita VC4710 3.2.3 Auto-On/Off-Operation - "auto" switch position The vacuum is drawn into the tool outlet on the vacuum. Insert the plug of the...

VC4710 Instruction Manual
Page 15
... complete cleaning if the filter element becomes extremely dirty. 1. Turn the switch to position "I" and let the vacuum operate for vacuum cleaning without the filter bag. Makita VC4710 10 sec . 3.3 Cleaning the filter element 3.3.1 Cleaning the filter element "Auto-Filter Cleaning System" Only for ap-
... complete cleaning if the filter element becomes extremely dirty. 1. Turn the switch to position "I" and let the vacuum operate for vacuum cleaning without the filter bag. Makita VC4710 10 sec . 3.3 Cleaning the filter element 3.3.1 Cleaning the filter element "Auto-Filter Cleaning System" Only for ap-
VC4710 Instruction Manual
Page 16
After picking up dry substances, always ensure that a filter bag is inserted in the tank (see page 23 for part #'s). If foam appears at exhaust vents, stop work immediately and properly dispose of chemicals in ... substances are picked up liquids If used correctly, additional accessories, suction nozzles and suction hoses can enhance the cleaning action and reduce the cleaning effort. Makita VC4710 4 Applications and techniques 4.1 Techniques 4.1.1 Picking up dry substances 4.1.2 Picking up , always remove the filter...
After picking up dry substances, always ensure that a filter bag is inserted in the tank (see page 23 for part #'s). If foam appears at exhaust vents, stop work immediately and properly dispose of chemicals in ... substances are picked up liquids If used correctly, additional accessories, suction nozzles and suction hoses can enhance the cleaning action and reduce the cleaning effort. Makita VC4710 4 Applications and techniques 4.1 Techniques 4.1.1 Picking up dry substances 4.1.2 Picking up , always remove the filter...

VC4710 Instruction Manual
Page 18
...and unplugged. 2. After finishing work Any other maintenance than described in chapter 6 should be A performed by Makita factory service center. 6.2.1 Emptying the tank After emptying the tank: clean the rim of vacuum before refitting... clamps (A) A and remove the upper sec- Close the retaining clamps A A (B). Makita VC4710 6 Maintenance 6.1 Maintenance plan 7.2.1 Emptying tank 7.2.2 Emptying tank after wet suction 7.2.3 Replacing the filter bag 7.2.4 Replacing the disposal bag 7.2.5 Replacing filter element 6.2 Maintenance work When required ...
...and unplugged. 2. After finishing work Any other maintenance than described in chapter 6 should be A performed by Makita factory service center. 6.2.1 Emptying the tank After emptying the tank: clean the rim of vacuum before refitting... clamps (A) A and remove the upper sec- Close the retaining clamps A A (B). Makita VC4710 6 Maintenance 6.1 Maintenance plan 7.2.1 Emptying tank 7.2.2 Emptying tank after wet suction 7.2.3 Replacing the filter bag 7.2.4 Replacing the disposal bag 7.2.5 Replacing filter element 6.2 Maintenance work When required ...

VC4710 Instruction Manual
Page 20
... switched off and unplugged. 2. Open the retaining clamps A (A) and remove the upper section of the new filter bag firmly on to the inlet fitting (B). 9. Press the cardboard collar of the vacuum clean- Makita VC4710 6.2.4 Replacing the filter bag A 1. Dispose of the vacuum. 10. Be sure that the retaining clamps fit properly. 20 Original Instruction...
... switched off and unplugged. 2. Open the retaining clamps A (A) and remove the upper section of the new filter bag firmly on to the inlet fitting (B). 9. Press the cardboard collar of the vacuum clean- Makita VC4710 6.2.4 Replacing the filter bag A 1. Dispose of the vacuum. 10. Be sure that the retaining clamps fit properly. 20 Original Instruction...

VC4710 Instruction Manual
Page 21
... inlet fitting (C). 5. Original Instruction 21 Dispose of the disposal bag in accordance with the slider. 6. E Inserting the disposal bag: 7. Ensure that the vacuum is switched off and unplugged. 2. 6.2.5 Replacing the disposal bag A Makita VC4710 1. Close the disposal bag with string (B). 4. er. B D C Removing the disposal bag: 3. Insert the disposal bag into the tank. 9. Check that the ventilation holes (E) remain...
... inlet fitting (C). 5. Original Instruction 21 Dispose of the disposal bag in accordance with the slider. 6. E Inserting the disposal bag: 7. Ensure that the vacuum is switched off and unplugged. 2. 6.2.5 Replacing the disposal bag A Makita VC4710 1. Close the disposal bag with string (B). 4. er. B D C Removing the disposal bag: 3. Insert the disposal bag into the tank. 9. Check that the ventilation holes (E) remain...

VC4710 Instruction Manual
Page 22
... Removing the filter elements: 3. er. settes with the filter elements onto the upper section of main filter elements we strongly recommend using filter bag when unit is switched off and unplugged. 2. Insert new filter elements (C) into the cassettes (D). 6. Open the retaining clamps A (A) and...section of the vacuum clean- Attach the cassettes with filter elements. Remove carefully the cas- Fix the filter tension part (B). 8. Makita VC4710 6.2.6 Replacing filter element (Auto-Filter Cleaning System) A Never use the vacuum without a filter.
... Removing the filter elements: 3. er. settes with the filter elements onto the upper section of main filter elements we strongly recommend using filter bag when unit is switched off and unplugged. 2. Insert new filter elements (C) into the cassettes (D). 6. Open the retaining clamps A (A) and...section of the vacuum clean- Attach the cassettes with filter elements. Remove carefully the cas- Fix the filter tension part (B). 8. Makita VC4710 6.2.6 Replacing filter element (Auto-Filter Cleaning System) A Never use the vacuum without a filter.

VC4710 Instruction Manual
Page 23
... again, contact the Makita service department. • Motor does not run in accord- is clogged. • See section "Wet suction", "Control/operation". • Replacement of filter bag + disposal bag" sections. •... Filter element is full. cleaning • Switch off the vacuum cleaner tripped. To maintaine product safety and reliability, repairs and other maintenance or adjustments should be 0,35 Amps. • Reduced suction power • Suction power selected with section "Control/op- 7 Troubleshooting Makita VC4710...
... again, contact the Makita service department. • Motor does not run in accord- is clogged. • See section "Wet suction", "Control/operation". • Replacement of filter bag + disposal bag" sections. •... Filter element is full. cleaning • Switch off the vacuum cleaner tripped. To maintaine product safety and reliability, repairs and other maintenance or adjustments should be 0,35 Amps. • Reduced suction power • Suction power selected with section "Control/op- 7 Troubleshooting Makita VC4710...

VC4710 Instruction Manual
Page 24
... X X X X Wet pickup X 24 Original Instruction Makita VC4710 8 Technical data MAKITA VC4710 US Voltage Mains frequency Current rating Power consumptionIEC Connected load for dust and liquid pick-up Fine dust (ex. P - 79859 Filter bag Disposal bag Container Recommendation for appliance socket Total connected load Air flow... m, EN 60704-1 Sound level Power cord: Length Power cord: Type Protection class Type of main filter elements we strongly recommend using filter bag when unit is operated with certified HEPA filters. P - 79843 P - 78293 P - 70297 P - 79865 W6084 For safety and ...
... X X X X Wet pickup X 24 Original Instruction Makita VC4710 8 Technical data MAKITA VC4710 US Voltage Mains frequency Current rating Power consumptionIEC Connected load for dust and liquid pick-up Fine dust (ex. P - 79859 Filter bag Disposal bag Container Recommendation for appliance socket Total connected load Air flow... m, EN 60704-1 Sound level Power cord: Length Power cord: Type Protection class Type of main filter elements we strongly recommend using filter bag when unit is operated with certified HEPA filters. P - 79843 P - 78293 P - 70297 P - 79865 W6084 For safety and ...
VC4710 Parts Breakdown
Page 1
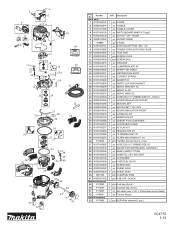
...1 pc O-RING 8 W107406161 1 pc AUTO ON-OFF PCB 120V - BLACK Standard accessory 49 P-78293 5 pcs Dust bag (5 pcs.) 50 P-70297 5 pcs Disposal bag (5 pcs.) 51 P-79865 1 pc Anti-static hose 1-3/8" x 16'Anti-static hose ø36x5m 52 W6084 Optonal ...accessory 1 pc Crevice Nozzle 53 P-79859 2 pcs HEPA filter element (2 pcs.) VC4710 1-13 Spare parts QTY Description 1 W107406157 1 pc COVER 2 W302004019 1 pc HANDLE 3 W107401369 1 pc HANDLE COVER 4 W107406158 1 pc SWITCHBOARD MAKITA...
...1 pc O-RING 8 W107406161 1 pc AUTO ON-OFF PCB 120V - BLACK Standard accessory 49 P-78293 5 pcs Dust bag (5 pcs.) 50 P-70297 5 pcs Disposal bag (5 pcs.) 51 P-79865 1 pc Anti-static hose 1-3/8" x 16'Anti-static hose ø36x5m 52 W6084 Optonal ...accessory 1 pc Crevice Nozzle 53 P-79859 2 pcs HEPA filter element (2 pcs.) VC4710 1-13 Spare parts QTY Description 1 W107406157 1 pc COVER 2 W302004019 1 pc HANDLE 3 W107401369 1 pc HANDLE COVER 4 W107406158 1 pc SWITCHBOARD MAKITA...
VC4710 Flyer English
Page 2
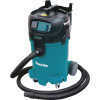
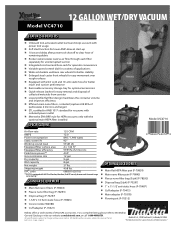
...Net weight 8 gal. 27 lbs. STANDARD EQUIPMENT n Main nano filters pair (P-79843) n Fleece nano filter bag (5/pk) (P-78293) n Disposal bag (5/pk) (P-70297) n Main flat nano filters (P-79843) n Fleece nano filter bag (P-78293) n Disposal bag (P-70297) n 1-3/8'' x 16' Anti-static hose (P-79865) n 1'' x 11-1/2' anti-static hose (P-70487... n ETL certified to the Makita General Catalog or visit our website at makitatools.com, or call 1-800-4MAKITA. therefore,PeakHPcan onlybe measured at normal usage not at start -up . 12 GALLON WET/DRY VACUUM Model VC4710 FEATURES & BENEFITS n Onboard tool...
...Net weight 8 gal. 27 lbs. STANDARD EQUIPMENT n Main nano filters pair (P-79843) n Fleece nano filter bag (5/pk) (P-78293) n Disposal bag (5/pk) (P-70297) n Main flat nano filters (P-79843) n Fleece nano filter bag (P-78293) n Disposal bag (P-70297) n 1-3/8'' x 16' Anti-static hose (P-79865) n 1'' x 11-1/2' anti-static hose (P-70487... n ETL certified to the Makita General Catalog or visit our website at makitatools.com, or call 1-800-4MAKITA. therefore,PeakHPcan onlybe measured at normal usage not at start -up . 12 GALLON WET/DRY VACUUM Model VC4710 FEATURES & BENEFITS n Onboard tool...