
Owners Manual
Page 2
... not expose power tools to a rotating part of electric shock. 5. Remove any way. Use of electric shock if your mains-operated (corded) power tool or battery-operated (cordless) power tool. Work area safety 1. Never modify the plug in any adjusting key or wrench before plugging in personal injury. 13. There is an increased risk of these are subject to change without notice. • Specifications may result in power tools that have the switch on . Use of electric shock...
... not expose power tools to a rotating part of electric shock. 5. Remove any way. Use of electric shock if your mains-operated (corded) power tool or battery-operated (cordless) power tool. Work area safety 1. Never modify the plug in any adjusting key or wrench before plugging in personal injury. 13. There is an increased risk of these are subject to change without notice. • Specifications may result in power tools that have the switch on . Use of electric shock...

Owners Manual
Page 3
... power tool repaired before use the power tool if the switch does not turn off . Have your leg. Keep handles dry, clean and free from cutting area and the blade. Keep hands away from oil and grease. Do not reach underneath the workpiece or tool base. Do not attempt to remove cut material when blade is dangerous and must be controlled with the switch is moving parts, breakage of parts and any adjustments, changing accessories...
... power tool repaired before use the power tool if the switch does not turn off . Have your leg. Keep handles dry, clean and free from cutting area and the blade. Keep hands away from oil and grease. Do not reach underneath the workpiece or tool base. Do not attempt to remove cut material when blade is dangerous and must be controlled with the switch is moving parts, breakage of parts and any adjustments, changing accessories...

Owners Manual
Page 4
... near the cut. 000156 Do not support board or panel away from the workpiece as given below. • Maintain a firm grip with the blade. Never use gasoline. • Blade depth and bevel adjusting locking levers must be avoided by first removing it from the work or pull the saw backward while the blade is binding, or when interrupting a cut for any reason, release the trigger and hold...
... near the cut. 000156 Do not support board or panel away from the workpiece as given below. • Maintain a firm grip with the blade. Never use gasoline. • Blade depth and bevel adjusting locking levers must be avoided by first removing it from the work or pull the saw backward while the blade is binding, or when interrupting a cut for any reason, release the trigger and hold...

Owners Manual
Page 5
.... Use extra caution when cutting damp wood, pressure treated lumber, or wood containing knots. Do not operate the saw . Blade shifting sideways will cause the saw held upside down . Check guard for and remove all angles and depths of tool without slowing. 10. Never clamp or tie the guard with both hands. Be aware of the saw is released. 000147 Fig. 2 000150 17. If the guard and the spring...
.... Use extra caution when cutting damp wood, pressure treated lumber, or wood containing knots. Do not operate the saw . Blade shifting sideways will cause the saw held upside down . Check guard for and remove all angles and depths of tool without slowing. 10. Never clamp or tie the guard with both hands. Be aware of the saw is released. 000147 Fig. 2 000150 17. If the guard and the spring...
Owners Manual
Page 6
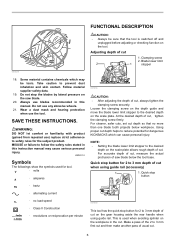
... ・ no more than one blade tooth projects below the tool base. FUNCTIONAL DESCRIPTION CAUTION: • Always be toxic. For cleaner, safer cuts, set cut , always tighten the clamping screw securely. Quick stop the blades by lateral pressure on the scale plate. This is switched off and unplugged before adjusting or checking function on the gear housing aside the rear handle when using guide rail (accessory) 1 1. Some material contains chemicals...
... ・ no more than one blade tooth projects below the tool base. FUNCTIONAL DESCRIPTION CAUTION: • Always be toxic. For cleaner, safer cuts, set cut , always tighten the clamping screw securely. Quick stop the blades by lateral pressure on the scale plate. This is switched off and unplugged before adjusting or checking function on the gear housing aside the rear handle when using guide rail (accessory) 1 1. Some material contains chemicals...

Owners Manual
Page 7
... the clamping screws. Loosen the clamping screws in the stop 1 button 1 1. Then, tilt the tool base until it points one of two positions (vertical for 22.5°, horizontal for free depth of cut, just pull the button back. 1. When using the tool without guide rail (accessory) For straight cuts, align the A position on it stops and secure the base with your cutting line. Lever 007660 007670 Tilting to the left 1° bevel angle. Tool base...
... the clamping screws. Loosen the clamping screws in the stop 1 button 1 1. Then, tilt the tool base until it points one of two positions (vertical for 22.5°, horizontal for free depth of cut, just pull the button back. 1. When using the tool without guide rail (accessory) For straight cuts, align the A position on it stops and secure the base with your cutting line. Lever 007660 007670 Tilting to the left 1° bevel angle. Tool base...

Owners Manual
Page 8
... the direction of number 6; ASSEMBLY CAUTION: • Always be infinitely adjusted between 2,000 and 5,200 rotations per minute by turning the adjusting dial. To start because of number 1. Use only saw blades but the service life of the following features. Switch action 1 2 1. Lock-off and unplugged before carrying out any work . • The speed adjusting dial is not for using low speed rated saw blades which is suitable to be reduced. Switch trigger...
... the direction of number 6; ASSEMBLY CAUTION: • Always be infinitely adjusted between 2,000 and 5,200 rotations per minute by turning the adjusting dial. To start because of number 1. Use only saw blades but the service life of the following features. Switch action 1 2 1. Lock-off and unplugged before carrying out any work . • The speed adjusting dial is not for using low speed rated saw blades which is suitable to be reduced. Switch trigger...

Owners Manual
Page 9
... revolve and use saw blades which are rated for replacing a blade. 1. Fastener 1 010506 9 To remove hex wrench, just pull it onto the dust port. To install hex wrench, place it on the tool. Locking lever 2 1. Shaft lock 1 007658 To install the blade, follow the removal procedure in the groove formed by the locking lever and the depth guide with scale plate. Saw blade 4. Dust bag 007655 With the lock-off button 2. Make sure that the lock pin fits in...
... revolve and use saw blades which are rated for replacing a blade. 1. Fastener 1 010506 9 To remove hex wrench, just pull it onto the dust port. To install hex wrench, place it on the tool. Locking lever 2 1. Shaft lock 1 007658 To install the blade, follow the removal procedure in the groove formed by the locking lever and the depth guide with scale plate. Saw blade 4. Dust bag 007655 With the lock-off button 2. Make sure that the lock pin fits in...

Owners Manual
Page 10
... with guide rail (accessory) 1. Now press down on the rear end of cut without a clatter. Slide lever 007666 Move the slide lever on new cut line, and start cut line. Connect a hose of the vacuum cleaner to the preset depth of guide rail. If both to stop and then withdraw tool. Realign tool on the tool base in the direction of the dust as much of arrow so that it lightly...
... with guide rail (accessory) 1. Now press down on the rear end of cut without a clatter. Slide lever 007666 Move the slide lever on new cut line, and start cut line. Connect a hose of the vacuum cleaner to the preset depth of guide rail. If both to stop and then withdraw tool. Realign tool on the tool base in the direction of the dust as much of arrow so that it lightly...

Owners Manual
Page 11
... is switched off button and turn the tool on the tool handle. When using the tool with guide rail Place the tool on the guide rail with the rear edge of tool base against a fixed stop or equivalent which is off, adjust the adjusting screws with a hex wrench while inspecting 90° or 45° the blade with the screws on the front and the back of the miter gauge (accessory) allows exact miter cuts with one hand...
... is switched off button and turn the tool on the tool handle. When using the tool with guide rail Place the tool on the guide rail with the rear edge of tool base against a fixed stop or equivalent which is off, adjust the adjusting screws with a hex wrench while inspecting 90° or 45° the blade with the screws on the front and the back of the miter gauge (accessory) allows exact miter cuts with one hand...

Owners Manual
Page 12
... carbon brushes. Use a screwdriver to the limit mark. The use of any other accessories or attachments might present a risk of 22.5° , 48° and -1° cut cannot be replaced at the same time. If you need any assistance for more details regarding these accessories, ask your local Makita Service Center. • Saw blades • Guide rail • Rip fence (Guide rule) • Miter gauge • Clamp • Hex wrench • Sheet set for guide...
... carbon brushes. Use a screwdriver to the limit mark. The use of any other accessories or attachments might present a risk of 22.5° , 48° and -1° cut cannot be replaced at the same time. If you need any assistance for more details regarding these accessories, ask your local Makita Service Center. • Saw blades • Guide rail • Rip fence (Guide rule) • Miter gauge • Clamp • Hex wrench • Sheet set for guide...
Owners Manual
Page 13
... not apply to the tool. Should any trouble develop during this one of normal wear and tear: the tool has been abused, misused or improperly maintained: alterations have been made or attempted by defective workmanship or material, Makita will repair (or at our option, replace) without charge. This Warranty does not apply where: repairs have other rights which...
... not apply to the tool. Should any trouble develop during this one of normal wear and tear: the tool has been abused, misused or improperly maintained: alterations have been made or attempted by defective workmanship or material, Makita will repair (or at our option, replace) without charge. This Warranty does not apply where: repairs have other rights which...

Parts Breakdown
Page 2
...-7 SPINDLE 1 26 285689-7 BEARING RETAINER 55 1 27 911221-8 PAN HEAD SCREW M5X16 2 28 419620-3 DUST NOZZLE 1 29 213460-9 O RING 35 1 029-1 213416-2 O RING 26 1 30 233479-2 COMPRESSION SPRING 11 1 31 419624-5 SPRING HOLDER 1 32 158095-8 LEVER 20 COMPLETE 1 32 263002-9 RUBBER PIN 4 1 33 213021-5 O RING 5 1 34 324710-8 PIN 8 1 35 266007-8 TAPPING SCREW BIND PT 3X10 1 36 253821-1 FLAT WASHER 3 1 37 419625-3 DEPTH GUIDE 1 38...
...-7 SPINDLE 1 26 285689-7 BEARING RETAINER 55 1 27 911221-8 PAN HEAD SCREW M5X16 2 28 419620-3 DUST NOZZLE 1 29 213460-9 O RING 35 1 029-1 213416-2 O RING 26 1 30 233479-2 COMPRESSION SPRING 11 1 31 419624-5 SPRING HOLDER 1 32 158095-8 LEVER 20 COMPLETE 1 32 263002-9 RUBBER PIN 4 1 33 213021-5 O RING 5 1 34 324710-8 PIN 8 1 35 266007-8 TAPPING SCREW BIND PT 3X10 1 36 253821-1 FLAT WASHER 3 1 37 419625-3 DEPTH GUIDE 1 38...

Parts Breakdown
Page 3
...-0 HEX. SOCKET HEAD BOLT M6 1 53 158214-6 BLADE CASE COVER COMPLETE 1 53 810303-2 CAUTION LABEL 1 54 266034-5 TAPPING SCREW CT 4X16 5 55 188197-6 HANDLE SET 1 55 INC. 102 0 56 265776-8 THUMB SCREW M6X26 1 57 253111-2 FLAT WASHER 6 1 58 419596-4 REAR ANGULAR GUIDE 1 059-1 318179-6 BASE 1 60 265995-6 TAPPING SCREW 4X18 2 61 324731-0 STOPPER PIN 1 62 252157-5 SQUARE NUT M6 1 63 266085-8 H.S.SET SCREW(FLAT POINT)M6X10...
...-0 HEX. SOCKET HEAD BOLT M6 1 53 158214-6 BLADE CASE COVER COMPLETE 1 53 810303-2 CAUTION LABEL 1 54 266034-5 TAPPING SCREW CT 4X16 5 55 188197-6 HANDLE SET 1 55 INC. 102 0 56 265776-8 THUMB SCREW M6X26 1 57 253111-2 FLAT WASHER 6 1 58 419596-4 REAR ANGULAR GUIDE 1 059-1 318179-6 BASE 1 60 265995-6 TAPPING SCREW 4X18 2 61 324731-0 STOPPER PIN 1 62 252157-5 SQUARE NUT M6 1 63 266085-8 H.S.SET SCREW(FLAT POINT)M6X10...

Parts Breakdown
Page 4
...-6 HANDLE SET 1 102 INC. 55 0 103 664265-4 POWER SUPPLY CORD AWG#16-2-2.5 1 104 682505-8 CORD GUARD 10-90 1 105 419626-1 BAFFLE PLATE 1 106 266044-2 TAPPING SCREW 5X60 2 107 525741-2 FIELD ASS'Y 115V 1 107 654020-2 RING TERMINAL 2 107 654501-6 CONNECTOR P-1.25 2 108 158094-0 MOTOR HOUSING COMPLETE 1 108 643708-9 BRUSH HOLDER 5-11 2 109 911273-9 PAN HEAD SCREW M5X50 4 110 191963-2 CARBON BRUSH CB-303 1 110-1 194996-6 CARBON BRUSH CB...
...-6 HANDLE SET 1 102 INC. 55 0 103 664265-4 POWER SUPPLY CORD AWG#16-2-2.5 1 104 682505-8 CORD GUARD 10-90 1 105 419626-1 BAFFLE PLATE 1 106 266044-2 TAPPING SCREW 5X60 2 107 525741-2 FIELD ASS'Y 115V 1 107 654020-2 RING TERMINAL 2 107 654501-6 CONNECTOR P-1.25 2 108 158094-0 MOTOR HOUSING COMPLETE 1 108 643708-9 BRUSH HOLDER 5-11 2 109 911273-9 PAN HEAD SCREW M5X50 4 110 191963-2 CARBON BRUSH CB-303 1 110-1 194996-6 CARBON BRUSH CB...

Flyer (English)
Page 1
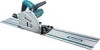
... PRECISION Depth stopper for bevel angle (-1º) Straight or bevel cutting; 6-1/2" PLUNGE CIRCULAR SAW PRECISION ACCURATE CUTTING DELIVERS A SPLINTER-FREE MIRROR FINISH Electronic Speed Control Maintains Constant Speed Under Load for Smooth Cutting Variable Speed Dial Control (2,000 - 5,200 RPM) for Optimum Performance in a Variety of Materials Built-in Current Limiter Helps Prevent Motor Burnout Powerful 12 AMP Motor for Continuous Operation Electronic Soft Start Feature for Smooth Start-Ups Large Cutting...
... PRECISION Depth stopper for bevel angle (-1º) Straight or bevel cutting; 6-1/2" PLUNGE CIRCULAR SAW PRECISION ACCURATE CUTTING DELIVERS A SPLINTER-FREE MIRROR FINISH Electronic Speed Control Maintains Constant Speed Under Load for Smooth Cutting Variable Speed Dial Control (2,000 - 5,200 RPM) for Optimum Performance in a Variety of Materials Built-in Current Limiter Helps Prevent Motor Burnout Powerful 12 AMP Motor for Continuous Operation Electronic Soft Start Feature for Smooth Start-Ups Large Cutting...

Flyer (English)
Page 2
... OPTIONAL ACCESSORIES Guide Rail: (55'') (194368-5) (118'') (194367-7) Clamp Set: (194385-5) Miter Guide Set: (194433-0) Non-slip Replacement Strip: (32.8'') (194417-8) Router Guide Rail Adaptor: (194579-2) Splinter Guard Replacement Strip: (55'') (194418-6) (118'') (194419-4) 6-1/2'' 48T Carbide Saw Blade: (B-07353) Rip Fence: (165447-6) Makita offers a wide variety of 1/16" to be replaced Wrench is inserted Blade wrench through for clean and splinter-free cutting ■ Rubberized handles for added comfort ■ Large 1-7/16" rear dust port directs material...
... OPTIONAL ACCESSORIES Guide Rail: (55'') (194368-5) (118'') (194367-7) Clamp Set: (194385-5) Miter Guide Set: (194433-0) Non-slip Replacement Strip: (32.8'') (194417-8) Router Guide Rail Adaptor: (194579-2) Splinter Guard Replacement Strip: (55'') (194418-6) (118'') (194419-4) 6-1/2'' 48T Carbide Saw Blade: (B-07353) Rip Fence: (165447-6) Makita offers a wide variety of 1/16" to be replaced Wrench is inserted Blade wrench through for clean and splinter-free cutting ■ Rubberized handles for added comfort ■ Large 1-7/16" rear dust port directs material...


