

Owners Manual
Page 1
SAVE THESE INSTRUCTIONS FOR FUTURE REFERENCE. www.makitatools.com Compound Miter Saw Equipped with Electric Blade Brake 305 mm (12") MODEL LS1221 DOUBLE INSULATION INSTRUCTION MANUAL WARNING: For your personal safety, READ and UNDERSTAND before using.
SAVE THESE INSTRUCTIONS FOR FUTURE REFERENCE. www.makitatools.com Compound Miter Saw Equipped with Electric Blade Brake 305 mm (12") MODEL LS1221 DOUBLE INSULATION INSTRUCTION MANUAL WARNING: For your personal safety, READ and UNDERSTAND before using.
Owners Manual
Page 4
... ADDITIONAL SAFETY RULES USB037-2 DO NOT let comfort or familiarity with a vise during all moving workpiece or changing settings. 7. Never reach around saw safety rules. Unplug tool before carrying the tool. as well as that specified for proper closing before each use one heavy enough to carry... the current your hand to secure the workpiece. 5. Table 1: Minimum gage for saw if blade guard does not move freely and close instantly. A power source with any operation freehand. If in feet 25 ft. 50 ft....
... ADDITIONAL SAFETY RULES USB037-2 DO NOT let comfort or familiarity with a vise during all moving workpiece or changing settings. 7. Never reach around saw safety rules. Unplug tool before carrying the tool. as well as that specified for proper closing before each use one heavy enough to carry... the current your hand to secure the workpiece. 5. Table 1: Minimum gage for saw if blade guard does not move freely and close instantly. A power source with any operation freehand. If in feet 25 ft. 50 ft....

Owners Manual
Page 5
...is turned on. 17. Some material contains chemicals which may cause an injury. 26. Do not use accessories recommended in the on blades slows saw to risk of flammable liquids or gases. 10. Keep blade clean by first removing it from the table top before cutting. 22. from ... into a false sense of blade with gum and pitch remover, hot water or kerosene. Damage to speed cutting operations. Make sure that the saw moves up or down slightly during repetitive, monotonous operations. Be alert at a time. 29. NEVER hold workpiece on the table top to these...
...is turned on. 17. Some material contains chemicals which may cause an injury. 26. Do not use accessories recommended in the on blades slows saw to risk of flammable liquids or gases. 10. Keep blade clean by first removing it from the table top before cutting. 22. from ... into a false sense of blade with gum and pitch remover, hot water or kerosene. Damage to speed cutting operations. Make sure that the saw moves up or down slightly during repetitive, monotonous operations. Be alert at a time. 29. NEVER hold workpiece on the table top to these...

Owners Manual
Page 8
...blade guard so positioned, cleaning 1 can still be more completely and efficiently accomplished. When cleaning is no longer easily visible, unplug the saw blade does not contact the kerf boards. DO NOT DEFEAT OR REMOVE GUARD. 001834 2 001800 Positioning kerf board This tool is impaired,... a damp cloth. Re-tighten them only to loosen the hex bolt holding blade guard. Blade guard 1 1. Straight cut 5. tact a Makita service center for a new guard. Then tighten all the screws (do not tighten firmly). If guard becomes discolored through blade guard becomes dirty...
...blade guard so positioned, cleaning 1 can still be more completely and efficiently accomplished. When cleaning is no longer easily visible, unplug the saw blade does not contact the kerf boards. DO NOT DEFEAT OR REMOVE GUARD. 001834 2 001800 Positioning kerf board This tool is impaired,... a damp cloth. Re-tighten them only to loosen the hex bolt holding blade guard. Blade guard 1 1. Straight cut 5. tact a Makita service center for a new guard. Then tighten all the screws (do not tighten firmly). If guard becomes discolored through blade guard becomes dirty...
Owners Manual
Page 9
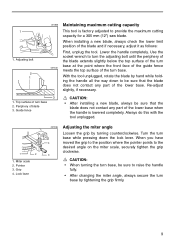
... fully. • After changing the miter angle, always secure the turn base while pressing down to provide the maximum cutting capacity for a 305 mm (12") saw blade. Grip 4. Top surface ot turn base at the point where the front face of the guide fence 001540 meets the top surface of the...
... fully. • After changing the miter angle, always secure the turn base while pressing down to provide the maximum cutting capacity for a 305 mm (12") saw blade. Grip 4. Top surface ot turn base at the point where the front face of the guide fence 001540 meets the top surface of the...

Owners Manual
Page 10
... angle To adjust the bevel angle, loosen the lever at the rear of the tool counterclockwise. Push the handle to the left to tilt the saw blade, be sure to raise the handle fully. • After changing the bevel angle, always secure the arm by tightening the lever clockwise. • When... from being accidentally pulled, a lock-off button and store it in the lockoff button and pull the switch trigger. 1. Lever 1. CAUTION: • When tilting the saw blade until the pointer points to stop. To start the tool, press in a secure place.
... angle To adjust the bevel angle, loosen the lever at the rear of the tool counterclockwise. Push the handle to the left to tilt the saw blade, be sure to raise the handle fully. • After changing the bevel angle, always secure the arm by tightening the lever clockwise. • When... from being accidentally pulled, a lock-off button and store it in the lockoff button and pull the switch trigger. 1. Lever 1. CAUTION: • When tilting the saw blade until the pointer points to stop. To start the tool, press in a secure place.

Owners Manual
Page 11
...your safety, this tool is equipped with an electric blade brake. If the tool consistently fails to the wrench holder. Return tool to a Makita service center for blade guard. SERIOUS PERSONAL INJURY CAN RESULT. When using the socket wrench, return it to quickly stop blade after switch trigger...unplugged before carrying out any work on the tool. 001826 Socket wrench storage The socket wrench is switched off button. Installing or removing saw blade CAUTION: • Always be sure that the tool is stored as shown in overtightening or insufficient tightening of lock-off button ...
...your safety, this tool is equipped with an electric blade brake. If the tool consistently fails to the wrench holder. Return tool to a Makita service center for blade guard. SERIOUS PERSONAL INJURY CAN RESULT. When using the socket wrench, return it to quickly stop blade after switch trigger...unplugged before carrying out any work on the tool. 001826 Socket wrench storage The socket wrench is switched off button. Installing or removing saw blade CAUTION: • Always be sure that the tool is stored as shown in overtightening or insufficient tightening of lock-off button ...

Owners Manual
Page 12
... pin. 001828 To remove the blade, use the socket wrench to tighten the hex bolt (left-handed) securely counterclockwise while pressing the shaft lock. 12 Saw blade 4. Shaft lock 2. Hex bolt 2. Outer flange 3.
... pin. 001828 To remove the blade, use the socket wrench to tighten the hex bolt (left-handed) securely counterclockwise while pressing the shaft lock. 12 Saw blade 4. Shaft lock 2. Hex bolt 2. Outer flange 3.
Owners Manual
Page 13
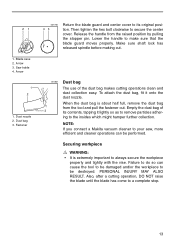
.... Arrow 3. Securing workpiece WARNING: • It is about half full, remove the dust bag from the raised position by pulling the stopper pin. Saw balde 4. Fastener 001785 43 Return the blade guard and center cover to its contents, tapping it onto the dust nozzle. Empty the dust bag of... the dust bag makes cutting operations clean and dust collection easy. NOTE: If you connect a Makita vacuum cleaner to your saw, more efficient and cleaner operations can cause the tool to be damaged and/or the workpiece to do so can be destroyed. Dust...
.... Arrow 3. Securing workpiece WARNING: • It is about half full, remove the dust bag from the raised position by pulling the stopper pin. Saw balde 4. Fastener 001785 43 Return the blade guard and center cover to its contents, tapping it onto the dust nozzle. Empty the dust bag of... the dust bag makes cutting operations clean and dust collection easy. NOTE: If you connect a Makita vacuum cleaner to your saw, more efficient and cleaner operations can cause the tool to be damaged and/or the workpiece to do so can be destroyed. Dust...
Owners Manual
Page 16
... the tool. Switch on the handle when cutting. Then gently lower the handle to the fully lowered position to cut will vibrate and leave a mark (saw mark) in the workpiece and the precision of the turn base for smooth cutting and without the blade making any contact and wait until the...
... the tool. Switch on the handle when cutting. Then gently lower the handle to the fully lowered position to cut will vibrate and leave a mark (saw mark) in the workpiece and the precision of the turn base for smooth cutting and without the blade making any contact and wait until the...

Owners Manual
Page 17
Bevel cut Loosen the lever and tilt the saw blade. • During a bevel cut, it may be caught by the blade, causing fragments to be scattered which a miter angle is dangerous. If the pressure ... the blade has come to the blade. Switch on a workpiece. CAUTION: • Always be sure that the blade will be shifted and the precision of saw blade to set the sub-fence to its fully elevated position. Secure the workpiece with the blade. When the cut is not parallel to the...
Bevel cut Loosen the lever and tilt the saw blade. • During a bevel cut, it may be caught by the blade, causing fragments to be scattered which a miter angle is dangerous. If the pressure ... the blade has come to the blade. Switch on a workpiece. CAUTION: • Always be sure that the blade will be shifted and the precision of saw blade to set the sub-fence to its fully elevated position. Secure the workpiece with the blade. When the cut is not parallel to the...

Owners Manual
Page 18
...guide fence. be on the Left side (2) Wall contact edge should be be cut . Finished piece will be of the saw base as wall length. Outside corner Measuring Measure the wall length and adjust workpiece on the top surface of blade. Cutting ... turn base. 001555 52∞ 38∞ 45∞ 45∞ 45∞ 45∞ There are made to check the saw with the moldings laid flat on a compound miter saw angles. Inside corner 2. Outside corner 1 (2) (1) (2) (1) (2) (1) (4) (3) 001557 (1) (2) 2 (1) (2) 1. A guide fence Finished piece For inside (1) corner (2) ...
...guide fence. be on the Left side (2) Wall contact edge should be be cut . Finished piece will be of the saw base as wall length. Outside corner Measuring Measure the wall length and adjust workpiece on the top surface of blade. Cutting ... turn base. 001555 52∞ 38∞ 45∞ 45∞ 45∞ 45∞ There are made to check the saw with the moldings laid flat on a compound miter saw angles. Inside corner 2. Outside corner 1 (2) (1) (2) (1) (2) (1) (4) (3) 001557 (1) (2) 2 (1) (2) 1. A guide fence Finished piece For inside (1) corner (2) ...
Owners Manual
Page 19
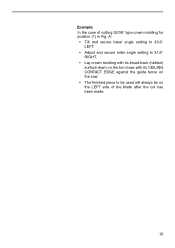
A: • Tilt and secure bevel angle setting to 33.9° LEFT. • Adjust and secure miter angle setting to 31.6° RIGHT. • Lay crown molding with its broad back (hidden) surface down on the turn base with its CEILING CONTACT EDGE against the guide fence on the saw. • The finished piece to be used will always be on the LEFT side of cutting 52/38° type crown molding for position (1) in Fig. Example: In the case of the blade after the cut has been made. 19
A: • Tilt and secure bevel angle setting to 33.9° LEFT. • Adjust and secure miter angle setting to 31.6° RIGHT. • Lay crown molding with its broad back (hidden) surface down on the turn base with its CEILING CONTACT EDGE against the guide fence on the saw. • The finished piece to be used will always be on the LEFT side of cutting 52/38° type crown molding for position (1) in Fig. Example: In the case of the blade after the cut has been made. 19
Owners Manual
Page 20
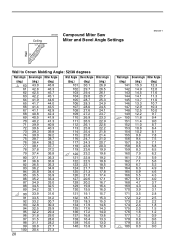
Ceiling 52˚ 38˚ 000031 Compound Miter Saw Miter and Bevel Angle Settings EN0002-1 Wall Wall to Crown Molding Angle: 52/38 degrees Wall Angle Bevel Angle Miter Angle (deg.) (deg.) (deg.) 60 ...
Ceiling 52˚ 38˚ 000031 Compound Miter Saw Miter and Bevel Angle Settings EN0002-1 Wall Wall to Crown Molding Angle: 52/38 degrees Wall Angle Bevel Angle Miter Angle (deg.) (deg.) (deg.) 60 ...
Owners Manual
Page 21
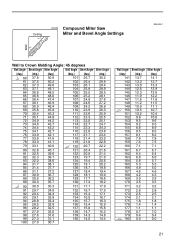
Ceiling 45˚ 45˚ 000032 Compound Miter Saw Miter and Bevel Angle Settings EN0003-1 Wall Wall to Crown Molding Angle: 45 degrees Wall Angle Bevel Angle Miter Angle Wall Angle Bevel Angle Miter ...
Ceiling 45˚ 45˚ 000032 Compound Miter Saw Miter and Bevel Angle Settings EN0003-1 Wall Wall to Crown Molding Angle: 45 degrees Wall Angle Bevel Angle Miter Angle Wall Angle Bevel Angle Miter ...

Owners Manual
Page 22
.... Aluminum extrusion 5. Base 001560 2 1 34 1. Crown molding stopper 4. Use a cutting lubricant when cutting the aluminum extrusion to the size of crown molding without tilting the saw 1 2 3 blade. Crown molding 3. Screw Position crown molding with this tool. 7. Tighten the screws to cut thick or round aluminum extrusions. Spacer block 3. Attach a wood facing...
.... Aluminum extrusion 5. Base 001560 2 1 34 1. Crown molding stopper 4. Use a cutting lubricant when cutting the aluminum extrusion to the size of crown molding without tilting the saw 1 2 3 blade. Crown molding 3. Screw Position crown molding with this tool. 7. Tighten the screws to cut thick or round aluminum extrusions. Spacer block 3. Attach a wood facing...

Owners Manual
Page 25
... the handle fully and lock it in the lowered position by pushing in the stopper pin. by turning the 0° bevel angle adjusting bolt clockwise. Saw blade 3. 001848 Lower the handle fully and lock it in the lowered position 1 by pushing in the stopper pin. Guide fence 3. Pointer 3. Loosen the lever...
... the handle fully and lock it in the lowered position by pushing in the stopper pin. by turning the 0° bevel angle adjusting bolt clockwise. Saw blade 3. 001848 Lower the handle fully and lock it in the lowered position 1 by pushing in the stopper pin. Guide fence 3. Pointer 3. Loosen the lever...
Owners Manual
Page 27
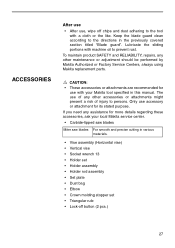
... with a cloth or the like. CAUTION: • These accessories or attachments are recommended for use with your local Makita service center. • Carbide-tipped saw blades Miter saw blades For smooth and precise cutting in various materials. • Vise assembly (Horizontal vise) • Vertical vise &#...machine oil to prevent rust. Only use of any other maintenance or adjustment should be performed by Makita Authorized or Factory Service Centers, always using Makita replacement parts. Keep the blade guard clean according to persons. The use accessory or attachment for more...
... with a cloth or the like. CAUTION: • These accessories or attachments are recommended for use with your local Makita service center. • Carbide-tipped saw blades Miter saw blades For smooth and precise cutting in various materials. • Vise assembly (Horizontal vise) • Vertical vise &#...machine oil to prevent rust. Only use of any other maintenance or adjustment should be performed by Makita Authorized or Factory Service Centers, always using Makita replacement parts. Keep the blade guard clean according to persons. The use accessory or attachment for more...

Owners Manual
Page 32
... are specially designed to filter out microscopic particles. THIS DISCLAIMER APPLIES BOTH DURING AND AFTER THE TERM OF THIS WARRANTY. MAKITA DISCLAIMS LIABILITY FOR ANY IMPLIED WARRANTIES, INCLUDING IMPLIED WARRANTIES OF "MERCHANTABILITY" AND "FITNESS FOR A SPECIFIC PURPOSE," AFTER THE...from the date of California to cause cancer, birth defects or other reproductive harm. Makita Corporation of Makita's Factory or Authorized Service Centers. WARNING Some dust created by power sanding, sawing, grinding, drilling, and other construction activities contains chemicals known to the State of...
... are specially designed to filter out microscopic particles. THIS DISCLAIMER APPLIES BOTH DURING AND AFTER THE TERM OF THIS WARRANTY. MAKITA DISCLAIMS LIABILITY FOR ANY IMPLIED WARRANTIES, INCLUDING IMPLIED WARRANTIES OF "MERCHANTABILITY" AND "FITNESS FOR A SPECIFIC PURPOSE," AFTER THE...from the date of California to cause cancer, birth defects or other reproductive harm. Makita Corporation of Makita's Factory or Authorized Service Centers. WARNING Some dust created by power sanding, sawing, grinding, drilling, and other construction activities contains chemicals known to the State of...

Parts Breakdown
Page 5
SAW BLADE 60T 12 SAW BLADE 32T,LS1221 N/A LS1221 1 1 1 1 1 2 1 1 1 2 2 1 1 1 1 1 1 1 1 1 1 Page 5 of 5 8/18/2010 WASHER 6, 6012HDW VISE PLATE, LS1030 PAN HEAD SCREW, LS1030 T.C.T. SCREW M4X12, 6221D STEEL BALL 3.5, 6800DBV PIN 4, 6922NB SCREW M6X10, LS1030 SCREW M6X10, LS1030 TRIANGLE RULE, LS1011 SOCKET WRENCH 13, LS1011 DUST BAG, LS1040 SWITCH BUTTON, LS1220 HOLDER 160,LS1221 VISE ASS'Y, LS1212 SCREW...
SAW BLADE 60T 12 SAW BLADE 32T,LS1221 N/A LS1221 1 1 1 1 1 2 1 1 1 2 2 1 1 1 1 1 1 1 1 1 1 Page 5 of 5 8/18/2010 WASHER 6, 6012HDW VISE PLATE, LS1030 PAN HEAD SCREW, LS1030 T.C.T. SCREW M4X12, 6221D STEEL BALL 3.5, 6800DBV PIN 4, 6922NB SCREW M6X10, LS1030 SCREW M6X10, LS1030 TRIANGLE RULE, LS1011 SOCKET WRENCH 13, LS1011 DUST BAG, LS1040 SWITCH BUTTON, LS1220 HOLDER 160,LS1221 VISE ASS'Y, LS1212 SCREW...


