Owners Manual
Page 5
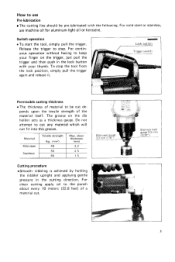
... trigger t o stop the tool from the lock position, simply pull the trigger again and release it. To stop . For clean cutting apply oil to the punch about every 10 meters (32.8 feet) of the material itself. For mild steel or stainless, use Pre-lubrication The cutting line should be cut any...
... trigger t o stop the tool from the lock position, simply pull the trigger again and release it. To stop . For clean cutting apply oil to the punch about every 10 meters (32.8 feet) of the material itself. For mild steel or stainless, use Pre-lubrication The cutting line should be cut any...
Owners Manual
Page 6
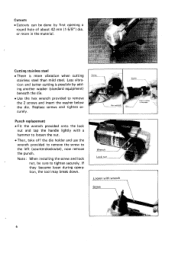
... may break down. Replace screws and tighten securely. Note : When installing the screw and lock nut, be sure to the left (counterclockwise), now remove the punch. Punch replacement .Fit the wrench provided onto the lock nut and tap the handle lightly with wrench Screw 6 Loosen with a hammer t o loosen the nut. .Then, take...
... may break down. Replace screws and tighten securely. Note : When installing the screw and lock nut, be sure to the left (counterclockwise), now remove the punch. Punch replacement .Fit the wrench provided onto the lock nut and tap the handle lightly with wrench Screw 6 Loosen with a hammer t o loosen the nut. .Then, take...

Owners Manual
Page 7
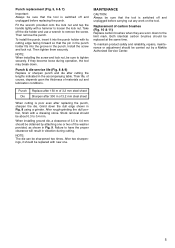
..., of course, depends upon the thickness of 3.2 m m (118") steel sheet *When cutting is poor even after replacing the punch, sharpen the die. Grind/sharpen; rm 3.5-4.0mm I Washer Punch Replace after 150 m (492.1 ft.) of 3.2 mm (118") steel sheet Sharpen after cutting the lengths indicated in the figure....Failure t o have the proper clearance will reulst in the figure using , clean out the die area, lubricate with a dressing stone. Caution ; Punch & die service l i f e Replace or sharpen punch and die after 3 0 0 m 1984.3 ft.) of materials cut and lubrication conditions.
..., of course, depends upon the thickness of 3.2 m m (118") steel sheet *When cutting is poor even after replacing the punch, sharpen the die. Grind/sharpen; rm 3.5-4.0mm I Washer Punch Replace after 150 m (492.1 ft.) of 3.2 mm (118") steel sheet Sharpen after cutting the lengths indicated in the figure....Failure t o have the proper clearance will reulst in the figure using , clean out the die area, lubricate with a dressing stone. Caution ; Punch & die service l i f e Replace or sharpen punch and die after 3 0 0 m 1984.3 ft.) of materials cut and lubrication conditions.
Owners Manual
Page 9
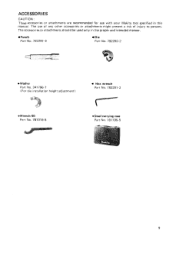
ACCESSOR IES CAUTION : These accessories o r attachments are recommended for use of any other accessories or attachments might present a risk of injury t o persons. The accessories or attachments should be used only in this manual. Punch Part No. 792291-4 Die Part No. 792292-2 Washer Part No. 341796-7 ( F o r die installation height adjustment) Hex wrench Part No. 783201-2 .Wrench 50 Part No. 781019-5 .Steel carrying case Part No. 181795-5 9 The use w i t h y o u r Makita t o o l specified in the proper and intended manner.
ACCESSOR IES CAUTION : These accessories o r attachments are recommended for use of any other accessories or attachments might present a risk of injury t o persons. The accessories or attachments should be used only in this manual. Punch Part No. 792291-4 Die Part No. 792292-2 Washer Part No. 341796-7 ( F o r die installation height adjustment) Hex wrench Part No. 783201-2 .Wrench 50 Part No. 781019-5 .Steel carrying case Part No. 181795-5 9 The use w i t h y o u r Makita t o o l specified in the proper and intended manner.
Owners Manual
Page 11
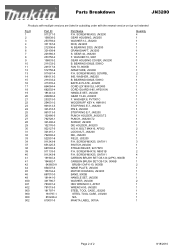
... 1 BafflP Platri 11 1 Cord Guard 18 1 Cord 19 1 Handle Set [With Item 481 20 1 Gear Compleie 1 5 - 4 6 21 1 Flat Washer 8 22 1 Woodruff K e y 4 'E,',"$:, DESCRIPTION S o p - 2 2 - - ' 9 4 US 1 Stop Rinq E 1 1 Punch Holder 30 2 :: '31 1 32 ~ 1 1 3 31 1 38 1 39 2 40 4 41 2 42 2 43 2 44 1 45 1 46 1 48 1 Hex Socket Head Bolt M 4 x 1 6 Lock Nul Die FIELD ASSEMBLY Pan...
... 1 BafflP Platri 11 1 Cord Guard 18 1 Cord 19 1 Handle Set [With Item 481 20 1 Gear Compleie 1 5 - 4 6 21 1 Flat Washer 8 22 1 Woodruff K e y 4 'E,',"$:, DESCRIPTION S o p - 2 2 - - ' 9 4 US 1 Stop Rinq E 1 1 Punch Holder 30 2 :: '31 1 32 ~ 1 1 3 31 1 38 1 39 2 40 4 41 2 42 2 43 2 44 1 45 1 46 1 48 1 Hex Socket Head Bolt M 4 x 1 6 Lock Nul Die FIELD ASSEMBLY Pan...
Parts Breakdown
Page 2
... KEY 4, HM1810 STOP RING E-7, JN3200 PIN 9, JN3200 STOP RING E-7, JN3200 PUNCH HOLDER, JN3200,T2 PUNCH, JN3200,T2 SCREW, JN3200 DIE HOLDER, JN3200 H.S.H. SCREW M4X18, N9501B P.H. SCREW M5X60, 9218PBL INS. BOLT M4X16, AF502 LOCK NUT, JN3200 DIE, JN3200 FIELD, JS3200 P.H. SCREW M5X50, JN3200 GEAR HOUSING, JN3200 WASHER 12, JS3200 ROD, JN3200 N. WASHER 10, 9901 GEAR HOUSING COVER, JN3200 B. BEARING 2020, JN3200 CRANKSHAFT, JN3200 S. WASHER, JN3200 B. SCREW M5X25, GA7911 SWITCH...
... KEY 4, HM1810 STOP RING E-7, JN3200 PIN 9, JN3200 STOP RING E-7, JN3200 PUNCH HOLDER, JN3200,T2 PUNCH, JN3200,T2 SCREW, JN3200 DIE HOLDER, JN3200 H.S.H. SCREW M4X18, N9501B P.H. SCREW M5X60, 9218PBL INS. BOLT M4X16, AF502 LOCK NUT, JN3200 DIE, JN3200 FIELD, JS3200 P.H. SCREW M5X50, JN3200 GEAR HOUSING, JN3200 WASHER 12, JS3200 ROD, JN3200 N. WASHER 10, 9901 GEAR HOUSING COVER, JN3200 B. BEARING 2020, JN3200 CRANKSHAFT, JN3200 S. WASHER, JN3200 B. SCREW M5X25, GA7911 SWITCH...
Instruction Manual
Page 4
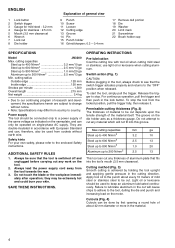
... Screw 11 Loosen 12 Cutting edge 13 Groove 14 Pin 15 Punch holder 16 Grind/sharpen; 0.3 - 0.4 mm 17 Remove dull portion 18 Die 19 Washer 20 Limit mark 21 Screwdriver 22 Brush holder cap SPECIFICATIONS Model JN3200 Max. Always be cut any work on the motor. Switch action (Fig. 1) CAUTION: ... cutting line with European Standard and can be extremely hot and could burn your own safety, please refer to the tool, dulling the die and punch and increasing load on the tool. 2. use light oil or kerosene when cutting aluminum. Cutting method (Fig. 3) Smooth cutting is switched off and ...
... Screw 11 Loosen 12 Cutting edge 13 Groove 14 Pin 15 Punch holder 16 Grind/sharpen; 0.3 - 0.4 mm 17 Remove dull portion 18 Die 19 Washer 20 Limit mark 21 Screwdriver 22 Brush holder cap SPECIFICATIONS Model JN3200 Max. Always be cut any work on the motor. Switch action (Fig. 1) CAUTION: ... cutting line with European Standard and can be extremely hot and could burn your own safety, please refer to the tool, dulling the die and punch and increasing load on the tool. 2. use light oil or kerosene when cutting aluminum. Cutting method (Fig. 3) Smooth cutting is switched off and ...
Instruction Manual
Page 5
... fits into the groove in Fig. 9. Failure to loosen the lock nut. Then remove the punch. Punch replacement (Fig. 5, 6 & 7) Important: Always be carried out by attaching one . 5 MAINTENANCE CAUTION: Always be obtained by a Makita Authorized Service Center. Punch Die Replace after 150 m of 3.2 mm steel sheet Sharpen after cutting the lengths indicated in Fig...
... fits into the groove in Fig. 9. Failure to loosen the lock nut. Then remove the punch. Punch replacement (Fig. 5, 6 & 7) Important: Always be carried out by attaching one . 5 MAINTENANCE CAUTION: Always be obtained by a Makita Authorized Service Center. Punch Die Replace after 150 m of 3.2 mm steel sheet Sharpen after cutting the lengths indicated in Fig...