Owners Manual
Page 1
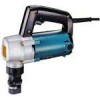
cutting radius Mild steel Stainless Outside edge Inside edge 3.2 mm (118") 2 5 mm 128 mm 13/32',) (5-1116") (142-03m14m") AMPS "I A Strokes per minute 1,300 Overall length Net we'ght 215 mm 3.4kg (8-112") (7.5Ibs) Power s u p p l ~cord 2.5 m (8.2f t . ) cutting capacities Min. MODEL JN3200 INSTRUCTION MANUAL DOUBLE INSULATlO N SPECIFlCAT10NS Max.
cutting radius Mild steel Stainless Outside edge Inside edge 3.2 mm (118") 2 5 mm 128 mm 13/32',) (5-1116") (142-03m14m") AMPS "I A Strokes per minute 1,300 Overall length Net we'ght 215 mm 3.4kg (8-112") (7.5Ibs) Power s u p p l ~cord 2.5 m (8.2f t . ) cutting capacities Min. MODEL JN3200 INSTRUCTION MANUAL DOUBLE INSULATlO N SPECIFlCAT10NS Max.
Owners Manual
Page 2
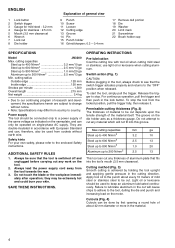
... the job of children. 5. Don't use circular saw for lubricating and changing accessories. They can be caught in damp or wet locations. Also use power tools in moving parts. Never carry tool by authorized service facility. IO. SECURE WORK. DON'T OVERREACH. Keep tools sharp and clean for purpose not intended; Inspect tool cords periodically and if damaged, have repaired by cord or yank it frees both hands t o operate tool. 11. DISCONNECTTOOLS.
... the job of children. 5. Don't use circular saw for lubricating and changing accessories. They can be caught in damp or wet locations. Also use power tools in moving parts. Never carry tool by authorized service facility. IO. SECURE WORK. DON'T OVERREACH. Keep tools sharp and clean for purpose not intended; Inspect tool cords periodically and if damaged, have repaired by cord or yank it frees both hands t o operate tool. 11. DISCONNECTTOOLS.
Owners Manual
Page 3
... of moving parts, breakage of power and overheating. 14. When using an extension cord, be properly repaired or replaced by authorized service center. For example; Form habit of the tool, a guard or other conditions that keys and adjusting wrenches are doing, use tool if switch does not turn it will cause a drop in line voltage resulting in . 16. Don't operate tool when you are removed from tool before turning it still...
... of moving parts, breakage of power and overheating. 14. When using an extension cord, be properly repaired or replaced by authorized service center. For example; Form habit of the tool, a guard or other conditions that keys and adjusting wrenches are doing, use tool if switch does not turn it will cause a drop in line voltage resulting in . 16. Don't operate tool when you are removed from tool before turning it still...

Owners Manual
Page 4
A power source with voltage less than that specified on the nameplate of the tool. If in SERIOUS INJURY t o the user - Using a power source with voltage greater than the nameplate rating is the same as damage t o the tool. Nibbler & Standard Equipment 0Washer 2 (For die installation height adjustment) 0Hex wrench 1 0Wrench ( 5 0 1 4 as well as that specified for the tool can result in doubt, DO NOT PLUG IN THE TOOL. VOLTAGE WARNING: Before connecting the tool to a power source (receptacle, outlet, etc.) be sure the voltage supplied is harmful to the motor.
A power source with voltage less than that specified on the nameplate of the tool. If in SERIOUS INJURY t o the user - Using a power source with voltage greater than the nameplate rating is the same as damage t o the tool. Nibbler & Standard Equipment 0Washer 2 (For die installation height adjustment) 0Hex wrench 1 0Wrench ( 5 0 1 4 as well as that specified for the tool can result in doubt, DO NOT PLUG IN THE TOOL. VOLTAGE WARNING: Before connecting the tool to a power source (receptacle, outlet, etc.) be sure the voltage supplied is harmful to the motor.
Owners Manual
Page 5
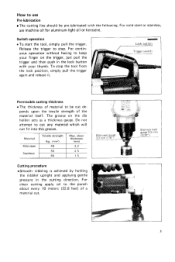
... with your finger on the die holder acts as a thickness gauge. pends upon the tensile strength of a material cut any material which will not fit into this groove. Do not attempt t o cut . 5 Release the trigger t o stop the tool from the lock position, simply pull the trigger again and release it. How to use machine oil for aluminum light oil or kerosene. Material Mild steel Stain...
... with your finger on the die holder acts as a thickness gauge. pends upon the tensile strength of a material cut any material which will not fit into this groove. Do not attempt t o cut . 5 Release the trigger t o stop the tool from the lock position, simply pull the trigger again and release it. How to use machine oil for aluminum light oil or kerosene. Material Mild steel Stain...
Owners Manual
Page 6
... operation, the tool may break down. Replace screws and tighten securely. Punch replacement .Fit the wrench provided onto the lock nut and tap the handle lightly with wrench Screw 6 or more vibration when cutting stainless steel than mild steel. Note : When installing the screw and lock nut, be sure to the left (counterclockwise), now remove the punch. Loosen with a hammer t o loosen the nut. .Then, take off the die holder and use the wrench provided t o remove...
... operation, the tool may break down. Replace screws and tighten securely. Punch replacement .Fit the wrench provided onto the lock nut and tap the handle lightly with wrench Screw 6 or more vibration when cutting stainless steel than mild steel. Note : When installing the screw and lock nut, be sure to the left (counterclockwise), now remove the punch. Loosen with a hammer t o loosen the nut. .Then, take off the die holder and use the wrench provided t o remove...

Owners Manual
Page 7
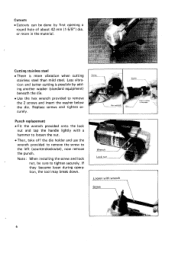
Maintenance After using a grinder. Punch & die service l i f e Replace or sharpen punch and die after cutting the lengths indicated in vibration during operation. Failure t o have the proper clearance will reulst in the accompanying table. A loose screw can cause tool breakage during cutting. After rough-grindingthe dull portion, finish with machine oil, run for a minute or two and store the tool. Stock removal should suffice. Grind/sharpen...
Maintenance After using a grinder. Punch & die service l i f e Replace or sharpen punch and die after cutting the lengths indicated in vibration during operation. Failure t o have the proper clearance will reulst in the accompanying table. A loose screw can cause tool breakage during cutting. After rough-grindingthe dull portion, finish with machine oil, run for a minute or two and store the tool. Stock removal should suffice. Grind/sharpen...

Owners Manual
Page 8
... the brush holder cap with a (-1 screwdriver. a 0 \ Carbon brush q To maintain product SAFETY and RELIABILITY, repairs, any other maintenance or adjustment should be replaced at the same time. Replacing carbon brushes Remove and check the carbon brushes regularly. Keep the carbon brushes clean and free t o slip in the holders. Both carbon brushes should be performed by Makita Authorized or Factory Service Centers, always using Makita replacement parts. Use only identical carbon brushes. Unscrew to perform . MAINTENANCE CAUTION: Always be sure that the tool is switched...
... the brush holder cap with a (-1 screwdriver. a 0 \ Carbon brush q To maintain product SAFETY and RELIABILITY, repairs, any other maintenance or adjustment should be replaced at the same time. Replacing carbon brushes Remove and check the carbon brushes regularly. Keep the carbon brushes clean and free t o slip in the holders. Both carbon brushes should be performed by Makita Authorized or Factory Service Centers, always using Makita replacement parts. Use only identical carbon brushes. Unscrew to perform . MAINTENANCE CAUTION: Always be sure that the tool is switched...
Owners Manual
Page 9
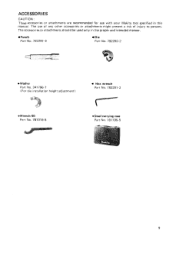
Punch Part No. 792291-4 Die Part No. 792292-2 Washer Part No. 341796-7 ( F o r die installation height adjustment) Hex wrench Part No. 783201-2 .Wrench 50 Part No. 781019-5 .Steel carrying case Part No. 181795-5 9 The use w i t h y o u r Makita t o o l specified in the proper and intended manner. ACCESSOR IES CAUTION : These accessories o r attachments are recommended for use of any other accessories or attachments might present a risk of injury t o persons. The accessories or attachments should be used only in this manual.
Punch Part No. 792291-4 Die Part No. 792292-2 Washer Part No. 341796-7 ( F o r die installation height adjustment) Hex wrench Part No. 783201-2 .Wrench 50 Part No. 781019-5 .Steel carrying case Part No. 181795-5 9 The use w i t h y o u r Makita t o o l specified in the proper and intended manner. ACCESSOR IES CAUTION : These accessories o r attachments are recommended for use of any other accessories or attachments might present a risk of injury t o persons. The accessories or attachments should be used only in this manual.
Owners Manual
Page 10
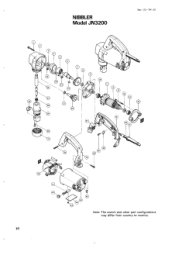
NIBBLER Model JN3200 Sep.--22--'94 US Note: The switch and other part configurations may differ from country to country. 10
NIBBLER Model JN3200 Sep.--22--'94 US Note: The switch and other part configurations may differ from country to country. 10
Owners Manual
Page 11
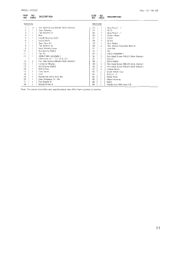
... 1 Cord 19 1 Handle Set [With Item 481 20 1 Gear Compleie 1 5 - 4 6 21 1 Flat Washer 8 22 1 Woodruff K e y 4 'E,',"$:, DESCRIPTION S o p - 2 2 - - ' 9 4 US 1 Stop Rinq E 1 1 Punch Holder 30 2 :: '31 1 32 ~ 1 1 3 31 1 38 1 39 2 40 4 41 2 42 2 43 2 44 1 45 1 46 1 48 1 Hex Socket Head Bolt M 4 x 1 6 Lock Nul Die FIELD ASSEMBLY Pan Head Screw M 5 x 2 5 (With Washer1 Sw8tc.h Strain Relief Pan Head Screw M4x18 IWith Washer) Pan Head Screw M5x25 IWith Washer1 Carbon Brush Brush Holder Cap Rivet 0 3 Name Plate Motor...
... 1 Cord 19 1 Handle Set [With Item 481 20 1 Gear Compleie 1 5 - 4 6 21 1 Flat Washer 8 22 1 Woodruff K e y 4 'E,',"$:, DESCRIPTION S o p - 2 2 - - ' 9 4 US 1 Stop Rinq E 1 1 Punch Holder 30 2 :: '31 1 32 ~ 1 1 3 31 1 38 1 39 2 40 4 41 2 42 2 43 2 44 1 45 1 46 1 48 1 Hex Socket Head Bolt M 4 x 1 6 Lock Nul Die FIELD ASSEMBLY Pan Head Screw M 5 x 2 5 (With Washer1 Sw8tc.h Strain Relief Pan Head Screw M4x18 IWith Washer) Pan Head Screw M5x25 IWith Washer1 Carbon Brush Brush Holder Cap Rivet 0 3 Name Plate Motor...

Owners Manual
Page 12
... Makita will repair (or at our option, replace) without charge. This Warranty does not apply where: 0 repairs have been made to the tool. MAKlTA DISCLAIMS LIABILITY FOR ANY IMPLIED WARRANTIES, INCLUDING IMPLIED WARRANTIES O F "MERCHANTABILITY" AND "FITNESS FOR A SPECIFIC PURPOSE," AFTER THE ONE-YEAR TERM O F THIS WARRANTY. Makita Corporation...the factory. IN NO 1:VbNT SHALL MAKITA BE LIABLE FOR ANY INDIKtCT, INCIDkNTAL OR CONSFQUFNTIAL DAMAGES FROM THF SALI: OK USE 01: THI. This Warranty gives you specific legal rights, and you . Should any trouble develop during this one of original ...
... Makita will repair (or at our option, replace) without charge. This Warranty does not apply where: 0 repairs have been made to the tool. MAKlTA DISCLAIMS LIABILITY FOR ANY IMPLIED WARRANTIES, INCLUDING IMPLIED WARRANTIES O F "MERCHANTABILITY" AND "FITNESS FOR A SPECIFIC PURPOSE," AFTER THE ONE-YEAR TERM O F THIS WARRANTY. Makita Corporation...the factory. IN NO 1:VbNT SHALL MAKITA BE LIABLE FOR ANY INDIKtCT, INCIDkNTAL OR CONSFQUFNTIAL DAMAGES FROM THF SALI: OK USE 01: THI. This Warranty gives you specific legal rights, and you . Should any trouble develop during this one of original ...
Parts Breakdown
Page 2
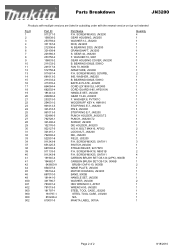
SCREW M5X50, JN3200 GEAR HOUSING, JN3200 WASHER 12, JS3200 ROD, JN3200 N. WASHER 8, PV7001C WOODRUFF KEY 4, HM1810 STOP RING E-7, JN3200 PIN 9, JN3200 STOP RING E-7, JN3200 PUNCH HOLDER, JN3200,T2 PUNCH, JN3200,T2 SCREW, JN3200 DIE HOLDER, JN3200 H.S.H. BOLT M4X16, AF502 LOCK NUT, JN3200 DIE, JN3200 FIELD, JS3200 P.H. BEARING 608LB, 5091D BAFFLE PLATE, JN3200 CORD (2X18X8 SJ), HR2400 CORD GUARD 8-85, HP2010N HANDLE SET, JN3200 GEAR 15-46, JN3200 F. Parts Breakdown JN3200 Products with multiple versions are listed in subsiding order with the newest version on top not indented Fig #...
SCREW M5X50, JN3200 GEAR HOUSING, JN3200 WASHER 12, JS3200 ROD, JN3200 N. WASHER 8, PV7001C WOODRUFF KEY 4, HM1810 STOP RING E-7, JN3200 PIN 9, JN3200 STOP RING E-7, JN3200 PUNCH HOLDER, JN3200,T2 PUNCH, JN3200,T2 SCREW, JN3200 DIE HOLDER, JN3200 H.S.H. BOLT M4X16, AF502 LOCK NUT, JN3200 DIE, JN3200 FIELD, JS3200 P.H. BEARING 608LB, 5091D BAFFLE PLATE, JN3200 CORD (2X18X8 SJ), HR2400 CORD GUARD 8-85, HP2010N HANDLE SET, JN3200 GEAR 15-46, JN3200 F. Parts Breakdown JN3200 Products with multiple versions are listed in subsiding order with the newest version on top not indented Fig #...
Instruction Manual
Page 4
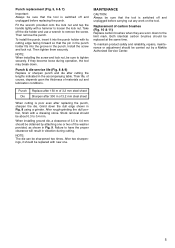
... view 9 Punch 10 Screw 11 Loosen 12 Cutting edge 13 Groove 14 Pin 15 Punch holder 16 Grind/sharpen; 0.3 - 0.4 mm 17 Remove dull portion 18 Die 19 Washer 20 Limit mark 21 Screwdriver 22 Brush holder cap SPECIFICATIONS Model JN3200 Max. ENGLISH 1 Lock button 2 Switch trigger 3 Gauge for mild steel : 3.2 mm 4 Gauge for stainless : 2.5 mm 5 Mouth (3.5 mm clearance) 6 Wrench 7 Lock nut 8 Die holder Explanation of the material itself. cutting radius Outside edge 128 mm Inside...
... view 9 Punch 10 Screw 11 Loosen 12 Cutting edge 13 Groove 14 Pin 15 Punch holder 16 Grind/sharpen; 0.3 - 0.4 mm 17 Remove dull portion 18 Die 19 Washer 20 Limit mark 21 Screwdriver 22 Brush holder cap SPECIFICATIONS Model JN3200 Max. ENGLISH 1 Lock button 2 Switch trigger 3 Gauge for mild steel : 3.2 mm 4 Gauge for stainless : 2.5 mm 5 Mouth (3.5 mm clearance) 6 Wrench 7 Lock nut 8 Die holder Explanation of the material itself. cutting radius Outside edge 128 mm Inside...
Instruction Manual
Page 5
... the lock nut. Failure to remove the screw. To maintain product safety and reliability, repairs, maintenance or adjustment should be replaced with its cutting edge facing forward so that the tool is switched off and unplugged before replacing the punch. Fit the wrench provided onto the lock nut and tap the handle lightly with a dressing stone. After two sharpenings, it into the groove in Fig. 8 using a grinder. Install the screw and lock nut. Both identical carbon brushes...
... the lock nut. Failure to remove the screw. To maintain product safety and reliability, repairs, maintenance or adjustment should be replaced with its cutting edge facing forward so that the tool is switched off and unplugged before replacing the punch. Fit the wrench provided onto the lock nut and tap the handle lightly with a dressing stone. After two sharpenings, it into the groove in Fig. 8 using a grinder. Install the screw and lock nut. Both identical carbon brushes...


