Owners Manual
Page 2
... not abuse the cord. When operating a power tool outdoors, use an extension cord suitable for outdoor use . Stay alert, watch what you to change without notice. • Note: Specifications may result in unexpected situations. 14. A moment of electric shock if your mains-operated (corded) power tool or battery-operated (cordless) power tool. Always wear eye protection. Ensure the switch is earthed or grounded. 6. Remove any adjusting key or wrench before plugging in electric shock, fire...
... not abuse the cord. When operating a power tool outdoors, use an extension cord suitable for outdoor use . Stay alert, watch what you to change without notice. • Note: Specifications may result in unexpected situations. 14. A moment of electric shock if your mains-operated (corded) power tool or battery-operated (cordless) power tool. Always wear eye protection. Ensure the switch is earthed or grounded. 6. Remove any adjusting key or wrench before plugging in electric shock, fire...
Owners Manual
Page 3
... better and safer at any adjustments, changing accessories, or storing power tools. Many accidents are easier to rotary hammer safety rules. Have your power tool serviced by operating it under no one in accordance with the tool. Be sure the bit is maintained. 24. The screws can cause hearing loss. 2. Use the correct power tool for the particular type of moving parts. 11. Do not use ) replace strict adherence to control. 22...
... better and safer at any adjustments, changing accessories, or storing power tools. Many accidents are easier to rotary hammer safety rules. Have your power tool serviced by operating it under no one in accordance with the tool. Be sure the bit is maintained. 24. The screws can cause hearing loss. 2. Use the correct power tool for the particular type of moving parts. 11. Do not use ) replace strict adherence to control. 22...
Owners Manual
Page 4
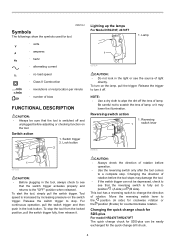
... tool. To turn it . CAUTION: • Always check the direction of rotation before operation. • Use the reversing switch only after the tool comes to change drill chuck. 4 Changing the direction of rotation before the tool stops may lower the illumination. This tool has a reversing switch to a complete stop . Switch trigger 2. USD202-2 Symbols The followings show the symbols used for tool. ・ volts ・ amperes ・ hertz ・ alternating current ・ no load speed...
... tool. To turn it . CAUTION: • Always check the direction of rotation before operation. • Use the reversing switch only after the tool comes to change drill chuck. 4 Changing the direction of rotation before the tool stops may lower the illumination. This tool has a reversing switch to a complete stop . Switch trigger 2. USD202-2 Symbols The followings show the symbols used for tool. ・ volts ・ amperes ・ hertz ・ alternating current ・ no load speed...
Owners Manual
Page 5
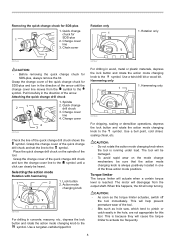
... lock button and rotate the action mode changing knob to the symbol. Quick change chuck for 1 SDS-plus 1. Torque limiter The torque limiter will be damaged. • To avoid rapid wear on the spindle of the quick change drill chuck 2 1 1. Change cover line 3. Change cover 007945 4 3 Check the line of the tool. Use a twist drill bit or wood bit. The tool will actuate when a certain torque level is running under load. The motor will stop turning. Removing...
... lock button and rotate the action mode changing knob to the symbol. Quick change chuck for 1 SDS-plus 1. Torque limiter The torque limiter will be damaged. • To avoid rapid wear on the spindle of the quick change drill chuck 2 1 1. Change cover line 3. Change cover 007945 4 3 Check the line of the tool. Use a twist drill bit or wood bit. The tool will actuate when a certain torque level is running under load. The motor will stop turning. Removing...
Owners Manual
Page 6
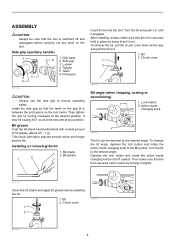
... symbol. Bit grease Coat the bit shank head beforehand with a small amount of bit grease (about 0.5 - 1 g). Bit shank 2. Then make sure that the teeth on the tool. ASSEMBLY CAUTION: • Always be sure that the tool is switched off and unplugged before installing the bit. 1. Loosen 4. Turn the bit and push it out. Bit 2. Depress the lock button and rotate the action mode changing knob to ensure operating safety. Install the...
... symbol. Bit grease Coat the bit shank head beforehand with a small amount of bit grease (about 0.5 - 1 g). Bit shank 2. Then make sure that the teeth on the tool. ASSEMBLY CAUTION: • Always be sure that the tool is switched off and unplugged before installing the bit. 1. Loosen 4. Turn the bit and push it out. Bit 2. Depress the lock button and rotate the action mode changing knob to ensure operating safety. Install the...
Owners Manual
Page 7
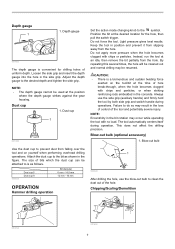
... mm OPERATION Hammer drilling operation 1 002449 After drilling the hole, use the side grip (auxiliary handle) and firmly hold the tool by both side grip and switch handle during operation. Position the bit at an idle, then remove the bit partially from the hole. Dust cup 1 001300 Set the action mode changing knob to the desired depth and tighten the side grip. Keep the tool in the side grip. Depth gauge 007952 The depth gauge...
... mm OPERATION Hammer drilling operation 1 002449 After drilling the hole, use the side grip (auxiliary handle) and firmly hold the tool by both side grip and switch handle during operation. Position the bit at an idle, then remove the bit partially from the hole. Dust cup 1 001300 Set the action mode changing knob to the desired depth and tighten the side grip. Keep the tool in the side grip. Depth gauge 007952 The depth gauge...

Owners Manual
Page 8
... sleeve clockwise to use "rotation with hammering" when the quick change drill chuck as it , refer to "changing the quick change chuck for SDS-plus 2. MAINTENANCE 004224 For Model HR2470/HR2470F Use the optional drill chuck assembly. When installing it firmly. • Always secure small workpieces in wood. Change cover 1 1. CAUTION: • If performing diamond core drilling operations using Makita replacement parts. 8 CAUTION: • Always be performed by setting the reversing switch to reverse rotation in...
... sleeve clockwise to use "rotation with hammering" when the quick change drill chuck as it , refer to "changing the quick change chuck for SDS-plus 2. MAINTENANCE 004224 For Model HR2470/HR2470F Use the optional drill chuck assembly. When installing it firmly. • Always secure small workpieces in wood. Change cover 1 1. CAUTION: • If performing diamond core drilling operations using Makita replacement parts. 8 CAUTION: • Always be performed by setting the reversing switch to reverse rotation in...
Owners Manual
Page 9
... these accessories, ask your local Makita Service Center. • SDS-Plus Carbide-tipped bits • Bull point • Cold chisel • Scaling chisel • Grooving chisel • Drill chuck assembly • Drill chuck S13 • Chuck adapter • Chuck key S13 • Bit grease • Side grip • Depth gauge • Blow-out bulb • Dust cup • Dust extractor attachment • Safety goggles • Plastic carrying case • Keyless drill chuck MAKITA LIMITED...
... these accessories, ask your local Makita Service Center. • SDS-Plus Carbide-tipped bits • Bull point • Cold chisel • Scaling chisel • Grooving chisel • Drill chuck assembly • Drill chuck S13 • Chuck adapter • Chuck key S13 • Bit grease • Side grip • Depth gauge • Blow-out bulb • Dust cup • Dust extractor attachment • Safety goggles • Plastic carrying case • Keyless drill chuck MAKITA LIMITED...
Parts Breakdown
Page 2
... PLATE, HR2450F INNER HOUSING CPL., HR2470F FELT, HR2470F O RING 26, 4200H OIL SEAL 10, BHR241 BALL BEARING 6000DDW, HR4040C FLAT WASHER 10, HR2431 FAN 64, HR2470F ARMATURE ASS'Y 115V, HR2470F INSULATION WASHER, JR180DWB INSULATION WASHER, HR2470F Page 2 of 3 Quantity 1 1 1 1 1 1 1 1 1 1 1 1 1 1 1 4 1 1 1 1 1 1 1 1 1 1 1 1 1 1 1 1 1 1 1 1 1 1 1 1 1 1 1 1 1 1 2 1 1 1 1 1 1 1 1 1 1 1 1 1 1 1 1 1 8/18/2010 WASHER, HP2050F GRIP BASE, HP2070F GRIP 36 CPL., HR2470F CHANGE LEVER, HR2470F COMPRESSION SPRING 3, HR1830F LOCK BUTTON, HR1830F O RING 17,HR2450F GEAR HOUSING CPL., HR2470F TAPPING SCREW...
... PLATE, HR2450F INNER HOUSING CPL., HR2470F FELT, HR2470F O RING 26, 4200H OIL SEAL 10, BHR241 BALL BEARING 6000DDW, HR4040C FLAT WASHER 10, HR2431 FAN 64, HR2470F ARMATURE ASS'Y 115V, HR2470F INSULATION WASHER, JR180DWB INSULATION WASHER, HR2470F Page 2 of 3 Quantity 1 1 1 1 1 1 1 1 1 1 1 1 1 1 1 4 1 1 1 1 1 1 1 1 1 1 1 1 1 1 1 1 1 1 1 1 1 1 1 1 1 1 1 1 1 1 2 1 1 1 1 1 1 1 1 1 1 1 1 1 1 1 1 1 8/18/2010 WASHER, HP2050F GRIP BASE, HP2070F GRIP 36 CPL., HR2470F CHANGE LEVER, HR2470F COMPRESSION SPRING 3, HR1830F LOCK BUTTON, HR1830F O RING 17,HR2450F GEAR HOUSING CPL., HR2470F TAPPING SCREW...

Parts Breakdown
Page 3
... 941102-2 819358-4 819364-9 122881-3 324219-0 824799-1 805452-8 Parts Breakdown BALL BEARING 627DDW, 9910 WAVE WASHER 15, HR2470F TAPPING SCREW 4X60, HR2470F RETAINER, GD0800C BAFFLE PLATE, HR2470F FIELD 115V, HR2470F MOTOR HOUSING, HR2470F NAME PLATE, HR2470F CARBON BRUSH CB325,9553NB CARBON BRUSH SET CB-325, 9553NB BRUSH HOLDER UNIT, HR2470F SWITCH, HR2470F S/N LABEL, HR2470F CORD GUARD 8, 6824 CORD CORD CLAMP, GA5020 TAPPING SCREW 4X22, HR2470F LIGHT CIRCUIT, HR2470F HANDLE COVER, HR2470F TAPPING SCREW 4X22, HR2470F TAPPING SCREW 4X22, HR2470F STOP RING E-3, 4304 GUIDE BASE, HR2455 COMP.
... 941102-2 819358-4 819364-9 122881-3 324219-0 824799-1 805452-8 Parts Breakdown BALL BEARING 627DDW, 9910 WAVE WASHER 15, HR2470F TAPPING SCREW 4X60, HR2470F RETAINER, GD0800C BAFFLE PLATE, HR2470F FIELD 115V, HR2470F MOTOR HOUSING, HR2470F NAME PLATE, HR2470F CARBON BRUSH CB325,9553NB CARBON BRUSH SET CB-325, 9553NB BRUSH HOLDER UNIT, HR2470F SWITCH, HR2470F S/N LABEL, HR2470F CORD GUARD 8, 6824 CORD CORD CLAMP, GA5020 TAPPING SCREW 4X22, HR2470F LIGHT CIRCUIT, HR2470F HANDLE COVER, HR2470F TAPPING SCREW 4X22, HR2470F TAPPING SCREW 4X22, HR2470F STOP RING E-3, 4304 GUIDE BASE, HR2455 COMP.


