
Owners Manual
Page 5
...parts of screws carefully before operation. 5. Hold the tool firmly with both hands. 9. SAVE THESE INSTRUCTIONS WARNING: MISUSE or failure to the bit immediately after operation; Wear ear protectors when using the tool in the area when operating. Under normal operation, the tool is secured in ... the lubrication. Take caution to hammer safety rules. Check tightness of the tool "live" and shock the operator. 2. Always be toxic. The bit could burn your skin. 13. SPECIFIC SAFETY RULES USB009-2 DO NOT let comfort or familiarity with product (gained from moving parts. 10. Hold...
...parts of screws carefully before operation. 5. Hold the tool firmly with both hands. 9. SAVE THESE INSTRUCTIONS WARNING: MISUSE or failure to the bit immediately after operation; Wear ear protectors when using the tool in the area when operating. Under normal operation, the tool is secured in ... the lubrication. Take caution to hammer safety rules. Check tightness of the tool "live" and shock the operator. 2. Always be toxic. The bit could burn your skin. 13. SPECIFIC SAFETY RULES USB009-2 DO NOT let comfort or familiarity with product (gained from moving parts. 10. Hold...
Owners Manual
Page 6
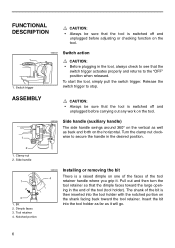
... adjusting or checking function on the tool. 1 1. Side handle 1 2 3 1. Notched portion 002924 4 Installing or removing the bit There is a raised dimple on one of the faces of the bit is then inserted into the tool holder as far as back and forth on the horizontal. The shank of the...Tool retainer 4. Release the switch trigger to secure the handle in the desired position. 2 1. Turn the clamp nut clock- 1 wise to stop. Insert the bit into the tool holder with the notched portion on the shank facing back toward the large opening in the tool, always check to see that...
... adjusting or checking function on the tool. 1 1. Side handle 1 2 3 1. Notched portion 002924 4 Installing or removing the bit There is a raised dimple on one of the faces of the bit is then inserted into the tool holder as far as back and forth on the horizontal. The shank of the...Tool retainer 4. Release the switch trigger to secure the handle in the desired position. 2 1. Turn the clamp nut clock- 1 wise to stop. Insert the bit into the tool holder with the notched portion on the shank facing back toward the large opening in the tool, always check to see that...

Owners Manual
Page 7
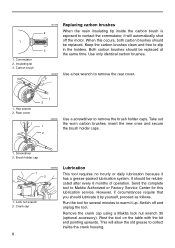
...Dimple OPERATION 002946 Chipping/Scaling/Demolition Hold the tool firmly with both hands. To remove the bit, follow the installation procedure in reverse. 1. Hold the tool securely and try to forcefully pull the bit out of the tool holder to be sure that the tool is switched off and unplugged ...before attempting to secure the bit. MAINTENANCE CAUTION: • Always be facing away 1 from the tool holder and bit. The dimple will not bounce around, uncontrolled. Turn the tool on and apply slight pressure on the...
...Dimple OPERATION 002946 Chipping/Scaling/Demolition Hold the tool firmly with both hands. To remove the bit, follow the installation procedure in reverse. 1. Hold the tool securely and try to forcefully pull the bit out of the tool holder to be sure that the tool is switched off and unplugged ...before attempting to secure the bit. MAINTENANCE CAUTION: • Always be facing away 1 from the tool holder and bit. The dimple will not bounce around, uncontrolled. Turn the tool on and apply slight pressure on the...
Owners Manual
Page 8
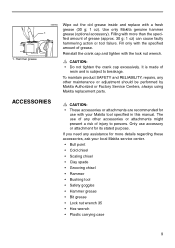
...3 in the holders. However, if circumstances require that you should be replaced at the same time. Switch off the motor. Remove the crank cap using a Makita lock nut wrench 35 (optional accessory). This will automatically shut off and unplug the tool. Carbon brush 001146 Replacing carbon brushes 2 When the resin insulating... because it by yourself, proceed as follows. It should lubricate it 2 has a grease-packed lubrication system. Rest the tool on the table with the bit end pointing upwards. Brush holder cap 1 1. Insulating tip 3. Lock nut wrench 2. 1 1.
...3 in the holders. However, if circumstances require that you should be replaced at the same time. Switch off the motor. Remove the crank cap using a Makita lock nut wrench 35 (optional accessory). This will automatically shut off and unplug the tool. Carbon brush 001146 Replacing carbon brushes 2 When the resin insulating... because it by yourself, proceed as follows. It should lubricate it 2 has a grease-packed lubrication system. Rest the tool on the table with the bit end pointing upwards. Brush holder cap 1 1. Insulating tip 3. Lock nut wrench 2. 1 1.
Owners Manual
Page 9
... assistance for its stated purpose. ACCESSORIES CAUTION: • These accessories or attachments are recommended for use of grease. Fill only with your local Makita service center. • Bull point • Cold chisel • Scaling chisel • Clay spade • Grooving chisel • Rammer... • Bushing tool • Safety goggles • Hammer grease • Bit grease • Lock nut wrench 35 • Hex wrench • Plastic carrying case 9 Reinstall the crank cap and tighten with the lock nut ...
... assistance for its stated purpose. ACCESSORIES CAUTION: • These accessories or attachments are recommended for use of grease. Fill only with your local Makita service center. • Bull point • Cold chisel • Scaling chisel • Clay spade • Grooving chisel • Rammer... • Bushing tool • Safety goggles • Hammer grease • Bit grease • Lock nut wrench 35 • Hex wrench • Plastic carrying case 9 Reinstall the crank cap and tighten with the lock nut ...


