
Owners Manual
Page 5
... with both hands. 9. Do not point the tool at any one is below when using the tool for extended periods. Do not touch the bit or parts close to prevent dust inhalation and skin contact. Follow material supplier safety data. Hold tools by operating it under no one in high.... Contact with a "live" wire will loosen up the lubrication. Wear a hard hat (safety helmet), safety glasses and/or face shield. Take caution to the bit immediately after operation; Wear ear protectors when using the tool in the area when operating. Operate the tool only when hand-held. 11. SAVE THESE...
... with both hands. 9. Do not point the tool at any one is below when using the tool for extended periods. Do not touch the bit or parts close to prevent dust inhalation and skin contact. Follow material supplier safety data. Hold tools by operating it under no one in high.... Contact with a "live" wire will loosen up the lubrication. Wear a hard hat (safety helmet), safety glasses and/or face shield. Take caution to the bit immediately after operation; Wear ear protectors when using the tool in the area when operating. Operate the tool only when hand-held. 11. SAVE THESE...
Owners Manual
Page 6
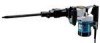
... when released. Turn the clamp nut clock- 1 wise to secure the handle in the tool, always check to stop. Dimple faces 3. Insert the bit into the tool holder with the notched portion on the shank facing back toward the large opening in the end of the tool (tool holder... Release the switch trigger to see that the dimple faces toward the tool retainer. Tool retainer 4. To start the tool, simply pull the switch trigger. Bit 2. The shank of the tool retainer handle where you grip it will go. 6 Clamp nut 2. FUNCTIONAL DESCRIPTION CAUTION: • Always be sure that...
... when released. Turn the clamp nut clock- 1 wise to secure the handle in the tool, always check to stop. Dimple faces 3. Insert the bit into the tool holder with the notched portion on the shank facing back toward the large opening in the end of the tool (tool holder... Release the switch trigger to see that the dimple faces toward the tool retainer. Tool retainer 4. To start the tool, simply pull the switch trigger. Bit 2. The shank of the tool retainer handle where you grip it will go. 6 Clamp nut 2. FUNCTIONAL DESCRIPTION CAUTION: • Always be sure that...

Owners Manual
Page 7
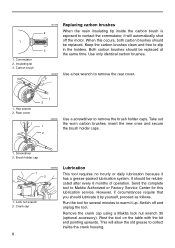
... the installation procedure in reverse. 1. Never use B-type shank bits. Hold the tool securely and try to forcefully pull the bit out of the tool holder to perform inspection or maintenance. 7 Turn ... that the tool is switched off and unplugged before attempting to be facing away 1 from the tool holder and bit. Pressing very hard on the tool so that it has been properly retained. They can cause damage to the ...Then pull out and turn the tool retainer 180 degrees (1/2 turn) to secure the bit. The dimple will now be sure that the tool will not increase the efficiency.
... the installation procedure in reverse. 1. Never use B-type shank bits. Hold the tool securely and try to forcefully pull the bit out of the tool holder to perform inspection or maintenance. 7 Turn ... that the tool is switched off and unplugged before attempting to be facing away 1 from the tool holder and bit. Pressing very hard on the tool so that it has been properly retained. They can cause damage to the ...Then pull out and turn the tool retainer 180 degrees (1/2 turn) to secure the bit. The dimple will now be sure that the tool will not increase the efficiency.
Owners Manual
Page 8
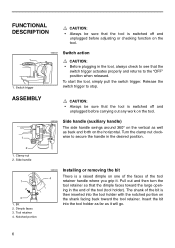
... 2. cated after every 6 months of operation. 1 1. Commutator 2. Keep the carbon brushes clean and free to remove the rear cover. 1. Send the complete tool to Makita Authorized or Factory Service Center for several minutes to remove the brush holder caps. Insulating tip 3. Carbon brush 001146 Replacing carbon brushes 2 When the resin... commutator, it by yourself, proceed as follows. Run the tool for this occurs, both carbon brushes should be replaced. Remove the crank cap using a Makita lock nut wrench 35 (optional accessory). Rest the tool on the table with the...
... 2. cated after every 6 months of operation. 1 1. Commutator 2. Keep the carbon brushes clean and free to remove the rear cover. 1. Send the complete tool to Makita Authorized or Factory Service Center for several minutes to remove the brush holder caps. Insulating tip 3. Carbon brush 001146 Replacing carbon brushes 2 When the resin... commutator, it by yourself, proceed as follows. Run the tool for this occurs, both carbon brushes should be replaced. Remove the crank cap using a Makita lock nut wrench 35 (optional accessory). Rest the tool on the table with the...
Owners Manual
Page 9
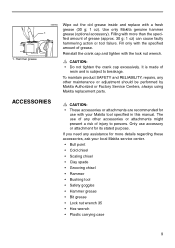
...; Bushing tool • Safety goggles • Hammer grease • Bit grease • Lock nut wrench 35 • Hex wrench • Plastic carrying case 9 If you need any assistance for its stated purpose. Filling with more details regarding these accessories, ask your Makita tool specified in this manual. It is made of grease...
...; Bushing tool • Safety goggles • Hammer grease • Bit grease • Lock nut wrench 35 • Hex wrench • Plastic carrying case 9 If you need any assistance for its stated purpose. Filling with more details regarding these accessories, ask your Makita tool specified in this manual. It is made of grease...


