Owners Manual
Page 2
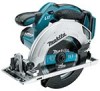
... injury. Cluttered and dark areas invite accidents. 2. Ensure the switch is earthed or grounded. 6. Failure to rain or wet conditions. ENGLISH SPECIFICATIONS Model BSS610 BSS611 Blade diameter 165 mm (6-1/2") at 50° 36 mm (1-7/16") No load speed (RPM) 3,700/min.
... injury. Cluttered and dark areas invite accidents. 2. Ensure the switch is earthed or grounded. 6. Failure to rain or wet conditions. ENGLISH SPECIFICATIONS Model BSS610 BSS611 Blade diameter 165 mm (6-1/2") at 50° 36 mm (1-7/16") No load speed (RPM) 3,700/min.

Owners Manual
Page 3
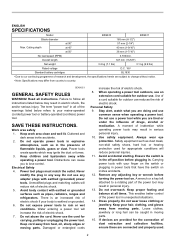
... power tools. If liquid contacts eyes, additionally seek medical help. This will do not allow persons unfamiliar with the charger specified by the blade. 2. Follow instruction for operations different from one type of battery pack may affect the power tools operation. Do not attempt to remove cut... abusive conditions, liquid may cause irritation or burns. Keep handles dry, clean and free from the battery may be performed. Wait until blade stops before making any other battery packs may cause burns or a fire. 27. Secure the workpiece to the thickness of the workpiece....
... power tools. If liquid contacts eyes, additionally seek medical help. This will do not allow persons unfamiliar with the charger specified by the blade. 2. Follow instruction for operations different from one type of battery pack may affect the power tools operation. Do not attempt to remove cut... abusive conditions, liquid may cause irritation or burns. Keep handles dry, clean and free from the battery may be performed. Wait until blade stops before making any other battery packs may cause burns or a fire. 27. Secure the workpiece to the thickness of the workpiece....
Owners Manual
Page 4
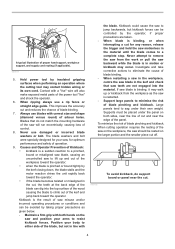
...of the panel. To minimize the risk of proper hand support, workpiece support, and supply cord routing (if applicable). 000187 5. Always use blades with both sides, near the edge of arbour holes. Investigate and take corrective actions to sag under the panel on both hands on the... portion and the smaller piece cut off. 000192 To avoid kickback, do not match the mounting hardware of operation. 9. A typical illustration of blade pinching and kickback. Never use a rip fence or straight edge guide. Kickback is binding, or when interrupting a cut for optimum performance and ...
...of the panel. To minimize the risk of proper hand support, workpiece support, and supply cord routing (if applicable). 000187 5. Always use blades with both sides, near the edge of arbour holes. Investigate and take corrective actions to sag under the panel on both hands on the... portion and the smaller piece cut off. 000192 To avoid kickback, do not match the mounting hardware of operation. 9. A typical illustration of blade pinching and kickback. Never use a rip fence or straight edge guide. Kickback is binding, or when interrupting a cut for optimum performance and ...
Owners Manual
Page 5
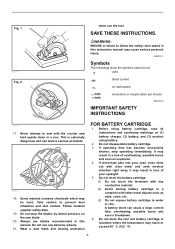
.... 13. Be aware of debris. 12. Inspect for kickback. As examples, Fig. 1 illustrates the RIGHT way to serious personal injury. If blade adjustment shifts while cutting, it down. If kickback occurs, the saw could easily jump backwards over your hand or fingers behind the saw down after... position. Lower guard may cause binding and kickback. DO NOT TRY TO HOLD SHORT PIECES BY HAND! 5 Never use dull or damaged blades. The protruding blade may be sure that can cause kickback. If saw can lead to walk backwards, cutting whatever is made. Check the operation of accuracy,...
.... 13. Be aware of debris. 12. Inspect for kickback. As examples, Fig. 1 illustrates the RIGHT way to serious personal injury. If blade adjustment shifts while cutting, it down. If kickback occurs, the saw could easily jump backwards over your hand or fingers behind the saw down after... position. Lower guard may cause binding and kickback. DO NOT TRY TO HOLD SHORT PIECES BY HAND! 5 Never use dull or damaged blades. The protruding blade may be sure that can cause kickback. If saw can lead to walk backwards, cutting whatever is made. Check the operation of accuracy,...
Owners Manual
Page 6
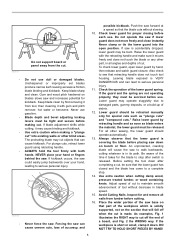
... stop operating immediately. Before using battery. 2. Do not short the battery cartridge: (1) Do not touch the terminals with the circular saw blade. 20. Do not store the tool and battery cartridge in loss of overheating, possible burns and even an explosion. 4. Fig. 1 000193 ...and can cause a large current flow, overheating, possible burns and even a breakdown. 6. If operating time has become excessively shorter, stop the blades by lateral pressure on (1) battery charger, (2) battery, and (3) product using battery cartridge, read all instructions and cautionary markings on the saw ...
... stop operating immediately. Before using battery. 2. Do not short the battery cartridge: (1) Do not touch the terminals with the circular saw blade. 20. Do not store the tool and battery cartridge in loss of overheating, possible burns and even an explosion. 4. Fig. 1 000193 ...and can cause a large current flow, overheating, possible burns and even a breakdown. 6. If operating time has become excessively shorter, stop the blades by lateral pressure on (1) battery charger, (2) battery, and (3) product using battery cartridge, read all instructions and cautionary markings on the saw ...
Owners Manual
Page 7
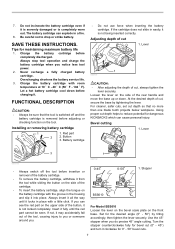
... button, it into place. Always insert it all the way until it fully until the red part cannot be sure that no more than one blade tooth projects below workpiece. Set for maintaining maximum battery life 1. Charge the battery cartridge before adjusting or checking function on the battery cartridge with room...
... button, it into place. Always insert it all the way until it fully until the red part cannot be sure that no more than one blade tooth projects below workpiece. Set for maintaining maximum battery life 1. Charge the battery cartridge before adjusting or checking function on the battery cartridge with room...
Owners Manual
Page 8
...pulled, a lock-off lever which prevents the tool from being pressed. To start the tool, press the lock-off lever. Return tool a MAKITA service center for the desired angle (0° - 50°) by tilting accordingly, then tighten the lever securely. If the tool consistently fails... purpose and function of lock-off lever and pull the switch trigger. To prevent the switch trigger from unintended starting. Removing or installing saw blade 1. Shaft lock 2. WARNING: • For your safety, this tool is equipped with lock-off lever is installed with your cutting line....
...pulled, a lock-off lever which prevents the tool from being pressed. To start the tool, press the lock-off lever. Return tool a MAKITA service center for the desired angle (0° - 50°) by tilting accordingly, then tighten the lever securely. If the tool consistently fails... purpose and function of lock-off lever and pull the switch trigger. To prevent the switch trigger from unintended starting. Removing or installing saw blade 1. Shaft lock 2. WARNING: • For your safety, this tool is equipped with lock-off lever is installed with your cutting line....
Owners Manual
Page 9
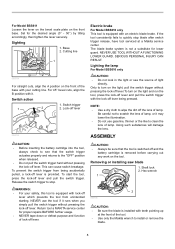
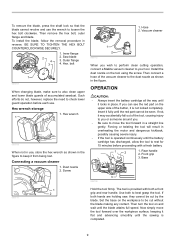
.... If you wish to perform clean cutting operation, connect a Makita vacuum cleaner to rest for 15 minutes before each use , store the hex wrench as shown in a straight line gently. Front grip 3. Hex wrench storage 1. The tool is operated continuously until the blade attains full speed. Forcing or twisting the tool will...
.... If you wish to perform clean cutting operation, connect a Makita vacuum cleaner to rest for 15 minutes before each use , store the hex wrench as shown in a straight line gently. Front grip 3. Hex wrench storage 1. The tool is operated continuously until the blade attains full speed. Forcing or twisting the tool will...
Owners Manual
Page 10
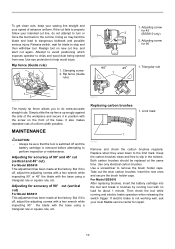
...To get clean cuts, keep your sawing line straight and your intended cut line, do extra-accurate straight cuts. Release switch, wait for blade to the limit mark. Use eye protection to dangerous kickback and possible serious injury. But if it is switched off , adjust the adjusting ...and electric brake operation when releasing the switch trigger. But if it is off and the battery cartridge is not working well, ask your local Makita service center for 45 ゚ (BSS610 only) 2. Limit mark 1 001145 Remove and check the carbon brushes regularly. Adjusting screw for accuracy ...
...To get clean cuts, keep your sawing line straight and your intended cut line, do extra-accurate straight cuts. Release switch, wait for blade to the limit mark. Use eye protection to dangerous kickback and possible serious injury. But if it is switched off , adjust the adjusting ...and electric brake operation when releasing the switch trigger. But if it is off and the battery cartridge is not working well, ask your local Makita service center for 45 ゚ (BSS610 only) 2. Limit mark 1 001145 Remove and check the carbon brushes regularly. Adjusting screw for accuracy ...
Owners Manual
Page 11
... are recommended for use with your local Makita Service Center. • Carbide-tipped saw blades Combination 006540 General purpose blade for more details regarding these accessories, ask your Makita tool specified in this one of Makita genuine batteries and chargers MAKITA LIMITED ONE YEAR WARRANTY Warranty Policy Every Makita tool is thoroughly inspected and tested before leaving...
... are recommended for use with your local Makita Service Center. • Carbide-tipped saw blades Combination 006540 General purpose blade for more details regarding these accessories, ask your Makita tool specified in this one of Makita genuine batteries and chargers MAKITA LIMITED ONE YEAR WARRANTY Warranty Policy Every Makita tool is thoroughly inspected and tested before leaving...
Parts Breakdown
Page 2
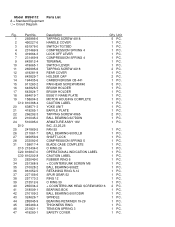
... UNIT BAFFLE PLATE TAPPING SCREW 4X65 BALL BEARING 627DDW ARMATURE ASS'Y 18V INC. 23,25,26 FAN 55 BALL BEARING 6000LLB SHAFT LOCK COMPRESSION SPRING 5 BLADE CASE COMPLETE O RING 26 OPERATIONAL INDICATION LABEL CAUTION LABEL RUBBER RING 6 + COUNTERSUNK SCREW M6 BALL BEARING 606ZZ RETAINING RING S-12 SPUR GEAR 52 RING 12.... 1 PC. 0 1 PC. 1 PC. 1 PC. 1 PC. 1 PC. 1 PC. 1 PC. 1 PC. 1 PC. 1 PC. 1 PC. 1 PC. 1 PC. 1 PC. 1 PC. 2 PC. 1 PC. 1 PC. 1 PC. 1 PC. 1 PC. 1 PC. 1 PC. Model BSS611Z Parts List A = Standard Equipment 〇= Circuit Diagram Fig.
... UNIT BAFFLE PLATE TAPPING SCREW 4X65 BALL BEARING 627DDW ARMATURE ASS'Y 18V INC. 23,25,26 FAN 55 BALL BEARING 6000LLB SHAFT LOCK COMPRESSION SPRING 5 BLADE CASE COMPLETE O RING 26 OPERATIONAL INDICATION LABEL CAUTION LABEL RUBBER RING 6 + COUNTERSUNK SCREW M6 BALL BEARING 606ZZ RETAINING RING S-12 SPUR GEAR 52 RING 12.... 1 PC. 0 1 PC. 1 PC. 1 PC. 1 PC. 1 PC. 1 PC. 1 PC. 1 PC. 1 PC. 1 PC. 1 PC. 1 PC. 1 PC. 1 PC. 1 PC. 2 PC. 1 PC. 1 PC. 1 PC. 1 PC. 1 PC. 1 PC. 1 PC. Model BSS611Z Parts List A = Standard Equipment 〇= Circuit Diagram Fig.
Parts Breakdown
Page 3
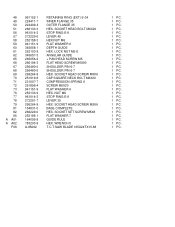
...-7 251896-4 941151-9 252133-9 961014-3 272251-7 266264-8 154831-0 266229-0 253186-1 164095-8 783203-8 A-85092 RETAINING RING (EXT) S-34 INNER FLANGE 35 OUTER FLANGE 35 HEX. WRENCH 5 T.C.T.SAW BLADE 165X24TX15.88 1 PC. 1 PC. 1 PC. 1 PC. 1 PC. 1 PC. 1 PC. 1 PC. 1 PC. 1 PC. 1 PC. 1 PC. 1 PC. 1 PC. 1 PC. 1 PC. 1 PC. 1 PC. 1 PC. 1 PC. 1 PC. 1 PC. 1 PC...
...-7 251896-4 941151-9 252133-9 961014-3 272251-7 266264-8 154831-0 266229-0 253186-1 164095-8 783203-8 A-85092 RETAINING RING (EXT) S-34 INNER FLANGE 35 OUTER FLANGE 35 HEX. WRENCH 5 T.C.T.SAW BLADE 165X24TX15.88 1 PC. 1 PC. 1 PC. 1 PC. 1 PC. 1 PC. 1 PC. 1 PC. 1 PC. 1 PC. 1 PC. 1 PC. 1 PC. 1 PC. 1 PC. 1 PC. 1 PC. 1 PC. 1 PC. 1 PC. 1 PC. 1 PC. 1 PC...


