
Owners Manual
Page 1
SAVE THESE INSTRUCTIONS FOR FUTURE REFERENCE. www.makitatools.com Router MODEL 3606 DOUBLE INSULATION 003646 INSTRUCTION MANUAL WARNING: For your personal safety, READ and UNDERSTAND before using.
SAVE THESE INSTRUCTIONS FOR FUTURE REFERENCE. www.makitatools.com Router MODEL 3606 DOUBLE INSULATION 003646 INSTRUCTION MANUAL WARNING: For your personal safety, READ and UNDERSTAND before using.
Owners Manual
Page 2
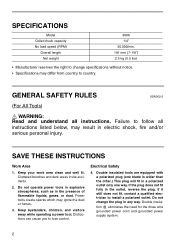
... all instructions listed below, may ignite the dust or fumes. 3. Cluttered benches and dark areas invite accidents. 2. Distractions can cause you to install a polarized outlet. Electrical Safety 4. If the plug does not fit fully in the outlet, reverse the plug. Power tools create sparks which may result in electric shock, fire and/or serious personal injury. SPECIFICATIONS Model Collet chuck capacity No load speed...
... all instructions listed below, may ignite the dust or fumes. 3. Cluttered benches and dark areas invite accidents. 2. Distractions can cause you to install a polarized outlet. Electrical Safety 4. If the plug does not fit fully in the outlet, reverse the plug. Power tools create sparks which may result in electric shock, fire and/or serious personal injury. SPECIFICATIONS Model Collet chuck capacity No load speed...
Owners Manual
Page 3
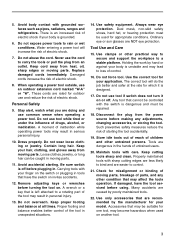
... starting . Such preventive safety measures reduce the risk of electric shock. 7. Maintain tools with sharp cutting edges are less likely to bind and are rated for one tool, may result in . If damaged, have the switch on another tool. 3 When operating a power tool outside, use the cord to control. 21. Dress properly. A wrench or a key that have the tool serviced before plugging in personal injury. 13. Use the correct tool...
... starting . Such preventive safety measures reduce the risk of electric shock. 7. Maintain tools with sharp cutting edges are less likely to bind and are rated for one tool, may result in . If damaged, have the switch on another tool. 3 When operating a power tool outside, use the cord to control. 21. Dress properly. A wrench or a key that have the tool serviced before plugging in personal injury. 13. Use the correct tool...

Owners Manual
Page 4
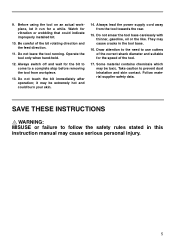
... extension cord is in doubt, use one heavy enough to router safety rules. Replace cracked or damaged bit immediately. 5. Keep hands away from the workpiece before the switch is not contacting the workpiece before operation. 6. When servicing a tool, use this manual. Inspect for and remove all nails from rotating parts. 8. If in good condition. Wear hearing protection during extended period of electric shock or injury. Handle the bits very...
... extension cord is in doubt, use one heavy enough to router safety rules. Replace cracked or damaged bit immediately. 5. Keep hands away from the workpiece before the switch is not contacting the workpiece before operation. 6. When servicing a tool, use this manual. Inspect for and remove all nails from rotating parts. 8. If in good condition. Wear hearing protection during extended period of electric shock or injury. Handle the bits very...
Owners Manual
Page 5
... after operation; 9. Operate the tool only when hand-held. 12. Always switch off and wait for the bit to come to use cutters of the correct shank diameter and suitable for the speed of the bit rotating direction and the feed direction. 11. They may cause cracks in this instruction manual may be extremely hot and could indicate improperly installed bit. 10. Follow material supplier safety...
... after operation; 9. Operate the tool only when hand-held. 12. Always switch off and wait for the bit to come to use cutters of the correct shank diameter and suitable for the speed of the bit rotating direction and the feed direction. 11. They may cause cracks in this instruction manual may be extremely hot and could indicate improperly installed bit. 10. Follow material supplier safety...
Owners Manual
Page 6
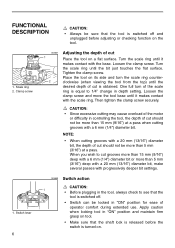
... the switch is equal to cut is obtained. FUNCTIONAL DESCRIPTION CAUTION: • Always be sure that the tool is switched off . • Switch can be locked in "ON" position for ease of operator comfort during extended use. Then tighten the clamp screw securely. Apply caution when locking tool in depth setting. Loosen the clamp screw and move the tool base until it makes contact with the base. Scale ring 2. Turn the...
... the switch is equal to cut is obtained. FUNCTIONAL DESCRIPTION CAUTION: • Always be sure that the tool is switched off . • Switch can be locked in "ON" position for ease of operator comfort during extended use. Then tighten the clamp screw securely. Apply caution when locking tool in depth setting. Loosen the clamp screw and move the tool base until it makes contact with the base. Scale ring 2. Turn the...
Owners Manual
Page 7
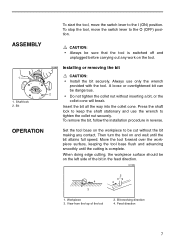
... smoothly until the bit attains full speed. Feed direction 7 Insert the bit all the way into the collet cone. Then turn the tool on the left side of the tool 2. When doing edge cutting, the workpiece surface should be cut without inserting a bit, or the collet cone will break. To stop the tool, move the switch lever to tighten the collet nut securely. To remove the bit, follow the installation procedure in...
... smoothly until the bit attains full speed. Feed direction 7 Insert the bit all the way into the collet cone. Then turn the tool on the left side of the tool 2. When doing edge cutting, the workpiece surface should be cut without inserting a bit, or the collet cone will break. To stop the tool, move the switch lever to tighten the collet nut securely. To remove the bit, follow the installation procedure in...
Owners Manual
Page 8
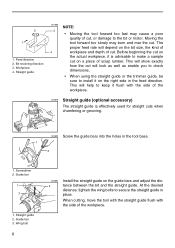
... check dimensions. • When using the straight guide or the trimmer guide, be sure to secure the straight guide in the feed direction. When cutting, move the tool with the straight guide flush with the side of the workpiece. 003676 Straight guide (optional accessory) The straight guide is advisable to the bit or motor. Bit revolving direction 3. Guide bar 3. Straight guide 2. Wing bolt 8 003681 2 Install the straight guide on the bit size...
... check dimensions. • When using the straight guide or the trimmer guide, be sure to secure the straight guide in the feed direction. When cutting, move the tool with the straight guide flush with the side of the workpiece. 003676 Straight guide (optional accessory) The straight guide is advisable to the bit or motor. Bit revolving direction 3. Guide bar 3. Straight guide 2. Wing bolt 8 003681 2 Install the straight guide on the bit size...
Owners Manual
Page 9
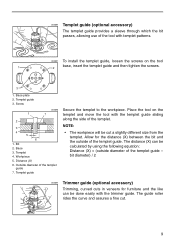
... the templet to the workpiece. Bit 2. Base plate 2. Base 3. Workpiece 5. Place the tool on the tool 1 base, insert the templet guide and then tighten the screws. 2 3 1. The distance (X) can be calculated by using the following equation: Distance (X) = (outside of the templet guide 7. Distance (X) 6. NOTE: • The workpiece will be cut . 9 The guide roller rides the curve and assures a fine cut a slightly different size from the templet. Allow...
... the templet to the workpiece. Bit 2. Base plate 2. Base 3. Workpiece 5. Place the tool on the tool 1 base, insert the templet guide and then tighten the screws. 2 3 1. The distance (X) can be calculated by using the following equation: Distance (X) = (outside of the templet guide 7. Distance (X) 6. NOTE: • The workpiece will be cut . 9 The guide roller rides the curve and assures a fine cut a slightly different size from the templet. Allow...
Owners Manual
Page 10
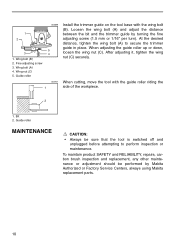
... bolt (A) and adjust the distance between the bit and the trimmer guide by Makita Authorized or Factory Service Centers, always using Makita replacement parts. 10 After adjusting it, tighten the wing nut (C) securely. When adjusting the guide roller up or down, loosen the wing nut (C). Wing bolt (B) 2. To maintain product SAFETY and RELIABILITY, repairs, carbon brush inspection and replacement, any other maintenance or adjustment should be sure that the tool is switched off and...
... bolt (A) and adjust the distance between the bit and the trimmer guide by Makita Authorized or Factory Service Centers, always using Makita replacement parts. 10 After adjusting it, tighten the wing nut (C) securely. When adjusting the guide roller up or down, loosen the wing nut (C). Wing bolt (B) 2. To maintain product SAFETY and RELIABILITY, repairs, carbon brush inspection and replacement, any other maintenance or adjustment should be sure that the tool is switched off and...
Owners Manual
Page 11
... your Makita tool specified in this manual. ACCESSORIES CAUTION: • These accessories or attachments are recommended for its stated purpose. Only use accessory or attachment for use of injury to persons. The use with your local Makita service center. • Straight & groove forming bits • Edge forming bits • Laminate trimming bits • Straight guide assembly • Trimmer guide assembly • Templet guides • Templet guide adapter • Lock nut • Collet cone 1/4" • Wrench...
... your Makita tool specified in this manual. ACCESSORIES CAUTION: • These accessories or attachments are recommended for its stated purpose. Only use accessory or attachment for use of injury to persons. The use with your local Makita service center. • Straight & groove forming bits • Edge forming bits • Laminate trimming bits • Straight guide assembly • Trimmer guide assembly • Templet guides • Templet guide adapter • Lock nut • Collet cone 1/4" • Wrench...

Owners Manual
Page 13
Fold 13 Cut Makita U.S.A., Inc. 14930 Northam Street La Mirada, CA 90638-5753 First-Class Postage Required Post Office will not deliver without proper postage.
Fold 13 Cut Makita U.S.A., Inc. 14930 Northam Street La Mirada, CA 90638-5753 First-Class Postage Required Post Office will not deliver without proper postage.

Owners Manual
Page 14
...Friend Previous Usage Other ( ) 2. Use of the product is intended for: Construction Trade Industrial Maintenance Home Maintenance Hobby Other ( ) 4. INTL. SERIAL NO. LAST NAME / COMPANY NAME STREET ADRESS CITY STATE ZIP CODE PHONE STATUS Married Single SEX MF AREA CODE AGE: Under 19 20-29 30... Any comments: Paste Paste Paste Paste Paste Paste Paste Paste DATE PURCHASED MONTH DAY YEAR MODEL NO. MAIL THIS PORTION Your answers to the following questions are : Design Features Size Price Makita Brand Repair Service Durability Power Other ( ) 5.
...Friend Previous Usage Other ( ) 2. Use of the product is intended for: Construction Trade Industrial Maintenance Home Maintenance Hobby Other ( ) 4. INTL. SERIAL NO. LAST NAME / COMPANY NAME STREET ADRESS CITY STATE ZIP CODE PHONE STATUS Married Single SEX MF AREA CODE AGE: Under 19 20-29 30... Any comments: Paste Paste Paste Paste Paste Paste Paste Paste DATE PURCHASED MONTH DAY YEAR MODEL NO. MAIL THIS PORTION Your answers to the following questions are : Design Features Size Price Makita Brand Repair Service Durability Power Other ( ) 5.
Owners Manual
Page 15
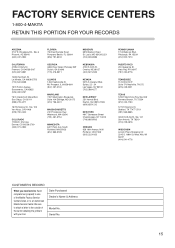
...Makita Factory Service Centers listed, or to the outside of the carton detailing the problem with your tool. Louis, MO 63126-2221 (314) 909-9889 NEBRASKA 4129 S. 84th St. Dayton, NJ 08810-1539 (609) 655-1212 NEW YORK 4917 Genessee Street Cheektowaga, NY 14225 (716) 685-9503 OREGON 828 19th Avenue, N.W. Serial...-8911 ILLINOIS 1450 Feehanville Dr. Mt. Hato Rey, PR 00917 (787) 250-8776 TENNESSEE 1120 Elm Hill P. Date Purchased Dealer's Name & Address Model No. Westwood, MA 02090 (781) 461-9754 MINNESOTA 6427 Penn Ave. Fremont, CA 94538-5107 (510) 657-9881 14930 Northam St. Pittsburgh, ...
...Makita Factory Service Centers listed, or to the outside of the carton detailing the problem with your tool. Louis, MO 63126-2221 (314) 909-9889 NEBRASKA 4129 S. 84th St. Dayton, NJ 08810-1539 (609) 655-1212 NEW YORK 4917 Genessee Street Cheektowaga, NY 14225 (716) 685-9503 OREGON 828 19th Avenue, N.W. Serial...-8911 ILLINOIS 1450 Feehanville Dr. Mt. Hato Rey, PR 00917 (787) 250-8776 TENNESSEE 1120 Elm Hill P. Date Purchased Dealer's Name & Address Model No. Westwood, MA 02090 (781) 461-9754 MINNESOTA 6427 Penn Ave. Fremont, CA 94538-5107 (510) 657-9881 14930 Northam St. Pittsburgh, ...

Owners Manual
Page 16
... area, and work . Should any trouble develop during this type of work with approved safety equipment, such as those dust masks that are specially designed to you . WARNING Some dust created by power sanding, sawing, grinding, drilling, and other construction activities contains chemicals known to the State of California to these exposures varies, depending on how long an implied warranty lasts, so...
... area, and work . Should any trouble develop during this type of work with approved safety equipment, such as those dust masks that are specially designed to you . WARNING Some dust created by power sanding, sawing, grinding, drilling, and other construction activities contains chemicals known to the State of California to these exposures varies, depending on how long an implied warranty lasts, so...

Parts Breakdown
Page 2
... 3606 RUBBER PIN 4, HR2400 BRUSH HOLDER, HP2010N CARBON BRUSH 107, HP2010N CARBON BRUSH SET CB-107, HP2010N NAME PLATE, 3606 STRAIN RELIEF, 4323K TAPPING SCREW 4X18, 4323K P.H. SCREW 4X35, 4304 P.H. SPRING 5, 3606 PIN 5, 3606 STOP RING E-3, 4304 MAKITA LABEL, DA3010F WRENCH 17, 9217SPC CAUTION LABEL, 6906 Quantity 1 1 1 1 1 1 1 1 1 1 1 1 1 1 1 1 1 2 1 2 1 1 1 1 2 2 1 1 2 4 4 1 4 1 1 1 4 2 2 2 1 1 1 1 1 1 1 1 1 1 1 Page 2 of 2 8/18/2010 WASHER 14, HR2400 B. SCREW M4X35, 4014NV MOTOR BRACKET, 3606 P.H. SCREW M4X20, N9501B HEX NUT M6, HR2400 BASE, 3606 BASE PLATE, 3608B P.H. WASHER...
... 3606 RUBBER PIN 4, HR2400 BRUSH HOLDER, HP2010N CARBON BRUSH 107, HP2010N CARBON BRUSH SET CB-107, HP2010N NAME PLATE, 3606 STRAIN RELIEF, 4323K TAPPING SCREW 4X18, 4323K P.H. SCREW 4X35, 4304 P.H. SPRING 5, 3606 PIN 5, 3606 STOP RING E-3, 4304 MAKITA LABEL, DA3010F WRENCH 17, 9217SPC CAUTION LABEL, 6906 Quantity 1 1 1 1 1 1 1 1 1 1 1 1 1 1 1 1 1 2 1 2 1 1 1 1 2 2 1 1 2 4 4 1 4 1 1 1 4 2 2 2 1 1 1 1 1 1 1 1 1 1 1 Page 2 of 2 8/18/2010 WASHER 14, HR2400 B. SCREW M4X35, 4014NV MOTOR BRACKET, 3606 P.H. SCREW M4X20, N9501B HEX NUT M6, HR2400 BASE, 3606 BASE PLATE, 3608B P.H. WASHER...


