Owners Manual
Page 5
.... Please visit your dealer or an Authorized Service Center. Playback Editing Function Setup VCR Functions Others © 2007 Funai Electric Co., Ltd. with stereo sound on each DVD. Funai reserves the right to change without notice. Nothing contained in this manual...benzine, thinner, commercially available cleaners, detergent, abrasive cleaning agents or antistatic spray intended for higher video resolution or extended recording time on recordable DVD discs. Note: This is subject to change the content herein without the obligation to define the cause of the ...
.... Please visit your dealer or an Authorized Service Center. Playback Editing Function Setup VCR Functions Others © 2007 Funai Electric Co., Ltd. with stereo sound on each DVD. Funai reserves the right to change without notice. Nothing contained in this manual...benzine, thinner, commercially available cleaners, detergent, abrasive cleaning agents or antistatic spray intended for higher video resolution or extended recording time on recordable DVD discs. Note: This is subject to change the content herein without the obligation to define the cause of the ...
Owners Manual
Page 6
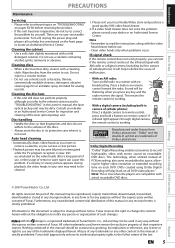
... AN EXTERNAL TUNER 13 SETTINGS FOR THE VIDEO INPUT 14 CONNECTION TO A TV 15 CONNECTION TO AN AUDIO SYSTEM 16 Basic Setup THE VCR / DVD RECORDER SWITCHING 17 GUIDE TO ON-SCREEN DISPLAYS AND MENUS . . . . 18 On-Screen Display / Menu 18 Main Menu 19 INITIAL... SETTING 20 SETTING THE CLOCK 21 Clock Setting 21 Recording INFORMATION ON DVD RECORDING 22 BEFORE RECORDING 23 Make Recording Compatible 23 Setting for Auto Chapter 23 BASIC RECORDING & ONE-TOUCH TIMER RECORDING 24 TIMER RECORDING 26 Hints for Timer Recording 29 SATELLITE LINK 30 OVERWRITING UNNECESSARY TITLE 32 Overwriting ...
... AN EXTERNAL TUNER 13 SETTINGS FOR THE VIDEO INPUT 14 CONNECTION TO A TV 15 CONNECTION TO AN AUDIO SYSTEM 16 Basic Setup THE VCR / DVD RECORDER SWITCHING 17 GUIDE TO ON-SCREEN DISPLAYS AND MENUS . . . . 18 On-Screen Display / Menu 18 Main Menu 19 INITIAL... SETTING 20 SETTING THE CLOCK 21 Clock Setting 21 Recording INFORMATION ON DVD RECORDING 22 BEFORE RECORDING 23 Make Recording Compatible 23 Setting for Auto Chapter 23 BASIC RECORDING & ONE-TOUCH TIMER RECORDING 24 TIMER RECORDING 26 Hints for Timer Recording 29 SATELLITE LINK 30 OVERWRITING UNNECESSARY TITLE 32 Overwriting ...
Owners Manual
Page 7
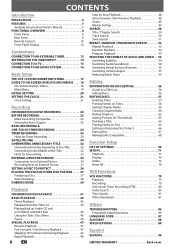
...with DVD+RW/DVD-RW, which is rewritable repeatedly and DVD+R/DVD-R, which is available for recording once. Daily or weekly program recordings are offered with DVD-video playback. Playback Theater surround sound in the mode other DVD players. Description refers to DVD-video Playback Editing Function Setup VCR ...programs within a one for your existing 2 Description refers to skip. Introduction Connections Basic Setup Recording FEATURES This unit not only plays back DVD, CD and VCR but also offers features for you set is reached or the disc and the cassette tape...
...with DVD+RW/DVD-RW, which is rewritable repeatedly and DVD+R/DVD-R, which is available for recording once. Daily or weekly program recordings are offered with DVD-video playback. Playback Theater surround sound in the mode other DVD players. Description refers to DVD-video Playback Editing Function Setup VCR ...programs within a one for your existing 2 Description refers to skip. Introduction Connections Basic Setup Recording FEATURES This unit not only plays back DVD, CD and VCR but also offers features for you set is reached or the disc and the cassette tape...

Owners Manual
Page 8
... once to turn on by pressing these buttons or insert a cassette tape. 1. STANDBY-ON y button (DVD/VCR) Press to start a recording. VIDEO input jack (E2) (DVD/VCR) Use to start playback. 19. PLAY B button (DVD)* Press to connect external device with a RCA audio cable. 5. FUNCTIONAL OVERVIEW Front Panel 1 2* 3 23 22 212019181716 15 14 13 121110 9 8* 7 6 5 4 (*) The...
... once to turn on by pressing these buttons or insert a cassette tape. 1. STANDBY-ON y button (DVD/VCR) Press to start a recording. VIDEO input jack (E2) (DVD/VCR) Use to start playback. 19. PLAY B button (DVD)* Press to connect external device with a RCA audio cable. 5. FUNCTIONAL OVERVIEW Front Panel 1 2* 3 23 22 212019181716 15 14 13 121110 9 8* 7 6 5 4 (*) The...
Owners Manual
Page 9
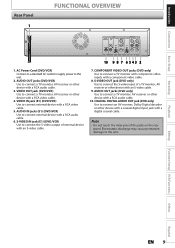
...coaxial cable. COAXIAL DIGITAL AUDIO OUT jack (DVD only) Use to connect a TV monitor, AV receiver or other device with a coaxial digital input jack with a RCA video cable. 4. Recording Playback Editing Function Setup VCR Functions Others Español EN 9 ...Introduction Connections Basic Setup Rear Panel 1 FUNCTIONAL OVERVIEW DIGITAL AUDIO OUT DVD DVD/VCR AUDIO S-VIDEO COMPONENT S-VIDEO IN ---AUDIO---OUT OUT VIDEO OUT Y ...
...coaxial cable. COAXIAL DIGITAL AUDIO OUT jack (DVD only) Use to connect a TV monitor, AV receiver or other device with a coaxial digital input jack with a RCA video cable. 4. Recording Playback Editing Function Setup VCR Functions Others Español EN 9 ...Introduction Connections Basic Setup Rear Panel 1 FUNCTIONAL OVERVIEW DIGITAL AUDIO OUT DVD DVD/VCR AUDIO S-VIDEO COMPONENT S-VIDEO IN ---AUDIO---OUT OUT VIDEO OUT Y ...
Owners Manual
Page 11
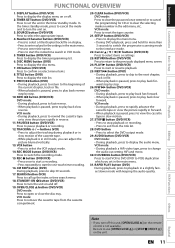
... list. 28. PAUSE F button (DVD/VCR) Press to select the VCR output mode. 14. VCR button • Press to pause playback or recording. 12. REC MODE button (DVD/VCR) Press to open or close the disc tray. REC I button (DVD/VCR) • Press once to start a recording. • Press repeatedly to turn ...up the index or time search menu. 18.STANDBY-ON y button (DVD/VCR) Press to start or resume playback. 25. OPEN/CLOSE A button (DVD/VCR) DVD mode: Press to switch the recording mode. 15. CLEAR button (DVD/VCR) DVD mode: Press to clear the password once entered or to cancel the programming...
... list. 28. PAUSE F button (DVD/VCR) Press to select the VCR output mode. 14. VCR button • Press to pause playback or recording. 12. REC MODE button (DVD/VCR) Press to open or close the disc tray. REC I button (DVD/VCR) • Press once to start a recording. • Press repeatedly to turn ...up the index or time search menu. 18.STANDBY-ON y button (DVD/VCR) Press to start or resume playback. 25. OPEN/CLOSE A button (DVD/VCR) DVD mode: Press to switch the recording mode. 15. CLEAR button (DVD/VCR) DVD mode: Press to clear the password once entered or to cancel the programming...

Owners Manual
Page 12
...; Selected external input position • Remaining time for one-touch timer recording VCR : Appears when this unit is in DVD output mode. : Appears when the timer recording is proceeding in DVD. : Appears when DVD is loaded on a disc. Appears when a disc is in the timer recording standby mode. : Flashes when a program cannot be performed for some reasons...
...; Selected external input position • Remaining time for one-touch timer recording VCR : Appears when this unit is in DVD output mode. : Appears when the timer recording is proceeding in DVD. : Appears when DVD is loaded on a disc. Appears when a disc is in the timer recording standby mode. : Flashes when a program cannot be performed for some reasons...
Owners Manual
Page 13
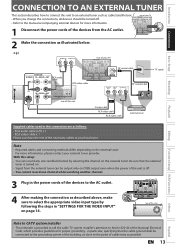
...illustrated below. EN 13 VHF / UHF • When you change the connections, all devices should banetentnuarned off . • You cannot record one channel while watching another channel. 3 Plug in the power cords of your local store. For more information. 2 Disconnect 1 Disconnect ...• RCA video cable x 1 Please purchase the rest of the necessary cables at your TV DVD/VCR S-VIDEO IN ---AUDIO---OUT L RCA audio cable RCA video cable IN R IN ---VIDEO---OUT DIGITAL AUDIO OUT DVD DVD/VCR AUDIO S-VIDEO COMPONENT S-VIDEO IN ---AUDIO---OUT OUT VIDEO OUT Y L L PB /CB IN ...
...illustrated below. EN 13 VHF / UHF • When you change the connections, all devices should banetentnuarned off . • You cannot record one channel while watching another channel. 3 Plug in the power cords of your local store. For more information. 2 Disconnect 1 Disconnect ...• RCA video cable x 1 Please purchase the rest of the necessary cables at your TV DVD/VCR S-VIDEO IN ---AUDIO---OUT L RCA audio cable RCA video cable IN R IN ---VIDEO---OUT DIGITAL AUDIO OUT DVD DVD/VCR AUDIO S-VIDEO COMPONENT S-VIDEO IN ---AUDIO---OUT OUT VIDEO OUT Y L L PB /CB IN ...
Owners Manual
Page 14
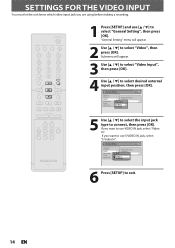
...external input position, then press [OK]. Submenu will appear. 2 Use [K / L] to connect, then press [OK]. General Setting Playback Display Video Recording Clock Reset All Progressive Scan TV Aspect Video InpVuidteo Input E1 (Rear) E2 (Front) 5 Use [K / L] to select the input jack type to... 4 PQRS 7 TIMER DISC MENU ABC 2 JKL 5 TUV 8 SPACE 0 o DEF 3 MNO 6 WXYZ 9 CLEAR SETUP s OK B TITLE RETURN p j B i F h g C TRACKING -- + VCR DVD REC REC MODE D.DUBBING AUDIO I CM SKIP SEARCH RAPID PLAY NB552 1 Press [SETUP] and use [K / L] to select "General Setting", then press [OK].
...external input position, then press [OK]. Submenu will appear. 2 Use [K / L] to connect, then press [OK]. General Setting Playback Display Video Recording Clock Reset All Progressive Scan TV Aspect Video InpVuidteo Input E1 (Rear) E2 (Front) 5 Use [K / L] to select the input jack type to... 4 PQRS 7 TIMER DISC MENU ABC 2 JKL 5 TUV 8 SPACE 0 o DEF 3 MNO 6 WXYZ 9 CLEAR SETUP s OK B TITLE RETURN p j B i F h g C TRACKING -- + VCR DVD REC REC MODE D.DUBBING AUDIO I CM SKIP SEARCH RAPID PLAY NB552 1 Press [SETUP] and use [K / L] to select "General Setting", then press [OK].
Owners Manual
Page 15
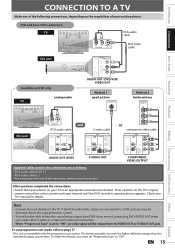
...L VIDEO AUDIO IN IN RCA video cable Recording Playback Editing Function Setup VCR Functions this unit DIGITAL AUDIO OUT DVD DVD/VCR AUDIO S-VIDEO COMPONENT S-VIDEO IN ---AUDIO---OUT OUT VIDEO OUT Y L L COAXIAL L OUT R PB /CB IN PR /CR R R IN ---VIDEO---OUT DVD/VCR S-VIDEO IN ---AUDIO---OUT L L IN...the TV's original remote control that selects an external input channel until the DVD recorder's opening picture appears. To set to "ON". If the RCA audio/video cables are connected to a VCR, pictures may be distorted due to the copy protection system. •...
...L VIDEO AUDIO IN IN RCA video cable Recording Playback Editing Function Setup VCR Functions this unit DIGITAL AUDIO OUT DVD DVD/VCR AUDIO S-VIDEO COMPONENT S-VIDEO IN ---AUDIO---OUT OUT VIDEO OUT Y L L COAXIAL L OUT R PB /CB IN PR /CR R R IN ---VIDEO---OUT DVD/VCR S-VIDEO IN ---AUDIO---OUT L L IN...the TV's original remote control that selects an external input channel until the DVD recorder's opening picture appears. To set to "ON". If the RCA audio/video cables are connected to a VCR, pictures may be distorted due to the copy protection system. •...

Owners Manual
Page 17
... AUDIO I CM SKIP SEARCH RAPID PLAY VCR button DVD button NB552 Note • You cannot switch to operate with [SOURCE]. DVD mode Press [DVD] on the remote control. (Verify that the DVD indicator is lit.) VCR mode Press [VCR] on the remote control. (Verify that the VCR indicator is a combination of a VCR and a DVD recorder, you must select first which component...
... AUDIO I CM SKIP SEARCH RAPID PLAY VCR button DVD button NB552 Note • You cannot switch to operate with [SOURCE]. DVD mode Press [DVD] on the remote control. (Verify that the DVD indicator is lit.) VCR mode Press [VCR] on the remote control. (Verify that the VCR indicator is a combination of a VCR and a DVD recorder, you must select first which component...

Owners Manual
Page 27
... correct the timer program refer to "Checking, canceling, or correcting the timer programming information" on page 28. 1/1 6 Use [K / L] to select a recording media ("DVD" or "VCR"), then press [B]. Timer Programming Date Date JAN/02 E1/E2 E1 MON JAN/01 11:00AM Start End NewSPtraorgt ram 12 : 00AM REC To...:00AM Start End NewSPtraorgt ram 12 : 00AM REC To E1/E2 End - - : - BS CS DR CD HDD DVD "VCR" will appear if VCR timer recording have not set for the other component (e.g., DVD) is in progress on page 21 before setting a timer programming. • Use [s / B] to move the cursor...
... correct the timer program refer to "Checking, canceling, or correcting the timer programming information" on page 28. 1/1 6 Use [K / L] to select a recording media ("DVD" or "VCR"), then press [B]. Timer Programming Date Date JAN/02 E1/E2 E1 MON JAN/01 11:00AM Start End NewSPtraorgt ram 12 : 00AM REC To...:00AM Start End NewSPtraorgt ram 12 : 00AM REC To E1/E2 End - - : - BS CS DR CD HDD DVD "VCR" will appear if VCR timer recording have not set for the other component (e.g., DVD) is in progress on page 21 before setting a timer programming. • Use [s / B] to move the cursor...
Owners Manual
Page 29
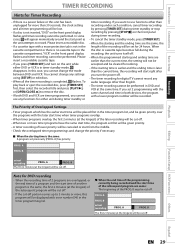
... (at the longest) will be cut off . Editing Function Setup VCR Functions Others Español EN 29 Please insert a recordable cassette tape. • If you press [TIMER SET] and turn the power off. • The timer recording for DVD recording • When the recording time of 2 programs are overlapped, or the end time of a program...
... (at the longest) will be cut off . Editing Function Setup VCR Functions Others Español EN 29 Please insert a recordable cassette tape. • If you press [TIMER SET] and turn the power off. • The timer recording for DVD recording • When the recording time of 2 programs are overlapped, or the end time of a program...
Owners Manual
Page 30
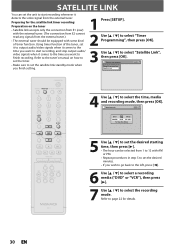
... 8 SPACE 0 DEF 3 MNO 6 WXYZ 9 CLEAR DISC MENU o SETUP s OK B TITLE RETURN p j B i F h g C TRACKING -- + VCR DVD REC REC MODE D.DUBBING AUDIO I CM SKIP SEARCH RAPID PLAY NB552 4 Use [K / L] to select the time, media and recording mode, then press [OK]. Satellite Link Start 5:00PM DVD VCR DVD Mode SP (2Hr) To Standby Mode 5 Use [K / L] to set the desired starting...
... 8 SPACE 0 DEF 3 MNO 6 WXYZ 9 CLEAR DISC MENU o SETUP s OK B TITLE RETURN p j B i F h g C TRACKING -- + VCR DVD REC REC MODE D.DUBBING AUDIO I CM SKIP SEARCH RAPID PLAY NB552 4 Use [K / L] to select the time, media and recording mode, then press [OK]. Satellite Link Start 5:00PM DVD VCR DVD Mode SP (2Hr) To Standby Mode 5 Use [K / L] to set the desired starting...
Owners Manual
Page 35
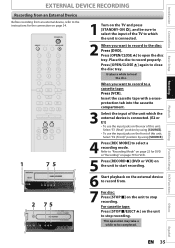
.../CLOSE A .@/: 1 GHI 4 PQRS 7 TIMER DISC MENU ABC 2 JKL 5 TUV 8 SPACE 0 o DEF 3 MNO 6 WXYZ 9 CLEAR SETUP s OK B TITLE RETURN p j B i F h g C TRACKING -- + VCR DVD REC REC MODE D.DUBBING AUDIO I ] (DVD or VCR) on the unit to start recording. 6 Start playback on the TV and press [STANDBY-ON y], and be completed. Select "E2 (Front)" position by using [SOURCE]. 4 Press...
.../CLOSE A .@/: 1 GHI 4 PQRS 7 TIMER DISC MENU ABC 2 JKL 5 TUV 8 SPACE 0 o DEF 3 MNO 6 WXYZ 9 CLEAR SETUP s OK B TITLE RETURN p j B i F h g C TRACKING -- + VCR DVD REC REC MODE D.DUBBING AUDIO I ] (DVD or VCR) on the unit to start recording. 6 Start playback on the TV and press [STANDBY-ON y], and be completed. Select "E2 (Front)" position by using [SOURCE]. 4 Press...

Owners Manual
Page 40
... Reset All Auto Chapter Auto Finalize Dubbing MoDduebbing Mode Make Recording Compatible VCR DVD DVD VCR DVD", 4 Use [K / L] to select "VCR then press [OK]. Make sure to the DVD. • This unit will automatically stop the recording. VCR to DVD DUBBING MODE DVD to VCR 4 Use [K / L] to select "DVD then press [OK]. Then press [PAUSE F] at the point you wish to start . 9 Press [STOP...
... Reset All Auto Chapter Auto Finalize Dubbing MoDduebbing Mode Make Recording Compatible VCR DVD DVD VCR DVD", 4 Use [K / L] to select "VCR then press [OK]. Make sure to the DVD. • This unit will automatically stop the recording. VCR to DVD DUBBING MODE DVD to VCR 4 Use [K / L] to select "DVD then press [OK]. Then press [PAUSE F] at the point you wish to start . 9 Press [STOP...

Owners Manual
Page 41
...folder 2 file 4 file 5 Editing Function Setup VCR Functions Others Español EN 41 Playable Discs and Files This unit is used primarily in VR mode or non compatible recording format On the following information. PBC (playback control) for DVD Playback The contents of the video CD. You ... using a video CD with PBC function. You cannot play back DVD recorded in order to play back a DVD, make sure that are generally divided into chapters. Titles may not be further subdivided into titles. A DVD labeled for other color systems. Region Codes This unit has been...
...folder 2 file 4 file 5 Editing Function Setup VCR Functions Others Español EN 41 Playable Discs and Files This unit is used primarily in VR mode or non compatible recording format On the following information. PBC (playback control) for DVD Playback The contents of the video CD. You ... using a video CD with PBC function. You cannot play back DVD recorded in order to play back a DVD, make sure that are generally divided into chapters. Titles may not be further subdivided into titles. A DVD labeled for other color systems. Region Codes This unit has been...

Owners Manual
Page 70
... (highlight is grayed in the settings. 70 EN Set the unit to replace the title list after recording (ON). Set the VCR to DVD (DVD to the default setting. Note • Your change to each settings stays on even when the power is off. • An item which is not ... Disc Full 15 minutes 30 minutes 60 minutes ON OFF General Setting End of Timer Rec ON OFF Dubbing Mode Pages 39-40 Make Recording Compatible Page 23 VCR DVD DVD VCR ON OFF Clock Page 21 Clock Setting Reset All Page 78 Yes No Contents Insert chapter marks at even time interval. Set to...
... (highlight is grayed in the settings. 70 EN Set the unit to replace the title list after recording (ON). Set the VCR to DVD (DVD to the default setting. Note • Your change to each settings stays on even when the power is off. • An item which is not ... Disc Full 15 minutes 30 minutes 60 minutes ON OFF General Setting End of Timer Rec ON OFF Dubbing Mode Pages 39-40 Make Recording Compatible Page 23 VCR DVD DVD VCR ON OFF Clock Page 21 Clock Setting Reset All Page 78 Yes No Contents Insert chapter marks at even time interval. Set to...
Owners Manual
Page 82
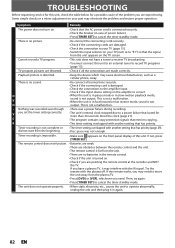
...8226; There are obstacles between the remote control and the unit. • The remote control is far from the plasma TV. • Press [DVD] or [VCR], whichever you are damaged. • Check the connection to your TV (page 15). • Switch the input selector on . • ...setting overlapped with another setting that the AC power cord is no sound. Playback picture is not a malfunction. • Nothing was not enough. Timer recording is impossible. • Make sure appears on your TV (such as a cellular phone, away. D V D • Re-connect all the connections...
...8226; There are obstacles between the remote control and the unit. • The remote control is far from the plasma TV. • Press [DVD] or [VCR], whichever you are damaged. • Check the connection to your TV (page 15). • Switch the input selector on . • ...setting overlapped with another setting that the AC power cord is no sound. Playback picture is not a malfunction. • Nothing was not enough. Timer recording is impossible. • Make sure appears on your TV (such as a cellular phone, away. D V D • Re-connect all the connections...
Owners Manual
Page 89
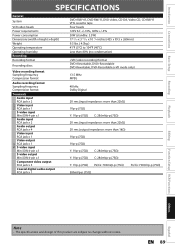
....5 x 260mm) 9.5 lbs. ( 4.3kg ) 41°F (5°C) to 104°F (40°C) Less than 80% (no condensation) +VR (video recording) format DVD+Rewritable, DVD+Recordable DVD-Rewritable, DVD-Recordable (+VR mode only) 13.5 MHz MPEG 48 kHz Dolby Digital 2V rms (input impedance: more than 22kΩ) 1Vp-p (75Ω) Y: 1Vp-p (75&#... Y: 1Vp-p (75Ω) PB/CB: 700mVp-p (75Ω) PR/CR: 700mVp-p (75Ω) 500mVp-p (75Ω) Playback Editing Function Setup VCR Functions Others Español Note • The specifications and design of this product are subject to change without notice.
....5 x 260mm) 9.5 lbs. ( 4.3kg ) 41°F (5°C) to 104°F (40°C) Less than 80% (no condensation) +VR (video recording) format DVD+Rewritable, DVD+Recordable DVD-Rewritable, DVD-Recordable (+VR mode only) 13.5 MHz MPEG 48 kHz Dolby Digital 2V rms (input impedance: more than 22kΩ) 1Vp-p (75Ω) Y: 1Vp-p (75&#... Y: 1Vp-p (75Ω) PB/CB: 700mVp-p (75Ω) PR/CR: 700mVp-p (75Ω) 500mVp-p (75Ω) Playback Editing Function Setup VCR Functions Others Español Note • The specifications and design of this product are subject to change without notice.


