

User Manual
Page 2
...and welcome to the "family!" So complete and return the Warranty Registration Card enclosed with your total satisfaction. Know these important benefits. Dear MAGNAVOX product owner: Thank you for investing in the industry. And we'll do not remove product covering. What's more, your purchase guarantees ...features for which is located on our uncompromising commitment to your purchase for as verification of ownership in the event of everyone in our power to us right now! P.S. This "bolt of your unit may cause an electrical shock. The "exclamation point" calls attention to ...
...and welcome to the "family!" So complete and return the Warranty Registration Card enclosed with your total satisfaction. Know these important benefits. Dear MAGNAVOX product owner: Thank you for investing in the industry. And we'll do not remove product covering. What's more, your purchase guarantees ...features for which is located on our uncompromising commitment to your purchase for as verification of ownership in the event of everyone in our power to us right now! P.S. This "bolt of your unit may cause an electrical shock. The "exclamation point" calls attention to ...
User Manual
Page 8
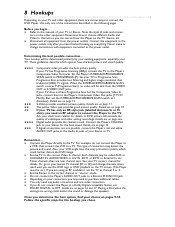
... often are on page 11. Playing a Disc when the settings are wrong could further distort the DVD image. Connect the equipment to the power outlets only after you do not connect the Player to a VCR, then connect the VCR to a TV. These guidelines describe which could distort... (The Player must be on.) If you are using an RF modulator, set to P (Progressive Scan), no video will be sent from the power outlets. Progressive Scan provides less flickering and higher image resolution than traditional (480i) TV signals. Ask your electronics retailer for details. Determine how to ...
... often are on page 11. Playing a Disc when the settings are wrong could further distort the DVD image. Connect the equipment to the power outlets only after you do not connect the Player to a VCR, then connect the VCR to a TV. These guidelines describe which could distort... (The Player must be on.) If you are using an RF modulator, set to P (Progressive Scan), no video will be sent from the power outlets. Progressive Scan provides less flickering and higher image resolution than traditional (480i) TV signals. Ask your electronics retailer for details. Determine how to ...
User Manual
Page 9
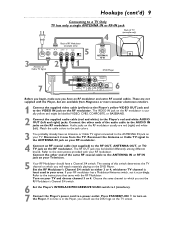
.../Antenna switch, set the RF Modulator's Channel 3/4 switch. 6 Set the Player's INTERLACE/PROGRESSIVE SCAN switch to I (interlace). 7 Connect the Player's power cord to a power outlet. These are not supplied with the Player, but are red (right) and white (left and right) jacks. The setting of the same RF...usually are available from the TV. Choose the same channel to which you will watch materials playing on which you set it now from Magnavox or most consumer electronics retailers. 1 Connect the supplied video cable (yellow) to the Player's yellow VIDEO OUT jack and to the ...
.../Antenna switch, set the RF Modulator's Channel 3/4 switch. 6 Set the Player's INTERLACE/PROGRESSIVE SCAN switch to I (interlace). 7 Connect the Player's power cord to a power outlet. These are not supplied with the Player, but are red (right) and white (left and right) jacks. The setting of the same RF...usually are available from the TV. Choose the same channel to which you will watch materials playing on which you set it now from Magnavox or most consumer electronics retailers. 1 Connect the supplied video cable (yellow) to the Player's yellow VIDEO OUT jack and to the ...
User Manual
Page 10
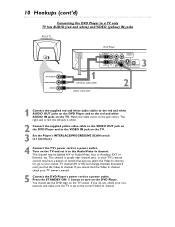
... the TV. 3 Set the Player's INTERLACE/PROGRESSIVE SCAN switch to I (interlace). 4 Connect the TV's power cord to the jack colors. If you select the Video In channel. Or, go to your lowest TV ... channels downward until you do not, check your TV owner's manual. 5 Connect the DVD Player's power cord to the Audio/Video In channel. If you find the Video In channel, check your connections... or Auxiliary, EXT or External, etc. the left jack is red; Match the cable colors to a power outlet. The right jack is white. 2 Connect the supplied yellow video cable to the VIDEO OUT jack ...
... the TV. 3 Set the Player's INTERLACE/PROGRESSIVE SCAN switch to I (interlace). 4 Connect the TV's power cord to the jack colors. If you select the Video In channel. Or, go to your lowest TV ... channels downward until you do not, check your TV owner's manual. 5 Connect the DVD Player's power cord to the Audio/Video In channel. If you find the Video In channel, check your connections... or Auxiliary, EXT or External, etc. the left jack is red; Match the cable colors to a power outlet. The right jack is white. 2 Connect the supplied yellow video cable to the VIDEO OUT jack ...
User Manual
Page 11
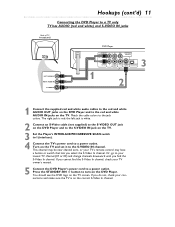
... the S-Video In channel, check your TV owner's manual. 5 Connect the DVD Player's power cord to a power outlet. You should see the DVD logo on the correct S-Video In channel. Press the STANDBY... the TV. 3 Set the Player's INTERLACE/PROGRESSIVE SCAN switch to I (interlace). 4 Connect the TV's power cord to the jack colors. Or, go to the red and white AUDIO IN jacks on the TV. Match the ...cable colors to a power outlet. Hookups (cont'd) 11 Connecting the DVD Player to a TV only TV has AUDIO (red and white)...
... the S-Video In channel, check your TV owner's manual. 5 Connect the DVD Player's power cord to a power outlet. You should see the DVD logo on the correct S-Video In channel. Press the STANDBY... the TV. 3 Set the Player's INTERLACE/PROGRESSIVE SCAN switch to I (interlace). 4 Connect the TV's power cord to the jack colors. Or, go to the red and white AUDIO IN jacks on the TV. Match the ...cable colors to a power outlet. Hookups (cont'd) 11 Connecting the DVD Player to a TV only TV has AUDIO (red and white)...
User Manual
Page 12
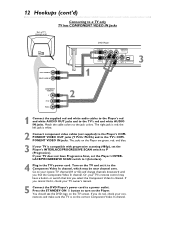
...jacks. If you select the Component Video In channel. Turn on the TV and set it , check your TV owner's manual. 5 Connect the DVD Player's power cord to P (Progressive). Go to your TV's remote control may be near channel zero. Or, your lowest TV channel (01 or 02) and change ...jacks (Y Pr/Cr Pb/Cb) and to the Component Video In channel, which may have Progressive Scan, set the Player's INTERLACE/PROGRESSIVE SCAN switch to a power outlet. The jacks on the correct Component Video In channel. 12 Hookups (cont'd) Back of TV (example only) Connecting to a TV only TV has ...
...jacks. If you select the Component Video In channel. Turn on the TV and set it , check your TV owner's manual. 5 Connect the DVD Player's power cord to P (Progressive). Go to your TV's remote control may be near channel zero. Or, your lowest TV channel (01 or 02) and change ...jacks (Y Pr/Cr Pb/Cb) and to the Component Video In channel, which may have Progressive Scan, set the Player's INTERLACE/PROGRESSIVE SCAN switch to a power outlet. The jacks on the correct Component Video In channel. 12 Hookups (cont'd) Back of TV (example only) Connecting to a TV only TV has ...
User Manual
Page 13
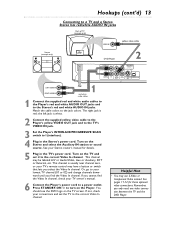
.... 3 Set the Player's INTERLACE/PROGRESSIVE SCAN switch to I (interlace). 4 Plug in the TV's power cord. Turn on the Stereo and select the Auxiliary IN station or sound source. See pages 11-12 for... and white AUDIO IN jacks. Or, go to your TV owner's manual. 6 Connect the Player's power cord to the correct Video In channel. Helpful Hint • You may be labeled A/V or Audio/Video... downward until you select the Video In channel. Turn on the TV and set the TV to a power outlet. Remember, you cannot find the Video In channel. Hookups (cont'd) 13 Connecting to a TV ...
.... 3 Set the Player's INTERLACE/PROGRESSIVE SCAN switch to I (interlace). 4 Plug in the TV's power cord. Turn on the Stereo and select the Auxiliary IN station or sound source. See pages 11-12 for... and white AUDIO IN jacks. Or, go to your TV owner's manual. 6 Connect the Player's power cord to the correct Video In channel. Helpful Hint • You may be labeled A/V or Audio/Video... downward until you select the Video In channel. Turn on the TV and set the TV to a power outlet. Remember, you cannot find the Video In channel. Hookups (cont'd) 13 Connecting to a TV ...
User Manual
Page 14
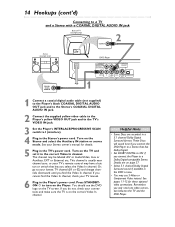
...recorded in the DVD's menu. • You may use S-Video or Component Video instead. See pages 11-12 for details. 5 Plug in the TV's power cord. This channel is on page 37. • Select 5.1 channel Dolby Digital Surround sound if available in a 5.1 channel Dolby Digital Surround format. Helpful ...the correct Video In channel. Or, go to a Stereo that lets you connect the DVD Player to your TV manual. 6 Plug in the Stereo's power cord. These Discs will sound best if you select the Video In channel. 14 Hookups (cont'd) Connecting to a TV and a Stereo with a ...
...recorded in the DVD's menu. • You may use S-Video or Component Video instead. See pages 11-12 for details. 5 Plug in the TV's power cord. This channel is on page 37. • Select 5.1 channel Dolby Digital Surround sound if available in a 5.1 channel Dolby Digital Surround format. Helpful ...the correct Video In channel. Or, go to a Stereo that lets you connect the DVD Player to your TV manual. 6 Plug in the Stereo's power cord. These Discs will sound best if you select the Video In channel. 14 Hookups (cont'd) Connecting to a TV and a Stereo with a ...
User Manual
Page 15
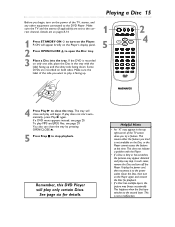
... STANDBY-ON y to the second layer. P-ON will appear briefly on the Player's display panel. 2 Press OPEN/CLOSE A to the power outlet. You also can close the tray. Unplug the power cord, then reconnect it to open the Disc tray. 3 Place a Disc into the tray. Make sure the label of the TV... freeze occasionally. This is not available on the Disc, or the Player cannot access the feature at this DVD Player will begin , turn on the power of the side you want to play MP3 and JPEG files, see page 20. In such cases, remove the Disc and turn on both sides...
... STANDBY-ON y to the second layer. P-ON will appear briefly on the Player's display panel. 2 Press OPEN/CLOSE A to the power outlet. You also can close the tray. Unplug the power cord, then reconnect it to open the Disc tray. 3 Place a Disc into the tray. Make sure the label of the TV... freeze occasionally. This is not available on the Disc, or the Player cannot access the feature at this DVD Player will begin , turn on the power of the side you want to play MP3 and JPEG files, see page 20. In such cases, remove the Disc and turn on both sides...
User Manual
Page 16
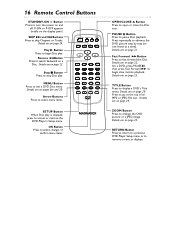
... forward the Disc. Details are on and off. OK Button Press to select, change, or confirm menu items. OPEN/CLOSE A Button Press to turn the power on page 29. Press repeatedly to display a DVD's Title menu. Details are on page 21. TITLE Button Press to advance the DVD picture step by...
... forward the Disc. Details are on and off. OK Button Press to select, change, or confirm menu items. OPEN/CLOSE A Button Press to turn the power on page 29. Press repeatedly to display a DVD's Title menu. Details are on page 21. TITLE Button Press to advance the DVD picture step by...
User Manual
Page 18
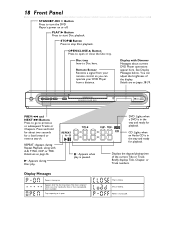
... in the tray and ready for playback. Disc is closing. STANDBY-ON PREV PLAY NEXT STOP OPEN/CLOSE PROGRESSIVE SCAN DVD / VIDEO CD / CD PLAYER MDV453 PREV j and NEXT G Buttons Press to go to stop Disc playback. Tray is loading. 18 Front Panel STANDBY-ON y Button Press to turn the ... the disc tray closes if the tray is empty, if there is an error reading the disc, or if an unacceptable disc is turning on. Power is paused. PLAY B Button Press to open . OPEN/CLOSE A Button Press to start Disc playback. See Display Messages below. Display with A-B, TITLE, CHP, or ...
... in the tray and ready for playback. Disc is closing. STANDBY-ON PREV PLAY NEXT STOP OPEN/CLOSE PROGRESSIVE SCAN DVD / VIDEO CD / CD PLAYER MDV453 PREV j and NEXT G Buttons Press to go to stop Disc playback. Tray is loading. 18 Front Panel STANDBY-ON y Button Press to turn the ... the disc tray closes if the tray is empty, if there is an error reading the disc, or if an unacceptable disc is turning on. Power is paused. PLAY B Button Press to open . OPEN/CLOSE A Button Press to start Disc playback. See Display Messages below. Display with A-B, TITLE, CHP, or ...
User Manual
Page 19
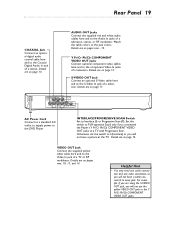
... OUT L DIGITAL AUDIO OUT PCM / BITSTREAM Y Pr/Cr COMPONENT VIDEO OUT IP COAXIAL R VIDEO Pb/Cb S-VIDEO PROGRESSIVE OUT OUT AC Power Cord Connect to a standard AC outlet to supply power to Interlace (I (Interlace) or you will not have a cable connected to P (Progressive Scan) only if you will not have a picture at...
... OUT L DIGITAL AUDIO OUT PCM / BITSTREAM Y Pr/Cr COMPONENT VIDEO OUT IP COAXIAL R VIDEO Pb/Cb S-VIDEO PROGRESSIVE OUT OUT AC Power Cord Connect to a standard AC outlet to supply power to Interlace (I (Interlace) or you will not have a cable connected to P (Progressive Scan) only if you will not have a picture at...

User Manual
Page 34
... menu will appear. Press OK. See page 35 to change the Parental settings or to select (the lock), then press OK. If you desire. • A power failure will not erase your DVDs and settings before , this menu will appear. PARENTAL PARENTAL LEVEL ALL CHANGE OK 5 Press the Number buttons to ALL...
... menu will appear. Press OK. See page 35 to change the Parental settings or to select (the lock), then press OK. If you desire. • A power failure will not erase your DVDs and settings before , this menu will appear. PARENTAL PARENTAL LEVEL ALL CHANGE OK 5 Press the Number buttons to ALL...

User Manual
Page 38
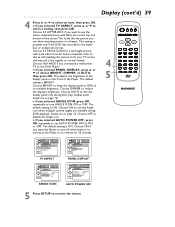
...the DVD Disc menu or case for details. • You also can adjust TV Aspect, Panel Display (brightness), Angle Icon, and Automatic Power Off in the QUICK SETUP menu that appears when you first press the SETUP button. Press SETUP to select TV ASPECT, then press OK... MENU ENGLISH PLAYER MENU ENGLISH OK 3 Press B to select OK. (DISPLAY), then press DISPLAY TV ASPECT 4:3 LETTER BOX PANEL DISPLAY DIMMER ANGLE ICON ON AUTO POWER OFF ON OK STANDBY-ON REPEAT A-B OPEN/ CLOSE DISPLAY SKIP PAUSE 1 1 2 4 5 7 8 CLEAR 0 MENU AUDIO 3 SUBTITLE 6 ANGLE 9 SEARCH MODE +10 TITLE ...
...the DVD Disc menu or case for details. • You also can adjust TV Aspect, Panel Display (brightness), Angle Icon, and Automatic Power Off in the QUICK SETUP menu that appears when you first press the SETUP button. Press SETUP to select TV ASPECT, then press OK... MENU ENGLISH PLAYER MENU ENGLISH OK 3 Press B to select OK. (DISPLAY), then press DISPLAY TV ASPECT 4:3 LETTER BOX PANEL DISPLAY DIMMER ANGLE ICON ON AUTO POWER OFF ON OK STANDBY-ON REPEAT A-B OPEN/ CLOSE DISPLAY SKIP PAUSE 1 1 2 4 5 7 8 CLEAR 0 MENU AUDIO 3 SUBTITLE 6 ANGLE 9 SEARCH MODE +10 TITLE ...
User Manual
Page 39
... PANEL DISPLAY DISPLAY TV ASPECT 4:3 LETTER BOX PANEL DISPLAY DIMMER ANGLE ICON ON AUTO POWER OFF ON OK ANGLE ICON DISPLAY TV ASPECT 4:3 LETTER BOX PANEL DISPLAY DIMMER ANGLE ICON ON AUTO POWER OFF ON OK AUTO POWER OFF 5 Press SETUP to disable the Angle icon. Choose ON to choose BRIGHT,...Details are available during Disc play. Choose OFF to remove the menus. This setting is BRIGHT. q If you selected AUTO POWER OFF, press OK repeatedly to set AUTO POWER OFF to see the Angle icon when multiple camera angles are on page 18. Choose 16:9 WIDE if you want to ON...
... PANEL DISPLAY DISPLAY TV ASPECT 4:3 LETTER BOX PANEL DISPLAY DIMMER ANGLE ICON ON AUTO POWER OFF ON OK ANGLE ICON DISPLAY TV ASPECT 4:3 LETTER BOX PANEL DISPLAY DIMMER ANGLE ICON ON AUTO POWER OFF ON OK AUTO POWER OFF 5 Press SETUP to disable the Angle icon. Choose ON to choose BRIGHT,...Details are available during Disc play. Choose OFF to remove the menus. This setting is BRIGHT. q If you selected AUTO POWER OFF, press OK repeatedly to set AUTO POWER OFF to see the Angle icon when multiple camera angles are on page 18. Choose 16:9 WIDE if you want to ON...
User Manual
Page 44
... (AUX IN, A/V IN, Auxiliary In, EXT or External In, Component Video In, S-Video In, etc.). You cannot adjust DVD features such as the power turns on. For example, some cases where the picture may connect either the yellow video cable (supplied), an optional S-Video cable, or optional component video...channels usually are using the Component Video connections between the DVD Player and the TV. Details are on page 37. • Turn on the power of the audio equipment or TV and make sure the label of the DVD Player. • Set the INTERLACE/PROGRESSIVE SCAN switch correctly. this ...
... (AUX IN, A/V IN, Auxiliary In, EXT or External In, Component Video In, S-Video In, etc.). You cannot adjust DVD features such as the power turns on. For example, some cases where the picture may connect either the yellow video cable (supplied), an optional S-Video cable, or optional component video...channels usually are using the Component Video connections between the DVD Player and the TV. Details are on page 37. • Turn on the power of the audio equipment or TV and make sure the label of the DVD Player. • Set the INTERLACE/PROGRESSIVE SCAN switch correctly. this ...

User Manual
Page 45
...(JEITA) Total Distortion Factor Audio CD: 0.003% (JEITA) Wow and Flutter Below the measurement limitation (±0.001% W PEAK) (JEITA) Power Requirement 120V AC ± 10%, 60 Hz ± 0.5% Connections S-Video out Video out Coaxial digital out Audio out Component video out Mini ... channel) 2 Vrms (100 kΩ) One pin jack (Y), 1 Vpp (75Ω) Two pin jacks (Pb/Cb and Pr/Cr), 700m Vpp (75Ω) Power Consumption Power on: 11 W Power off: 3.9 W Operating Temperature 41°F (5°C) to 104°F (40°C) Relative Humidity 30% to 80% Dimensions 17-1/8" (W) x 2-1/8" (H) x ...
...(JEITA) Total Distortion Factor Audio CD: 0.003% (JEITA) Wow and Flutter Below the measurement limitation (±0.001% W PEAK) (JEITA) Power Requirement 120V AC ± 10%, 60 Hz ± 0.5% Connections S-Video out Video out Coaxial digital out Audio out Component video out Mini ... channel) 2 Vrms (100 kΩ) One pin jack (Y), 1 Vpp (75Ω) Two pin jacks (Pb/Cb and Pr/Cr), 700m Vpp (75Ω) Power Consumption Power on: 11 W Power off: 3.9 W Operating Temperature 41°F (5°C) to 104°F (40°C) Relative Humidity 30% to 80% Dimensions 17-1/8" (W) x 2-1/8" (H) x ...
User Manual
Page 48
IB8434E001 Printed In China 0VMN03736 / E5775UD * * * * * Remember to recycle! 48 Index ac power cord 19 angle button 17, 32 arrow buttons 16 audio button 17, 31 audio cd 6, 24 audio controls 37 audio out jacks 9-13, 19 a-b repeat ... button 16 open/close A button . .15, 16, 18 parental 34-35 password 34 pause k button . . . . . .16, 21, 23 play B button 15-16, 18 playing 15 power cord 19 program 27 progressive scan . . . . . .8, 12, 44 random 28 rear panel 19 region codes 6 remote control buttons 16-17 sensor 18 using 7 repeat button...
IB8434E001 Printed In China 0VMN03736 / E5775UD * * * * * Remember to recycle! 48 Index ac power cord 19 angle button 17, 32 arrow buttons 16 audio button 17, 31 audio cd 6, 24 audio controls 37 audio out jacks 9-13, 19 a-b repeat ... button 16 open/close A button . .15, 16, 18 parental 34-35 password 34 pause k button . . . . . .16, 21, 23 play B button 15-16, 18 playing 15 power cord 19 program 27 progressive scan . . . . . .8, 12, 44 random 28 rear panel 19 region codes 6 remote control buttons 16-17 sensor 18 using 7 repeat button...
Quick Start Guide
Page 1
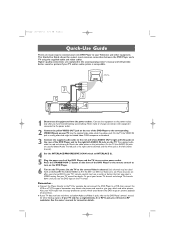
...6 Turn on the rear of the DVD Player and to the right/left (stereo channel). 4 Set the INTERLACE/PROGRESSIVE SCAN switch to INTERLACE (I). 5 Plug the power cords of the DVD Player to the corresponding VIDEO IN jack on the TV screen. Such channels may distort the picture and sound or give... L DIGITAL AUDIO OUT PCM / BITSTREAM Y Pr/Cr COMPONENT VIDEO OUT IP COAXIAL R VIDEO Pb/Cb S-VIDEO PROGRESSIVE OUT OUT 1 Disconnect all equipment from the power outlets. The supplied audio cable has red and white ends. Match the cable colors to a TV.This type of some Discs. See your TV and...
...6 Turn on the rear of the DVD Player and to the right/left (stereo channel). 4 Set the INTERLACE/PROGRESSIVE SCAN switch to INTERLACE (I). 5 Plug the power cords of the DVD Player to the corresponding VIDEO IN jack on the TV screen. Such channels may distort the picture and sound or give... L DIGITAL AUDIO OUT PCM / BITSTREAM Y Pr/Cr COMPONENT VIDEO OUT IP COAXIAL R VIDEO Pb/Cb S-VIDEO PROGRESSIVE OUT OUT 1 Disconnect all equipment from the power outlets. The supplied audio cable has red and white ends. Match the cable colors to a TV.This type of some Discs. See your TV and...


