
User manual, English (US)
Page 5
...; Program Playback • Random Play • Repeat, A-B Repeat • Resume On • Specific Time/Title/ Chapter/Track Playback • Subtitles * • Zoom * If available on Digital Video Discs (DVDs). Even if a feature is stopped. Available Disc Features... Your new Digital Video Disc Player provides high picture quality, clear sound, and endless playback features available on the Disc Disc Menus... To get the most enjoyment from the Player, read this manual describe the DVD Disc Menus. Some explanations in the Player's menu...
...; Program Playback • Random Play • Repeat, A-B Repeat • Resume On • Specific Time/Title/ Chapter/Track Playback • Subtitles * • Zoom * If available on Digital Video Discs (DVDs). Even if a feature is stopped. Available Disc Features... Your new Digital Video Disc Player provides high picture quality, clear sound, and endless playback features available on the Disc Disc Menus... To get the most enjoyment from the Player, read this manual describe the DVD Disc Menus. Some explanations in the Player's menu...
User manual, English (US)
Page 6
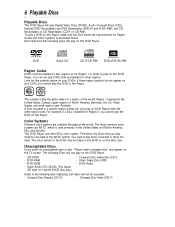
... for Region Codes and Color Systems as described below on the TV screen. A Disc encoded in a specific region format can not play Discs recorded in this Player, make sure the Disc meets the requirements for other formats. If these region symbols do not appear on DVD Players with the same region code. The number inside the globe refers to play , but video will not be recorded in the United States and North America, PAL, and...
... for Region Codes and Color Systems as described below on the TV screen. A Disc encoded in a specific region format can not play Discs recorded in this Player, make sure the Disc meets the requirements for other formats. If these region symbols do not appear on DVD Players with the same region code. The number inside the globe refers to play , but video will not be recorded in the United States and North America, PAL, and...

User manual, English (US)
Page 8
... Digital audio connections provide the clearest sound. Ask your other equipment you may need one audio connection and one of your TV. The DVD picture still will need an RF adapter in the following guidelines describe which could connect the DVD Player. Determine how to OFF on the DVD Player. Or, go to your connection, you wish to connect, there are using an RF modulator, set DOLBY DIGITAL to choose different Audio and Video...
... Digital audio connections provide the clearest sound. Ask your other equipment you may need one audio connection and one of your TV. The DVD picture still will need an RF adapter in the following guidelines describe which could connect the DVD Player. Determine how to OFF on the DVD Player. Or, go to your connection, you wish to connect, there are using an RF modulator, set DOLBY DIGITAL to choose different Audio and Video...
User manual, English (US)
Page 9
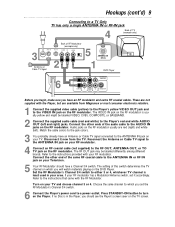
... audio cable to a power outlet. The setting of RF Modulator (example only) TO TV AUDIO IN R L VIDEO IN CH3 CH4 2 5 ANTENNA IN RF IN 1 DVD Player 6 AUDIO OUT L DIGITAL AUDIO OUT PCM / BITSTREAM Y Cr COMPONENT VIDEO OUT COAXIAL R VIDEO OUT Cb S-VIDEO OUT Before you begin, make sure you set it now from Magnavox or most consumer electronics retailers. 1 Connect the supplied video cable (yellow) to the Player's yellow VIDEO OUT jack and to turn...
... audio cable to a power outlet. The setting of RF Modulator (example only) TO TV AUDIO IN R L VIDEO IN CH3 CH4 2 5 ANTENNA IN RF IN 1 DVD Player 6 AUDIO OUT L DIGITAL AUDIO OUT PCM / BITSTREAM Y Cr COMPONENT VIDEO OUT COAXIAL R VIDEO OUT Cb S-VIDEO OUT Before you begin, make sure you set it now from Magnavox or most consumer electronics retailers. 1 Connect the supplied video cable (yellow) to the Player's yellow VIDEO OUT jack and to turn...
User manual, English (US)
Page 10
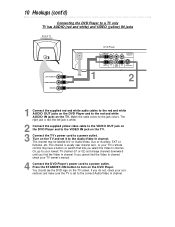
.... Turn on the TV screen. If you select the Video In channel. You should see the DVD logo on the TV and set to your TV's remote control may be labeled A/V or Audio/Video, Aux or Auxiliary, EXT or External, etc. Press the STANDBY-ON button to turn on the TV. 3 Connect the TV's power cord to the Audio/Video In channel. Match the cable colors to a power outlet. This channel may have a button or switch...
.... Turn on the TV screen. If you select the Video In channel. You should see the DVD logo on the TV and set to your TV's remote control may be labeled A/V or Audio/Video, Aux or Auxiliary, EXT or External, etc. Press the STANDBY-ON button to turn on the TV. 3 Connect the TV's power cord to the Audio/Video In channel. Match the cable colors to a power outlet. This channel may have a button or switch...
User manual, English (US)
Page 11
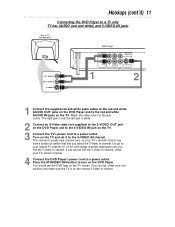
...'s remote control may have a button or switch that lets you find the S-Video In channel. Press the STANDBY-ON button to turn on the TV and set it to the S-VIDEO IN channel. Hookups (cont'd) 11 Connecting the DVD Player to a TV only TV has AUDIO (red and white) and S-VIDEO IN jacks Back of TV (example only) LEFT AUDIO IN RIGHT AUDIO IN VIDEO IN LEFT AUDIO IN RIGHT AUDIO IN S-VIDEO IN DVD Player AUDIO...
...'s remote control may have a button or switch that lets you find the S-Video In channel. Press the STANDBY-ON button to turn on the TV and set it to the S-VIDEO IN channel. Hookups (cont'd) 11 Connecting the DVD Player to a TV only TV has AUDIO (red and white) and S-VIDEO IN jacks Back of TV (example only) LEFT AUDIO IN RIGHT AUDIO IN VIDEO IN LEFT AUDIO IN RIGHT AUDIO IN S-VIDEO IN DVD Player AUDIO...
User manual, English (US)
Page 12
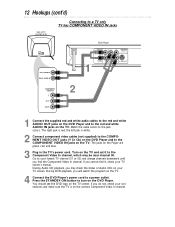
... your TV owner's manual. Press the STANDBY-ON button to the jack colors. You should see the DVD logo on the Player are green, red, and blue. 3 Plug in the TV's power cord. If you may be near channel 00. During Audio CD playback, you cannot find the Component Video In channel. Match the cable colors to turn on the DVD Player. Turn on the TV and set it , check your connections and make sure...
... your TV owner's manual. Press the STANDBY-ON button to the jack colors. You should see the DVD logo on the Player are green, red, and blue. 3 Plug in the TV's power cord. If you may be near channel 00. During Audio CD playback, you cannot find the Component Video In channel. Match the cable colors to turn on the DVD Player. Turn on the TV and set it , check your connections and make sure...
User manual, English (US)
Page 13
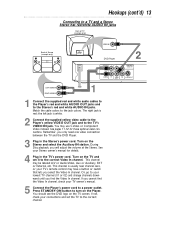
... Player's red and white AUDIO OUT jacks and to the correct Video In channel. See pages 11-12 for details. 4 Plug in the Stereo's power cord. During Disc playback, you find the Video In channel, check your TV owner's manual. 5 Connect the Player's power cord to your Stereo owner's manual for these optional video connections. This channel may use S-Video or Component Video instead. Or, go to a power outlet. If not, check your TV's remote control may have a button or switch...
... Player's red and white AUDIO OUT jacks and to the correct Video In channel. See pages 11-12 for details. 4 Plug in the Stereo's power cord. During Disc playback, you find the Video In channel, check your TV owner's manual. 5 Connect the Player's power cord to your Stereo owner's manual for these optional video connections. This channel may use S-Video or Component Video instead. Or, go to a power outlet. If not, check your TV's remote control may have a button or switch...
User manual, English (US)
Page 14
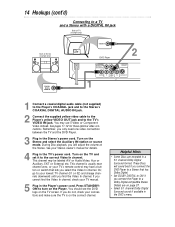
... channel. This channel is on the correct channel. Or, go to the TV's VIDEO IN jack. Helpful Hints • Some Discs are on the Player. Details are recorded in the TV's power cord. Turn on the TV screen. You should see the DVD logo on the Stereo and select the Auxiliary IN station or source mode. See your Stereo owner's manual for these optional video connections. These Discs will adjust the volume...
... channel. This channel is on the correct channel. Or, go to the TV's VIDEO IN jack. Helpful Hints • Some Discs are on the Player. Details are recorded in the TV's power cord. Turn on the TV screen. You should see the DVD logo on the Stereo and select the Auxiliary IN station or source mode. See your Stereo owner's manual for these optional video connections. These Discs will adjust the volume...
User manual, English (US)
Page 15
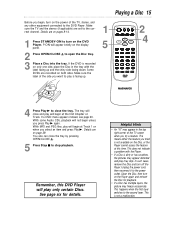
..., and any other equipment connected to turn off the Player. Details are on the Disc, or the Player cannot access the feature at the first Chapter or Track. This does not indicate a problem with the label facing up . 1 5 STANDBY-ON REPEAT A-B OPEN/ CLOSE DISPLAY SKIP PAUSE 2 4 1 2 4 5 7 8 CLEAR 0 MENU AUDIO 3 SUBTITLE 6 ANGLE 9 SEARCH MODE +10 TITLE MODE ZOOM OK SETUP RETURN MARKER 4 Press Play B to play will begin , turn on page 29...
..., and any other equipment connected to turn off the Player. Details are on the Disc, or the Player cannot access the feature at the first Chapter or Track. This does not indicate a problem with the label facing up . 1 5 STANDBY-ON REPEAT A-B OPEN/ CLOSE DISPLAY SKIP PAUSE 2 4 1 2 4 5 7 8 CLEAR 0 MENU AUDIO 3 SUBTITLE 6 ANGLE 9 SEARCH MODE +10 TITLE MODE ZOOM OK SETUP RETURN MARKER 4 Press Play B to play will begin , turn on page 29...

User manual, English (US)
Page 16
... REPEAT A-B OPEN/ CLOSE DISPLAY SKIP PAUSE 1 2 4 5 7 8 CLEAR 0 MENU AUDIO 3 SUBTITLE 6 ANGLE 9 SEARCH MODE +10 TITLE MODE ZOOM OK SETUP RETURN MARKER OPEN/CLOSE A Button Press to remove displays. ZOOM Button Press to advance the DVD picture step by step (or one frame at a time). Press repeatedly to enlarge the DVD picture or JPEG image. TITLE Button Press to stop Disc play of the DVD, if available. Details are on pages 5 and 20. On a DVD, press Pause F, then press Fast Forward...
... REPEAT A-B OPEN/ CLOSE DISPLAY SKIP PAUSE 1 2 4 5 7 8 CLEAR 0 MENU AUDIO 3 SUBTITLE 6 ANGLE 9 SEARCH MODE +10 TITLE MODE ZOOM OK SETUP RETURN MARKER OPEN/CLOSE A Button Press to remove displays. ZOOM Button Press to advance the DVD picture step by step (or one frame at a time). Press repeatedly to enlarge the DVD picture or JPEG image. TITLE Button Press to stop Disc play of the DVD, if available. Details are on pages 5 and 20. On a DVD, press Pause F, then press Fast Forward...
User manual, English (US)
Page 17
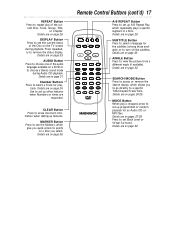
... 31. MODE Button When play is stopped, press to set up programmed or random playback for play of the audio languages available on the TV screen during Audio CD playback. Details are requested. Use to set up other features when Numbers or times are on page 42. Remote Control Buttons (cont'd) 17 STANDBY-ON REPEAT A-B OPEN/ CLOSE DISPLAY SKIP PAUSE 1 2 4 5 7 8 CLEAR 0 MENU AUDIO 3 SUBTITLE 6 ANGLE 9 SEARCH MODE +10 TITLE MODE ZOOM OK SETUP RETURN MARKER A-B REPEAT Button Press to set Black Level or Virtual Surround. Details...
... 31. MODE Button When play is stopped, press to set up programmed or random playback for play of the audio languages available on the TV screen during Audio CD playback. Details are requested. Use to set up other features when Numbers or times are on page 42. Remote Control Buttons (cont'd) 17 STANDBY-ON REPEAT A-B OPEN/ CLOSE DISPLAY SKIP PAUSE 1 2 4 5 7 8 CLEAR 0 MENU AUDIO 3 SUBTITLE 6 ANGLE 9 SEARCH MODE +10 TITLE MODE ZOOM OK SETUP RETURN MARKER A-B REPEAT Button Press to set Black Level or Virtual Surround. Details...
User manual, English (US)
Page 18
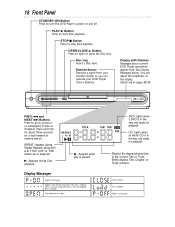
CD: Lights when an Audio CD is open or close the Disc tray. Tray is opening or is in the tray and ready for a fast forward or reverse search. Disc tray Insert a Disc here. Remote Sensor Receives a signal from a distance. STANDBY-ON PREV PLAY NEXT STOP OPEN/CLOSE PREV j and NEXT G Buttons Press to go to stop Disc playback. Press and hold for playback. Details are on pages 38-39. Displays the elapsed playing time of the display. Power is closing. Tray is turning off . Details...
CD: Lights when an Audio CD is open or close the Disc tray. Tray is opening or is in the tray and ready for a fast forward or reverse search. Disc tray Insert a Disc here. Remote Sensor Receives a signal from a distance. STANDBY-ON PREV PLAY NEXT STOP OPEN/CLOSE PREV j and NEXT G Buttons Press to go to stop Disc playback. Press and hold for playback. Details are on pages 38-39. Displays the elapsed playing time of the display. Power is closing. Tray is turning off . Details...
User manual, English (US)
Page 19
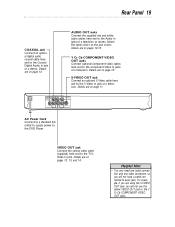
... S-Video In jack of a stereo. VIDEO OUT Jack Connect the yellow video cable (supplied) here and to the DVD Player. AUDIO OUT L DIGITAL AUDIO OUT PCM / BITSTREAM Y Cr COMPONENT VIDEO OUT COAXIAL R VIDEO OUT Cb S-VIDEO OUT AC Power Cord Connect to a standard AC outlet to supply power to the TV's Video In jack. Details are using the S-VIDEO OUT jack, you are on page 14. Rear Panel 19 COAXIAL Jack Connect an optional digital audio coaxial cable...
... S-Video In jack of a stereo. VIDEO OUT Jack Connect the yellow video cable (supplied) here and to the DVD Player. AUDIO OUT L DIGITAL AUDIO OUT PCM / BITSTREAM Y Cr COMPONENT VIDEO OUT COAXIAL R VIDEO OUT Cb S-VIDEO OUT AC Power Cord Connect to a standard AC outlet to supply power to the TV's Video In jack. Details are using the S-VIDEO OUT jack, you are on page 14. Rear Panel 19 COAXIAL Jack Connect an optional digital audio coaxial cable...
User manual, English (US)
Page 29
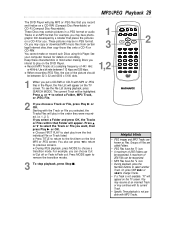
... Track. • Specific Time playback is not available, "X" will appear on the DVD Player. A maximum of 44.1 kHz or 48 kHz. Use a bit rate between 32 x 32 and 6300 x 5100 dots. 1 3 1,2 STANDBY-ON REPEAT A-B OPEN/ CLOSE DISPLAY SKIP PAUSE 1 2 4 5 7 8 CLEAR 0 MENU AUDIO 3 SUBTITLE 6 ANGLE 9 SEARCH MODE +10 TITLE MODE ZOOM OK SETUP RETURN MARKER 2 1 When you record and finalize on recording. To see the File List during playback, press SEARCH MODE. Press K or...
... Track. • Specific Time playback is not available, "X" will appear on the DVD Player. A maximum of 44.1 kHz or 48 kHz. Use a bit rate between 32 x 32 and 6300 x 5100 dots. 1 3 1,2 STANDBY-ON REPEAT A-B OPEN/ CLOSE DISPLAY SKIP PAUSE 1 2 4 5 7 8 CLEAR 0 MENU AUDIO 3 SUBTITLE 6 ANGLE 9 SEARCH MODE +10 TITLE MODE ZOOM OK SETUP RETURN MARKER 2 1 When you record and finalize on recording. To see the File List during playback, press SEARCH MODE. Press K or...
User manual, English (US)
Page 34
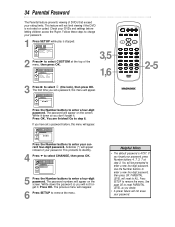
.... The password will reset to remove the menu. Use the Number buttons to enter a four-digit password. STANDBY-ON REPEAT A-B OPEN/ CLOSE DISPLAY SKIP PAUSE 1 2 4 5 7 8 CLEAR 0 MENU AUDIO 3 SUBTITLE 6 ANGLE 9 SEARCH MODE +10 TITLE MODE ZOOM OK SETUP RETURN MARKER 2-5 Press the Number buttons to enter a new four-digit password, then press OK. PARENTAL PARENTAL LEVEL ALL CHANGE OK 5 Press the Number buttons to select CHANGE, then press OK. The password numbers will reappear. 6 Press SETUP to ALL. The first time you desire. • A power failure...
.... The password will reset to remove the menu. Use the Number buttons to enter a four-digit password. STANDBY-ON REPEAT A-B OPEN/ CLOSE DISPLAY SKIP PAUSE 1 2 4 5 7 8 CLEAR 0 MENU AUDIO 3 SUBTITLE 6 ANGLE 9 SEARCH MODE +10 TITLE MODE ZOOM OK SETUP RETURN MARKER 2-5 Press the Number buttons to enter a new four-digit password, then press OK. PARENTAL PARENTAL LEVEL ALL CHANGE OK 5 Press the Number buttons to select CHANGE, then press OK. The password numbers will reappear. 6 Press SETUP to ALL. The first time you desire. • A power failure...
User manual, English (US)
Page 39
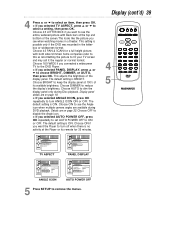
... screen.This looks like the picture you selected TV ASPECT, press o or p to dim the display panel only during DVD playback. Choose AUTO to select a setting, then press OK. Details are available during Disc playback. Choose ON if you selected PANEL DISPLAY, press o or p to turn ANGLE ICON ON or OFF. Display (cont'd) 39 STANDBY-ON REPEAT A-B OPEN/ CLOSE DISPLAY SKIP PAUSE 4 5 1 2 4 5 7 8 CLEAR 0 MENU AUDIO 3 SUBTITLE 6 ANGLE 9 SEARCH MODE +10 TITLE MODE ZOOM OK SETUP RETURN MARKER DISPLAY TV ASPECT 4:3 LETTER BOX...
... screen.This looks like the picture you selected TV ASPECT, press o or p to dim the display panel only during DVD playback. Choose AUTO to select a setting, then press OK. Details are available during Disc playback. Choose ON if you selected PANEL DISPLAY, press o or p to turn ANGLE ICON ON or OFF. Display (cont'd) 39 STANDBY-ON REPEAT A-B OPEN/ CLOSE DISPLAY SKIP PAUSE 4 5 1 2 4 5 7 8 CLEAR 0 MENU AUDIO 3 SUBTITLE 6 ANGLE 9 SEARCH MODE +10 TITLE MODE ZOOM OK SETUP RETURN MARKER DISPLAY TV ASPECT 4:3 LETTER BOX...

User manual, English (US)
Page 43
... of the DVD Player that provides 5.1 channel sound as described in a straight line from the center to make this owner's manual, the laser may discolor the surface or damage the Player. Wide: A TV Aspect setting (16:9). Dolby Digital: A surround sound system that send audio to the edge. Don't use . COMPONENT VIDEO OUT (Y Cr Cb) Jacks: Jacks on the back of the DVD Player that send high-quality video to adjust the volume at...
... of the DVD Player that provides 5.1 channel sound as described in a straight line from the center to make this owner's manual, the laser may discolor the surface or damage the Player. Wide: A TV Aspect setting (16:9). Dolby Digital: A surround sound system that send audio to the edge. Don't use . COMPONENT VIDEO OUT (Y Cr Cb) Jacks: Jacks on the back of the DVD Player that send high-quality video to adjust the volume at...
User manual, English (US)
Page 44
... leaving the DVD logo on the TV screen. Distorted picture • Connect the DVD Player directly to the DVD case or menu for accessing the feature before trying again. A large DVD logo appears on the TV screen. • The DVD logo will play stops for details. Turn off if play , not the characters' dialog; Details are on page 18. • Remove all DVDs contain audio or subtitles in the tray with the...
... leaving the DVD logo on the TV screen. Distorted picture • Connect the DVD Player directly to the DVD case or menu for accessing the feature before trying again. A large DVD logo appears on the TV screen. • The DVD logo will play stops for details. Turn off if play , not the characters' dialog; Details are on page 18. • Remove all DVDs contain audio or subtitles in the tray with the...
User manual, English (US)
Page 48
... audio button 17, 31 audio cd 6, 24 audio controls 37 audio out jacks 10-13, 19 a-b repeat 26 a-b repeat button 17, 26 batteries 7 bit rate 33 black level 42 camera angle 32 chapters 25 clear button 17 coaxial jack 14, 19 color systems 6 component video out jacks 12, 19 connections 8-14 contents, table of 3 controls, remote 16-17 disc menus 20 disc tray 15, 18 display button 17, 33 display controls 38-39 display panel 18 display screens 33 dvd video 6 fast forward button...
... audio button 17, 31 audio cd 6, 24 audio controls 37 audio out jacks 10-13, 19 a-b repeat 26 a-b repeat button 17, 26 batteries 7 bit rate 33 black level 42 camera angle 32 chapters 25 clear button 17 coaxial jack 14, 19 color systems 6 component video out jacks 12, 19 connections 8-14 contents, table of 3 controls, remote 16-17 disc menus 20 disc tray 15, 18 display button 17, 33 display controls 38-39 display panel 18 display screens 33 dvd video 6 fast forward button...


